Easily Consume a GraphQL API from React with Apollo

GraphQL is an incredibly powerful query language for APIs that helps improve performance and extensibility in your APIs. The query language is designed to allow developers to query exactly the data they need. As your API grows in size and scope, current consumers are unaffected by changes since their queries should return the same data.
Apollo Client is a state management library for JavaScript. It fits seamlessly into React applications and can handle fetching, caching, and modifying application data.
In this application, you will create a small React application that uses Apollo Client to query a GraphQL API that contains the data for SpaceX’s launches. You will display an overview of launch histories to the user and allow the user to drill down into a specific launch. To secure the application you will use Okta’s okta-react library to make setting up your authentication easy.
If you prefer to watch the demo, you can view this walk through.
Note: In May 2025, the Okta Integrator Free Plan replaced Okta Developer Edition Accounts, and the Okta CLI was deprecated.
We preserved this post for reference, but the instructions no longer work exactly as written. Replace the Okta CLI commands by manually configuring Okta following the instructions in our Developer Documentation.
Create your Okta Application
Before you begin, you’ll need a free Okta developer account. Install the Okta CLI and run okta register to sign up for a new account. If you already have an account, run okta login.
Then, run okta apps create. Select the default app name, or change it as you see fit.
Choose Single-Page App and press Enter.
Use http://localhost:3000/callback for the Redirect URI and accept the default Logout Redirect URI of http://localhost:3000.
What does the Okta CLI do?
The Okta CLI will create an OIDC Single-Page App in your Okta Org. It will add the redirect URIs you specified and grant access to the Everyone group. It will also add a trusted origin for http://localhost:3000. You will see output like the following when it’s finished:
Okta application configuration:
Issuer:    https://dev-133337.okta.com/oauth2/default
Client ID: 0oab8eb55Kb9jdMIr5d6
NOTE: You can also use the Okta Admin Console to create your app. See Create a React App for more information.
The Okta CLI will present you with a Client ID. Make note of this as you will need it in your application.
Create Your Apollo and React Application
Next, you will create your web application. Navigate to the parent directory where your application will be stored and use the command npx create-react-app apollo-demo. After your application is finished scaffolding you will need to install the required dependencies. First, you will be using bootstrap and react-bootstrap because it makes creating web pages simple.
cd apollo-demo
npm i bootstrap@4.5.3
npm i react-bootstrap@1.4.0
Next, you will need to get Okta’s core javascript and react packages. With these packages, setting up your authentication with Okta only takes a few short minutes.
npm i @okta/okta-auth-js@4.4.0
npm i @okta/okta-react@4.1.0
You will need the graphql and apollo-client packages to connect to the graphQL API that you will use for your data.
npm i @apollo/client@3.3.4
npm i graphql@15.4.0
Finally, you will use dotenv to store your sensitive data during development.
npm i dotenv@8.2.0
With dotenv installed, you can create a new file in the root of your application called .env and add the following code to it.
REACT_APP_OKTA_CLIENTID={yourClientId}
REACT_APP_OKTA_URL_BASE={yourOktaDomain}
REACT_APP_OKTA_APP_BASE_URL=http://localhost:3000
Note: The automatic install of peer dependencies was explicitly removed with NPM 3, and reintroduced in NPM v7. Check your NPM version and find out if you have to install peer dependencies manually.
Now you want to start building your application by editing the App.js file. Open App.js and replace the code with the following.
import React from 'react';
import { BrowserRouter as Router } from 'react-router-dom';
import AppWithRouterAccess from './AppWithRouterAccess';
import 'bootstrap/dist/css/bootstrap.min.css';

import { ApolloClient, InMemoryCache } from '@apollo/client';
import { ApolloProvider } from '@apollo/client';

const apolloClient = new ApolloClient({
  uri: 'https://api.spacex.land/graphql/',
  cache: new InMemoryCache()
});

const App = () => {
  return (
    <Router>
      <ApolloProvider client={apolloClient}>
        <AppWithRouterAccess />
      </ApolloProvider>
    </Router>
  );
}

export default App;
Most of this should look fairly familiar. You are importing the bootstrap CSS files at this level. You also need to instantiate your apolloClient and pass it into the ApolloProvider component that wraps AppWithRouterAccess. Per Apollo’s documentation, you should put the ApolloProvider as high up in your application as necessary so that all the children components can access it. The AppWithRouterAccess contains the logic for implementing Okta and securing routes.
Create a new file in your src directory called AppWithRouterAccess.jsx and add the following code.
import React from 'react';
import { Route } from 'react-router-dom';
import { Security, SecureRoute, LoginCallback } from '@okta/okta-react';
import { OktaAuth } from '@okta/okta-auth-js';

import Home from './Pages/Home'
import Blastoff from './Pages/Blastoff'

const AppWithRouterAccess = () => {
    const issuer = process.env.REACT_APP_OKTA_URL_BASE + '/oauth2/default'
    const clientId = process.env.REACT_APP_OKTA_CLIENTID;
    const redirect = process.env.REACT_APP_OKTA_APP_BASE_URL + '/callback';

    const oktaAuth = new OktaAuth({
        issuer: issuer,
        clientId: clientId,
        redirectUri: redirect
      });

    return (
        <Security oktaAuth={oktaAuth}>
            <Route path='/' exact={true} component={Home} ></Route>
            <SecureRoute path='/Blastoff' component={Blastoff} />
            <Route path='/callback' component={LoginCallback} />
        </Security>
    );
};
export default AppWithRouterAccess;
Here you are creating a new instance of OktaAuth and passing it into your Security component that is provided by Okta. The SecureRoute component is used to check if the user is logged in. If the user is not, they will be redirected to the Okta login page.
Now you can focus on creating your pages and components. First, add two new folders to your src directory; Pages and Components. In Pages, add a new file called Home.jsx. Add the following code to it.
import React from 'react';
import { Link, Redirect } from 'react-router-dom';

import Header from '../Components/Header'
import { Container, Row, Col, Card } from 'react-bootstrap'


import { useOktaAuth } from '@okta/okta-react';

const Home = () => {

  const { authState } = useOktaAuth();

  return (authState.isAuthenticated ?
    <Redirect to={{ pathname: '/Blastoff' }} /> :

    <Container>

      <Header></Header>

      <Row>

        <Col sm={12} className="text-center">
          <h3>BlastOff! </h3>
          <h4> A Look at SpaceX Launch History</h4>
          <br>
          </br>
          <h5>A React Demo Using <a target="_blank" rel="noreferer" href="https://www.apollographql.com/docs/react/">Apollo Client </a><br />Secured With <a target="_blank" rel="noreferer" href="https://www.okta.com/">Okta </a></h5>
          <h5><a href="https://api.spacex.land/graphql/" target="_blank" rel="noreferer">GraphQL Data Available here</a></h5>
        </Col>
      </Row>

      <br></br>

      <Row >
        <Col sm={12} className="text-center">
          <Card style={{ width: '21.5em', margin: '0 auto' }}>
            <Card.Header>
              Already have an Okta Account?
              </Card.Header>
            <Card.Body>
              <Link to='/Blastoff'>Login Here</Link>
            </Card.Body>
          </Card>

        </Col>

      </Row>

      <footer className="text-muted text-center">
        <div className="container">
          <p>A Small demo using <a target="_blank" rel="noreferer" href="https://www.apollographql.com/docs/react/">Apollo Client </a> Secured by <a target="_blank" rel="noreferer" href="https://www.okta.com/">Okta </a></p>
          <p>By <a href="https://profile.fishbowlllc.com">Nik Fisher</a></p>
        </div>
      </footer>

    </Container>
  );
};
export default Home;
This page serves two major needs. First, it provides a landing page for your users and gives some further reading about the technologies used on the site. Second, it contains a redirect to the Blastoff page if the user is already logged in. This second part isn’t strictly necessary but you can change the workflow if you feel so inclined.
Next, you can implement the code for the Blastoff page. Add a new file to your Pages directory called Blastoff.jsx and add the following code.
import React, { Component } from 'react';

import Header from '../Components/Header'
import { Container } from 'react-bootstrap'

import Histories from '../Components/Histories';
import History from '../Components/History';

class Blastoff extends Component {

    constructor(props, context) {
        super(props, context);

        this.state = {
            loading: false,
            showHistory: false,
            shownHistoryId: -1
        }

        this.onHistorySelected = this.onHistorySelected.bind(this);
        this.onReturnToHistories = this.onReturnToHistories.bind(this);
    }

    onHistorySelected (id) {
        this.setState({
            showHistory: true,
            shownHistoryId: id
        });
    }

    onReturnToHistories () {
        this.setState({
            showHistory: false,
            shownHistoryId: -1
        });
    }

    render () {

        if (this.state.loading) {
            return <Container>
                <Header></Header>
                <h4>Loading, please wait.</h4>
            </Container>
        }

        if (this.state.showHistory) {
            return (
                <Container>
                    <Header></Header>
                    <History id={this.state.shownHistoryId} onReturnToHistories={this.onReturnToHistories}></History>
                </Container >
            )
        }

        return (
            <Container>
                <Header></Header>
                <Histories onHistorySelected={this.onHistorySelected}></Histories>
            </Container >
        );
    }
}

export default Blastoff;
This page is the showcase of your application. Users will land on this page and be able to see all the detail your application offers. It has two modes, one to show all the histories available and one to show the details on a specific history. When the user first lands on this page, you will display the Histories component. If the user clicks on the title of a launch they will be presented with the details of that launch on a different component.
Next, add a new file to your Components directory and add a file called Histories.jsx. The code for that component is as follows.
import { gql, useQuery } from '@apollo/client';

import { Container } from 'react-bootstrap'

function Histories ({ onHistorySelected }) {

    const HistoriesQuery = gql`{
            histories {
              id
              details
              links {
                article
              }
              flight {
                id
                mission_name
              }
            }
          }`;

    const { loading, error, data } = useQuery(HistoriesQuery);

    if (loading) {

        return (<Container>
            <img src="https://media1.tenor.com/images/3f1d85ab9951d0db65e797c7f40e89cc/tenor.gif"></img>
        </Container>);
    }
    else {
        return (
            <Container>
                <table className="table table-striped">
                    <thead>
                        <tr>
                            <th>Mission Name</th>
                            <th>Details</th>
                            <th>Article</th>
                        </tr>
                    </thead>
                    <tbody>
                        {data.histories.map((history, i) => {
                            return <tr key={i}>
                                <td><a href="#" onClick={() => onHistorySelected(history.id)}>{history.flight == null ? "Unnamed" : history.flight.mission_name}</a> </td>
                                <td>{history.details}</td>
                                <td><a href={history.links.article} target="_blank" rel="noreferer">Read Article</a></td>
                            </tr>
                        })}
                    </tbody>
                </table>
            </Container>
        )
    }
}

export default Histories;
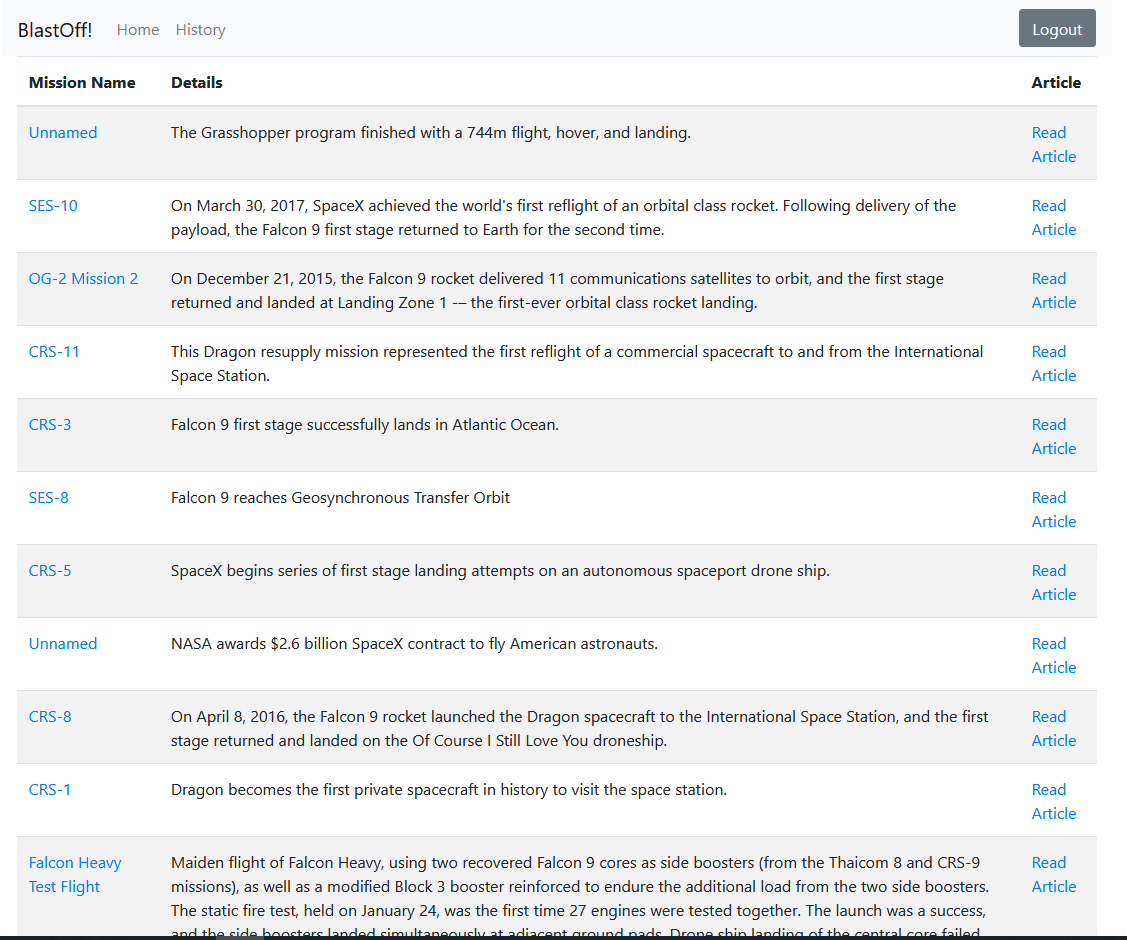
This component does the heavy lifting for displaying the histories to the user. Since you are using the useQuery hook, you will need to use it in a React function component. From this hook, you can get the loading, error, and data values. These allow you to build the component itself. If the data is still loading, you can present the user with a waiting gif of a classic space race moment. If there is an error you can display a brief error message. And once the data is returned, you can build a table with the data you wish to display to the user. Note here that the first column contains the mission_name and an onClick handler to tell the Blastoff page to load the detail.
For a detailed history, add a new file called History.jsx to the Components folder and add the following code.
import { gql, useQuery } from '@apollo/client';
import { Container, Row } from 'react-bootstrap'

function History ({ id, onReturnToHistories }) {

  const HistoryQuery = gql`
          query history($historyId: ID!) {
                    history(id: $historyId) {
                      details
                      event_date_unix
                      flight {
                        rocket {
                          rocket_name
                        }
                        launch_date_utc
                        launch_site {
                          site_name
                        }
                        launch_success
                      }
                      event_date_utc
                    }
                  }
                `;

  const { loading, error, data } = useQuery(HistoryQuery, { variables: { historyId: id }, });

  if (loading) {
    return (
      <Container>
        <img src="https://media1.tenor.com/images/3f1d85ab9951d0db65e797c7f40e89cc/tenor.gif"></img>
      </Container>);
  }
  if (error) {
    console.log(JSON.stringify(error, null, 2));
    return (<div>error</div>);
  }
  else {

    var successLabel;

    if (data.history.flight.launch_success) {
      successLabel = <span className="text-success">Success!</span>
    }
    else {
      successLabel = <span className="text-danger"> Failed ):</span>
    }

    return (
      <Container>
        <Row>
          <div className="col-lg-3">
            <button className="btn btn-primary" onClick={() => onReturnToHistories()}>Return</button>
          </div>
        </Row>

        <Row>
          <div className="col-lg-3">
            Launch Time UTC:
          </div>
          <div className="col-lg-3">
            {data.history.event_date_utc}
          </div>
          <div className="col-lg-3 text-right">
            Success?
           </div>
          <div className="col-lg-3">
            {successLabel}
          </div>
        </Row>
        <Row>
          <div className="col-lg-3">
            Launch Site:
          </div>
          <div className="col-lg-3">
            {data.history.flight.launch_site.site_name}
          </div>
        </Row>
        <Row>
          <div className="col-lg-3">
            Rocket Name:
          </div>
          <div className="col-lg-3">
            {data.history.flight.rocket.rocket_name}
          </div>
        </Row>
        <Row>
          <div className="col-lg-3">
            Details:
          </div>
        </Row>
        <Row>
          <div className="col-lg-12">
            {data.history.details}
          </div>
        </Row>
      </Container>
    )
  }
}

export default History;
Again, you obtain the loading, error, and data values from the useQuery hook, but this time you need a value for the gql. The reason is that you only want to get the data for one history. The gql itself is a little different as it fetches more data than the overview. This is one of the powerful features of graphQL, you only need to request the data you need which reduces the overhead.
Finally, in your components folder, add a file called Header.jsx. This file will provide links for your users as well as the logic for a login/logout button.
import React from 'react';
import { useOktaAuth } from '@okta/okta-react';

import { Navbar, Nav, Form, Button } from 'react-bootstrap'

const Header = () => {
    const { oktaAuth, authState } = useOktaAuth();

    if (authState.isPending) {
        return <div>Loading...</div>;
    }

    const button = authState.isAuthenticated ?
        <Button variant="secondary" onClick={() => { oktaAuth.signOut("/") }}>Logout</Button> :
        <Button variant="secondary" onClick={() => { oktaAuth.signInWithRedirect("/Blastoff") }}>Login</Button>

    return (

        <Navbar bg="light" expand="lg">
            <Navbar.Brand href="/">BlastOff!</Navbar.Brand>
            <Navbar.Toggle aria-controls="basic-navbar-nav" />
            <Navbar.Collapse id="basic-navbar-nav">
                <Nav className="mr-auto">
                    <Nav.Link href="/">Home</Nav.Link>
                    <Nav.Link href="/Blastoff">History</Nav.Link>
                </Nav>
                <Form inline>
                    {button}
                </Form>
            </Navbar.Collapse>
        </Navbar>

    );
};
export default Header;
Test Your Apollo and React Application
Your code is now complete. Use the command npm run start to start running your application. First, you will be shown the Home page. Click on either Login or Blastoff!. You will be presented with the Login screen hosted by Okta. Login in with your Okta account and you will be directed to the Blastoff page to review the launches from SpaceX.
Learn More About React and GraphQL
Using GraphQL you can create data-rich applications with minimal overhead. Apollo offers many products relating to GraphQL and I recommend you check them out. There are many great, open data sources using GraphQL. Try to build an application using one of them yourself.
- A Quick Guide to Integrating React and GraphQL
- Quickly Consume a GraphQL API from React
- Build a Simple React Application Using Hooks
Make sure you follow us on Twitter and subscribe to our YouTube channel. If you have any questions, or you want to share what tutorial you’d like to see next, please comment below.
Okta Developer Blog Comment Policy
We welcome relevant and respectful comments. Off-topic comments may be removed.