Android Login Made Easy with OIDC

Having a dedicated part of a mobile app for authorized users is a must for a modern-day app. Users want to have a personalized experience with the apps they love. They expect to seamlessly use services on different devices and platforms. And, most of all, they want to be sure that their personal data is secure.
Implementing a secure login process on Android can be challenging to achieve since many different moving parts need to be working in sync. On the Android side, you need to create a friendly login UI, communicate with a back-end service, securely persist the user data on the device, and maintain that data since the user expects to go through the login process only once. On top of that, you need to have a back-end app that supports the login features in the most secure way possible.
Here is where the Okta OIDC SDK comes to the rescue! It’s a mobile SDK developed by industry-leading security experts, designed to provide a simple way for your users to log in into your app. This is done by using OAuth 2.0 and OpenID Connect (OIDC), which are the security industry’s standards for authorization and authentication. A fun guide to these technologies can be found in An Illustrated Guide to OAuth and OpenID Connect.
This post will show you how easy it is to set up the Okta OIDC SDK on Android and leave you with a working app that allows users to securely login!
Note: In May 2025, the Okta Integrator Free Plan replaced Okta Developer Edition Accounts, and the Okta CLI was deprecated.
We preserved this post for reference, but the instructions no longer work exactly as written. Replace the Okta CLI commands by manually configuring Okta following the instructions in our Developer Documentation.
Create an Android Login Application
To begin, create a new Android app. It will consist of three screens:
-
Splash screen where you figure out if the user is already logged in or not.
-
Login screen.
-
Home screen, which is only accessible to the logged-in users.
First, you’ll need to download and install the latest version of Android Studio (v4.1.1 at the time of this writing).
Next, launch the app and navigate to File → New… → New Project…. Then, create an "Empty Activity" for "Phone and Tablet." You should now see a screen similar to this:
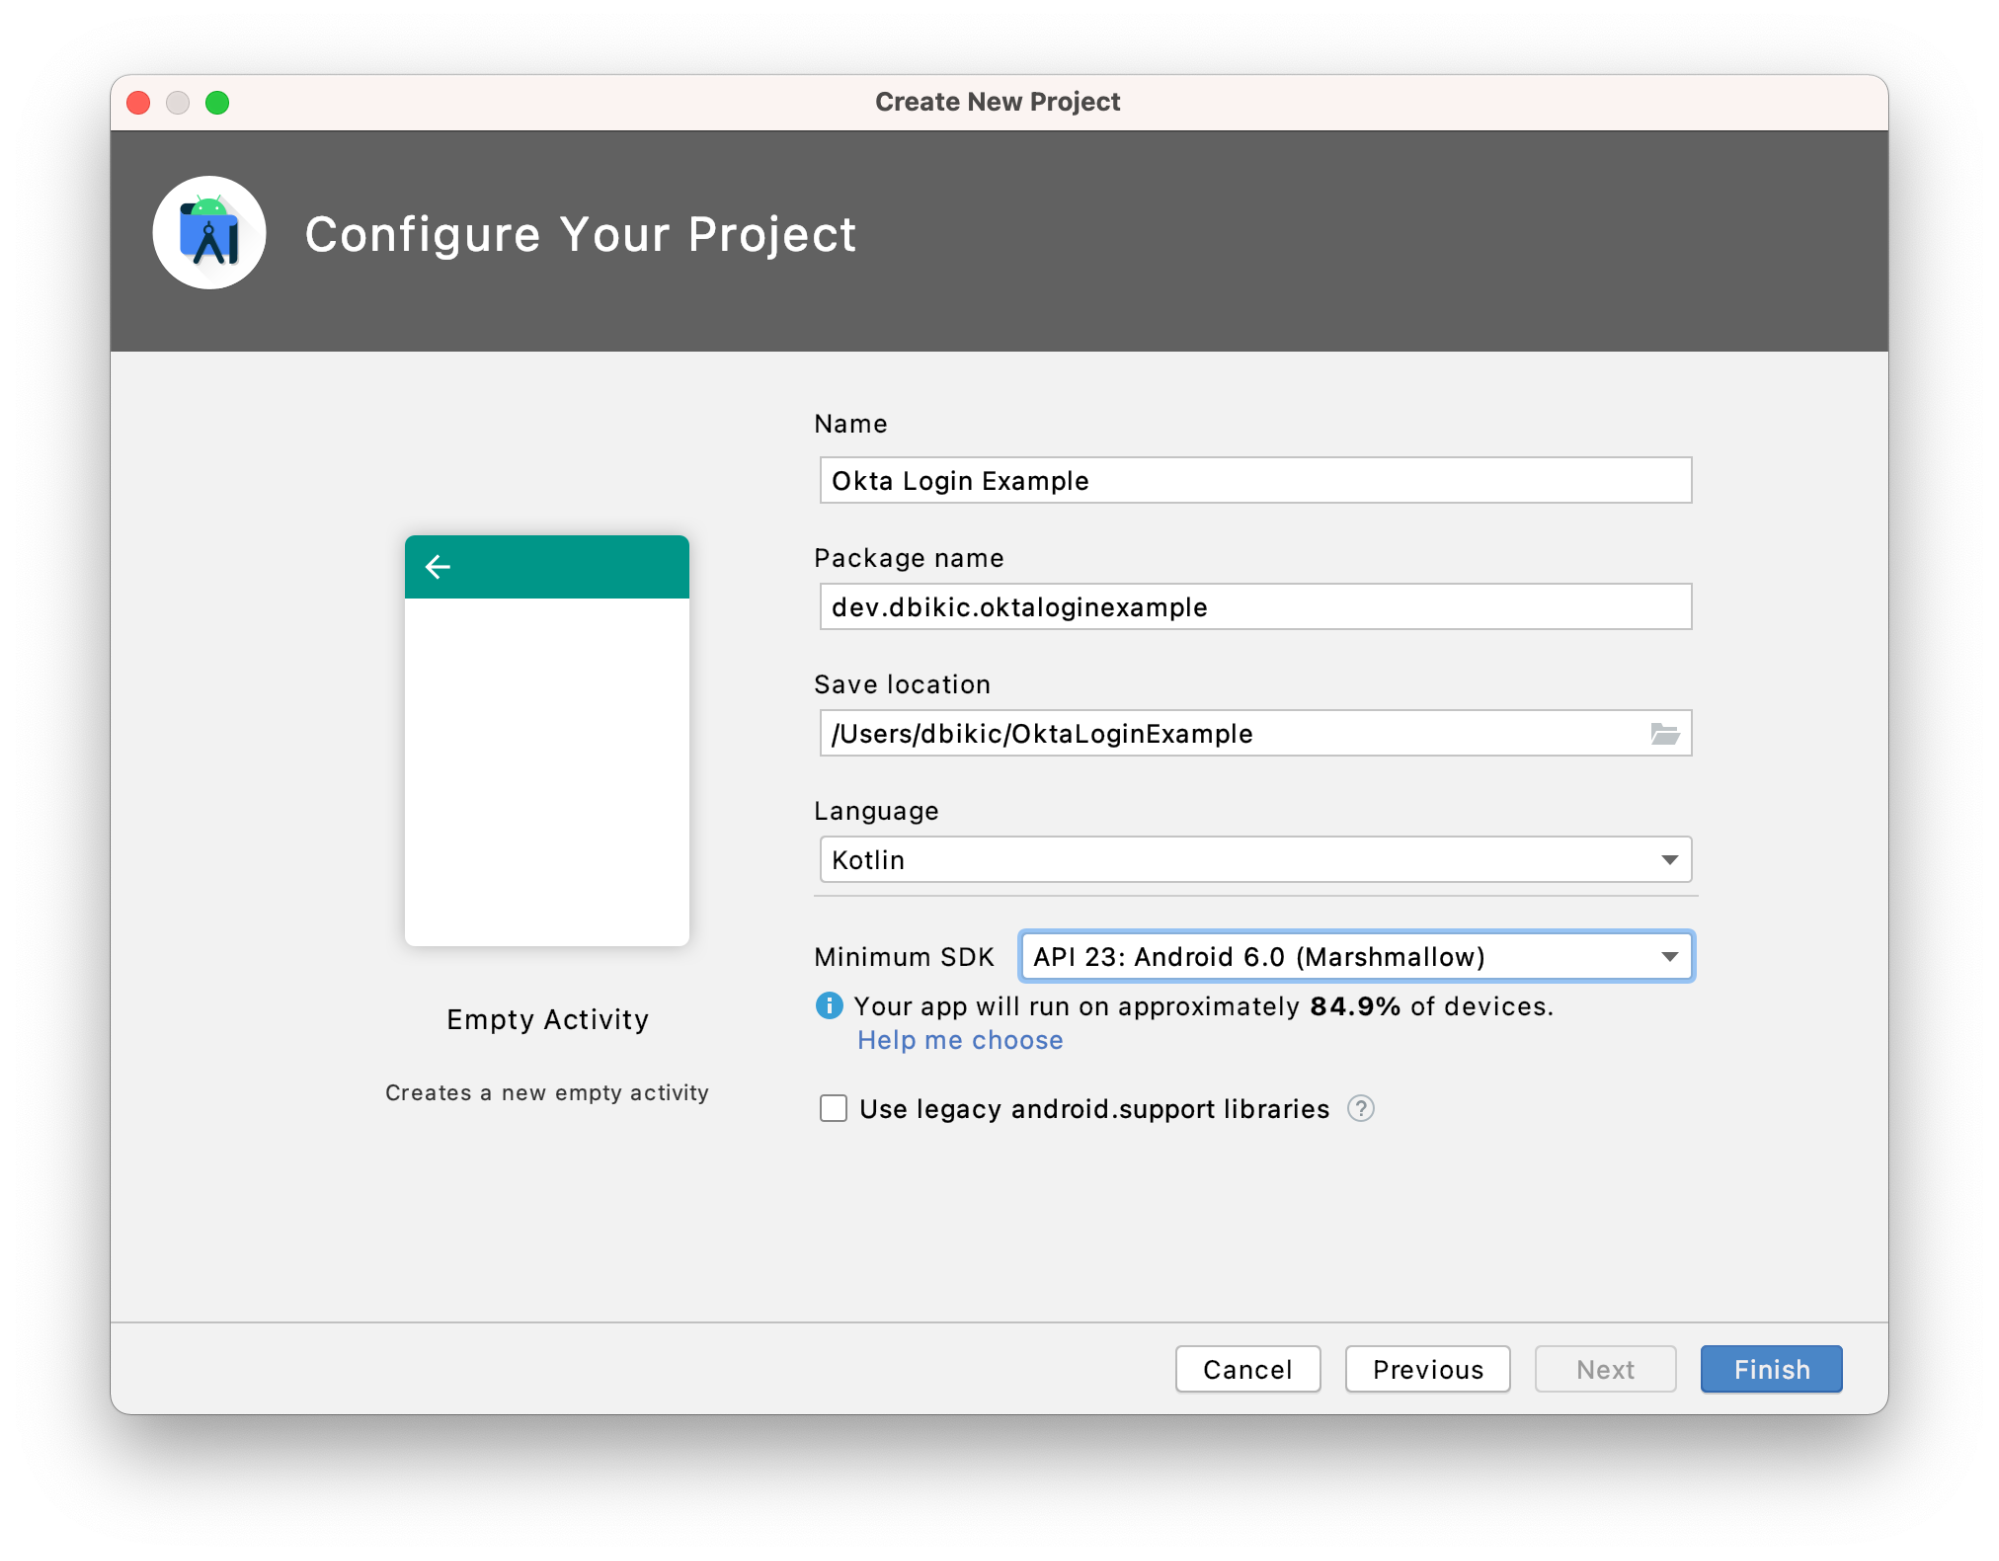
Change your application name and add the right package name, set the minimum SDK to API 23, and click Finish to create the project.
Add the Okta Android OIDC SDK
Android apps use Gradle as their build tool. To add the Okta OIDC SDK as a dependency to your project, you will need to modify the app module’s build.gradle file:
You need to add the right auth redirect scheme for your Okta app and add the Okta library as a dependency. Make sure the applicationId matches what you used when creating your app.
plugins {
    id 'com.android.application'
    id 'kotlin-android'
}

android {
    compileSdkVersion 29
    buildToolsVersion "30.0.2"
    defaultConfig {
        applicationId "dev.dbikic.oktaloginexample"
        minSdkVersion 23
        targetSdkVersion 29
        versionCode 1
        versionName "1.0"

        testInstrumentationRunner "androidx.test.runner.AndroidJUnitRunner"

        manifestPlaceholders = [
            "appAuthRedirectScheme": "com.okta.dev-123456" (1)
        ]
    }
    buildFeatures { (2)
        viewBinding true
    }
    buildTypes {
        release {
            minifyEnabled false
            proguardFiles getDefaultProguardFile('proguard-android-optimize.txt'), 'proguard-rules.pro'
        }
    }
    compileOptions { (3)
        sourceCompatibility JavaVersion.VERSION_1_8
        targetCompatibility JavaVersion.VERSION_1_8
    }
    kotlinOptions {
        jvmTarget = '1.8'
    }
}

dependencies {
    implementation "org.jetbrains.kotlin:kotlin-stdlib:$kotlin_version"
    implementation 'androidx.core:core-ktx:1.3.2'
    implementation 'androidx.appcompat:appcompat:1.2.0'
    implementation 'com.google.android.material:material:1.2.1'
    implementation "androidx.constraintlayout:constraintlayout:2.0.4"

    implementation 'com.okta.android:oidc-androidx:1.0.17'   (4)

    testImplementation 'junit:junit:4.+'
    androidTestImplementation 'androidx.test.ext:junit:1.1.2'
    androidTestImplementation 'androidx.test.espresso:espresso-core:3.3.0'
}| 1 | The redirect URI for the application you created in your Okta Developer Console. |
| 2 | We are using a view binding feature to interact with our views. More information can be found here. |
| 3 | Okta OIDC libraries require Java 1.8 compatibility. |
| 4 | Add the dependency required for the Okta OIDC library. |
Sync the project with Gradle files by clicking the File → Sync Project with Gradle Files, so the Okta dependency gets downloaded.
Create an OpenID Connect App on Okta
Before you begin, you’ll need a free Okta developer account. Install the Okta CLI and run okta register to sign up for a new account. If you already have an account, run okta login.
Then, run okta apps create. Select the default app name, or change it as you see fit.
Choose Native and press Enter.
Use com.okta.dev-133337:/callback for the Redirect URI and set the Logout Redirect URI to com.okta.dev-133337:/
(where dev-133337.okta.com is your Okta domain name). Your domain name is reversed to provide a unique scheme to open your app on a device.
What does the Okta CLI do?
The Okta CLI will create an OIDC Native App in your Okta Org. It will add the redirect URIs you specified and grant access to the Everyone group. You will see output like the following when it’s finished:
Okta application configuration:
Issuer:    https://dev-133337.okta.com/oauth2/default
Client ID: 0oab8eb55Kb9jdMIr5d6
NOTE: You can also use the Okta Admin Console to create your app. See Create a Native App for more information.
Create an Android Application Class
In the root folder of your app’s package (in the provided example, that’s the folder app/src/main/java/dev/dbikic/oktaloginexample) create a Kotlin application class named`OktaLoginApplication`.
The Application class is the entry point of your app and is used to maintain the global state of the application. The most common use for it is to initialize the third-party libraries in its onCreate() method. More info about it can be found in Android’s official documentation.
|
For now, just create the class and make it extend the Application class from the Android framework.
package dev.dbikic.oktaloginexample (1)

import android.app.Application

class OktaLoginApplication : Application()| 1 | Update the package to match the one you set when creating the project. |
After creating the application class, you need to reference it in your app/src/main/AndroidManifest.xml file:
<?xml version="1.0" encoding="utf-8"?>
<manifest xmlns:android="http://schemas.android.com/apk/res/android"
  package="dev.dbikic.oktaloginexample">

  <uses-permission android:name="android.permission.INTERNET" />    (1)

  <application
    android:allowBackup="true"
    android:icon="@mipmap/ic_launcher"
    android:label="@string/app_name"
    android:name=".OktaLoginApplication"  (2)
    android:roundIcon="@mipmap/ic_launcher_round"
    android:supportsRtl="true"
    android:theme="@style/Theme.OktaLoginExample" />
</manifest>| 1 | Okta OIDC SDK needs internet permission to communicate with the back-end. |
| 2 | Reference the application class you created in the previous step. |
AndroidManifest.xml is an essential file for an app that contains basic info about the app’s name, the package name, permissions, activities, and many other things. More information about it can be found in the official documentation.
|
Manage Authentication with a Manager Class
When adding third-party libraries to your codebase, it’s usually a good idea to create a wrapper class that will hide the actual usage. Reasons for this include:
-
Reusing of the common interaction with the libraries.
-
You can define all the library interactions in an interface and provide the actual implementation with dependency injection throughout your app.
-
Everything related to that library is in one place. Replacing the library with a different one is easy as you only need to change the wrapper class.
Because the above, create a class called OktaManager in the root package. This class will be used in all the screens you create:
package dev.dbikic.oktaloginexample

import android.app.Activity
import android.content.Context
import com.okta.oidc.*
import com.okta.oidc.clients.sessions.SessionClient
import com.okta.oidc.clients.web.WebAuthClient
import com.okta.oidc.net.response.UserInfo
import com.okta.oidc.storage.security.DefaultEncryptionManager
import com.okta.oidc.util.AuthorizationException

class OktaManager(applicationContext: Context) {

    /**
     * Authorization client using chrome custom tab as a user agent.
     */
    private var webAuth: WebAuthClient (1)

    /**
     * The authorized client to interact with Okta's endpoints.
     */
    private var sessionClient: SessionClient (2)

    init {
        val config = OIDCConfig.Builder()
            .clientId("********************") (3)
            .discoveryUri("https://dev-123456.okta.com") (4)
            .redirectUri("com.okta.dev-123456:/callback") (5)
            .endSessionRedirectUri("com.okta.dev-123456:/") (6)
            .scopes("openid", "profile", "offline_access")
            .create()
        webAuth = Okta.WebAuthBuilder()
            .withConfig(config)
            .withContext(applicationContext)
            .withCallbackExecutor(null)
            .withEncryptionManager(DefaultEncryptionManager(applicationContext))
            .setRequireHardwareBackedKeyStore(true)  (7)
            .create()
        sessionClient = webAuth.sessionClient
    }

    fun isAuthenticated(): Boolean {
        return sessionClient.isAuthenticated
    }

    fun registerWebAuthCallback(callback: ResultCallback<AuthorizationStatus, AuthorizationException>, activity: Activity) {
        webAuth.registerCallback(callback, activity)
    }

    fun registerUserProfileCallback(callback: RequestCallback<UserInfo, AuthorizationException>) {
        sessionClient.getUserProfile(callback)
    }

    fun signIn(activity: Activity, payload: AuthenticationPayload) {
        webAuth.signIn(activity, payload)
    }

    fun signOut(activity: Activity, callback: RequestCallback<Int, AuthorizationException>) {
        webAuth.signOut(activity, callback)
    }

    fun clearUserData() {
        sessionClient.clear()
    }
}| 1 | private lateinit var webAuth: WebAuthClient is a reference to the web client you will invoke to log in. |
| 2 | private lateinit var sessionClient: SessionClient refers to the session you can use to conduct multiple operations after logging in, such as getting the user’s profile, revoking the authentication token, refreshing the authentication token, etc. |
| 3 | Replace with your client ID. |
| 4 | Replace with your discovery URL. |
| 5 | Replace with your redirect URL. |
| 6 | Replace with your end session redirect URL. |
| 7 | setRequireHardwareBackedKeyStore(true) forces the app to require a device with encryption capabilities. This is the default configuration for Okta OIDC, and it’s considered the best practice. If you want to run this code in an emulator, though, you can temporarily set it to false. |
| Make sure to use the values you received when completing the Create an Okta OIDC App step. |
The last step of the setup stage will be to initialize the OktaManager. Remember the empty OktaLoginApplication class? Now you need to modify it to initialize the manager when the app is created.
package dev.dbikic.oktaloginexample

import android.app.Application

class OktaLoginApplication : Application() {

    lateinit var oktaManager: OktaManager

    override fun onCreate() {
        super.onCreate()
        oktaManager = OktaManager(this)
    }
}
That’s it! Now, let’s create the screens.
Add an Android Splash Screen
The purpose of a splash screen is to initialize all the applications' dependencies and prepare the app for usage. You’ll use it to figure out if the user is authenticated and decide which screen to show next: the login screen or the home screen.
Create a SplashActivity class in the root package.
package dev.dbikic.oktaloginexample

import android.content.Intent
import android.os.Bundle
import androidx.appcompat.app.AppCompatActivity
import dev.dbikic.oktaloginexample.ui.LoginActivity

class SplashActivity : AppCompatActivity() {

    (1)
    private val oktaManager: OktaManager by lazy { (application as OktaLoginApplication).oktaManager }

    override fun onCreate(savedInstanceState: Bundle?) {
        super.onCreate(savedInstanceState)
        if (oktaManager.isAuthenticated()) {
            navigateToHome()
        } else {
            navigateToLogin()
        }
    }

    private fun navigateToHome() {
        // todo implement
    }

    private fun navigateToLogin() {
        startActivity(Intent(this, LoginActivity::class.java)) (2)
        finish()
    }
}| 1 | For simplicity, the instance of the OktaManager class is in the application class so that it can be easily accessed from all the activities. The real-world solution here would be to use dependency injection and inject the instance class. |
| 2 | Ignore the unresolved reference error for now because we will add the missing class in the next step. |
Register the activity in the AndroidManifest.xml file:
<?xml version="1.0" encoding="utf-8"?>
<manifest xmlns:android="http://schemas.android.com/apk/res/android"
  package="dev.dbikic.oktaloginexample">

  <uses-permission android:name="android.permission.INTERNET" />

  <application
    android:allowBackup="true"
    android:icon="@mipmap/ic_launcher"
    android:label="@string/app_name"
    android:name=".OktaLoginApplication"
    android:roundIcon="@mipmap/ic_launcher_round"
    android:supportsRtl="true"
    android:theme="@style/Theme.OktaLoginExample">

    <activity
      android:name=".SplashActivity">
      <intent-filter>  (1)
        <action android:name="android.intent.action.MAIN" />
        <category android:name="android.intent.category.LAUNCHER" />
      </intent-filter>
    </activity>
  </application>
</manifest>| 1 | This intent filter specifies that the SplashActivity is the first activity that will be shown when the app is launched |
This class won’t compile just yet. You’ll need to create HomeActivity and LoginActivity classes before it does.
Build an Android Login Screen
Now, let’s do the LoginActivity! First, create a simple layout with a button in app/src/main/res/layout/activity_login.xml:
<?xml version="1.0" encoding="utf-8"?>
<androidx.constraintlayout.widget.ConstraintLayout xmlns:android="http://schemas.android.com/apk/res/android"
  xmlns:app="http://schemas.android.com/apk/res-auto"
  xmlns:tools="http://schemas.android.com/tools"
  android:layout_width="match_parent"
  android:layout_height="match_parent"
  android:background="@color/white"
  android:orientation="vertical"
  tools:context=".LoginActivity">

  <Button
    android:id="@+id/signInButton"
    android:layout_width="match_parent"
    android:layout_height="wrap_content"
    android:layout_margin="40dp"
    android:text="Sign in"
    app:layout_constraintEnd_toEndOf="parent"
    app:layout_constraintStart_toStartOf="parent"
    app:layout_constraintBottom_toBottomOf="parent" />

</androidx.constraintlayout.widget.ConstraintLayout>
Then, create the LoginActivity class in a new ui package:
package dev.dbikic.oktaloginexample.ui

import android.content.Intent
import android.os.Bundle
import android.util.Log
import androidx.appcompat.app.AppCompatActivity
import com.okta.oidc.*
import com.okta.oidc.AuthorizationStatus.*
import com.okta.oidc.util.AuthorizationException
import dev.dbikic.oktaloginexample.OktaLoginApplication
import dev.dbikic.oktaloginexample.OktaManager
import dev.dbikic.oktaloginexample.databinding.ActivityLoginBinding

class LoginActivity : AppCompatActivity() {

    private val oktaManager: OktaManager by lazy { (application as OktaLoginApplication).oktaManager }
    private lateinit var binding: ActivityLoginBinding

    override fun onCreate(savedInstanceState: Bundle?) {
        super.onCreate(savedInstanceState)
        binding = ActivityLoginBinding.inflate(layoutInflater)
        setContentView(binding.root)
        setupOktaCallback()
        setupViews()
    }

    private fun setupOktaCallback() {
        oktaManager.registerWebAuthCallback(getAuthCallback(), this)  (1)
    }

    private fun setupViews() {
        binding.signInButton.setOnClickListener {
            val payload = AuthenticationPayload.Builder().build()
            oktaManager.signIn(this, payload)  (2)
        }
    }

    private fun getAuthCallback(): ResultCallback<AuthorizationStatus, AuthorizationException> {
        return object : ResultCallback<AuthorizationStatus, AuthorizationException> {
            override fun onSuccess(result: AuthorizationStatus) {  (3)
                when (result) {
                    AUTHORIZED -> navigateToHome()
                    SIGNED_OUT -> Log.d("LoginActivity", "Signed out")
                    CANCELED -> Log.d("LoginActivity", "Canceled")
                    ERROR -> Log.d("LoginActivity", "Error")
                    EMAIL_VERIFICATION_AUTHENTICATED -> Log.d("LoginActivity", "Email verification authenticated")
                    EMAIL_VERIFICATION_UNAUTHENTICATED -> Log.d("LoginActivity", "Email verification unauthenticated")
                }
            }

            override fun onCancel() {
                Log.d("LoginActivity", "Canceled")
            }

            override fun onError(msg: String?, exception: AuthorizationException?) {
                Log.d("LoginActivity", "Error: $msg")
            }
        }
    }

    private fun navigateToHome() {
        // todo implement
    }
}| 1 | Register the auth callback with the OktaManager. |
| 2 | Call the sign-in method when the button is clicked. |
| 3 | The result is an AuthorizationStatus object. With a simple when expression we can quickly figure out the status type and access its members if needed. |
And register it in the AndroidManifest.xml:
<?xml version="1.0" encoding="utf-8"?>
<manifest xmlns:android="http://schemas.android.com/apk/res/android"
  package="dev.dbikic.oktaloginexample">
    ...
  <application
    ... >
    ...
    <activity
      android:name=".ui.LoginActivity"
      android:theme="@style/Theme.MaterialComponents.Light.NoActionBar" />
  </application>
</manifest>
The purpose of the LoginActivity is to try to authenticate the user with Okta when the login button is pressed. To achieve that, you need to register the web auth callback with the Okta OIDC SDK, and call the signIn() method.
This is enough for the SDK to open a custom Chrome tab with the login screen of the Okta application. Users input their credentials into the form, and when the process is finished, the appropriate method of your auth callback will be called. This allows you to gracefully handle the possible errors or handle the login success, which is, in this case, navigating to the HomeActivity.
Create an Android Home Screen
HomeActivity is the part of your app which can be accessed only by authorized users. In this example, you can fetch the user details, display the user name on the UI, and sign the user out of the app. First, create the layout file in res/layout/activity_home.xml:
<?xml version="1.0" encoding="utf-8"?>
<LinearLayout xmlns:android="http://schemas.android.com/apk/res/android"
  xmlns:tools="http://schemas.android.com/tools"
  android:layout_width="match_parent"
  android:layout_height="match_parent"
  android:orientation="vertical"
  tools:context=".HomeActivity">

  <TextView
    android:id="@+id/userLabel"
    android:layout_width="match_parent"
    android:layout_height="0dp"
    android:layout_weight="1"
    android:gravity="center"
    android:textSize="22sp"
    tools:ignore="HardcodedText"
    tools:text="Hello, user!" />

  <Button
    android:id="@+id/signOutButton"
    android:layout_width="match_parent"
    android:layout_height="wrap_content"
    android:layout_margin="40dp"
    android:text="Log out"
    tools:ignore="HardcodedText" />
</LinearLayout>
Then, create the HomeActivity:
package dev.dbikic.oktaloginexample.ui

import android.content.Intent
import android.os.Bundle
import android.util.Log
import androidx.appcompat.app.AppCompatActivity
import com.okta.oidc.RequestCallback
import com.okta.oidc.net.response.UserInfo
import com.okta.oidc.util.AuthorizationException
import dev.dbikic.oktaloginexample.OktaLoginApplication
import dev.dbikic.oktaloginexample.OktaManager
import dev.dbikic.oktaloginexample.databinding.ActivityHomeBinding

class HomeActivity : AppCompatActivity() {

    private val oktaManager: OktaManager by lazy { (application as OktaLoginApplication).oktaManager }
    private lateinit var binding: ActivityHomeBinding

    override fun onCreate(savedInstanceState: Bundle?) {
        super.onCreate(savedInstanceState)
        binding = ActivityHomeBinding.inflate(layoutInflater)
        setContentView(binding.root)

        oktaManager.registerUserProfileCallback(getUserProfileCallback()) (1)
        binding.signOutButton.setOnClickListener {
            oktaManager.signOut(this, getSignOutCallback()) (2)
        }
    }

    private fun getSignOutCallback(): RequestCallback<Int, AuthorizationException> {
        return object : RequestCallback<Int, AuthorizationException> {
            override fun onSuccess(result: Int) {
                oktaManager.clearUserData() (3)
                val intent = Intent(this@HomeActivity, LoginActivity::class.java) (4)
                intent.flags = Intent.FLAG_ACTIVITY_CLEAR_TOP (5)
                startActivity(intent)
                finish()
            }

            override fun onError(msg: String?, exception: AuthorizationException?) {
                Log.d("HomeActivity", "Error: $msg")
            }
        }
    }

    private fun getUserProfileCallback(): RequestCallback<UserInfo, AuthorizationException> {
        return object : RequestCallback<UserInfo, AuthorizationException> {
            override fun onSuccess(result: UserInfo) {
                binding.userLabel.text = "Hello, ${result["preferred_username"]}!" (6)
            }

            override fun onError(msg: String?, exception: AuthorizationException?) {
                Log.d("HomeActivity", "Error: $msg")
            }
        }
    }
}| 1 | Register the user profile callback with the OktaManager. |
| 2 | Sign out from the app on the sign out button. |
| 3 | After the user is successfully logged out from Okta, clear the user’s data. |
| 4 | Navigate the user back to the LoginActivity after they sign out. |
| 5 | This flag makes sure that all the back stack activities are cleared and that the LoginActivity will be the only activity in the memory. |
| 6 | You have fetched the user info successfully! You can check which fields you received here. |
And register it in the AndroidManifest.xml:
<?xml version="1.0" encoding="utf-8"?>
<manifest xmlns:android="http://schemas.android.com/apk/res/android"
  package="dev.dbikic.oktaloginexample">
    ...
  <application
    ... >
    ...
    <activity
      android:name=".ui.HomeActivity"
      android:theme="@style/Theme.MaterialComponents.Light.NoActionBar" />
  </application>
</manifest>
You can now implement the empty method navigateToHome() in both SplashActivity and LoginActivity.
import dev.dbikic.oktaloginexample.ui.HomeActivity

...

private fun navigateToHome() {
    startActivity(Intent(this, HomeActivity::class.java))
    finish()
}
Run Your Android Application
Now it’s time to run the application on an emulator or on a physical device, by pressing the play icon in the top right part of Android Studio. Your app and its login process should look similar to the video below:
What’s cool about the Okta OIDC SDK is that it also securely stores the user session to the app’s local storage and maintains its state for you. Instead of creating a custom user management system and handling multiple edge-cases that can happen in the real world, you can concentrate on spending your time building app features for your users.
You also implemented the logout flow, which is triggered by the user clicking the Log Out button:
Learn More About Android and OIDC
This post showcased how easy it is to set up and use the Okta OIDC SDK for an Android app. The functionalities which the SDK brings to your app, like the OAuth 2.0 authorization and OpenID Connect authentication, are essential for a modern-day app with challenges like security and data privacy.
Creating a custom solution for security and privacy is challenging and time-consuming since the code on the mobile part is not enough, and you also need to have a back-end app that supports those features. Maintaining two applications can cause a lot of long-term work.
You can find the source code for this example on GitHub, in the oktadeveloper/okta-android-login-example repository.
Although the example you created here does enough to satisfy the needs of most apps, the Okta OIDC SDK doesn’t stop there. The Okta OIDC Android repository contains a variety of ideas and suggestions to improve user experience such as:
-
Using your own OkHttp client.
-
Using a custom UI to log in.
-
Add a social login for accounts that include Google, Apple, Facebook, and LinkedIn.
-
Biometric login, with Iris authentication, fingerprint authentication, PIN authentication, pattern authentication, and more.
-
Having fine-grained control over session tokens' expiration and refresh.
-
Settings to handle preference of browser client for the authentication process.
This post has provided you with the foundations to set up a successful OIDC client. If you want to deepen your knowledge around modern authentication systems, check these additional resources on Android, OAuth 2.0, and OpenID Connect:
If you enjoyed this blog post and want to see more like it, follow @oktadev on Twitter, subscribe to our YouTube channel, or follow us on LinkedIn.
Okta Developer Blog Comment Policy
We welcome relevant and respectful comments. Off-topic comments may be removed.