Build a Secure GraphQL API with MicroProfile
MicroProfile is an open-source community project with the goal to encourage the development of Java microservice solutions. It was created in 2016 in response to the changing needs of modern web development. In particular, it seeks to foster the development of smaller, less monolithic services (microservices) that can run on faster release cycles than the typical, old-school Enterprise Java application. Shortly after its creation, it joined the Eclipse foundation.
MicroProfile, in essence, is a set of specifications and standards agreed upon by a community of developers that allows for “write once, run anywhere” in the Java microservice ecosystem. There are currently around nine compliant runtimes for MicroProfile, including Apache TomEE, Quarkus, and Open Liberty. A program written for one can be seamlessly run on another. The community also serves as an incubator for new ideas within Enterprise Java and microservice architectures.
In this tutorial, the runtime you are going to use is Open Liberty. Open Liberty is an implementation of the MicroProfile specification. Open Liberty bills itself as “a lightweight open framework for building fast and efficient cloud-native Java microservices.” It’s easily customizable, fast to start, and has a low footprint.
Table of Contents
- Why Use GraphQL Instead of REST?
- Create a Java Project Using the MicroProfile Starter
- Configure MicroProfile for GraphQL
- Implement GraphQL Hello World
- Generate Surf Forecasts Using GraphQL
- Create an OpenID Connect Application
- Generate a JSON Web Token
- Configure MicroProfile for JWT Authentication
- All’s Well That Ends Authenticated
Note: In May 2025, the Okta Integrator Free Plan replaced Okta Developer Edition Accounts, and the Okta CLI was deprecated.
We preserved this post for reference, but the instructions no longer work exactly as written. Replace the Okta CLI commands by manually configuring Okta following the instructions in our Developer Documentation.
Why Use GraphQL Instead of REST?
The application you’re going to write is a surf report generator. Why? Because people seem to like weather apps for their example apps, and I thought a surf report generator was more fun. The surf reports, unfortunately, will just be randomly generated. However, you’ll use GraphQL to query and return data instead of a traditional REST API.
With a REST API, a typical transaction cycle might include numerous API requests. The client app may have to, at a minimum, make a different call for each type of resource required, and often, lots of data is returned that is not used by the client. This results in a lot of inefficient communication. Facebook created GraphQL to address this.
GraphQL allows a client to ask the server for exactly the data it needs in a single request. The client can group multiple request types in a single request and specify exactly which properties on the requested data structures it wants to be included in the response. This results in much more efficient communications between client and server, allowing, for example, mobile apps to work well even on slow connections.
The app will be secured using OAuth 2.0 and OpenID Connect using Okta as the provider. MicroProfile provides a JSON Web Token (JWT) authentication and authorization specification that Open Liberty implements. You’ll use this to add role-based authorization to your surf report.
Prerequisites:
Before you get started, you’ll need to have a few things installed.
- Java 11: This tutorial uses Java 11. SDKMAN is an excellent option for installing and managing Java versions.
- Maven: The MicroProfile starter uses Maven, a dependency management utility. It can be installed according to the instructions on their website. You could also use SDKMAN or Homebrew.
- Okta Developer Account: You’ll be using Okta as an OAuth/OIDC provider to add JWT authentication and authorization to the application. You can go to our developer site and sign up for a free developer account.
- HTTPie: This is a powerful command-line HTTP request utility that you’ll use to test your MicroProfile app. Install it according to the docs on their site.
Create a Java Project Using the MicroProfile Starter
You can bootstrap a project using the MicroProfile starter. This will quickly configure your MicroProfile project using OpenLiberty as the MicroProfile implementation.
Open the starter website, https://start.microprofile.io/, and make the following selections.
- MicroProfile Version:
3.3 - Java SE Version:
Java 11 - MicroProfile Runtime:
OpenLiberty
Leave the groupId as com.example and the artifactId as demo. Don’t check any of the Examples for specifications. These are great for exploring and understanding the various features of MicroProfile, but they’ll just complicate things for this tutorial.
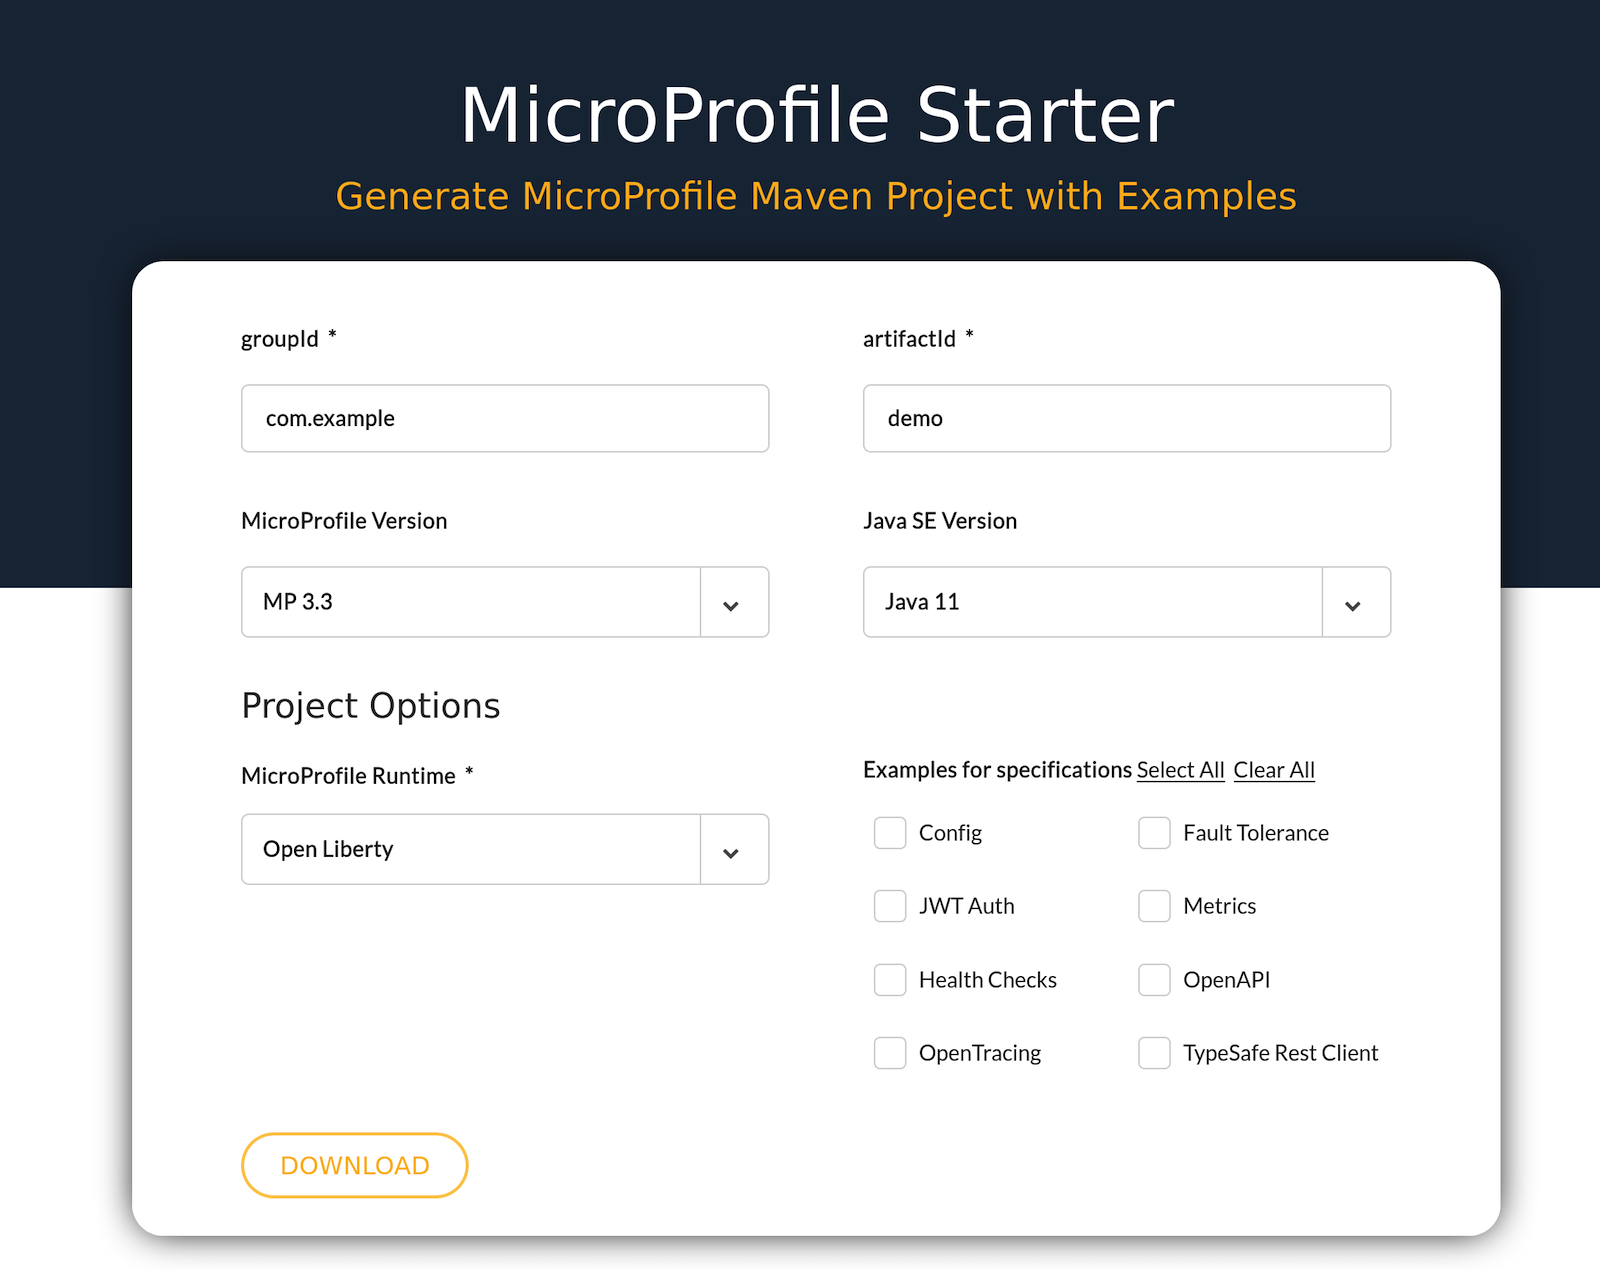
Click DOWNLOAD.
Copy the demo.zip file somewhere appropriate as a project root directory and extract the files.
You have a fully functioning application. Open a shell and navigate to the project root directory. Run the starter application using the following command.
mvn liberty:run
You’ll see a lot of output that ends with the following.
[INFO] [AUDIT   ] CWWKT0016I: Web application available (default_host): http://localhost:9080/openapi/ui/
[INFO] [AUDIT   ] CWWKT0016I: Web application available (default_host): http://localhost:9080/metrics/
[INFO] [AUDIT   ] CWWKT0016I: Web application available (default_host): http://localhost:9080/ibm/api/
[INFO] [AUDIT   ] CWWKT0016I: Web application available (default_host): http://localhost:9080/health/
[INFO] [AUDIT   ] CWWKT0016I: Web application available (default_host): http://localhost:9080/jwt/
[INFO] [AUDIT   ] CWWKT0016I: Web application available (default_host): http://localhost:9080/openapi/
[INFO] [AUDIT   ] CWWKT0016I: Web application available (default_host): http://localhost:9080/
[INFO] [AUDIT   ] CWWKZ0001I: Application demo started in 1.574 seconds.
[INFO] [AUDIT   ] CWWKF0012I: The server installed the following features: [appSecurity-2.0, cdi-2.0, concurrent-1.0, distributedMap-1.0, jaxrs-2.1, jaxrsClient-2.1, jndi-1.0, json-1.0, jsonb-1.0, jsonp-1.1, jwt-1.0, microProfile-3.3, monitor-1.0, mpConfig-1.4, mpFaultTolerance-2.1, mpHealth-2.2, mpJwt-1.1, mpMetrics-2.3, mpOpenAPI-1.1, mpOpenTracing-1.3, mpRestClient-1.4, opentracing-1.3, servlet-4.0, ssl-1.0].
[INFO] [AUDIT   ] CWWKF0011I: The demo server is ready to run a smarter planet. The demo server started in 4.429 seconds.
Test the basic server using HTTPie to run a GET request on the auto-generated endpoint.
http :9080/data/hello


HTTP/1.1 200 OK
...

Hello World
Configure MicroProfile for GraphQL
Now you’re going to create a simple GraphQL “hello world.” To do this, you need to add some dependencies to the pom.xml file and add the GraphQL feature to the server.xml file. The pom.xml file is Maven’s dependency management file. The server.xml file (src/main/liberty/config/server.xml) is the MicroProfile configuration file.
Add two dependencies to the pom.xml file.
<dependency>
  <groupId>org.eclipse.microprofile.graphql</groupId>
  <artifactId>microprofile-graphql-api</artifactId>
  <version>1.0.3</version>
</dependency>
<dependency>
  <groupId>org.projectlombok</groupId>
  <artifactId>lombok</artifactId>
  <version>1.18.16</version>
  <scope>provided</scope>
</dependency>
The first dependency is the MicroProfile GraphQL dependency. The second adds Lombok to the project. Lombok is a collection of helper annotations that will save you (or me, really, since you’d just be copy and pasting them) from the tedious task of writing a bunch of getters, setters, and constructors.
You also need to make two additions to the src/main/liberty/config/server.xml file.
First, add the GraphQL feature to the <featureManager> section.
<featureManager>
    ...
    <feature>mpGraphQL-1.0</feature>  <!-- ADD ME -->
</featureManager>
Second, add the following line under the top-level <server> element (this just allows us to log from the app and have it shown on the console).
<server>
    ...
    <logging consoleLogLevel="INFO" />
</server>
Implement GraphQL Hello World
Create a new Java file, HelloGraphQl.java. This is a simple GraphQL resource controller.
src/main/java/com/example/demo/HelloGraphQl.java
package com.example.demo;

import org.eclipse.microprofile.graphql.GraphQLApi;
import org.eclipse.microprofile.graphql.Query;

@GraphQLApi
public class HelloGraphQl {

    @Query("hello")
    public String sayHello() {
        return "Hello world!";
    }

}
MicroProfile and OpenLiberty have a feature that detects changes and code and attempts to reload the application quickly. However, this feature did not always work for me and often resulted in errors on subsequent GraphQL queries. I found it better just to stop and restart after changes.
Stop your server if you haven’t, using Control-c. Start it again.
mvn liberty:run
Wait for it to finish loading. Test your new GraphQL endpoint.
http POST :9080/graphql query='{ hello }'


HTTP/1.1 200 OK
Content-Language: en-US
Content-Length: 33
Content-Type: application/json;charset=UTF-8
Date: Wed, 23 Dec 2020 16:57:01 GMT
X-Powered-By: Servlet/4.0

{
    "data": {
        "hello": "Hello world!"
    }
}
Notice that the REST endpoint was at /data/hello, and this endpoint is at /graphql. Notice also that you’re using the GraphQL query language, not making a REST request. You’re also making a POST request instead of a GET.
Explaining GraphQL query language is beyond the scope of this tutorial. If you’d like to learn more about it, take a look at the documentation on the project website.
Of course, this request is trivial. To do something more interesting, you’re going to create a GraphQL endpoint that returns surf forecasts. The forecasts are randomly generated, but the controller will accept a parameter and allow you to use the GraphQL query language to choose the data you’d like returned.
Generate Surf Forecasts Using GraphQL
First, create the SurfController class that will expose the surfReport query.
src/main/java/com/example/demo/SurfController.java
package com.example.demo;

import org.eclipse.microprofile.graphql.GraphQLApi;
import org.eclipse.microprofile.graphql.Name;
import org.eclipse.microprofile.graphql.Query;


@GraphQLApi
public class SurfController {

    @Query("surfReport")
    public SurfConditions getSurfReport(@Name("location") String location) {
        return SurfConditions.getRandom(location);
    }

}
Second, create the SurfConditions data model.
src/main/java/com/example/demo/SurfConditions.java
package com.example.demo;

import lombok.Data;
import lombok.ToString;

import java.util.Arrays;
import java.util.List;
import java.util.Random;
import java.util.logging.Logger;

@Data @ToString
public class SurfConditions {

    private static final Logger LOG = Logger.getLogger("SurfConditions");

    private final String location;
    private final int chanceOfRainPercent;
    private final double windKnots;
    private final String windDirection;
    private final int swellHeight;
    private final int swellPeriodSeconds;

    static SurfConditions getRandom(String location) {

        List<String> windDirections = Arrays.asList("S", "SW", "W", "NW", "N", "NE", "E", "SE");
        Random rand = new Random();
        String windDirection = windDirections.get(rand.nextInt(windDirections.size()));
        int chanceOfRain = (int)(Math.random() * 100);
        double windKnots = (Math.random() * (40 - 5)) + 5;
        int swellHeight = (int)((Math.random() * (25 - 2)) + 2);
        int swellPeriodSeconds = (int)((Math.random() * (15 - 8)) + 8);

        SurfConditions report = new SurfConditions(
                location,  // just the input location
                chanceOfRain,  // random int between 0-100
                windKnots,  // random double between 5-40
                windDirection,  // random direction
                swellHeight,  // random int between 2-14
                swellPeriodSeconds // random int between 8-15
        );

        LOG.info(report.toString());

        return report;
    }

}
Much of this class’s complexity is in the getRandom() method that returns a random surf forecast, which is just a convenience method for this tutorial. In a real situation, you’d likely be querying a database instead of generating random forecasts.
If you strip that out (see below), you’ll see that your model class is really just a Java class with some properties defined. Two Lombok annotations (@Data @ToString) are used to generate all of the necessary getters, setters, constructors, and the toString() method.
package com.example.demo;

import lombok.Data;
import lombok.ToString;

@Data @ToString
public class SurfConditions {

    private final String location;
    private final int chanceOfRainPercent;
    private final double windKnots;
    private final String windDirection;
    private final int swellHeight;
    private final int swellPeriodSeconds;

}
Stop the server with Control-c and re-run.
mvn liberty:run
Try a couple of queries. Play around. Notice that you can specify a different location parameter in the search query. You can also specify which return values you need. In more complex situations, this is a great way to reduce network traffic.
http POST :9080/graphql query='{ surfReport(location:"Texas") {location,chanceOfRainPercent,windKnots,windDirection,swellHeight,swellPeriodSeconds} }'


HTTP/1.1 200 OK
...

{
    "data": {
        "surfReport": {
            "chanceOfRainPercent": 9,
            "location": "Texas",
            "swellHeight": 22,
            "swellPeriodSeconds": 8,
            "windDirection": "E",
            "windKnots": 14.561441929794396
        }
    }
}
http POST :9080/graphql query='{ surfReport(location:"Oregon") {windKnots,swellHeight,swellPeriodSeconds} }'


HTTP/1.1 200 OK
...

{
    "data": {
        "surfReport": {
            "swellHeight": 14,
            "swellPeriodSeconds": 13,
            "windKnots": 32.28906559297788
        }
    }
}
You’ve now got a working MicroProfile GraphQL app. The next step is to use Okta to add JWT authentication to your application.
Create an OpenID Connect Application
Okta implements two standards that allow you to do this. First, Okta is an OAuth 2.0 provider. OAuth 2.0 is an authorization standard, meaning that it enables your application to verify user permissions. OpenID Connect (OIDC) is an authentication standard, meaning that it allows your application to verify the identity of the user or client service. Together they provide a full specification for authentication and authorization–everything you need for web security. As you will see, Okta implements this standard in a way that allows you to quickly and easily integrate these technologies into your application.
In this particular example, you’re implementing a web service that uses a JSON Web Token to verify the identity of web clients making requests. Each request is required to contain a valid web token in an authentication header. The web token will be issued by Okta (you’ll do this manually via the OIDC Debugger) and will also be validated by Okta using the MicroProfile JWT feature.
Before you begin, you’ll need a free Okta developer account. Install the Okta CLI and run okta register to sign up for a new account. If you already have an account, run okta login.
Then, run okta apps create. Select the default app name, or change it as you see fit.
Choose Web and press Enter.
Select Other.
Then, change the Redirect URI to https://oidcdebugger.com/debug and use http://localhost:8080 for the Logout Redirect URI.
What does the Okta CLI do?
The Okta CLI will create an OIDC Web App in your Okta Org. It will add the redirect URIs you specified and grant access to the Everyone group. You will see output like the following when it’s finished:
Okta application configuration has been written to: /path/to/app/.okta.env
Run cat .okta.env (or type .okta.env on Windows) to see the issuer and credentials for your app.
export OKTA_OAUTH2_ISSUER="https://dev-133337.okta.com/oauth2/default"
export OKTA_OAUTH2_CLIENT_ID="0oab8eb55Kb9jdMIr5d6"
export OKTA_OAUTH2_CLIENT_SECRET="NEVER-SHOW-SECRETS"
Your Okta domain is the first part of your issuer, before /oauth2/default.
NOTE: You can also use the Okta Admin Console to create your app. See Create a Web App for more information.
You configured Okta as an OAuth 2.0 OIDC provider. Take note of the Client ID because you’ll need it in a moment.
Add Groups and UPN Claims to Default Authorization Server
To enable role-based authorization, as well as to meet MicroProfile’s requirements for the JWT, you need to add two claims mappings to your default Okta authorization server: a groups claim and a upn claim. The groups claim mapping is what maps Okta’s groups to the role-based authorization in MicroProfile. MicroProfile requires the upn claim, and you’ll get an invalid token error without it. This is the “user principal name” as defined in the documentation.
Run okta login and open the resulting URL in your browser. Sign in to the Okta Admin Console and go to Security > API. Select the default authorization server, then go to Claims > Add Claim. Set the following values:
- Name:
groups - Include in token type:
Access TokenAlways - Value type:
Groups - Filter:
Matches regex.*
Next, add a upn claim.
Click Add Claim.
- Name:
upn - Include in token type:
Access TokenAlways - Value type:
Expression - Value:
user.email
Click Create.
Generate a JSON Web Token
Every request to the secured API will require a valid JWT. Typically, the JWT is generated when a user signs in via a client application. In this case, there is no client application. Instead, you are going to use the OpenID Connect Debugger to generate a token. This web application allows you to perform a request for a JWT against Okta servers and inspect the results.
An easy way to get an access token is to generate one using OpenID Connect Debugger. Open the site in a new window or tab. Fill in your client ID, and use https://{yourOktaDomain}/oauth2/default/v1/authorize for the Authorize URI. Select code for the response type and Use PKCE.
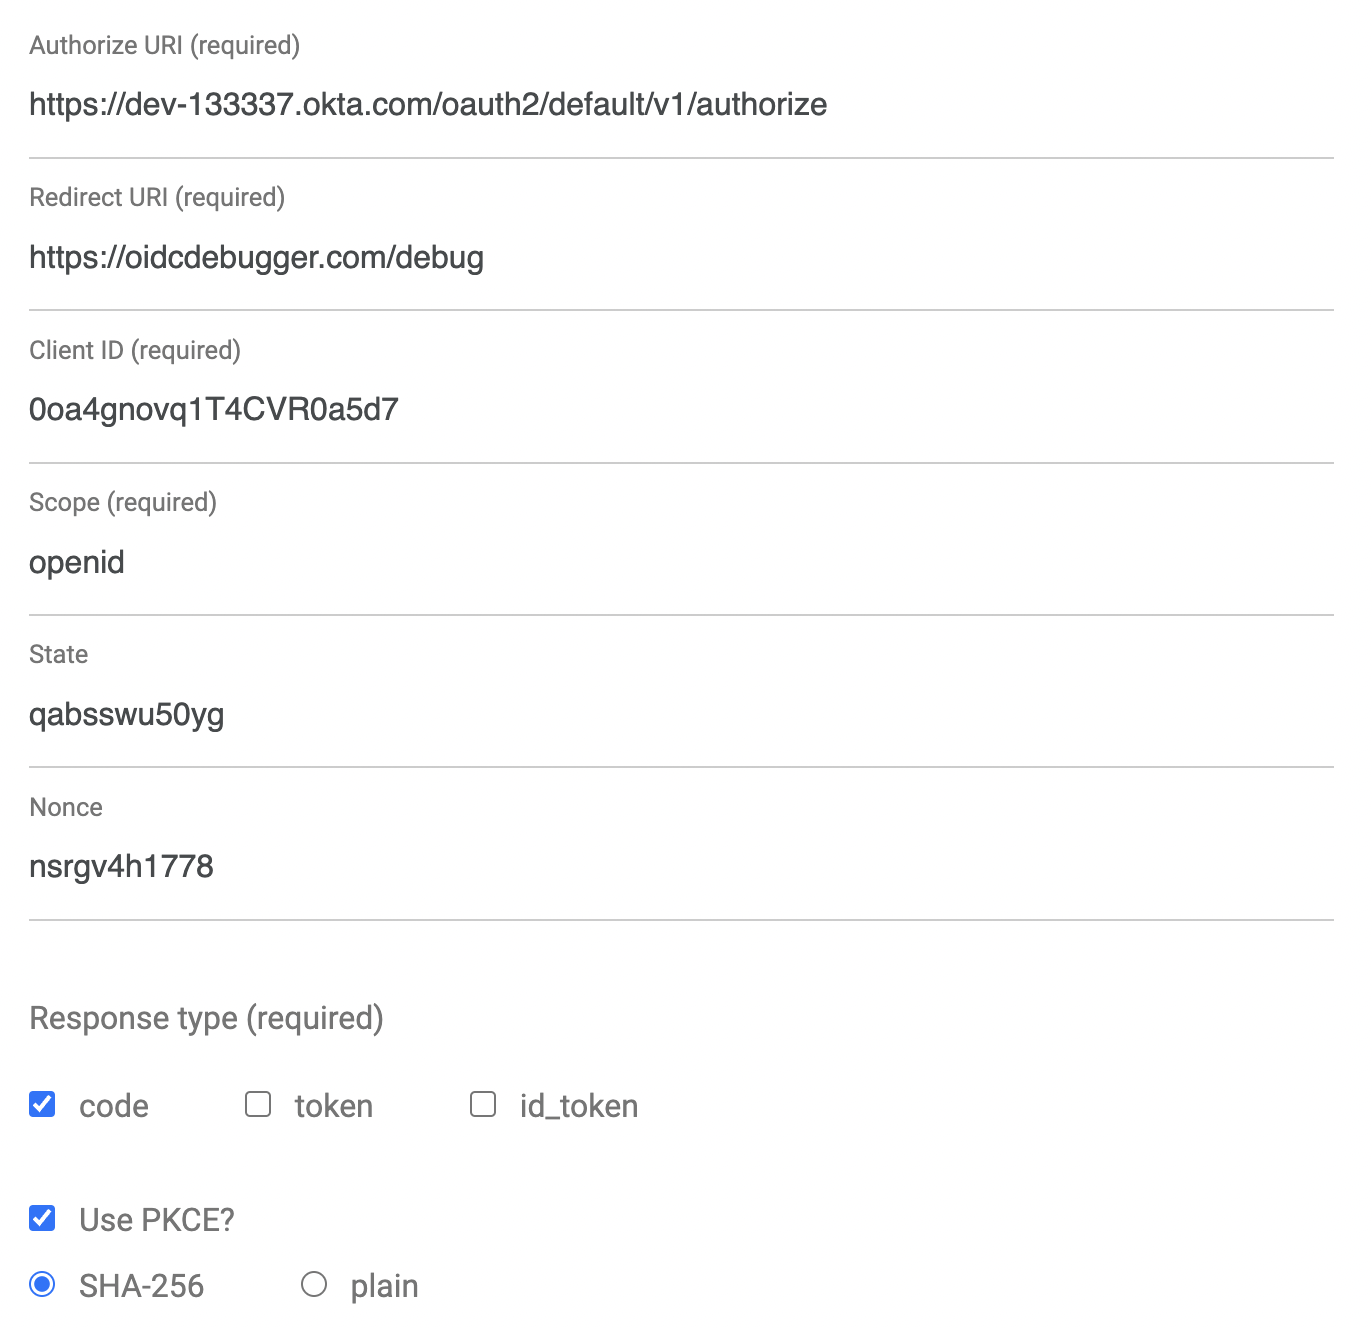
Scroll down and click Send Request.
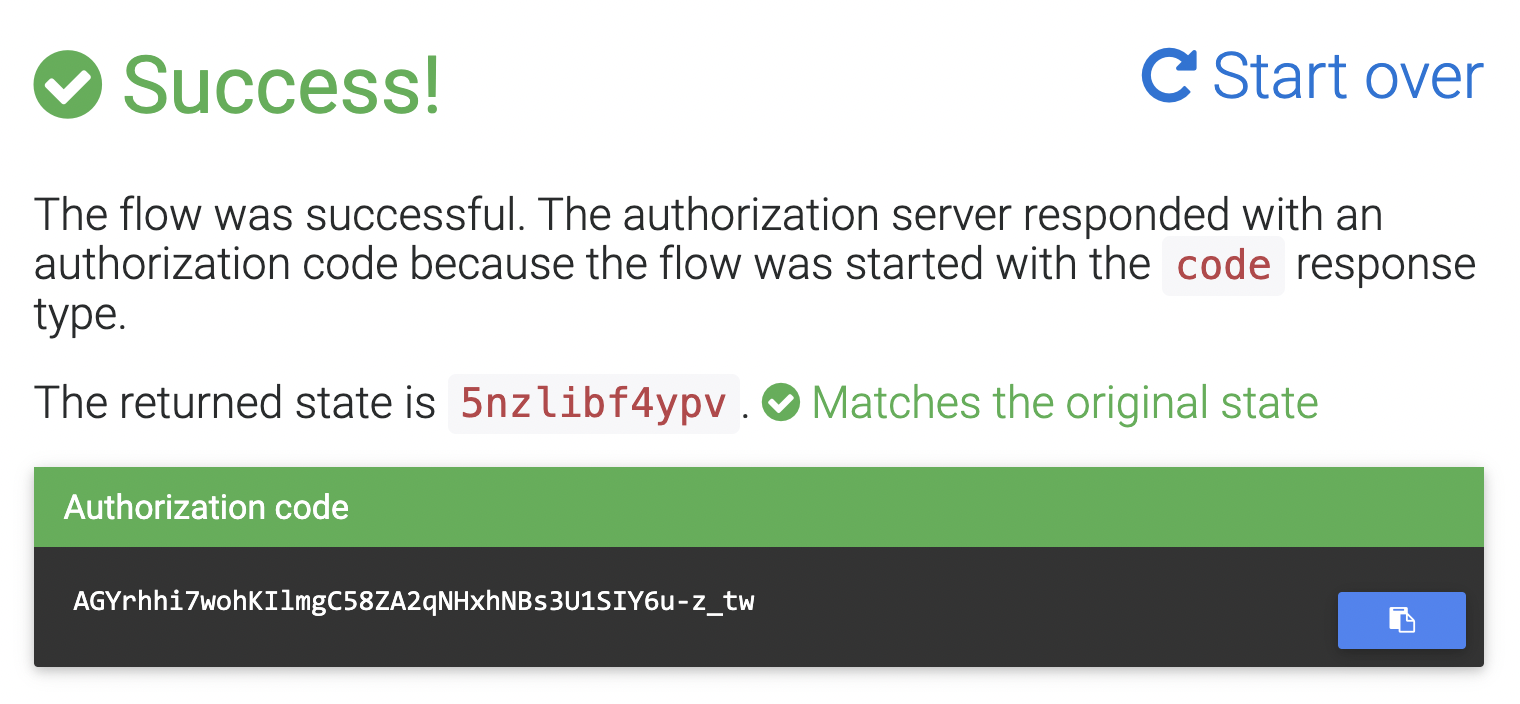
You should see a success screen with an authorization code.
You can use HTTPie to exchange this authorization code for an actual token. Fill in the values in brackets with your values: the authorization code, your Okta domain, your OIDC app client ID, and your OIDC app client secret.
http -f https://{yourOktaDomain}/oauth2/default/v1/token \
grant_type=authorization_code \
code={yourAuthCode} \
client_id={clientId} \
client_secret={clientSecret} \
redirect_uri=https://oidcdebugger.com/debug
You should get a lengthy response that looks like the following (with sections omitted for brevity and clarity).
HTTP/1.1 200 OK
Connection: keep-alive
Content-Type: application/json;charset=UTF-8
...

{
    "access_token": "eyJraWQiOiJBX05XeGVXcVdrNG5pUjBFWlJnbWg5X3JJa...",
    "expires_in": 3600,
    "id_token": "eyJraWQiOiJBX05XeGVXcVdrNG5pUjBFWlJnbWg5X3JJa1Q3...",
    "scope": "openid",
    "token_type": "Bearer"
}
To inspect the JWT, copy the access token value and go to token.dev. Paste the value in the JWT String field.
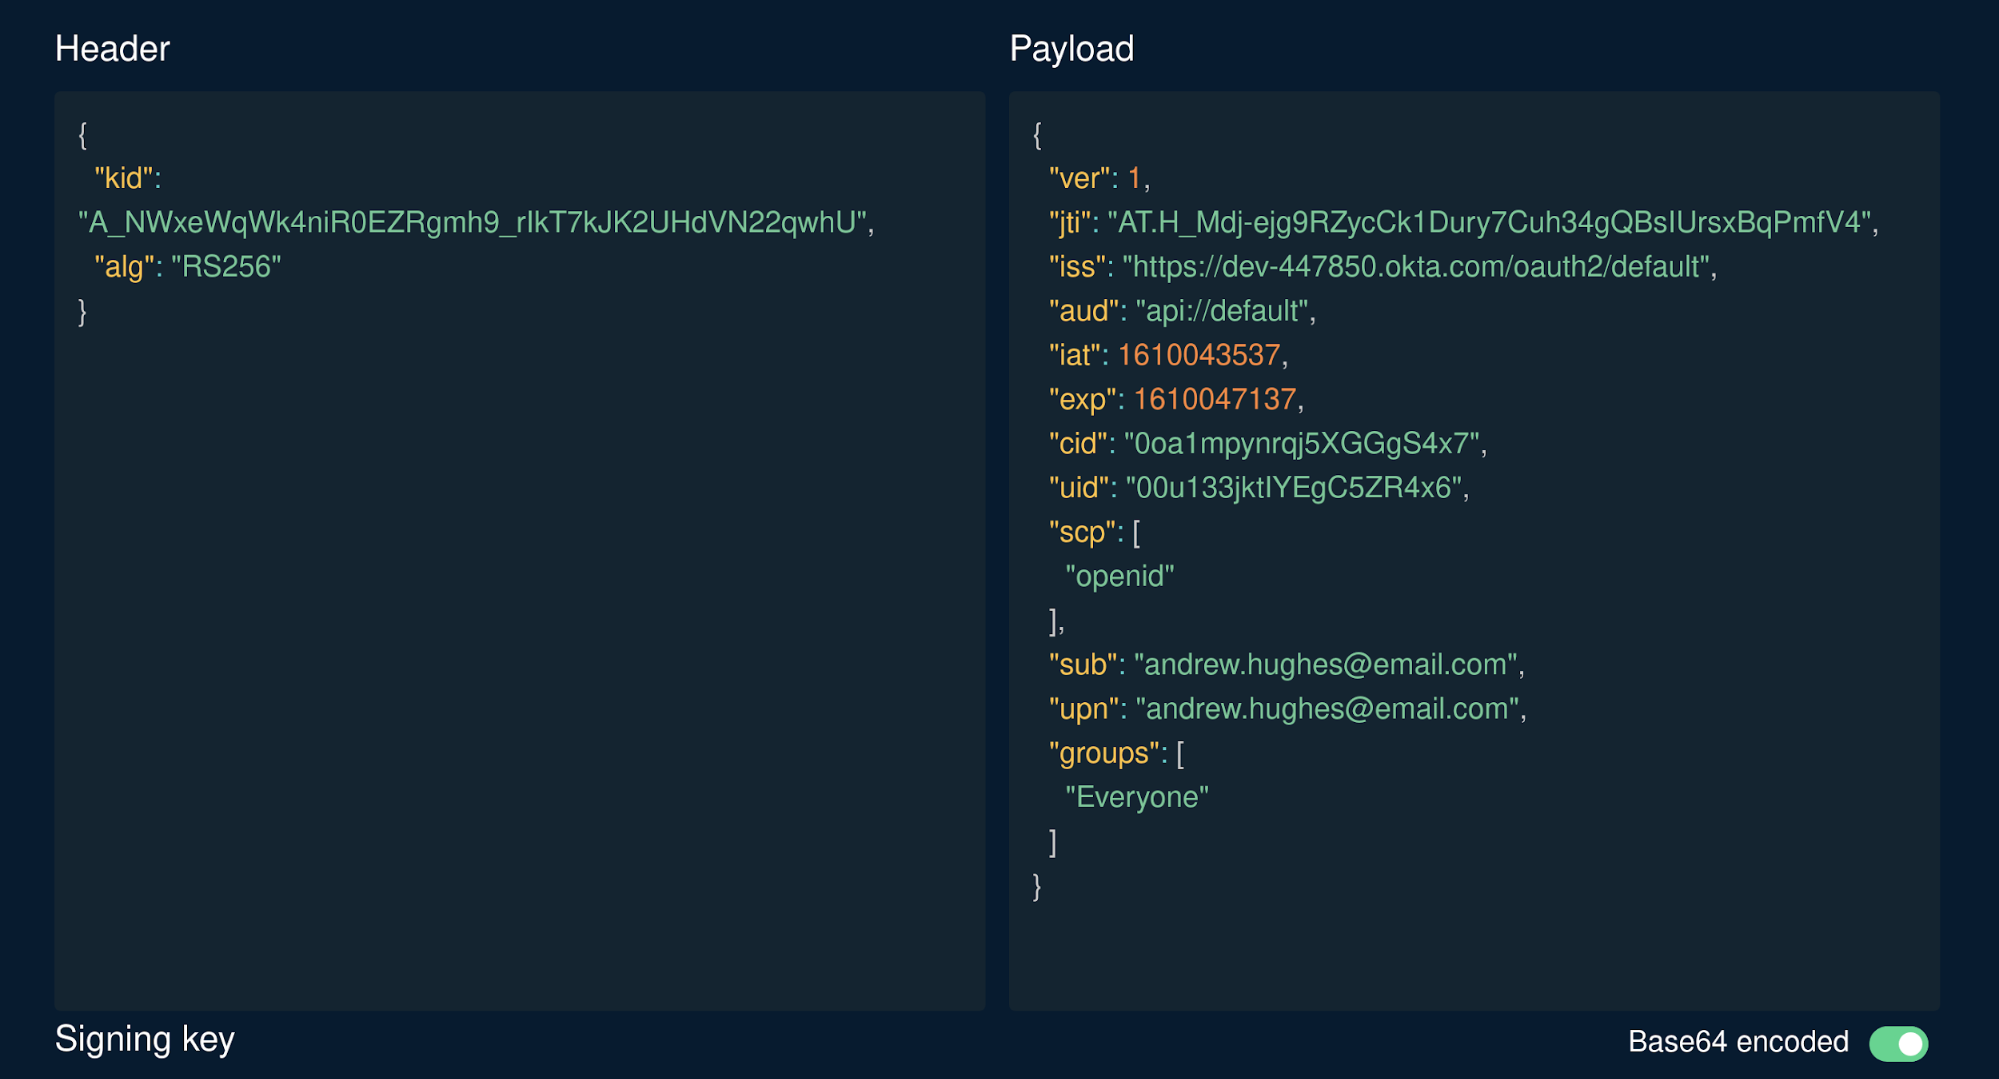
You’ll see something like the following for the JWT Payload.
{
  "ver": 1,
  "jti": "AT.H_Mdj-ejg9RZycCk1Dury7Cuh34gQBsIUrsxBqPmfV4",
  "iss": "https://dev-447850.okta.com/oauth2/default",
  "aud": "api://default",
  "iat": 1610043537,
  "exp": 1610047137,
  "cid": "0oa1mpynrqj5XGGgS4x7",
  "uid": "00u133jktIYEgC5ZR4x6",
  "scp": [
    "openid"
  ],
  "sub": "andrew.hughes@email.com",
  "upn": "andrew.hughes@email.com",
  "groups": [
    "Everyone"
  ]
}
Two things to notice: first, the upn claim is one of the claims you added. The MicroProfile JWT specification requires this. If it’s not there, go back and add the claim again. It won’t work without it. Second, notice the groups claim. This will contain an entry for every group (or role) of which the user is a member.
Groups and roles are not really the same thing (in short: groups are groups of users, and roles are collections of permissions). I mention this because, in a moment, you’ll use an annotation called @RolesAllowed to specify Everyone as the allowed role. Everyone is Okta’s default group, of which all users are a member. For the purposes of this tutorial, we don’t care if it’s a group or a role, just that it’s a string passed from Okta through the groups claim that specifies an authorization. It needs to be there for the rest of the tutorial to work. If it’s not, go back and check the groups claim in your default Okta auth server.
Save the access token to a shell variable.
TOKEN=eyJraWQiOiJBX05XeGVXcVdrNG5pUjBFWlJnbWg5X3JJ...
Leave this shell open. You’ll use it in a moment to make an authenticated request. First, you need to configure MicroProfile to use JWT authentication.
Configure MicroProfile for JWT Authentication
In src/main/liberty/config/server.xml, you need to replace these lines:
<!-- This is the keystore that will be used by SSL and by JWT. -->
<keyStore id="defaultKeyStore" location="public.jks" type="JKS" password="atbash" />

<!-- The MP JWT configuration that injects the caller's JWT into a ResourceScoped bean for inspection. -->
<mpJwt id="jwtUserConsumer" keyName="theKeyId" audiences="targetService" issuer="${jwt.issuer}"/>
With these lines:
<!-- Import default Java trust store for root certs -->
<ssl id="defaultSSLConfig" keyStoreRef="defaultKeyStore" trustStoreRef="defaultTrustStore" />
<keyStore id="defaultTrustStore" location="${javaKeystoreLocation}" type="JKS" password="changeit" />

<!-- Configure MicroProfile JWT Auth -->
<mpJwt
    id="myMpJwt"
    jwksUri="https://${oktaDomain}/oauth2/default/v1/keys"
    issuer="https://${oktaDomain}/oauth2/default"
    audiences="api://default"
/>
Add two properties to your pom.xml. You will need to add your own Okta domain for {yourOktaDomain}. For example, dev-6974382.okta.com.
<properties>
  ...
  <liberty.var.javaKeystoreLocation>${env.JAVA_HOME}/lib/security/cacerts</liberty.var.javaKeystoreLocation>
  <liberty.var.oktaDomain>{yourOktaDomain}</liberty.var.oktaDomain>
</properties>
In the server.xml file, you did two important things. First, you configured MicroProfile to use the default Java trust store and key store. You have to do this because when the app wants to verify the JWT, it will try and connect to the default Okta auth server via TLS/SSL. For the TLS handshake to work, MicroProfile needs a key store with root certificates. The default Java key store has the root certificates already installed. Another option would be to use your own key store and import Okta’s certificates into the trust store.
The second thing happening in the server.xml changes is that MicroProfile JWT (<mpJwt></mpJwt>) is configured to use Okta to verify the JWTs.
Two values are used in server.xml: the okta domain and the location of the Java key store. However, these values are placed in pom.xml and passed to server.xml as system properties.
To add security to your GraphQL controller, add the @RolesAllowed annotation to the getSurfReport() method in the SurfController class.
src/main/java/com/example/demo/SurfController.java
import javax.annotation.security.RolesAllowed;

@GraphQLApi
public class SurfController {

    @RolesAllowed("Everyone")  // <-- ADD ME
    @Query("surfReport")
    public SurfConditions getSurfReport(@Name("location") String location) {
        return SurfConditions.getRandom(location);
    }

}
With that annotation, only users or clients that are members of the Everyone group will be able to access the query.
Stop the server with Control-c and re-run.
mvn liberty:run
Go back to the shell where you saved your token. First, try a request without using the token.
http POST :9080/graphql query='{ surfReport(location:"Texas") {windKnots,swellHeight,swellPeriodSeconds} }'

HTTP/1.1 401 Unauthorized
...
Now, use your token.
http POST :9080/graphql query='{ surfReport(location:"Texas") {location,chanceOfRainPercent,windKnots,windDirection,swellHeight,swellPeriodSeconds} }' \
"Authorization: Bearer $TOKEN"
You should be able to query the GraphQL server successfully.
All’s Well That Ends Authenticated
In this tutorial, you created a simple sample web application using MicroProfile and OpenLiberty. You first saw how to easily bootstrap a project using the MicroProfile starter before configuring the project to use GraphQL. Next, you secured the application using JWT authentication.
You can find the source for this example on GitHub, in the oktadeveloper/okta-microprofile-graphql-example repository.
For more interesting tutorials related to MicroProfile and GraphQL, see the following posts:
- Build a REST API Using Java, MicroProfile, and JWT Authentication
- Build a Java REST API with Java EE and OIDC
- How to GraphQL in Java
- Build a Secure API with Spring Boot and GraphQL
- Build a Health Tracking App with React, GraphQL, and User Authentication
If you have any questions about this post, please add a comment below. For more awesome content, follow @oktadev on Twitter, like us on Facebook, or subscribe to our YouTube channel.
Okta Developer Blog Comment Policy
We welcome relevant and respectful comments. Off-topic comments may be removed.