How to Use WebAuthn in C#

Nowadays, using a password for authentication is becoming less and less secure. Password attacks are becoming more sophisticated, and data breaches occur more frequently. Have I Been Pwned, the website where you can check if your account has been compromised in a data breach, contains more than 10 billion accounts and more than 600 million passwords. With 62% of users reusing passwords, a successful attack on one of the websites gives the attacker access to your accounts on other sites as well. What’s more, the Director of Identity Security at Microsoft warns that long and complex passwords mostly don’t help either. Using multi-factor authentication is one of the easiest ways to secure your account but is still suspectable to some types of attacks.
In this tutorial, you will learn about how passwordless authentication works, why it is more secure, and how to implement passwordless authentication with WebAuthn in ASP.NET Core together with Okta.
To continue, you will need:
- A basic knowledge of C# and JavaScript
- Visual Studio 2019 or Visual Studio Code
- .NET Core 3.1 SDK
- Windows 10 Anniversary Update or newer and a computer with either a fingerprint reader, a Near-Infrared webcam, or a USB security key.
- An Okta Developer Account (free forever, to handle your OAuth needs)
Note: In May 2025, the Okta Integrator Free Plan replaced Okta Developer Edition Accounts, and the Okta CLI was deprecated.
We preserved this post for reference, but the instructions no longer work exactly as written. Replace the Okta CLI commands by manually configuring Okta following the instructions in our Developer Documentation.
Introduction to Passwordless Authentication with WebAuthn
The Web Authentication (also known as WebAuthn) is a World Wide Web Consortium specification of an API that allows web applications creation and authentication using public-key cryptography instead of using passwords. The specification is the official web standard for passwordless login since March 2019 and is supported by all major desktop and mobile browsers.
The web browser sits between two components that are outside the browser:
- Relying Party—also known as a web server—is the web application that will use web authentication API to register and authenticate users.
- Authenticators— are devices that can generate a cryptographic key pair and register it with the relying party. An authenticator can be a device with TouchID, FaceID, Windows Hello, or a USB or Bluetooth security key.
A web browser’s role is to exchange data between authenticators and relying parties, provide a user interface for authenticators if needed, and manage error handling.
When the authenticator generates a new private-public key pair for a website, the browser sends the public key and a random credential ID to the server, but the private key is stored securely on the user’s device. This makes passwordless authentication much more secure as there is no need to store or remember passwords anymore, and the public key is not secret and cannot be used without the corresponding private key.
Benefits of Passwordless Authentication with WebAuthn
Passwordless authentication has several key advantages:
- Protection against phishing; if an attacker creates a fake login page, the user won’t be able to login because the keypair is scoped to the website’s origin.
- Reduction of the impact of data breaches; if a data breach happens and an attacker steals public keys, they can’t authenticate without the private key.
- Invulnerability to password attacks: With passwordless authentication, users can’t reuse passwords anymore, and user accounts aren’t susceptible to brute-force attacks either.
Setup Windows Hello for Fingerprint Authentication
Before I start the project, let’s set up fingerprint authentication with Windows Hello. Windows Hello requires Windows 10 Anniversary Update or newer, so make sure to update your Windows if you are using an older Windows version.
Click the Start menu, open Settings, click Accounts and click Sign-in Options.
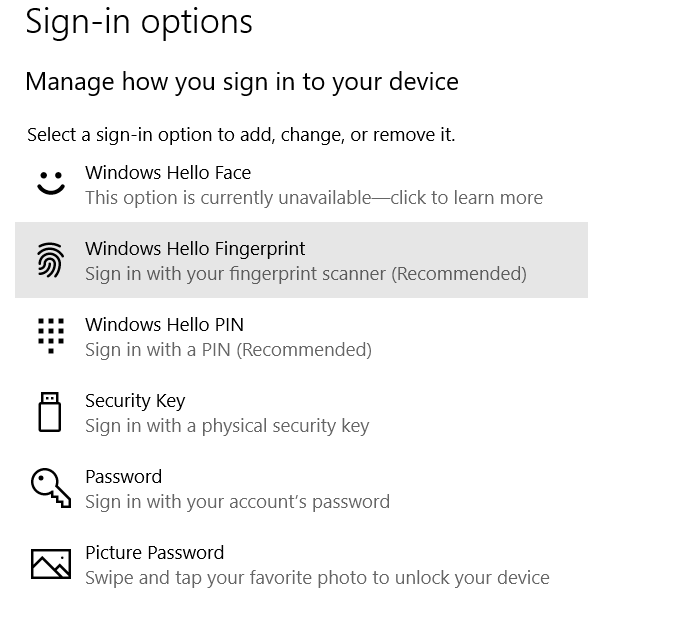
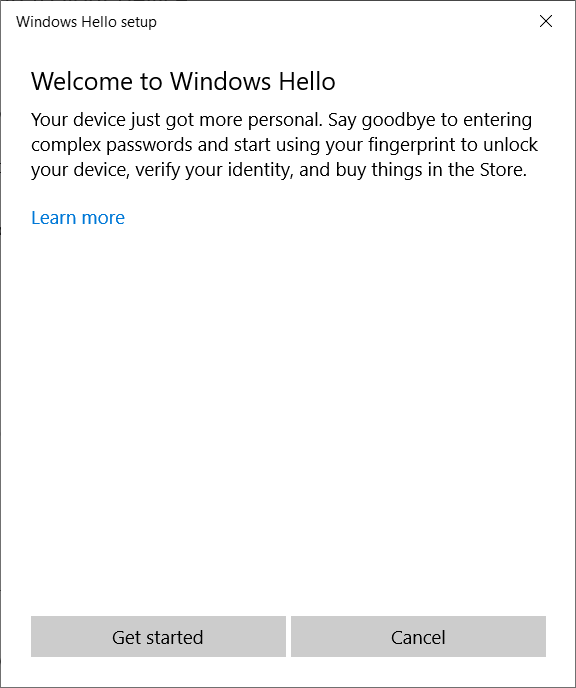
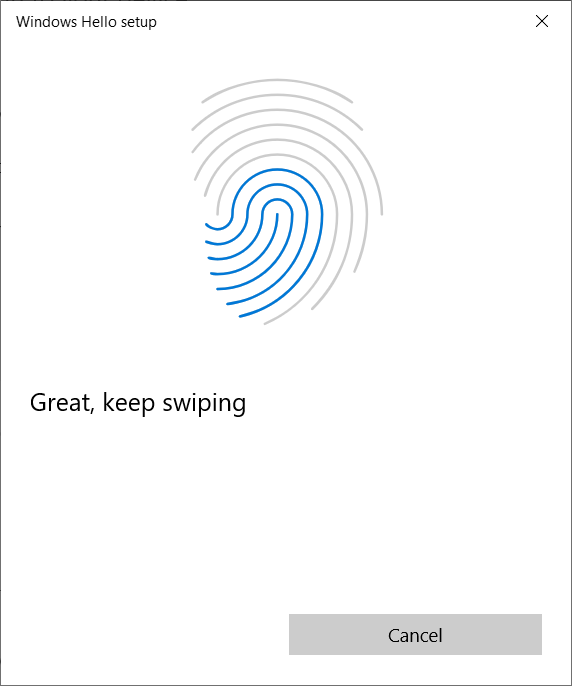
Then click on the Windows Hello Fingerprint, click Set up and click Get started On the next screen, swipe your finger to add your fingerprint.
Now, you are ready to add passwordless authentication to your web application.
Configure Passwordless Authentication in ASP.NET Core Web App
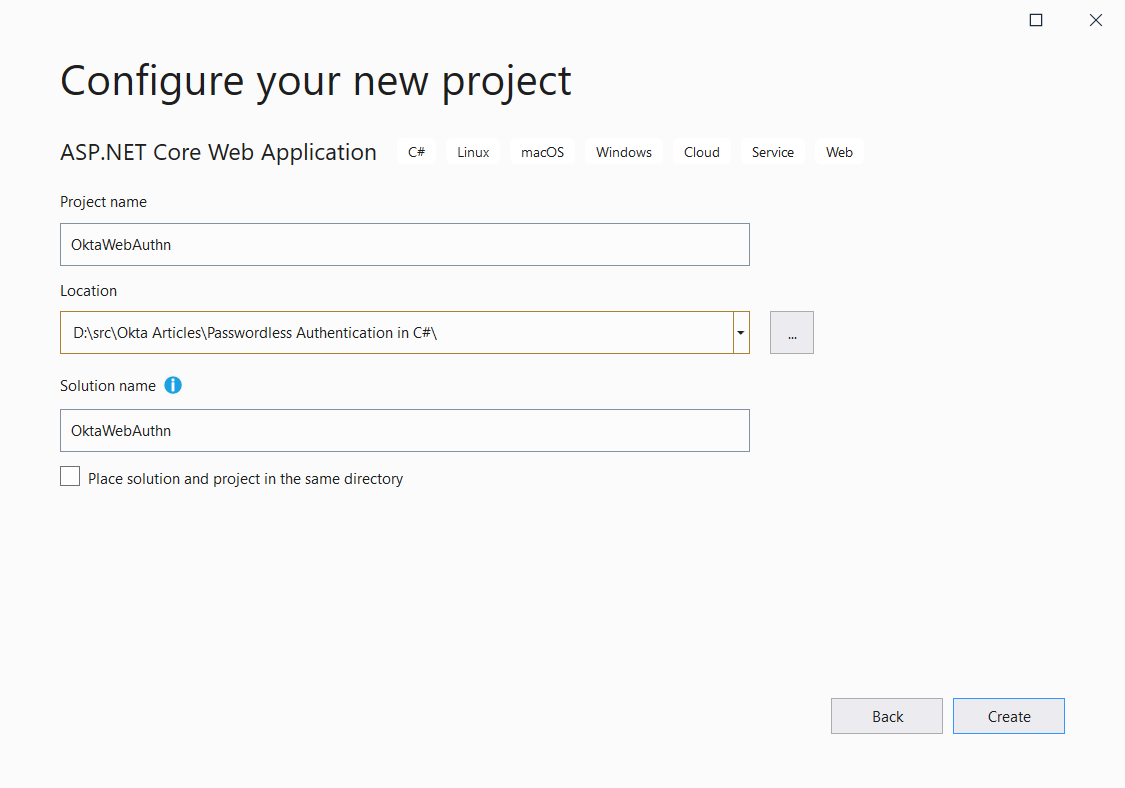
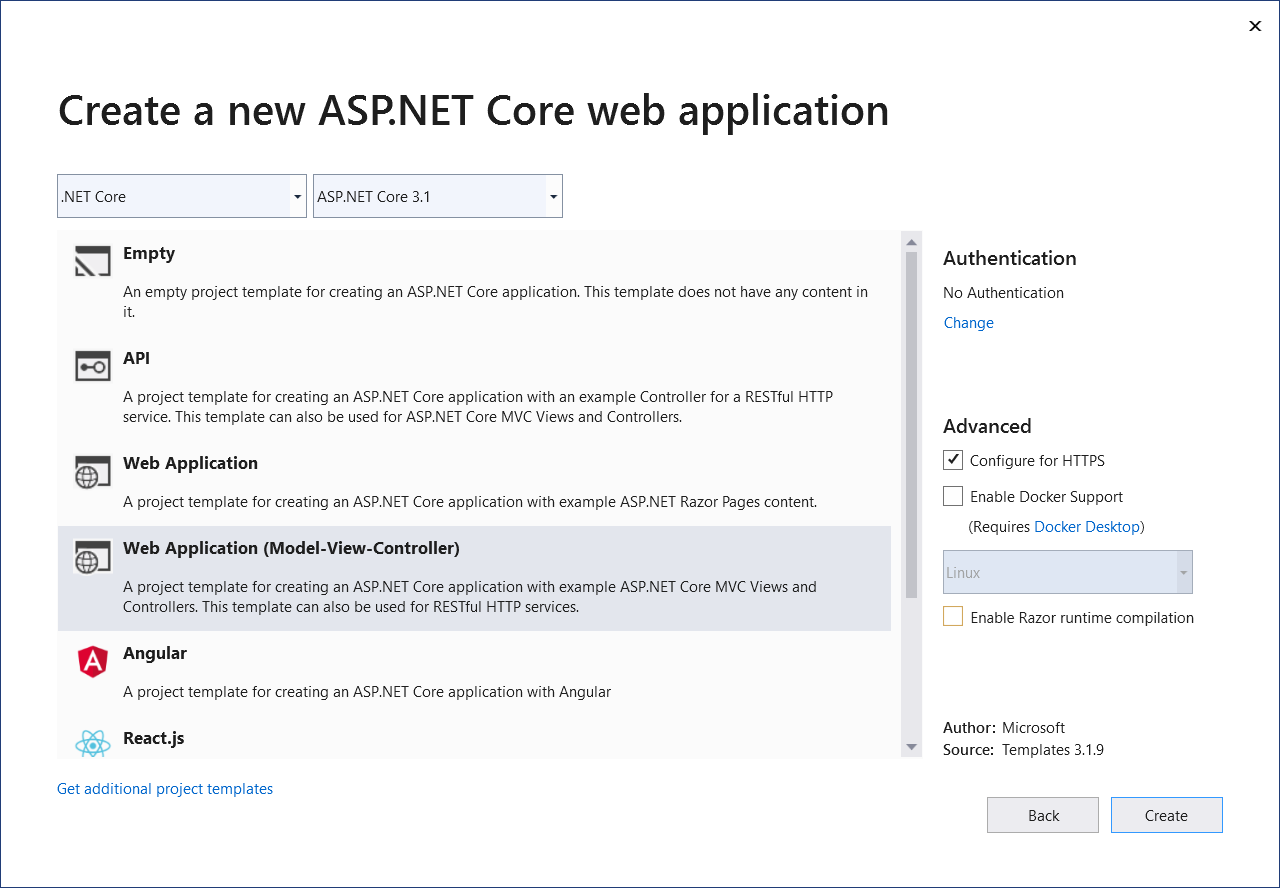
First, create a new ASP.NET Core project. Fire up Visual Studio and create a new project by clicking File>New Project select ASP.NET Core Web Application, and click Next. Name the app OktaWebAuthn and click Create.
In the next window, select Web Application (Model-View-Controller). Now, click Create, and Visual Studio will create a new ASP.NET Core web project.
To enable passwordless authentication for the project, I will use FIDO2 .NET Library, so go ahead and add a NuGet package for it and Microsoft.AspNetCore.Mvc.NewtonsoftJson:
dotnet add package Fido2.AspNet
dotnet add package Microsoft.AspNetCore.Mvc.NewtonsoftJson --version 3.1.10
Next, open appsettings.json file and add this section:
"fido2": {
"serverDomain": "localhost",
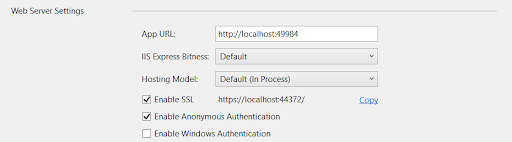
"origin": "https://localhost:44372",
"timestampDriftTolerance": 300000
}
Make sure that Enable SSL is checked and replace 44372 with the port number that your project is configured to use:
Finally, open Startup.cs file and configure the FIDO2 .NET Library in the ConfigureServices method:
services.AddControllersWithViews().AddNewtonsoftJson();

services.AddFido2(options =>
{
  options.ServerDomain = Configuration["fido2:serverDomain"];
  options.ServerName = "Okta WebAuthn Demo";
  options.Origin = Configuration["fido2:origin"];
  options.TimestampDriftTolerance = Configuration.GetValue<int>("fido2:timestampDriftTolerance");
});
Now, you are ready to add passwordless authentication to the project. The first step is to enable users to register a new user account using passwordless authentication.
Create User Accounts with Passwordless Authentication
Open the _Layout.cshtml file in Views\Shared folder and add the following before the <ul class="navbar-nav flex-grow-1"> element:
<ul class="navbar-nav">
    @if (User.Identity.IsAuthenticated)
    {
        <li class="nav-item">
        <a class="nav-link text-dark" href="#">Hello, @User.Identity.Name</a>
        </li>
        <li class="nav-item">
        <a class="nav-link text-dark" asp-controller="Account" asp-action="Profile" id="profile-button">Profile</a>
        </li>
    }
    else
    {
        <li class="nav-item">
        <a class="nav-link text-dark" asp-controller="Account" asp-action="Register" id="register-button">Register</a>
        </li>
        <li class="nav-item">
        <a class="nav-link text-dark" asp-controller="Account" asp-action="SignIn" id="login-button">Sign In</a>
        </li>
    }
</ul>
Next, add a AccountController.cs file in the Controllers folder, add RegisterModel.cs in the Models folder, and add Register.cshtml in the Views\Account folder:
public class AccountController : Controller
{
    private readonly IFido2 fido2;

    public AccountController(IFido2 fido2)
    {
        this.fido2 = fido2;
    }

    public ActionResult Register()
    {
        return View();
    }
}
@model RegisterModel
@{
    ViewData["Title"] = "Register";
}

<h1>@ViewData["Title"]</h1>

<div class="row">
    <div class="col-md-4">
        <form method="post" id="register-form">
            <h4>Create a new account.</h4>
            <hr />
            <div asp-validation-summary="All" class="text-danger"></div>
            <div class="form-group">
                <label asp-for="Email"></label>
                <input asp-for="Email" class="form-control" name="email" />
                <span asp-validation-for="Email" class="text-danger"></span>
            </div>
            <div class="form-group">
                <label asp-for="FirstName"></label>
                <input asp-for="FirstName" class="form-control" name="firstName" />
                <span asp-validation-for="FirstName" class="text-danger"></span>
            </div>
            <div class="form-group">
                <label asp-for="LastName"></label>
                <input asp-for="LastName" class="form-control" name="lastName" />
                <span asp-validation-for="LastName" class="text-danger"></span>
            </div>
            <button type="submit" class="btn btn-primary" id="register">Register</button>
        </form>
    </div>
</div>

@section Scripts {
    <partial name="_ValidationScriptsPartial" />
    <script src="~/js/helpers.js"></script>
    <script src="~/js/passwordless.register.js"></script>
}
public class RegisterModel
{
  [Required]
  [EmailAddress]
  [Display(Name = "Email")]
  public string Email { get; set; }

  [Required]
  [Display(Name = "First Name")]
  public string FirstName { get; set; }

  [Required]
  [Display(Name = "Last Name")]
  public string LastName { get; set; }
}
To create a new credential when the user registers, you need to call navigator.credentials.create JavaScript method. The create() method accepts a PublicKeyCredentialCreationOptions parameter with several required and optional fields that specify options for the requested credentials.
The required fields are:
rp- The relying party that requested credentials.user- The user for which credentials are created.challenge- A buffer of cryptographically random bytes that will be signed by the authenticator and sent back to the server to avoid replay attacks.pubKeyCredParams- An array of algorithms that can be used for a cryptographic signature.
To generate these options, add a method to the AccountController class that looks like this:
[HttpPost]
public ActionResult CredentialOptions([FromBody] RegisterModel model)
{
  var user = new Fido2User
  {
    DisplayName = $"{model.FirstName} {model.LastName}",
    Name = model.Email,
    Id = Encoding.UTF8.GetBytes(model.Email)
  };

  var options = fido2.RequestNewCredential(user, new List<PublicKeyCredentialDescriptor>());

  HttpContext.Session.SetString("fido2.attestationOptions", options.ToJson());

  return Json(options);
}
The method takes the user details, generates an options parameter, and returns it as a JSON object to the browser.
Finally, create passwordless.register.js in wwwroot\js folder that ties all the pieces together:
document.getElementById('register-form').addEventListener('submit', handleRegisterSubmit);

async function handleRegisterSubmit(event) {
    event.preventDefault();

    let email = this.email.value;
    let firstName = this.firstName.value;
    let lastName = this.lastName.value;

    var data = new FormData();

    data.append('username', email);
    data.append('firstName', firstName);
    data.append('lastName', lastName);

    // send to server for registering
    let credentialOptions;
    try
    {
        credentialOptions = await fetchMakeCredentialOptions({ email: email, firstName: firstName, lastName: lastName });
    }
    catch (e)
    {
        console.error(e);
        alert("Something went really wrong");
        return;
    }

    if (credentialOptions.status !== "ok")
    {
        alert(credentialOptions.errorMessage);
        return;
    }

    // Turn the challenge back into the accepted format of padded base64
    credentialOptions.challenge = coerceToArrayBuffer(credentialOptions.challenge);
    credentialOptions.user.id = coerceToArrayBuffer(credentialOptions.user.id);

    if (credentialOptions.authenticatorSelection.authenticatorAttachment === null)
    {
        credentialOptions.authenticatorSelection.authenticatorAttachment = undefined;
    }

    let newCredential;
    try
    {
        newCredential = await navigator.credentials.create({publicKey: credentialOptions});
    } catch (e)
    {
        alert("Could not create credentials in browser.");
        return;
    }

    try
    {
        await registerNewCredential(newCredential);
        window.location.replace("/Account/Signin");
    } catch (e) {
        alert("Could not register new credentials on server");
    }
}

async function fetchMakeCredentialOptions(formData) {
let response = await fetch('/Account/CredentialOptions', {
    method: 'POST',
    body: JSON.stringify(formData),
    headers: {
    'Accept': 'application/json',
    'Content-Type': 'application/json'
    }
  });

  let data = await response.json();

  return data;
}


// This should be used to verify the auth data with the server
async function registerNewCredential(newCredential) {

    let attestationObject = new Uint8Array(newCredential.response.attestationObject);
    let clientDataJSON = new Uint8Array(newCredential.response.clientDataJSON);
    let rawId = new Uint8Array(newCredential.rawId);

    const data = {
        id: newCredential.id,
        rawId: coerceToBase64Url(rawId),
        type: newCredential.type,
        extensions: newCredential.getClientExtensionResults(),
        response: {
        AttestationObject: coerceToBase64Url(attestationObject),
        clientDataJson: coerceToBase64Url(clientDataJSON)
        }
    };

    let response;
    try {
            response = await registerCredentialWithServer(data);
        } catch (e)
        {
            alert(e);
            return;
        }

  console.log("Credential Object", response);

  // show error
    if (response.status !== "ok") {
        alert(response.errorMessage);
        return;
    }

    alert("You've registered successfully.");
}

async function registerCredentialWithServer(formData) {

    let response = await fetch('/Account/SaveCredentials', {
        method: 'POST',
        body: JSON.stringify(formData),
        headers: {
            'Accept': 'application/json',
            'Content-Type': 'application/json'
        }
    });

    let data = await response.json();

    return data;
}
Let’s go through the code and break down what it does. First, I register an event handler for the sign-up form. In the event handler, I call the /Account/CredentialOptions endpoint with the user data and use the resulting options to call the navigator.credentials.create method. After that, I send the generated credentials to the server by calling the /Account/SaveCredentials endpoint. It’s that simple.
The SaveCredentials endpoint doesn’t exist yet, but before I create that method, I will configure Okta as I will store user data and their credentials in Okta.
Store User and User’s Public Key in Okta
This tutorial will use Okta to store users and the public key of their credentials. Okta supports user authentication, multi-factor authentication, social authentication, as well as all OpenID Connect flows out of the box—it can take care of all the scenarios you might ever need.
To get started, log in to your Okta Developer account via the URL in the sign-up email to access your org’s portal dashboard. Once you log in, make sure to note your Org URL from the upper right corner of the screen:
Alternatively, you can install the Okta CLI and log in to your Okta account with the okta login command. You can also sign up for a new account with the okta start command if you don’t already have an Okta account.
Now, create a custom field for storing the user’s public key. Go to Users in the menu, click Profile Editor, and click the Profile button next to the default Okta profile. Click Add Attribute, fill the Add Attribute form and click Save:
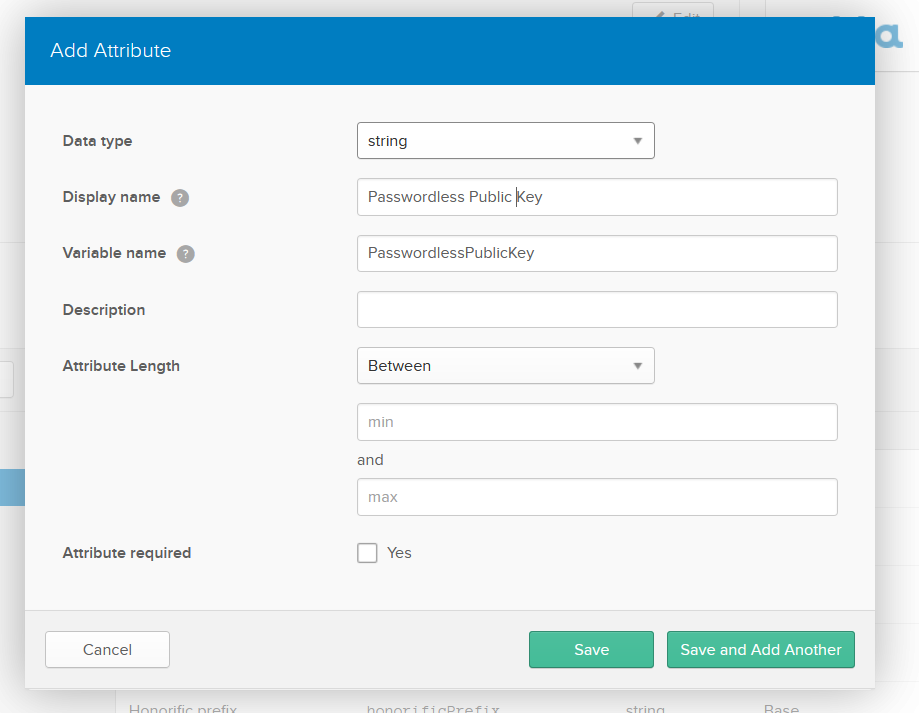
Do the same to add another attribute called CredentialId.
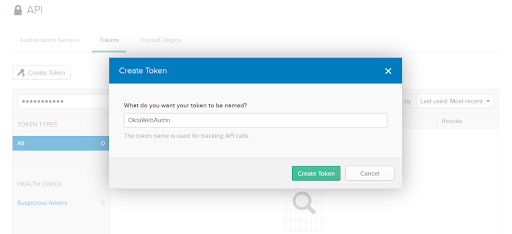
Next, go to API in the menu, click Tokens, and click the Create Token button. Enter the token name (I will use OktaWebAuthn) and click the Create Token button. Make sure you copy the token because you won’t be able to view it again:
Switch to Visual Studio, open the appsettings.json again, and add a section for Okta:
"Okta": {
  "Domain": "https://{yourOktaDomain}",
  "ApiToken": "{yourToken}"
}
Finally, add a NuGet package for managing users in Okta:
dotnet add package Okta.Sdk
Open the AccountController class and add the SaveCredentials method:
public async Task<JsonResult> SaveCredentials([FromBody] AuthenticatorAttestationRawResponse attestationResponse)
{
    try
    {
        var jsonOptions = HttpContext.Session.GetString("fido2.attestationOptions");
        var options = CredentialCreateOptions.FromJson(jsonOptions);

        var fidoCredentials = await fido2.MakeNewCredentialAsync(attestationResponse, options, IsCredentialUnique);

        var storedCredential = new StoredCredential{
            Descriptor = new PublicKeyCredentialDescriptor(fidoCredentials.Result.CredentialId),
            PublicKey = fidoCredentials.Result.PublicKey,
            UserHandle = fidoCredentials.Result.User.Id,
            SignatureCounter = fidoCredentials.Result.Counter,
            CredType = fidoCredentials.Result.CredType,
            RegDate = DateTime.Now,
            AaGuid = fidoCredentials.Result.Aaguid
        };

        var result = await oktaClient.Users.CreateUserAsync(new CreateUserWithoutCredentialsOptions
        {
            Profile = new UserProfile
            {
                Login = options.User.Name,
                Email = options.User.Name,
                DisplayName = options.User.DisplayName,
                ["CredentialId"] = Convert.ToBase64String(fidoCredentials.Result.CredentialId),
                ["PasswordlessPublicKey"] = JsonConvert.SerializeObject(storedCredential)
            }
        });

        return Json(fidoCredentials);
    }
    catch (Exception e)
    {
        return Json(new Fido2.CredentialMakeResult { Status = "error", ErrorMessage = e.Message });
    }
}
The SaveCredentials method accepts the public key object created by the authenticator, turns it into a credentials object for storing, and saves the user together with the credentials in Okta.
Now let’s see the app in action! Click F5 or use dotnet run to launch the app and click the Register menu item. Enter your email, personal details, and click the Register button. You should see a screen similar to this one:
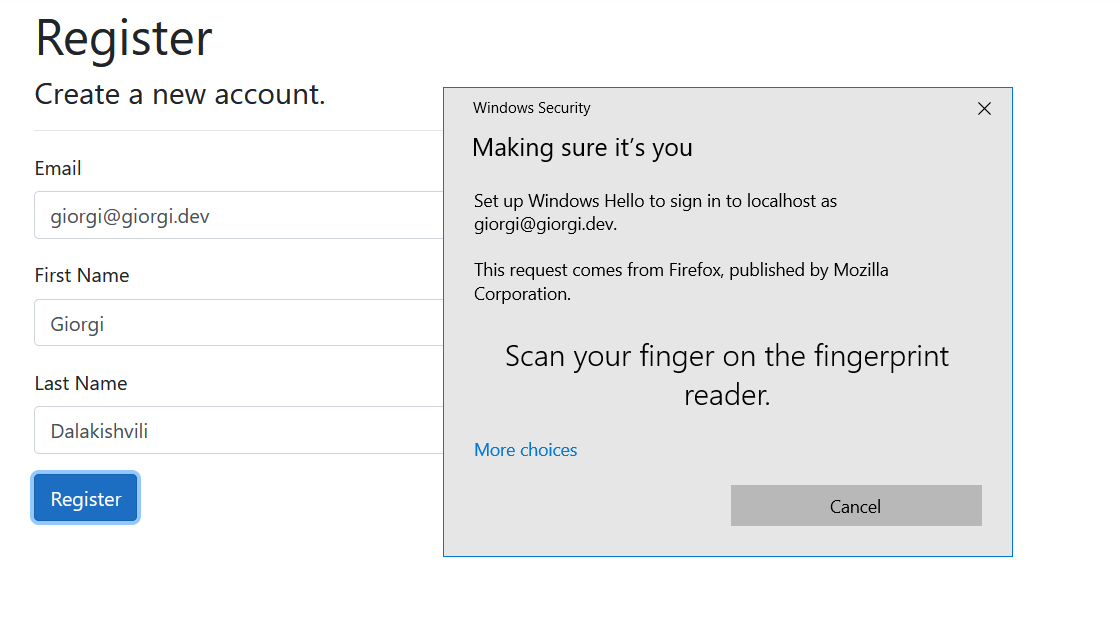
Scan your finger on the reader, and a new user will be saved in Okta with the public key corresponding to your passwordless credentials.
You can now register a user so let’s move on to signing in to passwordless accounts.
Authentication with WebAuthn
First, enable authentication using cookies in the project. Add the following in ConfigureServices method in Startup class:
services.AddAuthentication("Cookie").AddCookie("Cookie");
Also in the Configure method:
app.UseAuthentication();
Next, add SignIn method to the AccountController
public ActionResult SignIn()
{
  return View();
}
Finally, add a SignIn.cshtml in Views\Account:
@{
    ViewData["Title"] = "Sign In";
}

<h1>@ViewData["Title"]</h1>

<div class="row">
  <div class="col-md-4">
    <form method="post" id="signin-form">
    <h4>Sign in without password</h4>
    <hr />
    <div class="form-group">
        <label for="email">Email</label>
        <input id="email" class="form-control" name="email" />
    </div>
    <button type="submit" class="btn btn-primary" id="register">Sign In</button>
    </form>
  </div>
</div>

@section Scripts {
    <script src="~/js/helpers.js"></script>
    <script src="~/js/passwordless.login.js"></script>
}
Now, you are ready to add passwordless authentication. Login flow with passwordless authentication is similar to the registration flow. First, you need to initiate authentication for the user that wants to log in, and then use WebAuthn to facilitate the authentication process using the navigator.credentials.get method.
To create options for navigator.credentials.get, add a method in AccountController that will accept the user that initiated login and return corresponding options:
[HttpPost]
public async Task<ActionResult> SignInOptions([FromForm] string username)
{
    try
    {
        var user = await oktaClient.Users.GetUserAsync(username);

        if (user == null)
        throw new ArgumentException("Username was not registered");

        var credential = JsonConvert.DeserializeObject<StoredCredential>(user.Profile["PasswordlessPublicKey"].ToString());

        var options = fido2.GetAssertionOptions(new List<PublicKeyCredentialDescriptor> { credential.Descriptor },
                                                UserVerificationRequirement.Discouraged);

        HttpContext.Session.SetString("fido2.assertionOptions", options.ToJson());

        return Json(options);
    }

    catch (Exception e)
    {
        return Json(new AssertionOptions { Status = "error", ErrorMessage = e.Message });
    }
}
The SignInOptions method fetches the user that is trying to sign in from Okta, creates options with the credentials that the user is allowed to use, and returns them as JSON to the caller.
Next, add the JavaScript code that will get the options and prompt the user for authentication. Create a new passwordless.login.js file in wwwroot\js and paste the following:
document.getElementById('signin-form').addEventListener('submit', handleSignInSubmit);

async function handleSignInSubmit(event)
{
    event.preventDefault();

    let username = this.email.value;

    var formData = new FormData();
    formData.append('username', username);

    let publicKeyOptions;
    try {
        var res = await fetch('/Account/SignInOptions', {
            method: 'POST',
            body: formData,
            headers: {
                'Accept': 'application/json'
            }
        });

        publicKeyOptions = await res.json();
    } catch (e) {
        alert("Request to server failed");
        return;
    }

    if (publicKeyOptions.status !== "ok") {
        alert(publicKeyOptions.errorMessage);
        return;
    }

    const challenge = publicKeyOptions.challenge.replace(/-/g, "+").replace(/_/g, "/");
    publicKeyOptions.challenge = Uint8Array.from(atob(challenge), c => c.charCodeAt(0));

    publicKeyOptions.allowCredentials.forEach(function (listItem) {
        var fixedId = listItem.id.replace(/\_/g, "/").replace(/\-/g, "+");
        listItem.id = Uint8Array.from(atob(fixedId), c => c.charCodeAt(0));
    });

    // ask browser for credentials (browser will ask connected authenticators)
    let credential;
    try {
        credential = await navigator.credentials.get({ publicKey: publicKeyOptions });

        try {
            await verifyAssertionWithServer(credential);
        } catch (e) {
            alert("Could not verify assertion");
        }
    } catch (err) {
        alert(err.message ? err.message : err);
    }
}

async function verifyAssertionWithServer(assertedCredential)
{
    let authData = new Uint8Array(assertedCredential.response.authenticatorData);
    let clientDataJSON = new Uint8Array(assertedCredential.response.clientDataJSON);
    let rawId = new Uint8Array(assertedCredential.rawId);
    let sig = new Uint8Array(assertedCredential.response.signature);

    const data = {
        id: assertedCredential.id,
        rawId: coerceToBase64Url(rawId),
        type: assertedCredential.type,
        extensions: assertedCredential.getClientExtensionResults(),
        response: {
            authenticatorData: coerceToBase64Url(authData),
            clientDataJson: coerceToBase64Url(clientDataJSON),
            signature: coerceToBase64Url(sig)
        }
    };

    let response;
    try {
        let res = await fetch("/Account/SignIn", {
            method: 'POST',
            body: JSON.stringify(data),
            headers: {
                'Accept': 'application/json',
                'Content-Type': 'application/json'
            }
        });

        response = await res.json();
    } catch (e) {
        alert("Request to server failed", e);
        throw e;
    }

    console.log("Assertion Object", response);

    if (response.status !== "ok") {
        alert(response.errorMessage);
        return;
    }

    window.location.href = "/Account/Profile";
}
The above code handles the sign-in button click, fetches options from the server, and prompts the user for passwordless authentication. When the user signs in, the credentials are sent to the server for validation. I will now add the method to accept the credentials and sign in the user:
[HttpPost]
public async Task<JsonResult> SignIn([FromBody] AuthenticatorAssertionRawResponse clientResponse)
{
    try
    {
        var jsonOptions = HttpContext.Session.GetString("fido2.assertionOptions");
        var options = AssertionOptions.FromJson(jsonOptions);

        var user = await GetUserByCredentials(clientResponse.Id);

        var credential = JsonConvert.DeserializeObject<StoredCredential>(user.Profile["PasswordlessPublicKey"].ToString());

        var result = await fido2.MakeAssertionAsync(clientResponse, options, credential.PublicKey, credential.SignatureCounter,
                                                    args => Task.FromResult(credential.UserHandle.SequenceEqual(args.UserHandle)));

        await UpdateCounter(user, credential, result.Counter);

        var claims = new List<Claim>
        {
        new Claim(ClaimTypes.Name, user.Profile.Email)
        };

        var claimsIdentity = new ClaimsIdentity(claims, CookieAuthenticationDefaults.AuthenticationScheme);

        await HttpContext.SignInAsync(CookieAuthenticationDefaults.AuthenticationScheme, new ClaimsPrincipal(claimsIdentity));

        return Json(result);
    }
    catch (Exception e)
    {
        return Json(new AssertionVerificationResult { Status = "error", ErrorMessage = e.Message });
    }
}
Run the project again, click the Sign In in the menu, enter the email you signed up with, and click the Sign In button. You will see a prompt like this:
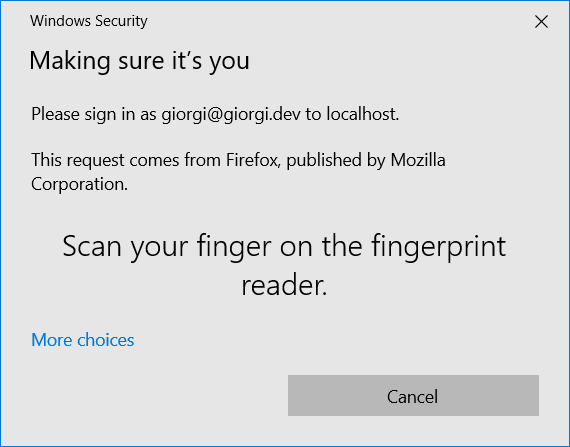
Swipe your finger, and you will be signed in and redirected to the profile page. To show the current user profile data, you can use the Okta .NET SDK to get the current user details and display them.
Add a Profile method with the following code:
public async Task<IActionResult> Profile()
{
  var subject = HttpContext.User.Claims.First(claim => claim.Type == ClaimTypes.Name).Value;
  var user = await oktaClient.Users.GetUserAsync(subject);
  return View(user);
}
Next, create the Profile.cshtml file in the Views\Account folder that looks like this:
@model Okta.Sdk.IUser

@{
  ViewData["Title"] = "User Profile";
}

<h1>User Profile</h1>

<div>
    <dl class="row">
    <dt class = "col-sm-2">
        @Html.DisplayNameFor(model => model.Profile.FirstName)
    </dt>
    <dd class = "col-sm-10">
        @Html.DisplayFor(model => model.Profile.FirstName)
    </dd>
    <dt class = "col-sm-2">
        @Html.DisplayNameFor(model => model.Profile.LastName)
    </dt>
    <dd class = "col-sm-10">
        @Html.DisplayFor(model => model.Profile.LastName)
    </dd>
    <dt class = "col-sm-2">
        @Html.DisplayNameFor(model => model.Profile.Email)
    </dt>
    <dd class = "col-sm-10">
        @Html.DisplayFor(model => model.Profile.Email)
    </dd>
    </dl>
</div>
<div>
    <a asp-action="EditProfile">Edit Profile</a>
</div>
The view renders profile details such as the user’s first name and last name, email, city, and country code.
Rerun the app, click the Profile button, and you will see the details of the currently logged in user.
That’s it! You can register and sign with passwordless authentication and view the details of the current user.
In this tutorial, you learned how to use WebAuthn in ASP.NET Core and Okta to make passwordless authentication more secure.
Give passwordless authentication a try, get the full source code of the project from GitHub and let us know what you think in the comments below.
Learn More About WebAuthn and Okta
For more Passwordless authentication, ASP.NET Core, and Okta articles, check out these posts:
- The Ultimate Guide to FIDO2 and WebAuthn Terminology
- ASP.NET Core 3.0 MVC Secure Authentication
- Okta .NET management SDK
- webauthn.me
If you like this topic, be sure to follow us on Twitter, subscribe to our YouTube Channel, and follow us on Twitch.
Okta Developer Blog Comment Policy
We welcome relevant and respectful comments. Off-topic comments may be removed.