How to Secure PII with Entity Framework Core

When the products we develop collect sensitive data, it’s essential to secure and safeguard it to protect user privacy and the user’s identity. Personally identifiable information (PII) is any data that can be used to identify a specific individual, such as name, email address, phone number, US Social Security number, birth date, and so on. Yet companies also need to store user-related data that is not as sensitive as PII. In this tutorial, you will learn how to use Entity Framework Core together with Okta for storing user’s non-sensitive data and PII.
Entity Framework Core is an open-source, cross-platform object-relational mapper (ORM) that allows .NET developers to work with a database using .NET objects. With EF Core, you no longer need to write SQL queries and commands manually. Instead, you query data with strongly typed LINQ (Language Integrated Query) queries and EF Core automatically tracks any changes you make to the result of the query.
To continue you will need:
- Basic knowledge of C#
- Visual Studio 2019 or Visual Studio Code
- .NET Core 3.1 SDK
- An Okta Developer account (free forever, to handle your OAuth needs)
Note: In May 2025, the Okta Integrator Free Plan replaced Okta Developer Edition Accounts, and the Okta CLI was deprecated.
We preserved this post for reference, but the instructions no longer work exactly as written. Replace the Okta CLI commands by manually configuring Okta following the instructions in our Developer Documentation.
Create an ASP.NET Core MVC Web App with Entity Framework Core
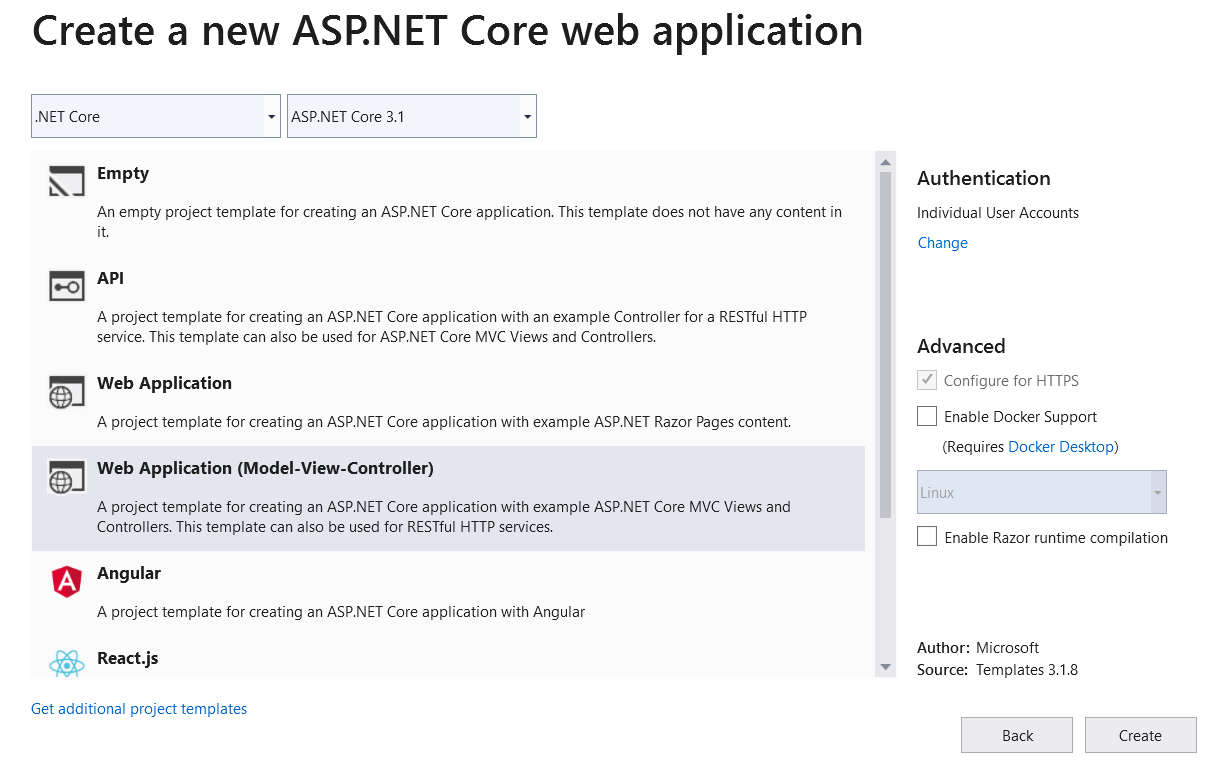
Let’s build a web app for tracking personal expenses. Fire up Visual Studio and create a new project by clicking File>New Project select ASP.NET Core Web Application, and click Next. Name the app ExpenseTracker and click Create. On the next window, select Web Application (Model-View-Controller). As we need to create and store user accounts, click Change under Authentication on the right side of the window, select Individual User Accounts and click OK. Now, click Create and Visual Studio will create a new web project with Entity Framework Core and ASP.NET Core Identity.
Alternatively, you can create the project by running the following command in the terminal:
dotnet new mvc --auth Individual -uld
ASP.NET Core Identity is the membership system for ASP.NET Core web applications that provides UI for login functionality and an API for managing users, roles, user data, and so on. Out of the box, ASP.NET Core Identity stores all data in a SQL Server database. The new project includes the migration code to create necessary tables and database objects—you just need to apply it using the dotnet ef tool.
If dotnet ef has not been installed, install it as a global tool:
dotnet tool install --global dotnet-ef
To apply the migration open terminal in the project folder and run the following command to:
dotnet ef database update
Finally, go to the Startup.cs file and change
services.AddDefaultIdentity<IdentityUser>(options => options.SignIn.RequireConfirmedAccount = true)
with
services.AddDefaultIdentity<IdentityUser>(options => options.SignIn.RequireConfirmedAccount = false)
so that you don’t have to confirm the account after signup.
Let’s run the project now and see what our website looks like. Hit the F5 button and you will see a page like this:
If you click the Register button you will see a sign-up page where you can create a local user and sign in to the website:
Now, let’s move on and add expense tracking with Entity Framework Core.
Create Data Model and Set Up Database
In the ExpenseTracker project inside the Models folder add Category.cs and Expense.cs classes:
public class Category
{
  public int Id { get; set; }
  public string Name { get; set; }
  public IdentityUser CreatedBy { get; set; }
  public List<Expense> Expenses { get; set; }
}
public class Expense
{
  public int Id { get; set; }
  public decimal Amount { get; set; }
  public DateTime CreatedAt { get; set; }
  public IdentityUser CreatedBy { get; set; }
  public string CreatedById { get; set; }
  public Category Category { get; set; }
  public int CategoryId { get; set; }
}
Next, you will need to update the ApplicationDbContext database context that was generated when you created the project. Open the ApplicationDbContext.cs file and add these two properties:
  public DbSet<Category> Categories { get; set; }
  public DbSet<Expense> Expenses { get; set; }
After that override the OnModelCreating method like this:
protected override void OnModelCreating(ModelBuilder builder)
{
  base.OnModelCreating(builder);

  builder.Entity<Category>().Property(category => category.Name).IsRequired();
  builder.Entity<Category>().HasMany(category => category.Expenses)
                            .WithOne(expense => expense.Category).IsRequired();

  builder.Entity<Expense>().Property(expense => expense.CreatedById).IsRequired();
}
The DbContext class serves as an entry point to the database. It represents a session to the database and is used to query and save instances of our database entities. The DbSet properties represent the entities exposed by the database that can be queried and modified. The OnModelCreating method allows you to configure the model using the Fluent API.
As you have modified the data model you need to create and apply a database migration to create corresponding tables for the new entities. Run the following commands in terminal:
dotnet ef migrations add AddCategoryExpense
dotnet ef database update
The first command generates a new migration called AddCategoryExpense and the second one applies it to the database.
Now let’s populate the database with some dummy data. In the ApplicationDbContext class add the following at the end of OnModelCreating method:
builder.Entity<Category>().HasData(new Category { Name = "Travel", Id = -1 }, new Category { Name = "Education", Id = -2 },
                                   new Category { Name = "Food", Id = -3 }, new Category { Name = "Healthcare", Id = -4 });
Once again add a new migration for the seed data and apply the migration to the database:
dotnet ef migrations add SeedData
dotnet ef database update
Our database setup is now complete and you are ready to build a web app around our database.
Build a Simple CRUD with Entity Framework Core
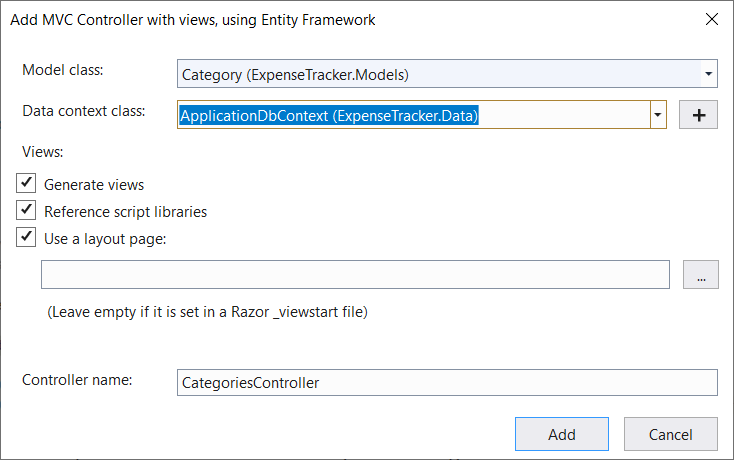
Let’s start with building a simple Create/Read/Update/Delete form for Categories. In Visual Studio, right click on the Controllers folder, click Add and click Controller. In the window that appears select MVC Controller with views, using Entity Framework and click OK. Select Category (ExpenseTracker.Models) for the model class, select ApplicationDbContext (ExpenseTracker.Data) for the data context class and click Add.
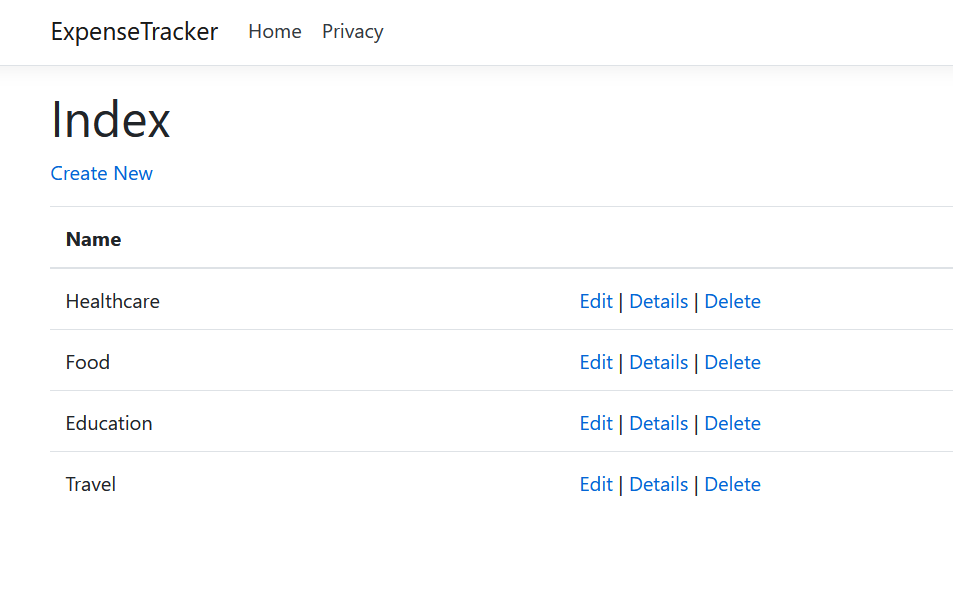
After code generation is complete, you will see a new controller in the Controllers folder and new views in the Views-> Categories folder. Run the app, visit the /Categories url and you should see a list of available categories:
As you can see, you can also create a new Category, view details of the existing category, modify it, or delete a category. Before moving on to Expenses let’s make some changes to the Categories page.
First, let’s disable editing and deleting for the built-in categories and categories belonging to other users. Open the Views\Categories\Index.cshtml file and replace:
@model IEnumerable<ExpenseTracker.Models.Category>
@{
    ViewData["Title"] = "Index";
}
with this:
@using Microsoft.AspNetCore.Identity
@model IEnumerable<ExpenseTracker.Models.Category>
@inject UserManager<IdentityUser> userManager

@{
    ViewData["Title"] = "Index";
    var currentUser = await userManager.FindByNameAsync(User.Identity.Name);
}
Now replace
<td>
  <a asp-action="Edit" asp-route-id="@item.Id">Edit</a> |
  <a asp-action="Details" asp-route-id="@item.Id">Details</a> |
  <a asp-action="Delete" asp-route-id="@item.Id">Delete</a>
</td>
with
@if (item.CreatedById != null && item.CreatedById == currentUser.Id)
{
  <td>
    <a asp-action="Edit" asp-route-id="@item.Id">Edit</a> |
    <a asp-action="Details" asp-route-id="@item.Id">Details</a> |
    <a asp-action="Delete" asp-route-id="@item.Id">Delete</a>
  </td>
}
else
{
  <td>
    <a asp-action="Details" asp-route-id="@item.Id">Details</a>
  </td>
}
The UserManager<IdentityUser> class provides an API for managing users of the application. I use it to get the Id of the current user and toggle Delete and Edit link visibility.
This way Delete and Edit links are only visible if the category was created by the current user. Now, open the CategoriesController class and add UserManager<IdentityUser> parameter to the constructor.
public CategoriesController(ApplicationDbContext context, UserManager<IdentityUser> userManager)
{
  this.context = context;
  this.userManager = userManager;
}
Next, add the following lines to the public async Task<IActionResult> Edit(int id, [Bind("Id,Name")] Category category) method:
var existingCategory = await context.FindAsync<Category>(id);
var user = await userManager.FindByIdAsync(category.CreatedById);

if (existingCategory.CreatedById == null || user.UserName != HttpContext.User.Identity.Name)
{
  return NotFound();
}
The code loads the category with the specified id from the database and checks if the category was created by the current user or not.
Add the same snippet to the DeleteConfirmed method too.
Secondly, modify Create method like this:
public async Task<IActionResult> Create([Bind("Id,Name")] Category category)
{
  if (ModelState.IsValid)
  {
    category.CreatedById = (await userManager.FindByNameAsync(User.Identity.Name)).Id;
    context.Add(category);
    await context.SaveChangesAsync();
    return RedirectToAction(nameof(Index));
  }
  return View(category);
Finally, as you want only authentication users making the changes to categories, add the Authorize attribute to the CategoriesController class:
[Authorize]
public class CategoriesController : Controller
{
  //Rest of the code
}
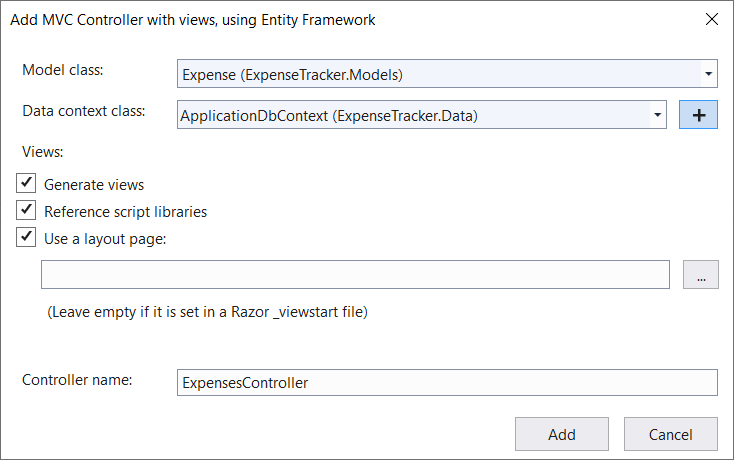
Now, let’s build a CRUD for expenses. Right-click the Controllers folder again, click Add and click Controller. Select MVC Controller with views, using Entity Framework in the new window, and click OK. This time select Expenses (ExpenseTracker.Models) for the model class, ApplicationDbContext (ExpenseTracker.Data) for the data context class and click Add:
I will update the Create and Edit methods in the ExpensesController so that CreatedBy and CreatedAt are set correctly and also update every corresponding cshtml file so that it doesn’t show textbox for CreatedAt.
Finally, I will add the [Authorize] attribute to the ExpensesController class and also add UserManager parameter to the constructor:
public async Task<IActionResult> Create([Bind("Id,Amount,CategoryId")] Expense expense)
{
  if (ModelState.IsValid)
  {
      expense.CreatedAt = DateTime.Now;
      expense.CreatedById = (await userManager.FindByNameAsync(User.Identity.Name)).Id
      _context.Add(expense);
      await _context.SaveChangesAsync();
      return RedirectToAction(nameof(Index));
  }
  ViewData["CategoryId"] = new SelectList(_context.Categories, "Id", "Name", expenseCategoryId);
  return View(expense);
}
Also, as I need to show the expenses belonging to the current user I will add a filter for that too:
public async Task<IActionResult> Index()
{
  var user = await userManager.FindByIdAsync(User.Identity.Name);
  var applicationDbContext = context.Expenses.Where(expense => expense.CreatedById == user.Id)
                                              .Include(e => e.Category);
  return View(await applicationDbContext.ToListAsync());
}
Before running the app, open the _Layout.cshtml file in Views/Shared folder and add categories and expenses menu items to the ul with the navbar-nav class:
<li class="nav-item">
  <a class="nav-link text-dark" asp-area="" asp-controller="asp-action="Index">Categories</a>
</li>
<li class="nav-item">
  <a class="nav-link text-dark" asp-area="" asp-controllerasp-action="Index">Expenses</a>
</li>
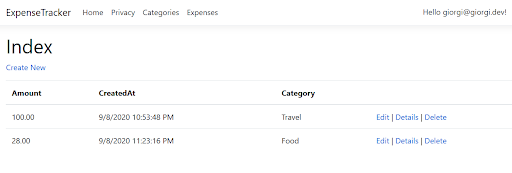
Now, run the app and you should be able to manage your expenses:
Store a User’s Personally Identifiable Information in Okta
The sample website already supports user authentication but all the user PII is stored in SQL Server database. Instead of that, I will store users’ personal information in Okta and secure the web app. Okta supports user authentication, multi-factor authentication, social authentication, as well as all OpenID Connect flows out of the box—it can take care of all the scenarios you might ever need.
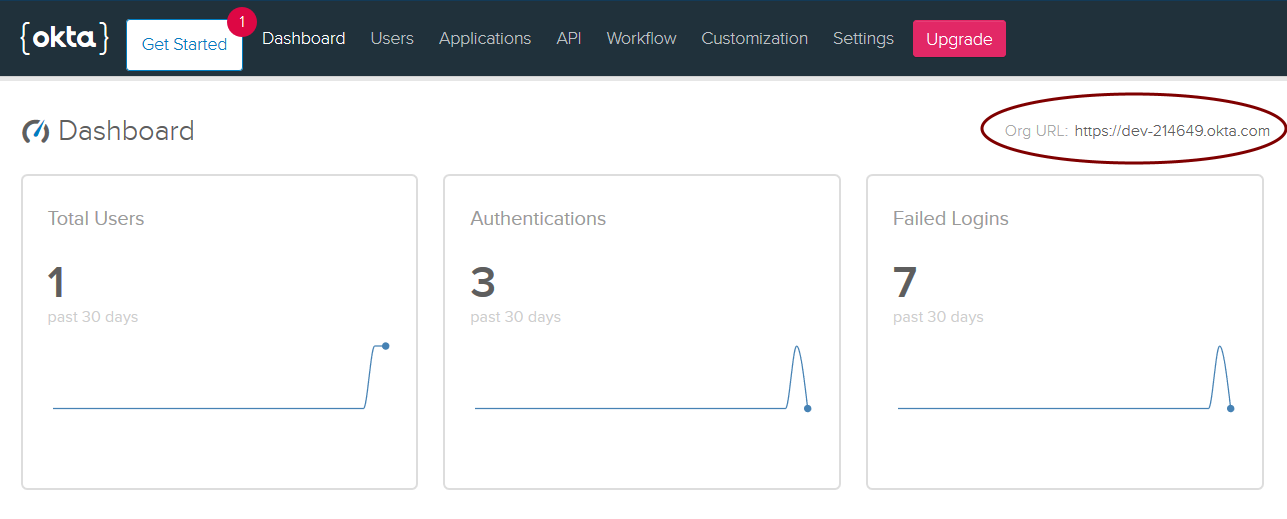
To get started, log in to your Okta Developer account, via the URL you were emailed after signing up, to access your org’s portal dashboard. Once you log in, make sure to note your Org URL from the upper right corner of the screen:
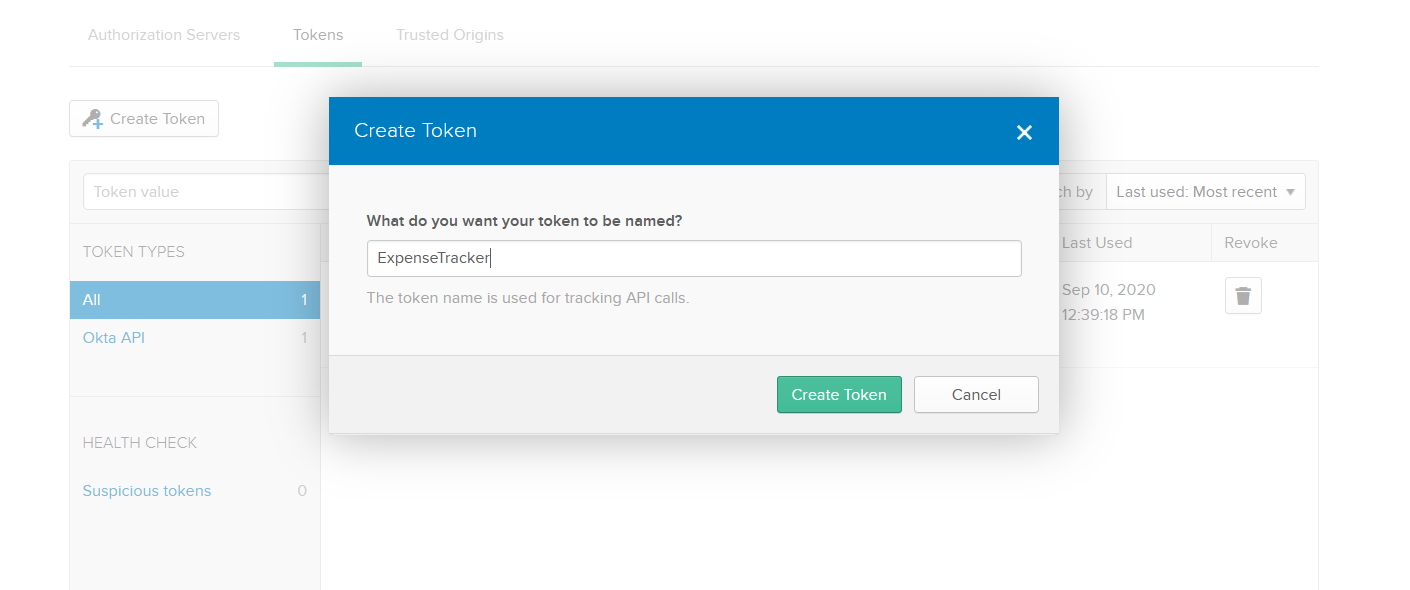
Now, go to API in the menu, click Tokens, and click the Create Token button. Enter the name of the token (I will use ExpenseTracker) and click the Create Token button. Make sure you copy the token because you won’t be able to view it again:
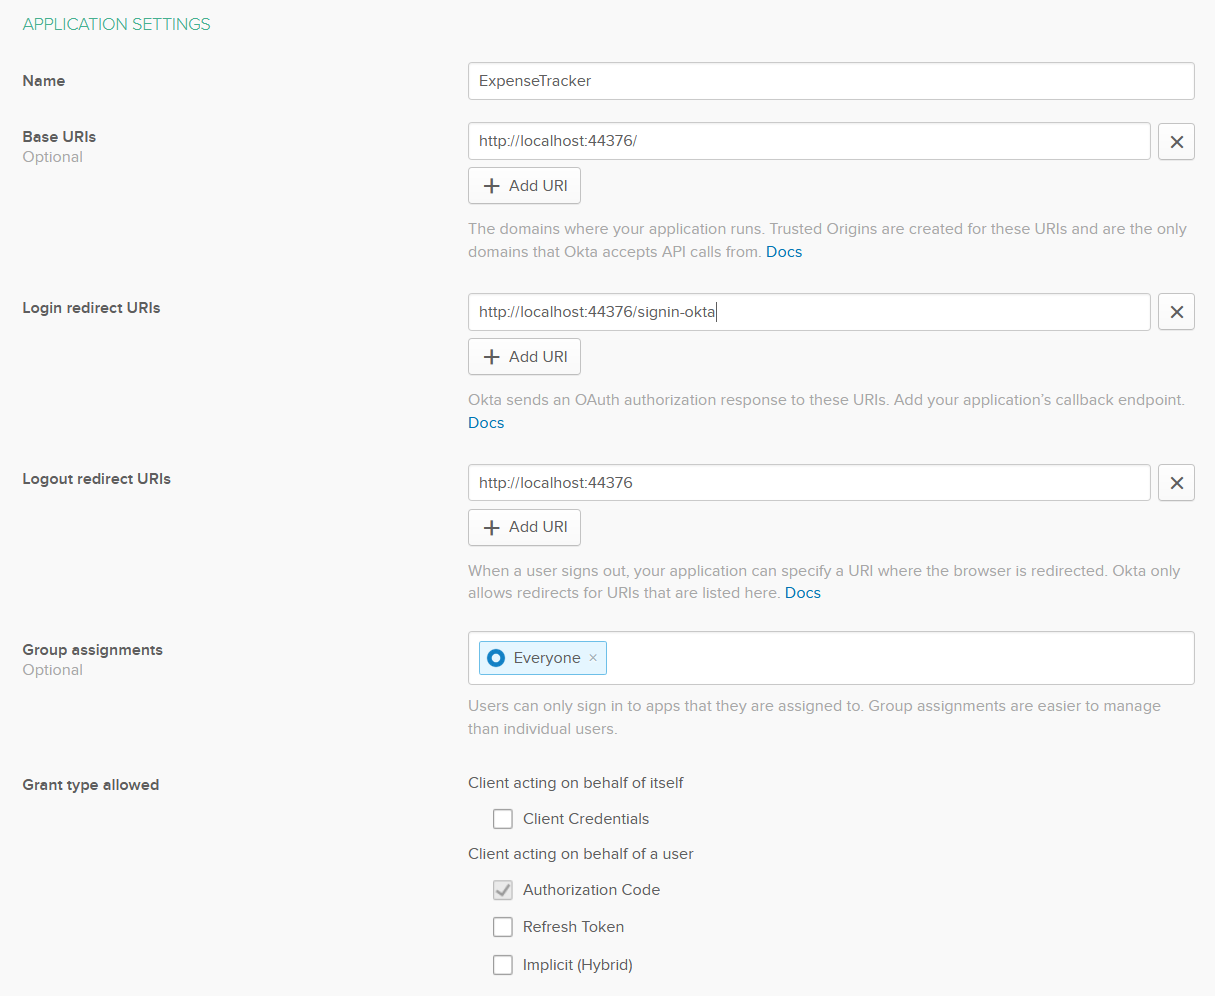
Next, create a new application. Click Applications in the top menu and then Add Application. Select Web and click Next. Enter a name for the app (I will use ExpenseTracker again), replace 8080 with your local port number (in my case it’s 44376), and set the Login redirect URIs to signin-okta and click Done.
On the next screen, you will see Client Id and Client Secret of the application. You will need these to configure the Okta middleware, so take note of them:

In Visual Studio, open the appsettings.Development.json file and add a new section Okta below the Logging section and put the details of your app and token:
{
  "Logging": {
    "LogLevel": {
      "Default": "Information",
      "Microsoft": "Warning",
      "Microsoft.Hosting.Lifetime": "Information"
    }
  },
  "Okta": {
    "ClientId": "{clientId}",
    "ClientSecret": "{clientSecret}",
    "Domain": "https://{yourOktaDomain}",
    "ApiToken": "{yourToken}"
  }
}
Now, you are ready to store users in Okta. Switch to Visual Studio and add the Okta.Sdk Nuget package:
dotnet add package Okta.Sdk
Next, create a new folder called Identity and add these two classes:
public class OktaUserManager<T> : UserManager<T> where T : IdentityUser<string>, new()
{
  private OktaClient oktaClient;

  public OktaUserManager(IConfiguration configuration, IUserStore<T> store,IOptions<IdentityOptions> optionsAccessor,
                         IPasswordHasher<T> passwordHasher,IEnumerable<IUserValidator<T>> userValidators,
                         IEnumerable<IPasswordValidator<T>> passwordValidators,ILookupNormalizer keyNormalizer,
                         IdentityErrorDescriber errors, IServiceProvider services,ILogger<UserManager<T>> logger)
  : base(store, optionsAccessor, passwordHasher, userValidators, passwordValidators, keyNormalizer, errors, services, logger)
  {
    oktaClient = new OktaClient(new OktaClientConfiguration
    {
        OktaDomain = "https://${yourOktaDomain}",
        Token = configuration["Okta:ApiToken"]
    });
  }

  public override async Task<IdentityResult> CreateAsync(T user, string password)
  {
    var validate = await ValidatePasswordAsync(user, password);
    if (!validate.Succeeded)
    {
        return validate;
    }

    var result = await CreateAsync(user);
    if (!result.Succeeded)
    {
        return result;
    }

    await oktaClient.Users.PartialUpdateUserAsync(new User
    {
        Credentials = new UserCredentials
        {
            Password = new PasswordCredential
            {
                Value = password
            }
        }
    }, user.Id);
    return result;
  }
}
public class OktaUserStore<T> : UserStore<T> where T : IdentityUser<string>, new()
{
  private OktaClient oktaClient;

  public OktaUserStore(IConfiguration configuration, DbContext context, IdentityErrorDescriber describer = null) : base(context, describer)
  {
    oktaClient = new OktaClient(new OktaClientConfiguration
    {
        OktaDomain = "https://${yourOktaDomain}",
        Token = configuration["Okta:ApiToken"]
    });
  }

  public override async Task<IdentityResult> CreateAsync(T user, CancellationToken cancellationToken = new CancellationToken())
  {
    var result = await oktaClient.Users.CreateUserAsync(new CreateUserWithoutCredentialsOptions
    {
        Profile = new UserProfile()
        {
            Login = user.NormalizedUserName,
            Email = user.NormalizedEmail,
            PrimaryPhone = user.PhoneNumber
        }
    }, cancellationToken: cancellationToken);
    user.Id = result.Id;
    return IdentityResult.Success;
  }

  public override async Task<T> FindByIdAsync(string userId, CancellationToken cancellationToken = new CancellationToken())
  {
    var user = await oktaClient.Users.GetUserAsync(userId, cancellationToken);
    return MapUser(user);
  }

  public override async Task<T> FindByNameAsync(string normalizedUserName, CancellationToken cancellationToken = new CancellationToken())
  {
    var user = await oktaClient.Users.ListUsers(filter: $"profile.login eq \{normalizedUserName}\"").FirstOrDefaultAsync(cancellationToken);
    return MapUser(user);
  }

  protected override Task<T> FindUserAsync(string userId, CancellationToken cancellationToken)
  {
    return FindByIdAsync(userId, cancellationToken);
  }

  public override async Task<T> FindByLoginAsync(string loginProvider, string providerKey, CancellationToken cancellationToken = new CancellationToken())
  {
    return await FindByIdAsync(providerKey, cancellationToken);
  }

  public override async Task<T> FindByEmailAsync(string normalizedEmail, CancellationToken cancellationToken = new CancellationToken())
  {
    var user = await oktaClient.Users.ListUsers(filter: $"profile.login eq \"{normalizedEmail}\"").FirstOrDefaultAsync(cancellationToken);
    return MapUser(user);
  }

  private static T MapUser(IUser user)
  {
    if (user == null)
    {
      return null;
    }
    return new T
    {
      Id = user.Id,
      PhoneNumber = user.Profile.PrimaryPhone,
      UserName = user.Profile.Login,
      NormalizedUserName = user.Profile.Login,
      Email = user.Profile.Email,
      NormalizedEmail = user.Profile.Email,
    };
  }
}
The OktaUserStore class derives from the existing UserStore class used by ASP.NET Core Identity, overrides existing methods, and uses OktaClient from the Okta SDK to store users in Okta. The built-in ASP.NET Core dependency injection will inject the current IConfiguration object that will read configuration values from the appsettings.Development.json file.
Similarly, OktaUserManager derives from the built-in UserManager class and overrides the CreateAsync method to create a user in Okta and set the user’s password.
Finally, open the Startup class to plug these classes instead of the built-in ones. Add AddDbContext<DbContext, ApplicationDbContext>() after the call to AddDbContext and add AddUserManager<OktaUserManager<IdentityUser>>().AddUserStore<OktaUserStore<IdentityUser>>() after the call to AddEntityFrameworkStores:
services.AddDbContext<ApplicationDbContext>(options =>
    options.UseSqlServer(
        Configuration.GetConnectionString("DefaultConnection")))
    .AddDbContext<DbContext, ApplicationDbContext>();

services.AddDefaultIdentity<IdentityUser>(options => options.SignIn.RequireConfirmedAccount = false)
    .AddEntityFrameworkStores<ApplicationDbContext>()
    .AddUserManager<OktaUserManager<IdentityUser>>().AddUserStore<OktaUserStore<IdentityUser>>();
As a result of this, all our users and their PII will be stored in Okta instead of the SQL Server database. The only remaining thing is to configure the web app so that it uses Okta for login too.
Configure Okta Middleware
You can use the official Okta OIDC integration for .NET Core, but for this sample, I chose Martin Costello’s NuGet package for configuration. Feel free to use whatever library you like for handling an Open ID Connect / OAuth provider in your .NET Core application.
First, run the following command in terminal to install AspNet.Security.OAuth.Okta package:
dotnet add package AspNet.Security.OAuth.Okta
Go the Startup class and add this code in ConfigureServices before services.AddControllersWithViews();:
services.AddAuthentication().AddOkta(options =>
{
  options.Domain = Configuration["Okta:Domain"];
  options.ClientId = Configuration["Okta:ClientId"];
  options.ClientSecret = Configuration["Okta:ClientSecret"];
});
You have now configured the app to use the Okta Sign-In widget. Before running the app let’s get rid of the Use a local account to log in. section from the login page.
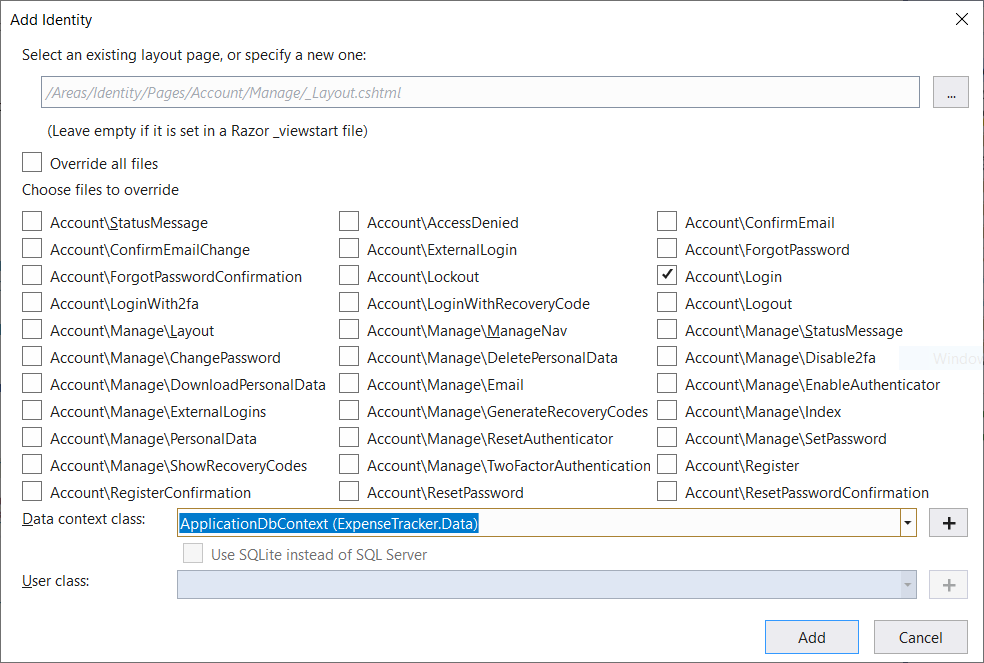
In Visual Studio, right-click on the project, click Add, click New Scaffolded Item…, click Identity on the left side of the window and select Identity again. In the new window check Account\Login, select ApplicationDbContext (ExpenseTracker.Data) in Data context class (even though you aren’t using it any more) and click Add:
After code generation is complete, open the Login.cshtml file from the Areas\Identity\Pages\Account folder and delete the first div with col-md-4 class. Also, replace <h4>Use another service to log in.</h4> with <h4>Use Okta to log in.</h4>
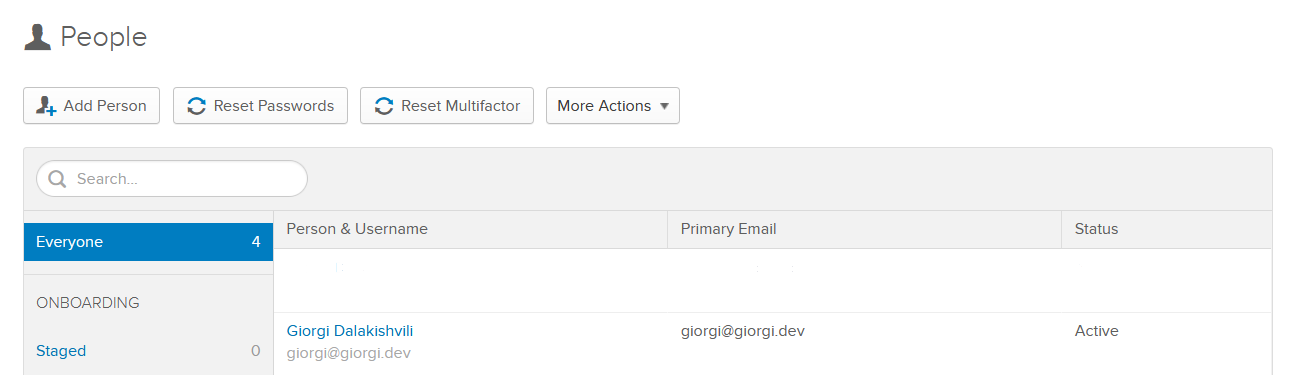
Finally, you are ready to run the app! Run the app, click Register, and create a new user account. If you now go to your Okta Developer Console and click Users, you will see the new user account that you just created:
To test the login flow, click the Logout button in the web app then click Login. Click the Okta button and you will be redirected to the Okta’s Single Sign-On page for authentication. Once you log in, you will be redirected back to the app and you will be logged in with your Okta account.
That’s it! We now have a web app that uses Okta to securely store users and their personally identifiable information and Entity Framework Core for other data.
Learn More About ASP.NET Core and Okta
I hope the tutorial was interesting to you and that you enjoyed it. You can get the full source code of the project from GitHub. For more Entity Framework Core and Okta articles check out these posts:
- Build a CRUD App with ASP.NET Core 2.2 and Entity Framework Core
- ASP.NET Core 3.0 MVC Secure Authentication
- Okta .NET management SDK
Make sure to follow us on Twitter, subscribe to our YouTube Channel and check out our Twitch stream so that you never miss any awesome content!
Okta Developer Blog Comment Policy
We welcome relevant and respectful comments. Off-topic comments may be removed.