Build Your First Deno App with Authentication

The creator of Node.js, Ryan Dahl, has authored a new framework for designing web applications. He went back and fixed some mistakes he made in hindsight, taking advantage of new technologies that were not available at the time he originally wrote Node. The result is Deno (pronounced DEH-no), a framework for writing “Node-like” web applications in TypeScript. Here, I will walk you through creating a basic web application with authentication.
You can find almost all the information you need at the Deno website—along with information on all the third-party libraries that are currently available for Deno. That is really the biggest drawback to the framework right now. It just hit version 1.0 on May 13th of 2020, so even though there are quite a few essential libraries, there are not nearly as many libraries as there are for Node. For those who are proficient in Node however, the transition to Deno should be pretty easy.
You can find the installation instructions at https://deno.land/#installation.
Note: In May 2025, the Okta Integrator Free Plan replaced Okta Developer Edition Accounts, and the Okta CLI was deprecated.
We preserved this post for reference, but the instructions no longer work exactly as written. Replace the Okta CLI commands by manually configuring Okta following the instructions in our Developer Documentation.
Create Your Deno Application
There aren’t any basic scaffolding libraries that I could find, so I just started with an empty folder. In the application’s root folder, create a file called index.ts that will be the starting point of your Deno application. You’ll use Opine, which is an Express clone for Deno to make building and routing easier.
One thing that is different about Deno is that there are no package managers for bringing in third-party libraries. You do this by using the library’s full URL. Do that at the top of the index.ts file, then set up a basic web application.
import { opine } from 'https://deno.land/x/opine@2.0.0/mod.ts';

const app = opine();

app.get('/', (req, res) => {
  res.send('Deno Sample');
});

app.listen(3000);
console.log('running on port 3000');
You can then run this very basic application by going to the terminal in the application’s folder and entering:
deno run -A index.ts
The -A is a shortcut for development purposes. Deno is completely locked down by default, so you’ll need to pass arguments to the run command to allow access like --allow-net to allow networking, and --allow-read to allow the application to read from the file system. The -A used here allows everything, effectively disabling all security. When you run this application and then go to http://localhost:3000 you should be greeted with Deno Sample on a blank page.
Build a Real Web Application with Deno
While this is a good first step, it’s not very useful. You’ll want to add some real functionality that’s a little more “real-world”, so change the index.ts file so that the contents are:
import { opine, serveStatic } from 'https://deno.land/x/opine@2.0.0/mod.ts';
import { renderFileToString } from 'https://deno.land/x/dejs@0.10.1/mod.ts';
import { join, dirname } from 'https://deno.land/x/opine@2.0.0/deps.ts';

import { ensureAuthenticated } from './middleware/authmiddleware.ts';
import users from './controllers/usercontroller.ts';
import auth from './controllers/authcontroller.ts';

const app = opine();
const __dirname = dirname(import.meta.url);

app.engine('.html', renderFileToString);
app.use(serveStatic(join(__dirname, 'public')));
app.set('view engine', 'html');

app.get('/', (req, res) => {
  res.render('index', { title: 'Deno Sample' });
});

app.use('/users', ensureAuthenticated, users);
app.use('/auth', auth)

app.listen(3000);
console.log('running on port 3000');
You’ll notice some more import statements which bring in some third-party libraries. Here, I am using dejs which is an EJS port for Deno. I’ve also included some utility classes from the Opine library for manipulating directory names. I will explain what the three files imported locally are in a moment. For now, just know that you’re importing them.
The line below the instantiation of the opine() app creates a reference to the local directory. The three lines below use this to set the view engine to DEJS for processing the HTML-like files, similar to the way EJS does for Node. The next section has been changed slightly to render one of those HTML template files, and the last two lines bring in some external routes. One thing of note is that the /users route has an ensureAuthenticated() middleware function. This will force users to log in before being allowed to visit the page. You’ll create that middleware shortly.
Fill In Your Deno Application
Now, you’ll want to create some of the missing pieces that you imported above. Start with the routes. Create a folder called controllers in the root of the application. Then add a usercontroller.ts file inside that folder with the following contents:
import { Router } from 'https://deno.land/x/opine@2.0.0/mod.ts';

const users = new Router();

// users routes
users.get('/me', (req, res) => {
  res.render('users/me', { title: 'My Profile', user: res.app.locals.user });
});

export default users;
This is a simple routing file. It gets the router from Opine and creates a new instance to hang routes from. Then there is code to add a route for /me to render the HTML view in users/me. The render() call also passes a title and the logged-in user to the page. This page will be protected so that there will always be a user to pass to the page.
Next, create some views to show when the routes are hit. In the root folder, add a views folder. Inside that, create a shared folder and a users folder. In the shared folder create a header.html and footer.html file. In the users folder add a me.html file. Finally, in the views folder itself create an index.html file.
These are pretty bare-bones, but it demonstrates how to create views that can be reused by other views. In the shared/header.html file add the following:
<!DOCTYPE html>
<html lang="en">

<head>
  <meta charset="utf-8">
  <meta name="viewport" content="width=device-width,initial-scale=1">
  <title><%= title %></title>
</head>

<body>
This outputs the top of an HTML page and injects the title into the page. Next, add the following to the shared/footer.html file:
</body>

</html>
Now you can use those partials in the index.html file:
<%- await include('views/shared/header.html', { title }); %>

<a href="/users/me">My Profile</a>

<%- await include('views/shared/footer.html'); %>
This includes the footer and header partials and adds a link to the profile page. The contents of the users/me.html file are:
<%- await include('views/shared/header.html', { title }); %>

<h1>My Profile</h1>

<ul>
<% for(var p in user){ %>
  <li><strong><%= p %>: </strong><%= user[p] %></li>
<% } %>
</ul>

<%- await include('views/shared/footer.html'); %>
Again, this page includes the header and footer, and loops through the properties of the user object. Granted, it’s not a super-sexy profile page, but it will let you know that the authentication steps all worked.
Manage Your Dependencies
Now that you’ve created your second file and imported the same dependencies, it’s easy to see what a chore managing and updating them will be. Deno recommends placing all imports in a single deps.ts file to centralize dependencies.
Create a file named deps.ts in the root of the application. This time you’ll export the dependencies you used, so the deps.ts file looks like this:
export {
    opine, serveStatic, Router
} from 'https://deno.land/x/opine@2.0.0/mod.ts';

export { renderFileToString } from 'https://deno.land/x/dejs@0.10.1/mod.ts';
export { join, dirname } from 'https://deno.land/x/opine@2.0.0/deps.ts';
Open index.ts to update the import statements. You’ll now import the dependencies from deps.ts. The library imports in the index.ts file becomes:
import {
  opine,
  serveStatic,
  renderFileToString,
  join,
  dirname } from './deps.ts';
Open the controllers/usercontroller.ts file to update the import there. The import statement changes to:
import { Router } from './../deps.ts';
Add Authentication with Okta
Before you begin, you’ll need a free Okta developer account. Install the Okta CLI and run okta register to sign up for a new account. If you already have an account, run okta login.
Then, run okta apps create. Select the default app name, or change it as you see fit.
Choose Web and press Enter.
Select Other.
Then, change the Redirect URI to http://localhost:3000/auth/callback and use http://localhost:3000 for the Logout Redirect URI.
What does the Okta CLI do?
The Okta CLI will create an OIDC Web App in your Okta Org. It will add the redirect URIs you specified and grant access to the Everyone group. You will see output like the following when it’s finished:
Okta application configuration has been written to: /path/to/app/.okta.env
Run cat .okta.env (or type .okta.env on Windows) to see the issuer and credentials for your app.
export OKTA_OAUTH2_ISSUER="https://dev-133337.okta.com/oauth2/default"
export OKTA_OAUTH2_CLIENT_ID="0oab8eb55Kb9jdMIr5d6"
export OKTA_OAUTH2_CLIENT_SECRET="NEVER-SHOW-SECRETS"
Your Okta domain is the first part of your issuer, before /oauth2/default.
NOTE: You can also use the Okta Admin Console to create your app. See Create a Web App for more information.
Make note of the ISSUER, CLIENT_ID, and CLIENT_SECRET values from the .okta.env file. You’ll need these 3 values for the next step.
Back in your application, create a new file in the root of the application called .env. The contents of the file will be:
issuer=https://{yourOktaOrgUrl}/oauth2/default
clientId={yourClientID}
clientSecret={yourClientSecret}
redirectUrl=http://localhost:3000/auth/callback
state=SuPeR-lOnG-sEcReT
Copy the Client ID, Client Secret, and Issuer from the .okta.env file and populate the values in the .env file.
First, open deps.ts and export a library for reading the .env file. The dotenv does this beautifully. Your deps.ts now looks like this:
export {
    opine, serveStatic, Router
} from 'https://deno.land/x/opine@2.0.0/mod.ts';

export { renderFileToString } from 'https://deno.land/x/dejs@0.10.1/mod.ts';
export { join, dirname } from 'https://deno.land/x/opine@2.0.0/deps.ts';
export { config } from 'https://deno.land/x/dotenv@v3.1.0/mod.ts';
You’re ready to start talking to Okta for authentication. Unfortunately, I couldn’t find any OpenID Connect (OIDC) libraries to make authentication with OAuth 2.0 and OIDC easier than this, so you’ll have to create it by hand. However, this can be an awesome exercise to help understand how OAuth and OIDC work. In the root folder of your application, create a new folder called middleware and add a file called authmiddleware.ts. Then add this content:
import { config } from './../deps.ts';

export const ensureAuthenticated = async (req:any, res:any, next:any) => {
  const user = req.app.locals.user;
  if (!user) {
    const reqUrl = req.originalUrl;
    const {issuer, clientId, redirectUrl, state} = config();
    const authUrl = `${issuer}/v1/authorize?client_id=${clientId}&response_type=code&scope=openid%20email%20profile&redirect_uri=${encodeURIComponent(redirectUrl)}&state=${state}:${reqUrl}`;
    res.location(authUrl).sendStatus(302);
  }
  next();
}
Then you’ll implement the ensureAuthenticated() middleware that starts the first step of the authentication process. First, it checks to make sure the user isn’t already logged in. If they are, it just calls next() because there is nothing to do.
If there isn’t a currently logged in user, it builds a URL made up of the issuer, clientId, redirectUrl, and state properties from the .env file. It makes a call to the /v1/authorize endpoint of the issuer’s URL. It then redirects to that URL. This is a login page hosted by Okta. Kind of like when you’re redirected to Google to log in with Google as the identity provider. The URL that it will call when login is done is the http://localhost:3000/auth/callback URL that’s in the .env file. I’ve also tagged the original URL that the user was going to when they were redirected to the state query parameter. This will make it easy to direct them back there once they’ve logged in.
Next, you’ll need to implement the auth/callback route to handle the result from the login page and exchange the authorization code that you’ll receive from Okta. Create a file called authcontroller.ts in the controllers folder with the contents:
import { Router, config } from './../deps.ts';

const auth = new Router();

// users routes
auth.get('/callback', async (req, res) => {
  const { issuer, clientId, clientSecret, redirectUrl, state } = config();

  if (req.query.state.split(':')[0] !== state) {
    res.send('State code does not match.').sendStatus(400);
  }

  const tokenUrl: string = `${issuer}/v1/token`;
  const code: string = req.query.code;

  const headers = new Headers();
  headers.append('Accept', 'application/json');
  headers.append('Authorization', `Basic ${btoa(clientId + ':' + clientSecret)}`);
  headers.append('Content-Type', 'application/x-www-form-urlencoded');

  const response = await fetch(tokenUrl, {
    method: 'POST',
    headers: headers,
    body: `grant_type=authorization_code&redirect_uri=${encodeURIComponent(redirectUrl)}&code=${code}`
  });

  const data = await response.json();
  if (!response.ok) {
    res.send(data);
  } else {
    const user = parseJwt(data.id_token);
    req.app.locals.user = user;
    req.app.locals.isAuthenticated = true;
    res.location(req.query.state.split(':')[1] || '/').sendStatus(302);
  }
});

function parseJwt(token:string) {
  const base64Url = token.split('.')[1];
  const base64 = base64Url.replace(/-/g, '+').replace(/_/g, '/');
  const jsonPayload = decodeURIComponent(atob(base64).split('').map(function(c) {
    return '%' + ('00' + c.charCodeAt(0).toString(16)).slice(-2);
  }).join(''));

  return JSON.parse(jsonPayload);
};

export default auth;
There is actually a lot less going on here than you might think. First, the imports bring in the Router from Opine and read in the .env file again. Then they instantiate the router like in the usercontroller.ts file. The next thing I did was deconstruct the config object to make it easier to use the values. Next, I checked the state query parameter to make sure it matches. This helps ensure that Okta is the one who sent the authorization code. Then the authorization code gets pulled off the query string with req.query.code.
What happens next is a call to the token endpoint. You’ll send the authorization code in a POST request to Okta to exchange for an ID Token. So, here I’ve built some headers for the request. The most important is the Authorization header that has a value of Basic {yourClientId}:{yourClientSecret} the client ID and secret are base64 encoded. Then the POST call is finally made to the token endpoint with those headers and a body with a grant_type of authorization_code—the same redirect URL as before—and the authorization code I just received from Okta.
The fetch() call returns a promise resolved with the then() function. I get the response object’s JSON value, make sure the call was successful, parse the id_token value with the parseJwt() function below and stick it into a local variable called user. Finally, the user is sent to the URL they originally requested before being redirected for authentication.
Run the Deno Application
You can now run the application from the terminal again with:
deno run -A index.ts
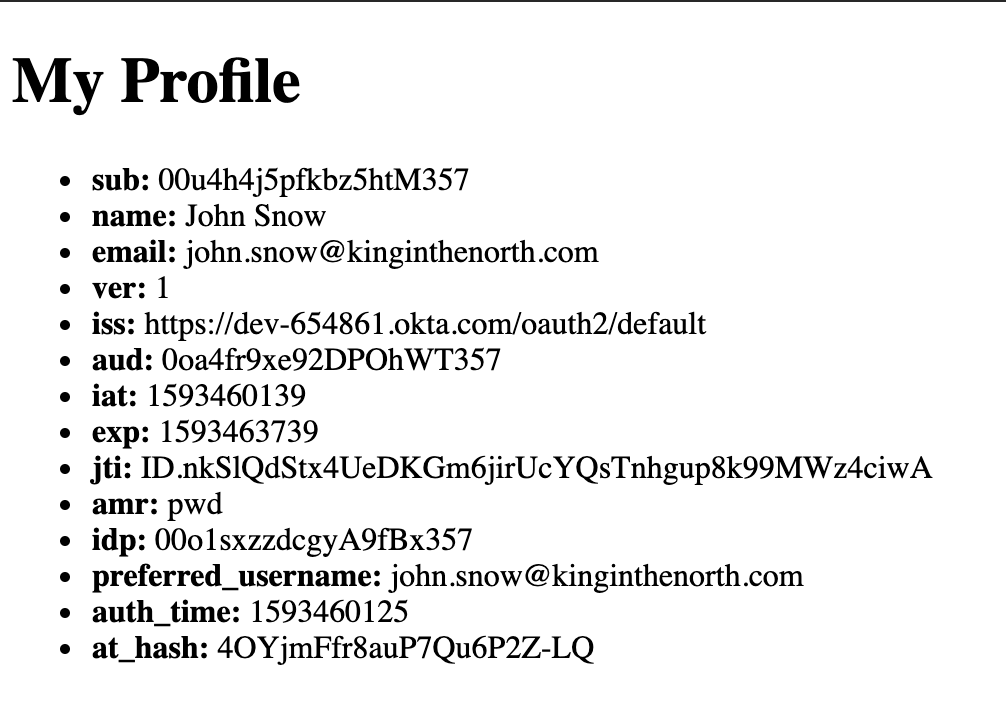
Once it’s running you will be able to click on the profile link on the home page and will be redirected to Okta’s hosted login page. Once you’ve logged in, you’ll be directed back to the profile page and you’ll see your ID token’s properties displayed in a list.
Learn More About Deno and Node.js
The completed code for this post, is on GitHub. If you want to learn more about Deno and Node, check out the links below.
- Painless Node.js Authentication
- Build a Node.js API with TypeScript
- Build and Understand Express Middleware Through Examples
If you liked this post, follow us on Twitter and subscribe to our YouTube Channel so you never miss any of our awesome content!
Changelog:
- Dec 10, 2021: Updated GitHub repo and blog post with dependency updates. You can see the changes in the example app on GitHub. Changes to this article can be viewed in oktadev/okta-blog#991.
Okta Developer Blog Comment Policy
We welcome relevant and respectful comments. Off-topic comments may be removed.