Build a Reactive App with Spring Boot and MongoDB
Reactive apps allow you to scale better if you’re dealing with lots of streaming data. They’re non-blocking and tend to be more efficient because they’re not tying up processing while waiting for stuff to happen.
Reactive systems embrace asynchronous I/O. The concept behind asynchronous I/O is straightforward: alleviate inefficient resource utilization by reclaiming resources that would otherwise be idle as they waited for I/O activity. Asynchronous I/O inverts the normal design of I/O processing: the clients are notified of new data instead of asking for it; this frees the client to do other things while waiting.
If you’re going to build a reactive app, you’ll need it to be reactive all the way down to your database. Use a blocking JDBC driver with Spring WebFlux, and you’ll be disappointed in its performance. Use a reactive NoSQL database like Cassandra, MongoDB, Couchbase and Redis – and you’ll be impressed by its performance.
In this tutorial, you’ll learn how to use Spring Boot, Spring WebFlux, and Spring Data to create a reactive web service that talks to a NoSQL database backend (MongoDB, in this case).
I just threw a handful of terms at you. Let’s go over them.
If you already understand NoSQL and Reactive programming and just want to see some code, feel free to skip the first two sections and start with “Build a Spring Boot Resource Server”.
NOTE: The first part of this series demonstrated how to use Spring Boot and Spring Data with a relational database, PostgreSQL. You can check out that post here.
Note: In May 2025, the Okta Integrator Free Plan replaced Okta Developer Edition Accounts, and the Okta CLI was deprecated.
We preserved this post for reference, but the instructions no longer work exactly as written. Replace the Okta CLI commands by manually configuring Okta following the instructions in our Developer Documentation.
What is NoSQL and Why MongoDB?
NoSQL is a term for any non-relational database. In relational databases (think SQL, MySQL, etc…), data is stored in tables with strong typing and well-defined relationships between table columns. The tight, well-defined structure of relational databases is both their strength and their weakness. It’s a trade-off. NoSQL databases explode this model and provide other models that allow for more flexibility and ease of scaling.
The microservice/cluster model of scaling created lots of problems for relational databases. They just weren’t built to run and stay in sync across multiple machines. NoSQL databases were developed, in part, to address this problem. Often, they were built with clustering and horizontal scaling in mind. To present this another way, classically with SQL databases, if you needed more power, you had to resize the server that the database was running on; it was pretty monolithic, and this is hard to do dynamically, even with all the modern virtual server snazziness available these days. At internet scale, a far better model is to have a flexible cluster of databases that automatically sync between them and that allow you to spin up instances as demand requires (and spin them down when demand lessens). This means that adding more power doesn’t require ever more expensive machines; you can simply add more, relatively cheap machines as needed.
Another potential benefit of NoSQL databases is their flexibility. A document-based NoSQL database like MongoDB can store arbitrary data in documents. Fields can be added to the stored documents on the fly, without the overhead of table migrations and what not. Of course, this doesn’t solve the problem of versioning and it’s still up to the app to deal with the changing data structure (not always trivial), but at least you’re not fighting the database.
All that said, keep in mind that SQL/relational databases aren’t going anywhere. They’re proven, fast, and super reliable. In some use cases, they’re cheaper and easier. MySQL is hard to beat for a simple website or blog, for example. But even in an enterprise setting, sometimes you want the structure that a relational database enforces. If you have a fairly static data model and don’t need to scale to internet scale, SQL may be the best choice. These types of design considerations are worth pondering before you dive into a database choice simply because it’s new and flashy.
I’m using MongoDB in this tutorial because it’s a breeze to start with. If you use Spring Data MongoDB, it’s even easier!
Get Reactive!
Reactive is another great bit of jargon. It feels like the kind of word that people like to throw around at parties and conferences with only vague ideas of what it actually means. Like “existential” or “ennui.” Let’s define it.
If you take a look at the Spring WebFlux documentation, they give a pretty good overview of what reactive means.
The term, “reactive,” refers to programming models that are built around reacting to change — network components reacting to I/O events, UI controllers reacting to mouse events, and others. In that sense, non-blocking is reactive, because, instead of being blocked, we are now in the mode of reacting to notifications as operations complete or data becomes available.
So reactive means: non-blocking, asynchronous, and centered around stream processing.
Build a Spring Boot Resource Server
Clone the starter project from the GitHub repository and check out the start branch:
git clone -b start https://github.com/oktadeveloper/okta-spring-boot-mongo-webflux-example.git
The starter project is a simple Spring Boot starter project with the necessary dependencies already in the build.gradle file.
Let’s take a quick look at the dependencies:
compile('org.springframework.boot:spring-boot-starter-webflux')
compile('org.springframework.boot:spring-boot-starter-data-mongodb-reactive')
compileOnly('org.projectlombok:lombok')
compile('de.flapdoodle.embed:de.flapdoodle.embed.mongo')
The first is for Spring WebFlux, the reactive version of Spring MVC. The second brings in the reactive MongoDB dependencies that Spring needs. The third is a project called Lombok that saves us from typing a bunch of constructors, getters, and setters in our Java code (you can check out the project on their webpage). The last dependency is an embedded, in-memory MongoDB database. This database is great for testing, simple tutorials like this, and isn’t persisted.
The application can be run using a simple Gradle command:
./gradlew bootRun
Of course, if you run the app at this point it’s not going to do much. Spring Boot will load, but there aren’t any controllers, resources, or repositories defined yet, so nothing much happens.
Define a Model Class for MongoDB
For clarity, this tutorial is going to parallel the first part of this series that I mentioned earlier. You’re going to build a simple server that stores types of kayaks. I always suggest starting any project by defining the data structure first.
Create a Kayak.java class file in the com.okta.springbootmongo package:
package com.okta.springbootmongo;

import lombok.AllArgsConstructor;
import lombok.Data;
import lombok.NoArgsConstructor;
import org.springframework.data.mongodb.core.mapping.Document;

@Document
@Data
@AllArgsConstructor
@NoArgsConstructor
public class Kayak {
    private String name;
    private String owner;
    private Number value;
    private String makeModel;
}
The @Document annotation is the NoSQL equivalent of @Entity. It tells Spring Boot that this class is defining a data model. In the NoSQL world, this means creating a document instead of a table entry. The other three annotations are Lombok helpers that autogenerate getters, setters, and constructors.
The kayak document has five properties: name, owner, value, and type. These are automatically mapped to appropriate BSON types for MongoDB. What’s a BSON type? Take a look at the MongoDB docs on the subject. They are the binary serialization types used to persist data in MongoDB documents. They define the primitive types that can be stored in a MongoDB database.
Add a ReactiveMongoRepository to Your Spring Boot App
Defining the Kayak class with the @Document annotation tells Spring Boot about the structure of the data, but doesn’t actually give us any way of saving or loading data from the database. In order to do that, you need to define a Repository.
The code for that is beguilingly simple. Create a KayakRepository.java class file in the com.okta.springbootmongo package:
package com.okta.springbootmongo;

import org.springframework.data.mongodb.repository.ReactiveMongoRepository;

public interface KayakRepository extends ReactiveMongoRepository<Kayak, Long> {
}
This actually gives you all of the basic methods you need to create, update, read, and delete documents from the database. To understand how, dig into the ReactiveMongoRepository class and the various other superclasses, particularly ReactiveCrudRepository. Take a look at the docs for ReactiveCrudRepository to see the implemented methods.
ReactiveCrudRepository actually provides a basic and complete set of CRUD methods. ReactiveMongoRepository builds on top of that to provide some MongoDB-specific querying features.
Implement a Controller with Spring WebFlux
With the repository added, you have enough to manipulate the data programmatically. However, there are no web endpoints defined. In the previous tutorial, to add REST endpoints, all that was required was to add the @RepositoryRestResource annotation to the KayakRepository class. This autogenerated a fully functioning REST resource for us with all of the CRUD methods. This shortcut does not work with Spring WebFlux, however. Any public web endpoints will have to be explicitly defined.
Add the following KayakController.java class
package com.okta.springbootmongo;

import org.springframework.beans.factory.annotation.Autowired;
import org.springframework.stereotype.Controller;
import org.springframework.web.bind.annotation.*;
import reactor.core.publisher.Flux;

@Controller
@RequestMapping(path = "/kayaks")
public class KayakController {

    private KayakRepository kayakRepository;

    public KayakController(KayakRepository kayakRepository) {
        this.kayakRepository = kayakRepository;
    }

    @PostMapping()
    public @ResponseBody
    Mono<Kayak> addKayak(@RequestBody Kayak kayak) {
        return kayakRepository.save(kayak);
    }

    @GetMapping()
    public @ResponseBody
    Flux<Kayak> getAllKayaks() {
        return kayakRepository.findAll();
    }
}
This controller adds two endpoints:
- POST
/kayaksthat adds a new kayak - GET
/kayaksthat lists all of the kayaks
You’ll also notice that the class uses Spring dependency injection to autowire the KayakRepository instance into the controller, and you’ll see how the Kayak domain class is being persisted using the repository.
This class looks an awful lot like a relational, blocking version. A lot of behind the scenes work goes into making this the case. Have no fear, however, this is 100% reactive, non-blocking code.
Test Your Spring Boot Server
At this point, you have a fully operational kayak REST resource server. Before you test it, add the following method to your MainApplication class. This simply injects some test data into the database when the application loads.
@Bean
ApplicationRunner init(KayakRepository repository) {

  Object[][] data = {
      {"sea", "Andrew", 300.12, "NDK"},
      {"creek", "Andrew", 100.75, "Piranha"},
      {"loaner", "Andrew", 75, "Necky"}
  };

  return args -> {
      repository
          .deleteAll()
          .thenMany(
              Flux
                  .just(data)
                  .map(array -> {
                      return new Kayak((String) array[0], (String) array[1], (Number) array[2], (String) array[3]);
                  })
                  .flatMap(repository::save)
          )
          .thenMany(repository.findAll())
          .subscribe(kayak -> System.out.println("saving " + kayak.toString()));
  };
}
HTTPie is a great command line utility that makes it easy to run requests against the resource server. If you don’t have HTTPie installed, install it using brew install httpie. Or head over to their website and make it happen. Or just follow along.
Make sure your Spring Boot app is running. If it isn’t, start it using ./gradlew bootRun.
Run a GET request against your resource server: http :8080/kayaks, which is shorthand for http GET http://localhost:8080/kayaks.
You’ll get this:
HTTP/1.1 200 OK
Content-Type: application/json;charset=UTF-8
transfer-encoding: chunked
[
    {
        "makeModel": "NDK",
        "name": "sea",
        "owner": "Andrew",
        "value": 300.12
    },
    {
        "makeModel": "Piranha",
        "name": "creek",
        "owner": "Andrew",
        "value": 100.75
    },
    {
        "makeModel": "Necky",
        "name": "loaner",
        "owner": "Andrew",
        "value": 75
    }
]
Now try POST’ing a new kayak to the server.
http POST :8080/kayaks name="sea2" owner="Andrew" value="500" makeModel="P&H"
You should see:
HTTP/1.1 200 OK
Content-Length: 62
Content-Type: application/json;charset=UTF-8
{
    "makeModel": "P&H",
    "name": "sea2",
    "owner": "Andrew",
    "value": 500
}
And if you repeat the GET request, http :8080/kayaks, you’ll see the new kayak in the list!
Set Up Secure Authentication
Now you need to integrate Okta for OAuth 2.0 and add token-based authentication to the resource server. This section is exactly the same as the section in Part 1 of this tutorial, so if you’ve already done that, all you need is your Client ID, and you can skip forward to the next section.
Before you begin, you’ll need a free Okta developer account. Install the Okta CLI and run okta register to sign up for a new account. If you already have an account, run okta login.
Then, run okta apps create. Select the default app name, or change it as you see fit.
Choose Single-Page App and press Enter.
Use https://oidcdebugger.com/debug for the Redirect URI and set the Logout Redirect URI to https://oidcdebugger.com.
What does the Okta CLI do?
The Okta CLI will create an OIDC Single-Page App in your Okta Org. It will add the redirect URIs you specified and grant access to the Everyone group. It will also add a trusted origin for https://oidcdebugger.com. You will see output like the following when it’s finished:
Okta application configuration:
Issuer:    https://dev-133337.okta.com/oauth2/default
Client ID: 0oab8eb55Kb9jdMIr5d6
NOTE: You can also use the Okta Admin Console to create your app. See Create a Single-Page App for more information.
NOTE: If you’re implementing a front end like Angular or React, you may need to update the default login redirect URI depending on the platform you’re using. Because this tutorial is only creating a resource server without a front end, it doesn’t really matter for the moment. All our resource server will be doing is validating the JSON web token with the authorization server, which doesn’t require a redirect.
Configure Your Spring Boot Server for Token Authentication
Now you need to update a few project files to configure Spring Boot for OAuth 2.0.
Add the following dependencies to your build.gradle file:
dependencies {
  ...
    compile('com.okta.spring:okta-spring-boot-starter:1.1.0')
  ...
}
Create a new configuration file called src/main/resources/application.yml:
okta:
  oauth2:
    issuer: https://{yourOktaDomain}/oauth2/default
    groupsClaim: groups
    clientId: {yourClientId}
Create a SecurityConfiguration.java class in the com.okta.springbootmongo package:
package com.okta.springbootmongo;

import org.springframework.context.annotation.Bean;
import org.springframework.security.config.annotation.web.reactive.EnableWebFluxSecurity;
import org.springframework.security.config.web.server.ServerHttpSecurity;
import org.springframework.security.web.server.SecurityWebFilterChain;

@EnableWebFluxSecurity
public class SecurityConfiguration {

    @Bean
    public SecurityWebFilterChain securityWebFilterChain(ServerHttpSecurity http) {
        http
            .authorizeExchange()
            .anyExchange().authenticated()
            .and()
            .oauth2ResourceServer()
            .jwt();
        return http.build();
    }
}
Test Your Protected Server
Stop your Spring Boot server and restart it using: ./gradlew bootRun
From the command line, run a simple GET request.
http :8080/kayaks
You’ll get a 401/unauthorized.
HTTP/1.1 401 Unauthorized
Cache-Control: no-store
Content-Type: application/json;charset=UTF-8
Generate an Access Token
To access the server now, you need a valid access token. You can use OpenID Connect debugger to help you do this.
An easy way to get an access token is to generate one using OpenID Connect Debugger. Open the site in a new window or tab. Fill in your client ID, and use https://{yourOktaDomain}/oauth2/default/v1/authorize for the Authorize URI. Select code for the response type and Use PKCE.
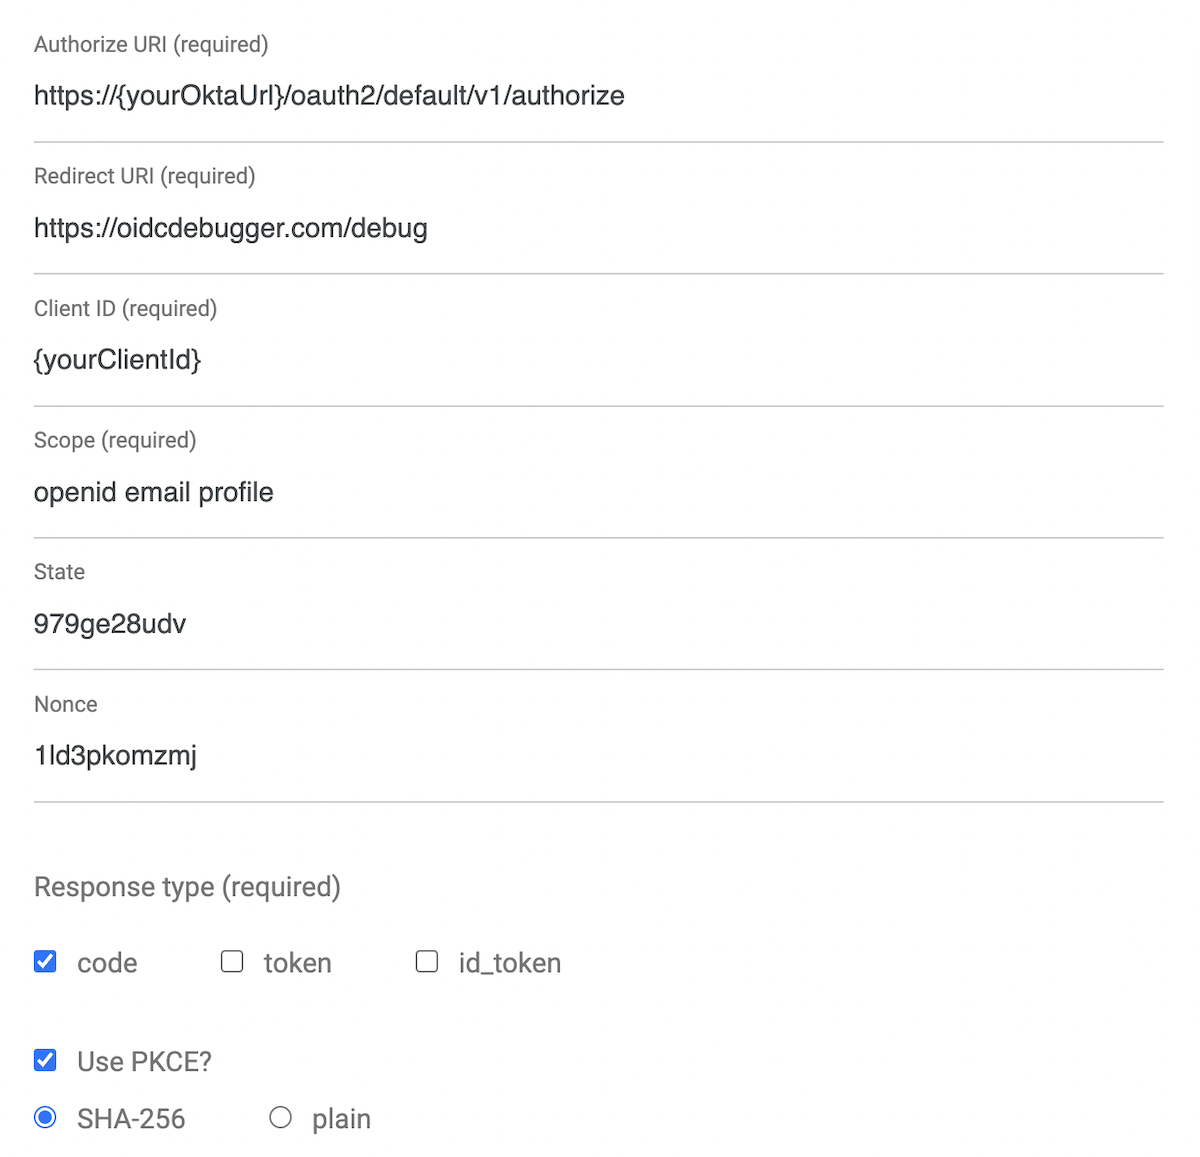
Click Send Request. If you are not logged into your Okta org, then you’ll be required to log in. If you are (as is likely) already logged in, then the access token will be generated for your signed-in identity.
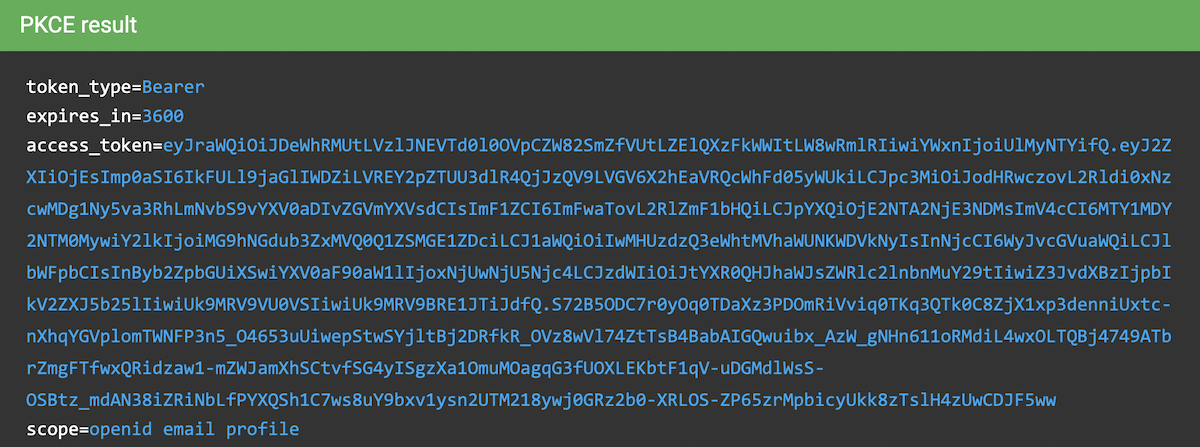
Use Your Access Token
You use the token by including in an Authorization request header of type Bearer.
Store the token in a shell variable:
TOKEN=eyJraWQiOiJldjFpay1DS3UzYjJXS3QzSVl1MlJZc3VJSzBBYUl3NkU4SDJfNVJr...
Then make a GET request with HTTPie:
http :8080/kayaks "Authorization: Bearer $TOKEN"
Note the double quotes above. Single quotes do not work because the shell variable is not expanded.
Add Group-Based Authorization
Now you’re going to make the authorization scheme a little more refined by adding the ability to control access to specific controller endpoints based on Group membership.
To use group-based authorization with Okta, you need to add a “groups” claim to your access token. Run okta login and open the returned URL in a browser. Sign in to the Okta Admin Console.
Create an Admin group (Directory > Groups > Add Group) and add your user to it. You can use the account you signed up with, or create a new user (People > Add Person).
Navigate to Security > API > Authorization Servers, click the Authorization Servers tab and edit the default one. Click the Claims tab and Add Claim. Name it “groups”, and include it in the access token. Set the value type to “Groups” and set the filter to be a Regex of .*.
The groups claim carries the groups to which the user is assigned. The default user you’re using to sign in to your Okta org website will also be a member of both the “Everyone” group, and the “Admin” group.
The SecurityConfiguration class also needs to be updated to use group-based authorization. Update the Java file to match the following:
package com.okta.springbootmongo;

import org.springframework.context.annotation.Bean;
import org.springframework.http.HttpMethod;
import org.springframework.security.config.annotation.method.configuration.EnableReactiveMethodSecurity;
import org.springframework.security.config.annotation.web.reactive.EnableWebFluxSecurity;
import org.springframework.security.config.web.server.ServerHttpSecurity;
import org.springframework.security.web.server.SecurityWebFilterChain;

@EnableWebFluxSecurity
@EnableReactiveMethodSecurity
public class SecurityConfiguration {

  @Bean
  public SecurityWebFilterChain securityWebFilterChain(ServerHttpSecurity http) {
      http
          .authorizeExchange()
          .pathMatchers(HttpMethod.POST, "/kayaks/**").hasAuthority("Admin")
          .anyExchange().authenticated()
          .and()
          .oauth2ResourceServer()
          .jwt();
      return http.build();
  }
}
In simple English, this tells Spring Boot to require the group membership Admin for any POST to the /kayak endpoint, and for all other requests, simply require a valid JWT.
Your group-based authorization policy is defined by these two lines:
.pathMatchers(HttpMethod.POST, "/kayaks/**").hasAuthority("Admin")
.anyExchange().authenticated()
For more information, take a look at the ServerHttpSecurity class’s documentation.
You might be wondering why it says hasAuthority() instead of hasRole() or hasGroup(). This is because authorities are what Spring calls the text strings sent by the server to denote permission membership, be it roles or groups. hasRole() assumes that roles are in a specific format: “ROLE_ADMIN”. This can be overridden, but hasAuthority() is a simple way to use the authority string directly. There is no hasGroup() method, as this use case is covered by the former two examples, if not explicitly.
Create a Non-Admin User
To test your group-based authorization scheme, you need a user that isn’t an admin. In the Okta Admin Console, select Directory > People. Click the Add Person button.
Give the user a First Name, Last Name, and Username (which will also be the Primary Email). The values do not matter, and you won’t need to be able to check the email. You simply need to know the email address/username and password so you can log in to Okta in a minute.
Password: change the drop down to Set by admin.
Assign the user a password.
Click Save.
You’ve just created a user that is NOT a member of the Admin group but is a member of the default group Everyone.
Test Group-Based Authorization
Log out of the Okta Admin Console.
Return to the OIDC Debugger and generate a new token.
This time, log in as your new non-admin user. You’ll be asked to choose a security question, after which you’ll be redirected to the https://oidcdebugger.com/debug page where your token can be copied.
If you like, you can go to token.dev and decode your new token. In the payload, the sub claim will show the email/username of the user, and the groups claim will show only the Everyone group.
{
  "sub": "test@gmail.com",
  "groups": [
    "Everyone"
  ]
}
According to the permission scheme, this user should be able to list all kayaks but shouldn’t be able to add a new kayak.
Remember, store your token in a shell script like so:
TOKEN=eyJraWQiOiI4UlE5REJGVUJOTnJER0VGaEExekd6bWJqREpSYTRTT1lhaGpsM3d4...
Make a GET request to list all kayaks:
http :8080/kayaks "Authorization: Bearer $TOKEN"

HTTP/1.1 200 OK
Cache-Control: no-cache, no-store, max-age=0, must-revalidate
Content-Type: application/json;charset=UTF-8
...

[
    {
        "makeModel": "NDK",
        "name": "sea",
        "owner": "Andrew",
        "value": 300.12
    },
    {
        "makeModel": "Necky",
        "name": "loaner",
        "owner": "Andrew",
        "value": 75
    },
    {
        "makeModel": "Piranha",
        "name": "creek",
        "owner": "Andrew",
        "value": 100.75
    }
]
Try to add a new kayak using the non-admin user token:
http POST :8080/kayaks "Authorization: Bearer $TOKEN" name="sea2" owner="Andrew" value="500" makeModel="P&H"
You’ll be denied!
HTTP/1.1 403 Forbidden
Cache-Control: no-cache, no-store, max-age=0, must-revalidate
Expires: 0
...
Now, log out of developer.okta.com, and generate a new token using the OIDC Debugger. This time log back in with your original, admin account.
Store the new token in the shell variable TOKEN.
Run the POST request:
http POST :8080/kayaks "Authorization: Bearer $TOKEN" name="sea2" owner="Andrew" value="500" makeModel="P&H"
BAM! 💥
HTTP/1.1 200 OK
Cache-Control: no-cache, no-store, max-age=0, must-revalidate
...
{
    "makeModel": "P&H",
    "name": "sea2",
    "owner": "Andrew",
    "value": 500
}
All’s Well that Ends Authenticated
That’s it! In this tutorial, you created a Spring Boot application with Spring WebFlux, used an embedded MongoDB database for persisting model classes, and added a resource server to it. After that, I showed you how to add JWT token authentication using Okta and OAuth 2.0. Finally, you saw how to use Okta and Spring Security to add group-based authorization to specific endpoints in a controller.
If you’d like to check out this complete project, you can find the repo on GitHub at oktadeveloper/okta-spring-boot-mongo-webflux-example.
If you haven’t already, check out Part 1 of this series: Build a Basic App with Spring Boot and JPA using PostgreSQL. It’s the same app, but using a more traditional relational database and Spring MVC-style blocking web server.
Learn More About Spring Boot, MongoDB, and Secure User Management
If you’d like to learn more about Spring Boot, Spring Security, or Okta, check out any of these great tutorials:
- Build Reactive APIs with Spring WebFlux
- Get Started with Spring Boot, OAuth 2.0, and Okta
- Add Single Sign-On to Your Spring Boot Web App in 15 Minutes
- Secure Your Spring Boot Application with Multi-Factor Authentication
- Build a Secure API with Spring Boot and GraphQL
Here are some excellent resources from Spring:
- Going reactive with Spring Data
- OAuth2 WebFlux Documentation
- Building a Reactive RESTful Web Service
- Spring WebFlux Documentation
If you liked this post, chances are you’ll like others we publish. Follow @oktadev on Twitter and subscribe to our YouTube channel for more interesting tutorials.
Okta Developer Blog Comment Policy
We welcome relevant and respectful comments. Off-topic comments may be removed.