Spring Boot with PostgreSQL, Flyway, and JSONB

Note: In May 2025, the Okta Integrator Free Plan replaced Okta Developer Edition Accounts, and the Okta CLI was deprecated.
We preserved this post for reference, but the instructions no longer work exactly as written. Replace the Okta CLI commands by manually configuring Okta following the instructions in our Developer Documentation.
In this tutorial, you are going to learn more about PostgreSQL and how to integrate it with a Spring Boot application. You will learn how to install a simple PostgreSQL instance using Docker and how to connect a Spring Boot application to it. After that, you’ll create a simple database schema and add some data to it. Next, I’ll show you how to create SQL files to deliver database changes, which are more suitable for enterprise applications. To finish, you will learn how to use PostgreSQL JSONB data structure and use PostgreSQL as a NoSQL database.
Let’s dig in!
Note: In May 2025, the Okta Integrator Free Plan replaced Okta Developer Edition Accounts, and the Okta CLI was deprecated.
We preserved this post for reference, but the instructions no longer work exactly as written. Replace the Okta CLI commands by manually configuring Okta following the instructions in our Developer Documentation.
Get Started with PostgreSQL via Docker
Initially proposed in the 70s, the RDBMS (Relational Database Management System) has grown in popularity through the years as computing processing power and storage capacity has increased. A critical characteristic of RDBMS is the support for ACID transactions (Atomicity, Consistency, Isolation, Durability) which guarantee data consistency even in a concurrent environment without the developer needing to be fully aware.
PostgreSQL is one of the most famous RDBMS around. Technically speaking it is also one of the most advanced relational database systems available. Why is that? Postgres means Post Ingres or the successor of Ingres, an older database that paved the way to the more famous Microsoft SQL Server and other products.
You will need PostgreSQL installed to complete the tutorial. To install and test PostgreSQL, I recommend using Docker:
docker pull postgres:11
docker run --name dev-postgres -p 5432:5432 -e POSTGRES_PASSWORD=mysecretpassword -d postgres:11
# CREATE db coursedb
docker exec dev-postgres psql -U postgres -c"CREATE DATABASE coursedb" postgres
NOTE: You will need Docker installed for these commands to work.
The command above should run in any Linux, Windows, or MacOS distribution that has an instance of Docker installed. The first line pulls PostgreSQL version 11; the second line initiates a new instance of it with the name dev-postgres, running on port 5432. The last line executes a DDL command to create the database coursedb into the instance. Keep in mind, you are not creating a volume for the storage data if the container is deleted, all its data will be deleted as well.
Create a Spring Boot App with PostgreSQL
First, you need to create a new project with the required dependencies. You can use Spring Initialzr for this.
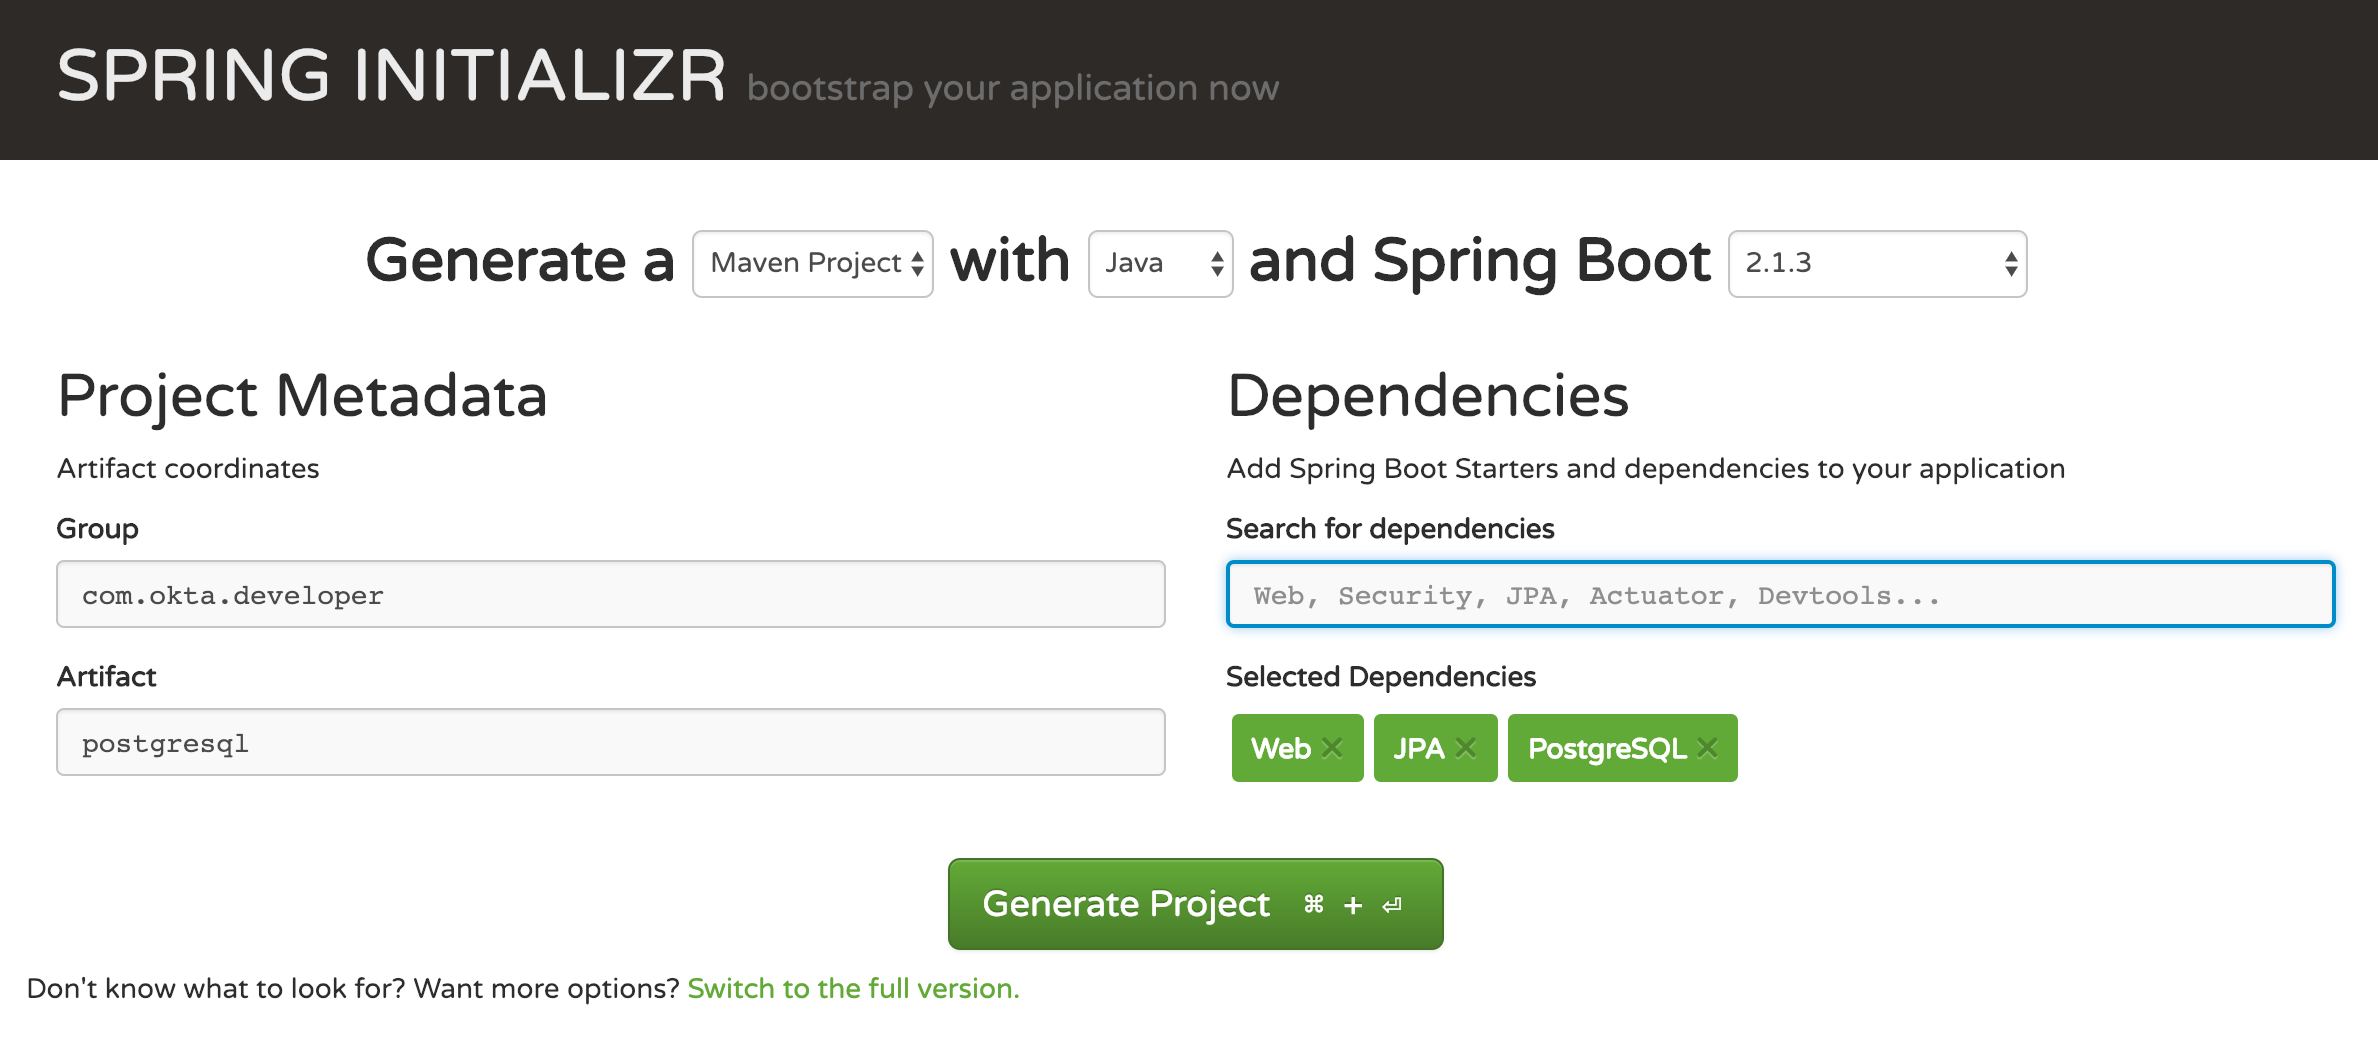
Configure your project as shown in the image above:
- Project Type: Maven Project
- Group: com.okta.developer
- Artifact: postgresql
- Dependencies: Web, JPA, PostgreSQL
Download the file and unzip it. Then, simply run the command below:
./mvnw spring-boot:run
NOTE: Depending on your operating system, you might need to change ./mvnw to mvnw.
Running mvnw will download Maven, all dependencies, and run the application goal (spring-boot:run). It will likely fail because you do not have a PostgreSQL database configured. Let’s fix this.
Add Database Configuration for PostgreSQL
You now have a system that has database dependencies but does not know where to connect. First, change your main class (probably com.okta.developer.postgresql.PostgresqlApplication) and add the annotation @EnableTransactionManagement to it, like this:
package com.okta.developer.postgresql;

import org.springframework.boot.SpringApplication;
import org.springframework.boot.autoconfigure.SpringBootApplication;
import org.springframework.transaction.annotation.EnableTransactionManagement;

@SpringBootApplication
@EnableTransactionManagement
public class PostgresqlApplication {

    public static void main(String[] args) {
        SpringApplication.run(PostgresqlApplication.class, args);
    }
}
Configuration annotations in Spring allow you to set up your application using type safe code. This means if something becomes inconsistent with your configuration, it will show compilation errors. The feature is a nice evolution from the older XML-based configuration Spring used to have. Previously, it was possible to get runtime errors since XML and your code was not linked.
Update src/main/resources/application.properties to define your database connection properties:
spring.datasource.url=jdbc:postgresql://192.168.99.100:5432/coursedb
spring.datasource.username=postgres
spring.datasource.password=mysecretpassword
spring.jpa.properties.hibernate.dialect=org.hibernate.dialect.PostgreSQLDialect
spring.jpa.hibernate.ddl-auto=create
Here’s a quick explanation of each property:
spring.datasource.url- describes the JDBC connection URL. Each RDBMS (like PostgreSQL, MySQL, Oracle, etc.) has its format. The IP192.168.99.100is the assigned by Docker to the host machine in Windows or MacOS machines. If you are running on Linux or Mac, you must change to127.0.0.1as the Docker Host is your machine.spring.datasource.username- the username you will connect to the database. You are going to use the master user for this tutorial. For production, you should create a limited user for each application.spring.datasource.password- The password you set when creating PostgreSQL docker instance.spring.jpa.properties.hibernate.dialect- Although SQL is a standard, each database has some specific syntax that is addressed by hibernate dialect.spring.jpa.hibernate.ddl-auto- Define if Hibernate can create, delete and create, update or validate the current Database Schema. Currently, you should set this property tocreateso Hibernate can handle all Database Schema.
What happens if you start up the application again?
./mvnw spring-boot:run
Now the application starts and you should be able to open http://localhost:8080 in your browser. Nothing nice happens as you haven’t written any code for the UI yet. You may see an error stack on initialization: don’t worry, it is simply Hibernate telling the JDBC driver does not support a feature (method createClob).
Create JPA Entities and Data Access Objects
OK, now let’s do some real work.
First of all, let’s look at this tutorial’s schema. It has two entities:
- Teacher
- Columns: name, picture, email
- Course
- Columns: name, workload, rate
- Relationship: teacher
Before changing the code, add two new dependencies in your pom.xml file:
<dependency>
    <groupId>org.projectlombok</groupId>
    <artifactId>lombok</artifactId>
</dependency>
<dependency>
    <groupId>org.springframework.boot</groupId>
    <artifactId>spring-boot-starter-data-rest</artifactId>
</dependency>
Project Lombok adds a series of helpful features that simplify a developer’s life like getter/setter and constructor autogeneration. If you are using an IDE to develop this tutorial, you must install a plugin to avoid compilation problems.
Spring Data REST is a handy dependency that creates an HTTP interface for your repositories. You are going to use the HTTP interface to test your code.
To help your entities, you’ll create a superclass that handles the primary key in the same way for every entity we create. PostgreSQL has support to UUID, so you are going to use it instead of the commonly used auto-increment integer. UUID is helpful to avoid a normal attack in which the hacker tries to increase or decrease an entity ID to discover new information.
Create the class EntityWithUUID in package com.okta.developer.postgresql.entities:
package com.okta.developer.postgresql.entities;

import org.hibernate.annotations.Type;

import javax.persistence.Id;
import javax.persistence.MappedSuperclass;
import java.util.UUID;

@MappedSuperclass
public class EntityWithUUID {
    @Id @Type(type = "pg-uuid")
    private UUID id;

    public EntityWithUUID() {
        this.id = UUID.randomUUID();
    }
}
There are some excellent annotations here:
@MappedSuperclasssays to JPA this class is a superclass of an entity and should have its attributes mapped into the entity.@Idsays the attribute is a primary key@Typespecifies what type is used on the database. You need to specify since PostgreSQL has its own type for UUIDs:pg-uuid.
Now, create the two entities in the com.okta.developer.postgresql.entities package:
Teacher.java
package com.okta.developer.postgresql.entities;

import lombok.AllArgsConstructor;
import lombok.Data;
import lombok.NoArgsConstructor;
import javax.persistence.Entity;

@Entity
@Data
@AllArgsConstructor
@NoArgsConstructor
public class Teacher extends EntityWithUUID {
    private String name;
    private String pictureURL;
    private String email;
}
Course.java
package com.okta.developer.postgresql.entities;

import lombok.AllArgsConstructor;
import lombok.Data;
import lombok.NoArgsConstructor;
import javax.persistence.*;

@Entity
@Data
@AllArgsConstructor
@NoArgsConstructor
public class Course extends EntityWithUUID {

    private String name;
    private int workload;
    private short rate;
    @ManyToOne
    @JoinColumn(foreignKey = @ForeignKey(name = "fk_course_teacher"))
    private Teacher teacher;
}
The annotations have a significant influence in these classes:
@Data- It’s a Lombok annotation and tells Lombok to create getter and setter for all attributes.@AllArgsConstructor- Tells Lombok to create a constructor with all class attributes@NoArgsConstructor- Tells Lombok to create another constructor with no arguments. It is useful for JPA.@Entity- Indicates this class represents a persistent entity. It is interpreted as a table by JPA, and the table should have the same class name unless you change it.@ManyToOneand@JoinColumn- Indicates there is a Many to One relationship whose relationship uses of a Join Column. It is possible to set the foreign key if Hibernate is going to create the DDL.
So far, so good. Now, create a DAO (Data Access Object, also called a Repository by Spring) class for each entity in the com.okta.developer.postgresql.dao package:
CourseDAO.java
package com.okta.developer.postgresql.dao;

import com.okta.developer.postgresql.entities.Course;
import org.springframework.data.repository.CrudRepository;
import java.util.UUID;

public interface CourseDAO extends CrudRepository<Course, UUID> {}
TeacherDAO.java
package com.okta.developer.postgresql.dao;

import com.okta.developer.postgresql.entities.Teacher;
import org.springframework.data.repository.CrudRepository;
import java.util.UUID;

public interface TeacherDAO extends CrudRepository<Teacher, UUID> {}
You now have DAOs for each entity. You may be asking, where is the implementation for them? Spring Data has some intelligent ways to handle this. Since your interfaces extend CrudRepository, Spring automatically generates the concrete class with all CRUD-related operations available!
To fill some data, create a new service class called DataFillerService. It will be responsible for inserting data in the database as soon as the application starts.
DataFillerService.java
package com.okta.developer.postgresql.service;

import com.okta.developer.postgresql.dao.CourseDAO;
import com.okta.developer.postgresql.dao.TeacherDAO;
import com.okta.developer.postgresql.entities.Course;
import com.okta.developer.postgresql.entities.Teacher;
import org.springframework.stereotype.Service;
import org.springframework.transaction.annotation.Transactional;
import javax.annotation.PostConstruct;

@Service
public class DataFillerService {
    private final CourseDAO courseDAO;
    private final TeacherDAO teacherDAO;
    public DataFillerService(CourseDAO courseDAO, TeacherDAO teacherDAO) {
        this.courseDAO = courseDAO;
        this.teacherDAO = teacherDAO;
    }
    @PostConstruct
    @Transactional
    public void fillData(){
        Teacher pj = new Teacher(
                "Professor Jirafales",
                "https://upload.wikimedia.org/wikipedia/commons/thumb/d/d1/Ruben2017.jpg/245px-Ruben2017.jpg",
                "jirafales@yahoo_.com"
        );
        Teacher px = new Teacher(
                "Professor X",
                "https://encrypted-tbn0.gstatic.com/images?q=tbn:ANd9GcS9uI1Cb-nQ2uJOph4_t96KRvLSMjczAKnHLJYi1nqWXagvqWc4",
                "director@xproject_.com"

        );
        teacherDAO.save(pj);
        teacherDAO.save(px);
        // create courses
        Course mathematics = new Course("Mathematics", 20, (short) 10, pj);
        Course spanish = new Course("Spanish", 20, (short) 10, pj);
        Course dealingWithUnknown = new Course("Dealing with unknown", 10, (short) 100, pj);
        Course handlingYourMentalPower = new Course("Handling your mental power", 50, (short) 100, pj);
        Course introductionToPsychology = new Course("Introduction to psychology", 90, (short) 100, pj);
        courseDAO.save(mathematics);
        courseDAO.save(spanish);
        courseDAO.save(dealingWithUnknown);
        courseDAO.save(handlingYourMentalPower);
        courseDAO.save(introductionToPsychology);
    }
}
The method fillData is automatically called by Spring Context as soon the application context finishes loading. It uses the @Transaction annotations to indicate the entire method must run inside a transaction. That way, if any instruction fails, the entire method will be rolled back. As you can see, CourseDAO and TeacherDAO has some CRUD methods available.
Now, you can test if your application is working:
./mvnw spring-boot:run
The application creates several REST endpoints to access your DAO’s method. Try some commands:
curl http://localhost:8080/courses
curl http://localhost:8080/teachers
Secure Spring Data REST with OAuth 2.0
You shouldn’t expose your database structure without proper authentication. Let’s solve this by creating an OAuth 2.0 Resource Server. A resource server is a service working in the infrastructure that has no login page, and it is used for server-to-server communications. In other words: it needs credentials but does not handle how they are acquired.
First, you’ll need to add a dependency on the Okta Spring Boot starter:
<dependency>
    <groupId>com.okta.spring</groupId>
    <artifactId>okta-spring-boot-starter</artifactId>
    <version>1.1.0</version>
</dependency>
Then add a WebSecurityConfigurerAdapter to PostgresqlApplication:
package com.okta.developer.postgresql;

import org.springframework.boot.SpringApplication;
import org.springframework.boot.autoconfigure.SpringBootApplication;
import org.springframework.context.annotation.Configuration;
import org.springframework.security.config.annotation.web.builders.HttpSecurity;
import org.springframework.security.config.annotation.web.configuration.WebSecurityConfigurerAdapter;
import org.springframework.transaction.annotation.EnableTransactionManagement;

@SpringBootApplication
@EnableTransactionManagement
public class PostgresqlApplication {

    public static void main(String[] args) {
        SpringApplication.run(PostgresqlApplication.class, args);
    }

    @Configuration
    static class OktaOAuth2WebSecurityConfigurerAdapter extends WebSecurityConfigurerAdapter {

        @Override
        protected void configure(HttpSecurity http) throws Exception {
            http
                .authorizeRequests().anyRequest().authenticated()
                .and()
                .oauth2ResourceServer().jwt();
        }
    }
}
The OktaOAuth2WebSecurityConfigurerAdapter class defines the security configuration.
.authorizeRequests().anyRequest().authenticated()- tells Spring Security every request must be authenticated..oauth2ResourceServer().jwt()- configures the application as a Resource Server that will allows access tokens for authorization.
Finally, add two new properties in your application.properties file:
okta.oauth2.issuer=https://{yourOktaDomain}/oauth2/default
okta.oauth2.clientId={yourClientId}
These properties are going to tell Spring and Okta where to find the OAuth 2.0 issuer and identify the client ID for this application…
… Issuer, client ID, what am I talking about?
Before you begin, you’ll need a free Okta developer account. Install the Okta CLI and run okta register to sign up for a new account. If you already have an account, run okta login.
Then, run okta apps create service. Select the default app name, or change it as you see fit.
What does the Okta CLI do?
The Okta CLI will create an OAuth 2.0 Service App in your Okta Org. You will see output like the following when it’s finished:
Okta application configuration has been written to: /path/to/app/.okta.env
Run cat .okta.env (or type .okta.env on Windows) to see the issuer and credentials for your app.
export OKTA_OAUTH2_ISSUER="https://dev-133337.okta.com/oauth2/default"
export OKTA_OAUTH2_CLIENT_ID="0oab8eb55Kb9jdMIr5d6"
export OKTA_OAUTH2_CLIENT_SECRET="NEVER-SHOW-SECRETS"
Your Okta domain is the first part of your issuer, before /oauth2/default.
NOTE: You can also use the Okta Admin Console to create your app. See Create a Service App for more information.
Copy and paste the Client ID in to your application.properties file.
Now, start your application as before:
./mvnw spring-boot:run
Run curl (the -v attribute will return the response headers):
> curl -v http://localhost:8080/courses
< HTTP/1.1 401
< Set-Cookie: JSESSIONID=6AA0A042FB1D69CC1CB9747820FDF5E1; Path=/; HttpOnly
< WWW-Authenticate: Bearer
< X-Content-Type-Options: nosniff
< X-XSS-Protection: 1; mode=block
< Cache-Control: no-cache, no-store, max-age=0, must-revalidate
< Pragma: no-cache
< Expires: 0
< X-Frame-Options: DENY
< Content-Length: 0
< Date: Thu, 20 Dec 2018 04:46:21 GMT
The server returns a 401 HTTP code, which means you are unauthorized. Now, let’s create a valid token. An easy way to achieve a token is to generate one using OpenID Connect
First, you’ll need to create a new web application in Okta to use this service:
Run okta apps create. Select the default app name, or change it as you see fit.
Choose Web and press Enter.
Select Other.
Then, change the Redirect URI to https://oidcdebugger.com/debug and use https://oidcdebugger.com for the Logout Redirect URI.
What does the Okta CLI do?
The Okta CLI will create an OIDC Web App in your Okta Org. It will add the redirect URIs you specified and grant access to the Everyone group. You will see output like the following when it’s finished:
Okta application configuration has been written to: /path/to/app/.okta.env
Run cat .okta.env (or type .okta.env on Windows) to see the issuer and credentials for your app.
export OKTA_OAUTH2_ISSUER="https://dev-133337.okta.com/oauth2/default"
export OKTA_OAUTH2_CLIENT_ID="0oab8eb55Kb9jdMIr5d6"
export OKTA_OAUTH2_CLIENT_SECRET="NEVER-SHOW-SECRETS"
Your Okta domain is the first part of your issuer, before /oauth2/default.
NOTE: You can also use the Okta Admin Console to create your app. See Create a Web App for more information.
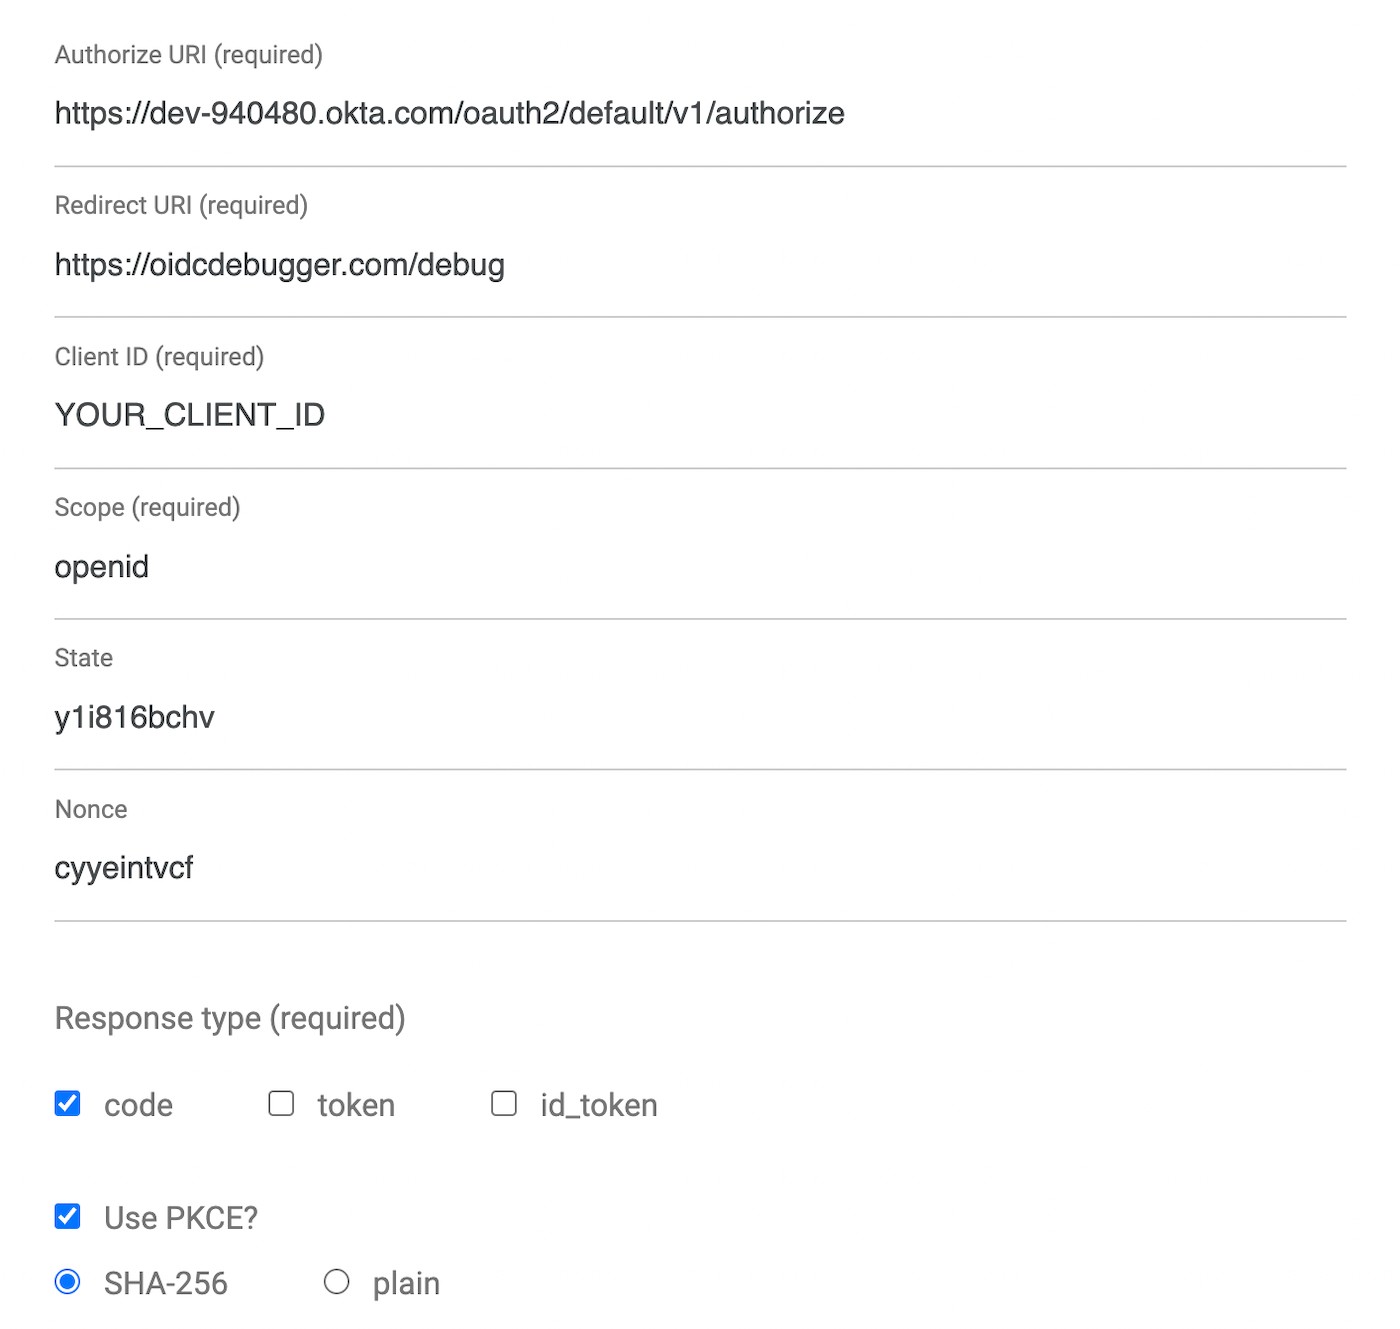
An easy way to get an access token is to generate one using OpenID Connect Debugger. Open the site in a new window or tab. Fill in your client ID, and use https://{yourOktaDomain}/oauth2/default/v1/authorize for the Authorize URI. Select code for the response type and Use PKCE.
Submit the form to start the authentication process. You’ll receive an Okta login form if you are not logged in or you’ll see the screen below with your custom token.
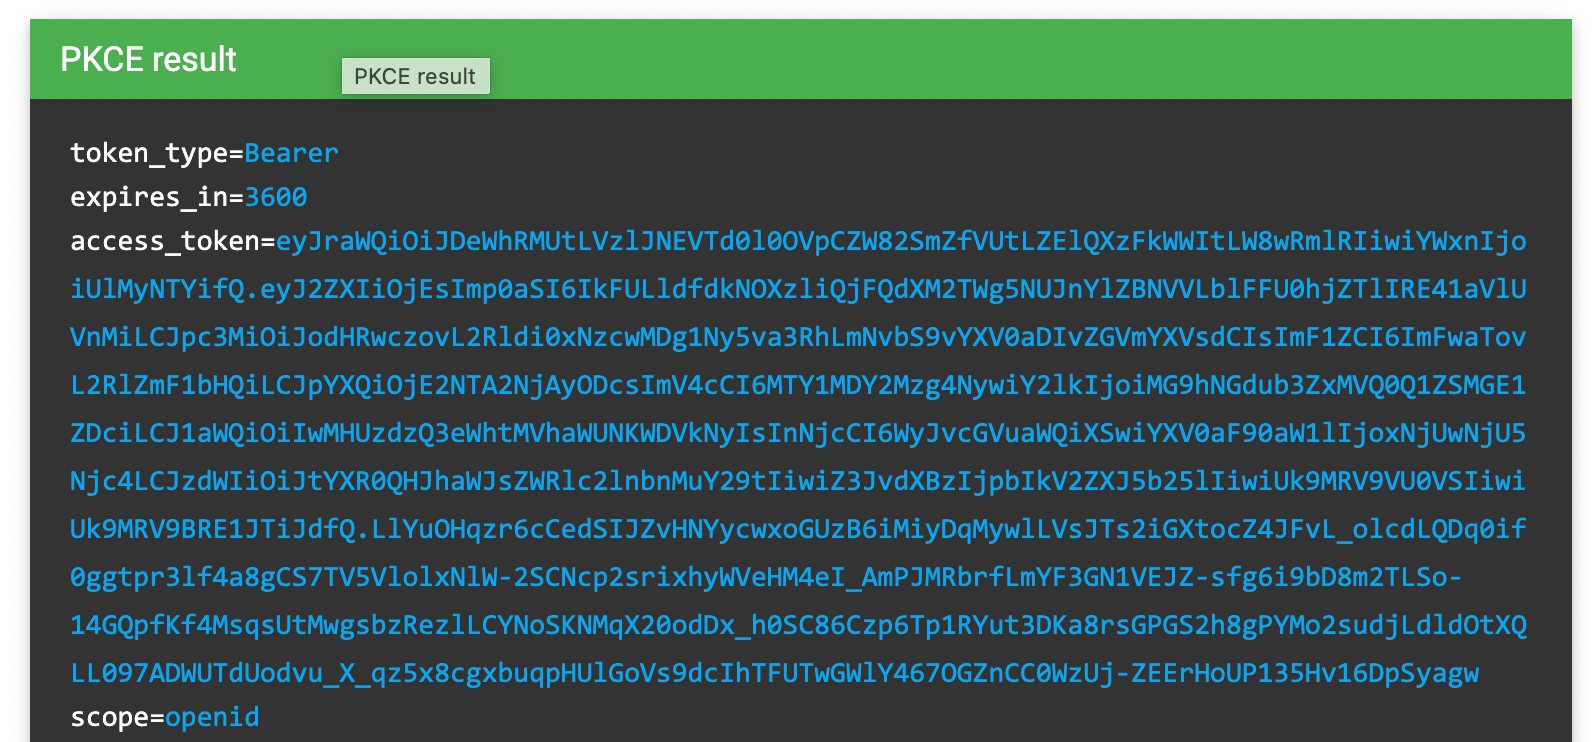
The access token will be valid for one hour so you can do a lot of testing with your API. It’s simple to use the token, just copy it and modify the curl command to use it as follows:
export TOKEN={YOUR_TOKEN}
curl -v -H "Authorization: Bearer ${TOKEN}" http://localhost:8080/teachers
Pretty sweet, eh?!
Versioning Schema Changes in PostgreSQL with Flyway
Hibernate DDL creation is a nice feature for PoCs or small projects. For more significant projects that have a complex deployment workflow and features like version rollback in case of a significant issue, the solution is not sufficient.
There are several tools to handle database migrations, and one of the most popular is Flyway, which works flawlessly with Spring Boot. Briefly, Flyway looks for SQL scripts on your project’s resource path and runs all scripts not previously executed in a defined order. Flyway stores what files were executed into a particular table called SCHEMA_VERSION.
First, add Flyway as a dependency in your pom.xml. When Spring Boot detects Flyway on the classpath, it will run it on startup:
<dependency>
    <groupId>org.flywaydb</groupId>
    <artifactId>flyway-core</artifactId>
</dependency>
By default, Flyway looks at files in the format V$X__$DESCRIPTION.sql, where $X is the migration version name, in folder src/main/resources/db/migration. Create two files: one for the DDL and another for sample data:
V1__ddl.sql
CREATE TABLE course
  (
     id         UUID NOT NULL,
     NAME       VARCHAR(255),
     rate       INT2 NOT NULL,
     workload   INT4 NOT NULL,
     teacher_id UUID,
     PRIMARY KEY (id)
  );

CREATE TABLE teacher
  (
     id         UUID NOT NULL,
     email      VARCHAR(255),
     NAME       VARCHAR(255),
     pictureurl VARCHAR(255),
     PRIMARY KEY (id)
  );

ALTER TABLE course
  ADD CONSTRAINT fk_course_teacher FOREIGN KEY (teacher_id) REFERENCES teacher;
V2__data.sql
INSERT INTO teacher
            (id,
             email,
             NAME,
             pictureurl)
VALUES      ( '531e4cdd-bb78-4769-a0c7-cb948a9f1238',
              'jirafales@yahoo_.com',
              'Profesor Jirafales',
              'https://upload.wikimedia.org/wikipedia/commons/thumb/d/d1/Ruben2017.jpg/245px-Ruben2017.jpg');

INSERT INTO teacher
            (id,
             email,
             NAME,
             pictureurl)
VALUES      ('6924b3ad-a7e7-4a9a-8773-58f89ef88509',
             'director@xproject_.com',
             'Professor X',
             'https://encrypted-tbn0.gstatic.com/images?q=tbn:ANd9GcS9uI1Cb-nQ2uJOph4_t96KRvLSMjczAKnHLJYi1nqWXagvqWc4');

INSERT INTO course
            (id,
             NAME,
             rate,
             teacher_id,
             workload)
VALUES      ('aeebbc96-52be-43fa-8c01-61b9fbca8fd7',
             'Mathematics',
             10,
             '531e4cdd-bb78-4769-a0c7-cb948a9f1238',
             20);

INSERT INTO course
            (id,
             NAME,
             rate,
             teacher_id,
             workload)
VALUES      ('a6e54dad-a5a6-46c6-92b0-d61a78abb142',
            'Spanish',
             10,
             '531e4cdd-bb78-4769-a0c7-cb948a9f1238',
             1)  ;

INSERT INTO course
            (id,
             NAME,
             rate,
             teacher_id,
             workload)
VALUES      ('13710917-7469-4bd7-91cc-af8df36213c9',
             'Dealing with unknown',
             100,
             '6924b3ad-a7e7-4a9a-8773-58f89ef88509',
             10) ;

INSERT INTO course
            (id,
             NAME,
             rate,
             teacher_id,
             workload)
VALUES      ('c5e24451-86d3-4f20-ae06-55810c3cf350',
             'Handling your mental power',
             50,
             '6924b3ad-a7e7-4a9a-8773-58f89ef88509',
             1000) ;

INSERT INTO course
            (id,
             NAME,
             rate,
             teacher_id,
             workload)
VALUES      ('d5063295-f1f6-44d3-8e3a-5ba5d8fb46eb',
             'Introduction to psychology',
             100,
             '6924b3ad-a7e7-4a9a-8773-58f89ef88509',
             90);
Before starting the project again, delete the class DataFillerService since these SQL files will now import all data.
In application.properties change the ddl-auto configuration to validate:
spring.jpa.hibernate.ddl-auto=validate
This causes Hibernate to validate the schema to see if it matches with what’s defined in Java. If no match is found, the application will not start.
Delete and create a new PostgreSQL database instance, since the first instance was created using JPA.
docker rm -f dev-postgres
docker run --name dev-postgres -p 5432:5432 -e POSTGRES_PASSWORD=mysecretpassword -d postgres:11
docker exec dev-postgres psql -U postgres -c"CREATE DATABASE coursedb" postgres
Now, start Spring Boot again:
./mvnw spring-boot:run
You will see the same data exposed, but if you have a look into the logs, will notice Flyway runs the database migration:
2018-11-25 23:50:12.941  INFO 30256 --- [           main] o.f.core.internal.command.DbValidate     : Successfully validated 2 migrations (execution time 00:00.037s)
2018-11-25 23:50:12.960  INFO 30256 --- [           main] o.f.c.i.s.JdbcTableSchemaHistory         : Creating Schema History table: "public"."flyway_schema_history"
2018-11-25 23:50:13.010  INFO 30256 --- [           main] o.f.core.internal.command.DbMigrate      : Current version of schema "public": << Empty Schema >>
2018-11-25 23:50:13.013  INFO 30256 --- [           main] o.f.core.internal.command.DbMigrate      : Migrating schema "public" to version 1 - ddl
2018-11-25 23:50:13.046  INFO 30256 --- [           main] o.f.core.internal.command.DbMigrate      : Migrating schema "public" to version 2 - data
2018-11-25 23:50:13.066  INFO 30256 --- [           main] o.f.core.internal.command.DbMigrate      : Successfully applied 2 migrations to schema "public" (execution time 00:00.109s)
Scratch the NoSQL Surface with Spring Boot and PostgreSQL’s JSONB Data Structure
NoSQL databases are, as the name says, databases that do not store their data with relationships. There are many types of NoSQL databases: graph databases, key-value stores, document, etc. Generally speaking, one of the most significant advantages of this kind of database is the lack of schema enforcement (you can mix a different kind of data), different levels of data consistency and better performance in some cases.
PostgreSQL adopted some data types to handle JSON data inside its data structures. This datatype is called JSONB, and this section shows how it is possible to use it with Spring Boot and without changing your current schema.
First, create a new migration file V3__teacher_reviews.sql.
ALTER TABLE teacher
  ADD COLUMN reviews jsonb
To properly work with this custom datatype, you need to add a dependency that correctly handles it. Add the following to pom.xml:
<dependency>
    <groupId>com.vladmihalcea</groupId>
    <artifactId>hibernate-types-52</artifactId>
    <version>2.3.4</version>
</dependency>
The column reviews stores a JSON array with all reviews a teacher received. First, you need to change the superclass to define the new datatype correctly:
EntityWithUUID.java
import com.vladmihalcea.hibernate.type.json.JsonBinaryType;
import org.hibernate.annotations.Type;
import org.hibernate.annotations.TypeDef;
import org.hibernate.annotations.TypeDefs;

import javax.persistence.Id;
import javax.persistence.MappedSuperclass;
import java.util.UUID;

@MappedSuperclass
@TypeDefs({
    @TypeDef(name = "jsonb", typeClass = JsonBinaryType.class)
})
public class EntityWithUUID {
    @Id
    @Type(type = "pg-uuid")
    private UUID id;

    public EntityWithUUID() {
        this.id = UUID.randomUUID();
    }
}
Now, create a class called Review in the entities package:
package com.okta.developer.postgresql.entities;

import lombok.AllArgsConstructor;
import lombok.Data;
import lombok.NoArgsConstructor;
import java.io.Serializable;
import java.time.LocalDate;

@Data
@AllArgsConstructor
@NoArgsConstructor
public class Review implements Serializable {
    private String author;
    private String review;
    private LocalDate date;
}
This class needs to implement Serializable as it is stored in JSON format. Now, change Teacher class to have a reviews property:
import lombok.AllArgsConstructor;
import lombok.Data;
import lombok.NoArgsConstructor;
import org.hibernate.annotations.Type;

import javax.persistence.Basic;
import javax.persistence.Column;
import javax.persistence.Entity;
import javax.persistence.FetchType;
import java.util.List;

@Entity
@Data
@AllArgsConstructor
@NoArgsConstructor
public class Teacher extends EntityWithUUID {

    private String name;
    private String pictureURL;
    private String email;

    @Type(type = "jsonb")
    @Column(columnDefinition = "jsonb")
    @Basic(fetch = FetchType.LAZY)
    private List<Review> reviews;
}
Now you have set a list of data type jsonb but also added a fetch = LAZY property. The property tells Hibernate NOT to retrieve the attribute value unless asked. Without the property, every call to a teacher instance will process JSON and create review objects. Hibernate needs a Maven plugin to work with lazy attributes properly. Edit the pom.xml file and add the following snippet in the <plugins> section.
<plugin>
    <groupId>org.hibernate.orm.tooling</groupId>
    <artifactId>hibernate-enhance-maven-plugin</artifactId>
    <version>5.4.1.Final</version>
    <executions>
        <execution>
            <configuration>
                <failOnError>true</failOnError>
                <enableLazyInitialization>true</enableLazyInitialization>
            </configuration>
            <goals>
                <goal>enhance</goal>
            </goals>
        </execution>
    </executions>
</plugin>
OK, you are almost there. You just need to add some methods to add reviews to a teacher. I decided to take a more MVC approach here and create a Service and a Controller.
TeacherService.java
package com.okta.developer.postgresql.service;

import com.okta.developer.postgresql.entities.Review;
import javax.validation.constraints.NotNull;

public interface TeacherService {
    /**
     *
     * @param teacherID
     * @param review
     * @throws javax.persistence.EntityNotFoundException
     */
    void addReview(@NotNull String teacherID, @NotNull Review review);
}
SimpleTeacherService.java
package com.okta.developer.postgresql.service;

import com.okta.developer.postgresql.dao.TeacherDAO;
import com.okta.developer.postgresql.entities.Review;
import com.okta.developer.postgresql.entities.Teacher;
import org.springframework.stereotype.Service;
import org.springframework.transaction.annotation.Isolation;
import org.springframework.transaction.annotation.Transactional;
import javax.persistence.EntityNotFoundException;
import java.time.LocalDate;
import java.util.ArrayList;
import java.util.Objects;
import java.util.UUID;

@Service
public class SimpleTeacherService implements TeacherService {
    private final TeacherDAO teacherDAO;

    public SimpleTeacherService(TeacherDAO teacherDAO) {
        this.teacherDAO = teacherDAO;
    }

    @Override
    @Transactional(isolation = Isolation.SERIALIZABLE)
    public void addReview(String teacherID, Review review) {
        Objects.requireNonNull(teacherID);
        Objects.requireNonNull(review);
        Teacher teacher = teacherDAO
                .findById(UUID.fromString(teacherID))
                .orElseThrow(() -> new EntityNotFoundException(teacherID));
        review.setDate(LocalDate.now());
        if(teacher.getReviews() == null){
            teacher.setReviews(new ArrayList<>());
        }
        teacher.getReviews().add(review);
        teacherDAO.save(teacher);
    }
}
TeacherController.java
package com.okta.developer.postgresql.controllers;

import com.okta.developer.postgresql.entities.Review;
import com.okta.developer.postgresql.service.TeacherService;
import org.springframework.http.ResponseEntity;
import org.springframework.web.bind.annotation.*;

import javax.persistence.EntityNotFoundException;

@RestController
public class TeacherController {

    private final TeacherService teacherService;

    public TeacherController(TeacherService teacherService) {
        this.teacherService = teacherService;
    }

    @PostMapping("/teachers/{id}/review")
    public ResponseEntity addReview(@RequestBody Review review, @PathVariable("id") String teacherID){
        try {
            teacherService.addReview(teacherID, review);
            return ResponseEntity.ok().build();
        }
        catch (EntityNotFoundException e){
            return ResponseEntity.notFound().build();
        }
    }
}
In SimpleTeacherService, note that there is an annotation @Transactional(isolation = Isolation.SERIALIZABLE). This means every call to this method runs in the most secure transaction level. In other words, once the code reads the reviews JSON value, no other code can read or write on the reviews column (it is blocked) until the transaction finishes. Why’s that? Since you are manipulating JSON content if a concurrent transaction updates the column, one of them will have consistency problems.
You can now start your app:
./mvnw spring-boot:run
And test the review upload by running CURL:
curl -X POST \
  -H "Authorization: Bearer $TOKEN"\
  http://localhost:8080/teachers/531e4cdd-bb78-4769-a0c7-cb948a9f1238/review \
  -H 'Content-Type: application/json' \
  -d '{
    "author" : "Raphael",
    "review" : "Test"
  }'
Learn More about Spring Boot, PostgreSQL, Hibernate, JPA, and Spring Data REST
In this tutorial, you learned how to integrate Spring Boot with PostgreSQL and use some advanced technologies like Flyway and JSONB. You can find the source code for this blog post on GitHub.
There is plenty more to learn about JPA, Hibernate and PostgreSQL. Please refer to the following posts if you’re interested in more knowledge:
- Create a Secure Spring REST API
- Build a Basic App with Spring Boot and JPA using PostgreSQL
- Use React and Spring Boot to Build a Simple CRUD App
- Build a Basic CRUD App with Angular 7.0 and Spring Boot 2.1
- NoSQL Options for Java Developers
Like what you learned today? Follow us on Twitter, and subscribe to our YouTube channel for more awesome content!
Okta Developer Blog Comment Policy
We welcome relevant and respectful comments. Off-topic comments may be removed.