Build a Basic Android App with Xamarin and Visual Studio

Are you a .NET developer that has always wanted to make a mobile application? Or maybe you have tried building native mobile apps with Android or iOS but didn’t like the languages? Well then, you are in luck! The .NET world has been blessed with Xamarin; a set of tools that lets you build mobile apps for Android, iOS, and Windows within Visual Studio.
Xamarin has two main flavors: Xamarin platform (Xamarin.iOS and Xamarin.Android) and Xamarin.Forms. With Xamarin.Forms a vast majority of your business logic and user interface can be written within one shared project that produces fully functioning apps on all 3 of the iOS, Android and the Windows (UWP) operating systems. Xamarin platform, on the other hand, is very much platform-specific work and is more akin to writing native apps but with C#.
In this tutorial, I’ll be looking more closely at the Xamarin platform and the Android operating system toolset known as Xamarin.Android. The overall aim is to enable you to create a simple native Android app with basic user authentication included.
Note: In May 2025, the Okta Integrator Free Plan replaced Okta Developer Edition Accounts, and the Okta CLI was deprecated.
We preserved this post for reference, but the instructions no longer work exactly as written. Replace the Okta CLI commands by manually configuring Okta following the instructions in our Developer Documentation.
Set Up Visual Studio and Your Environment
To follow along you’ll need a copy of Visual Studio, plus the ‘Mobile development with .NET’ workload. You can either enable this feature from first installation of Visual Studio or access it from the ‘Tools -> Get Tools and Features…’ menu item:
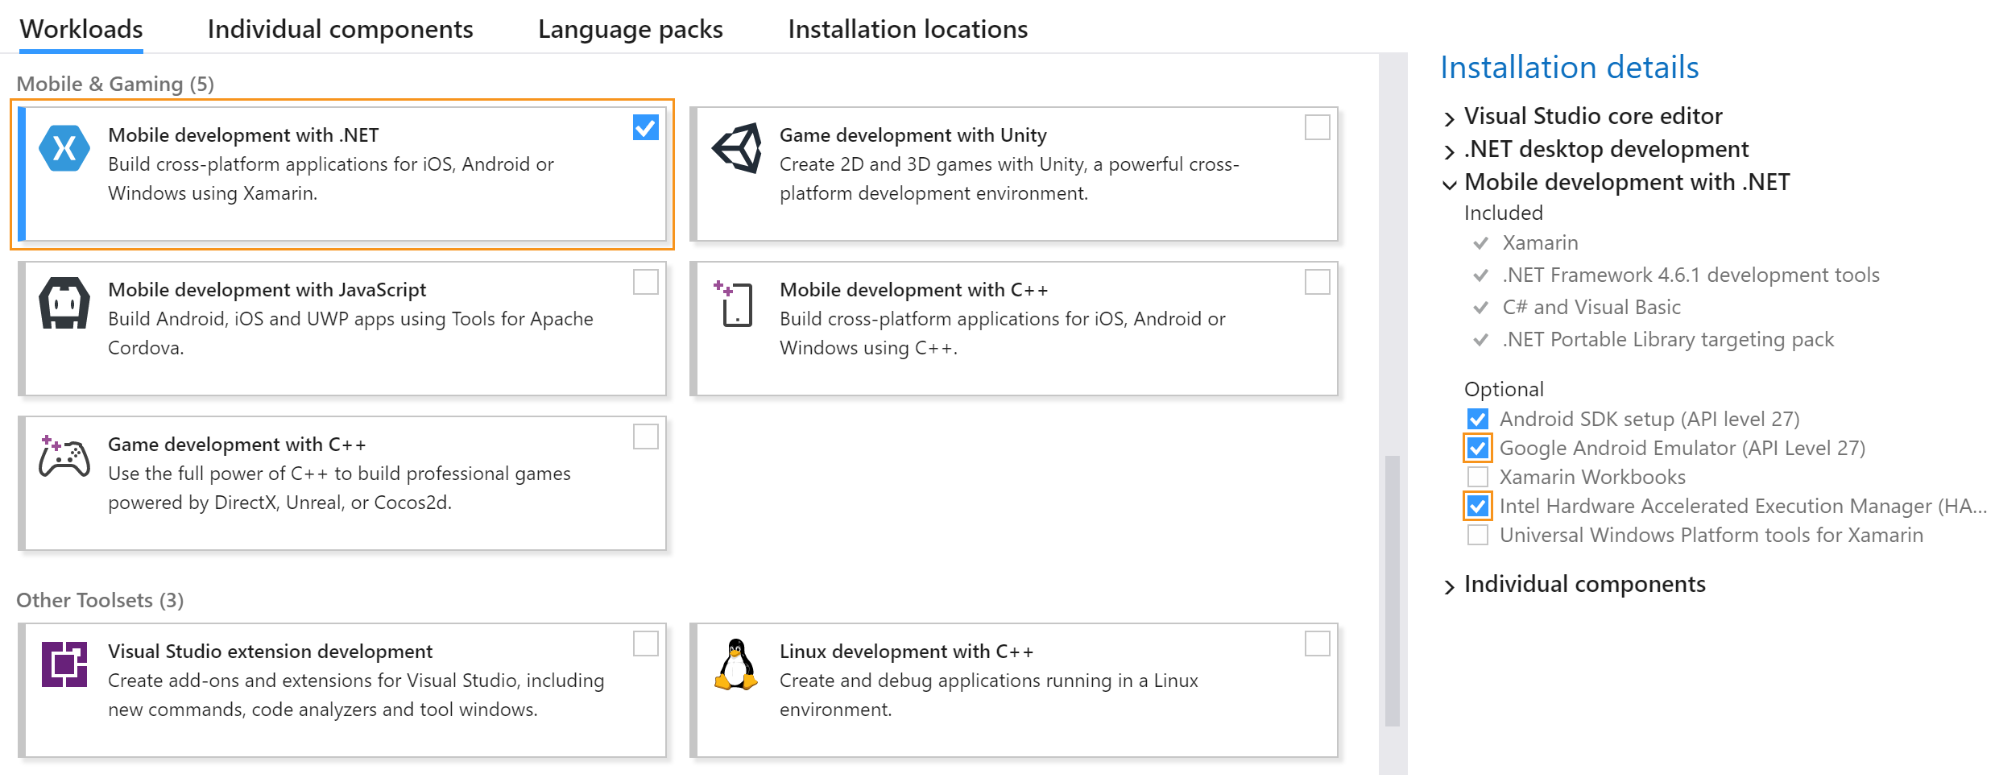
When testing and running your app you have the choice of doing so with either an Android emulator running on your development machine, or by directly connecting to an existing Android device. There’s no right option here and different developers prefer different form factors. If you choose the former option, you’ll need to ensure once you’ve selected the workload that on the right-hand pane (‘Installation details’) the checkboxes for Intel Hardware Accelerated Execution Manager and Google Android Emulator are selected (as seen above).
Verify Your Android Environment in Visual Studio
To verify everything installed properly and was configured correctly, go to ‘Tools -> Options -> Xamarin -> Android Settings’ and check your Java Development Kit Location and Android SDK Location paths are valid (i.e. have a green tick):
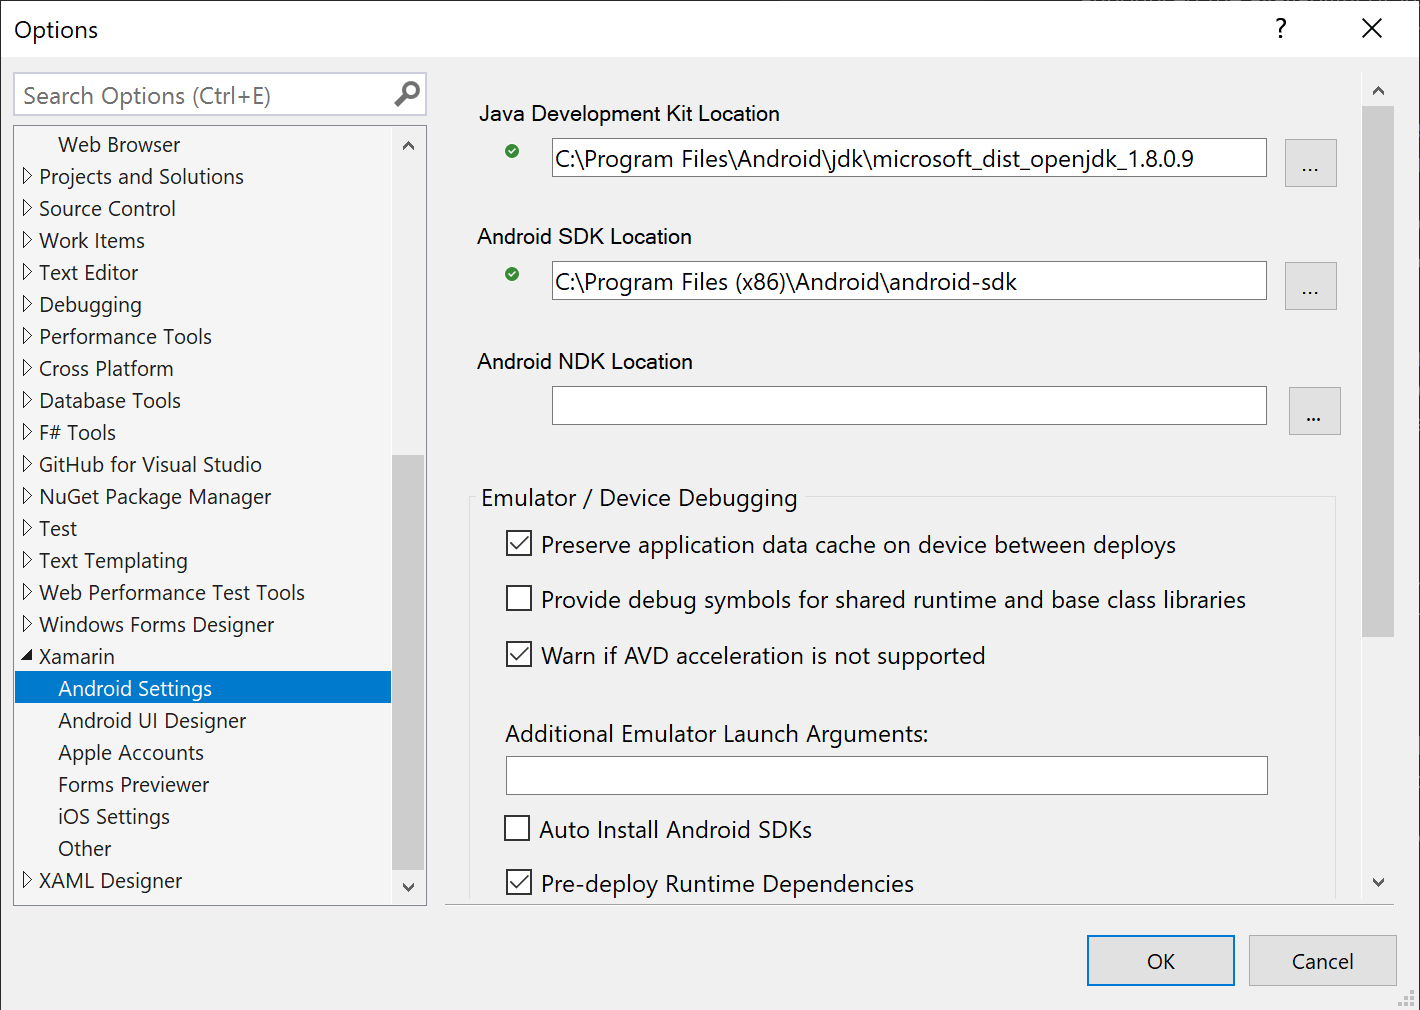
If either are missing you’ll have to manually install the Java Development Kit or Android SDK respectively.
Create a Xamarin App
Start by creating a new project and select the ‘Android App (Xamarin)’ master template (found under the Android menu). On the next page you’ll want to pick the ‘Single View App’ option as it is a great starter template to work from.
With regards to the Minimum Android Version, this is something down to your personal choice as the developer. There is a trade-off here between being able to access the latest and greatest API features in newer versions and supporting your customers that have older versions. To help you make this decision, Google publishes platform version distribution data they collect as part of their Distribution dashboard on a fairly regular cadence. My personal preference is between 5.0 or 6.0 depending on if this is an app for public consumption or a commissioned app for corporate phones only (i.e. they will likely have the latest updates); in this example I’ve gone with the latter. Note this version differs from the Target Android Version and that should always be set to the latest released SDK version, as anything less won’t be accepted into the Google Play store.
Once you’ve got this created all that’s left is to import the required NuGet packages. For this tutorial you will need:
- Xamarin.OpenId.AppAuth.Android - To Authenticate the user you will be using OpenID Connect standard (an enhancement of OAuth 2.0). The easiest way to implement client code that abides by this specification is by using the AppAuth client SDK for Android, and helpfully Xamarin has ported a package of this functionality available for you to use.
- System.IdentityModel.Tokens.Jwt - The method of authentication here uses JSON Web Tokens. To extract the data needed from these tokens you’ll need this package.
Additionally, you’ll need these two packages as well as they’re relied upon by AppAuth:
- Xamarin.Android.Support.v4
- Xamarin.Android.Support.CustomTabs
Familiarize Yourself with the Xamarin Project
If you’ve never worked with Android before, one of the key principles to get your head around is the concept of an Activity. Activities are components used to display your user interface; in their most basic form, you can think of Activities as being equal to pages in an app that the user can navigate between. An Activity in code is represented by a class, however like a page in ASP.NET you can (and almost always will) associate an XML-based layout file (a .axml file) with it for a displayable design. All new projects create a ‘MainActivity.cs’ and ‘activity_main.axml’ file to start with as the first Activity (i.e. page) to run upon opening the app. This can be changed to any other Activity by utilisation of the property MainLauncher = true within the Activity attribute of the class.
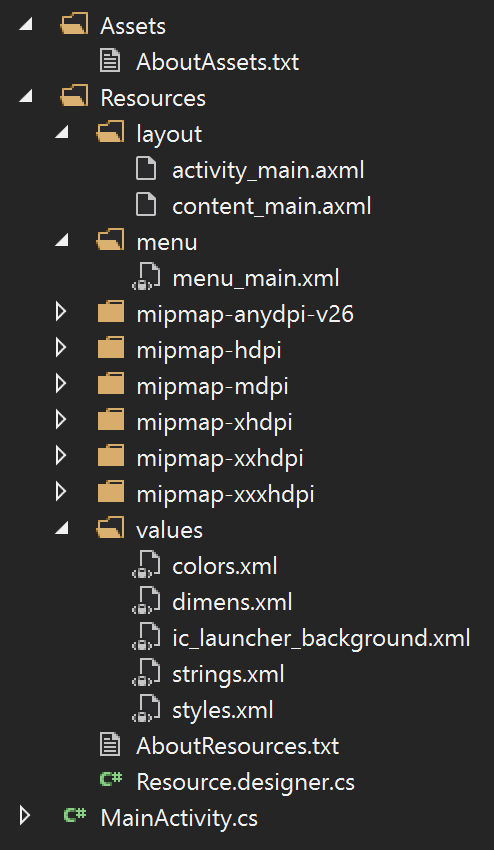
Resources are designed to be handled within their own directory and follow a somewhat strict naming convention. I’d strongly recommend storing as much of your resources as is feasible in this directory since it simplifies the reuse of these variables for your ongoing development. In the ‘values’ directory of the Resources directory is where you will find files with specific purposes:
- Strings.xml - Hosts all user facing strings. This one is especially important to use as it enables you to localise your strings for a global audience.
- Styles.xml - Where you’ll find the attributes for styling your design objects; think of it like a CSS file.
- Colors.xml - A place to store references to the colours you use most frequently as part of your styling.
- Dimens.xml - As the name might imply, where you define set dimensions for your app’s layout.
The other notable directories don’t follow any naming convention for their files, but they must contain certain file types:
- Layout - Location for storing your .axml files. These files define full Activity layouts, layout components that you programmatically generate and populate, layouts of dialog (alert) boxes, etc.
- Menu - Where you’ll find definitions of menus and their items. These are .xml files that have
menuas the root element anditemchild elements, of which can be grouped together withgroupelements. Most common menus you’ll encounter are the overflow menu (from the three vertical dots button) or the navigation menu (from the home ‘hamburger’ button). - Mipmap - Where you want to define images that need to be scaled depending on the screen density, i.e. those referenced by other apps, and not used internally. The app’s icon is the most common content you would put in the mipmap directories.
- Drawable - Not standard in a default project template, but can be created yourself. This is where you store your images/drawable content to be used within the app, e.g. splash screen, custom progress bar designs, icons used within the app, etc.
Lastly, if you have any raw content files that you want to use as part of your application (e.g. a text or font file), then the Assets directory is where to place them. As Assets these files will be deployed with your app for you to access with the Asset Manager.
To learn more about Assets and Resources and how to use them, there are handy ‘About’ text files in each directory of a newly created project.
Add User Authentication to Xamarin with OpenID Connect
Most apps these days require some form of user identification to enable the developer to offer bespoke experiences and in turn enable the user to keep their data across devices/installations. In addition to this there’s the matter of access control that might be useful to authorize a subset of users for extra functionality. Naturally this can be quite the laborious task, especially if you’re in the business of creating apps and you’ll need a new system for every single one. Thankfully with Okta you can set up an application in mere minutes and then all the hard work is done for you! The Okta service is OAuth 2.0 compliant and a certified OpenID Connect Provider, and so works perfectly with the AppAuth client SDK for all your authentication and authorization needs.
Set Up your Okta Application
Firstly, you should set up a new application in your Okta account for this project. If you’ve not got one yet, it’s really easy to create a new forever-free developer account.
Once that’s complete and you’ve logged in to the developer dashboard, take a note of the Org URL as we’ll need that later:
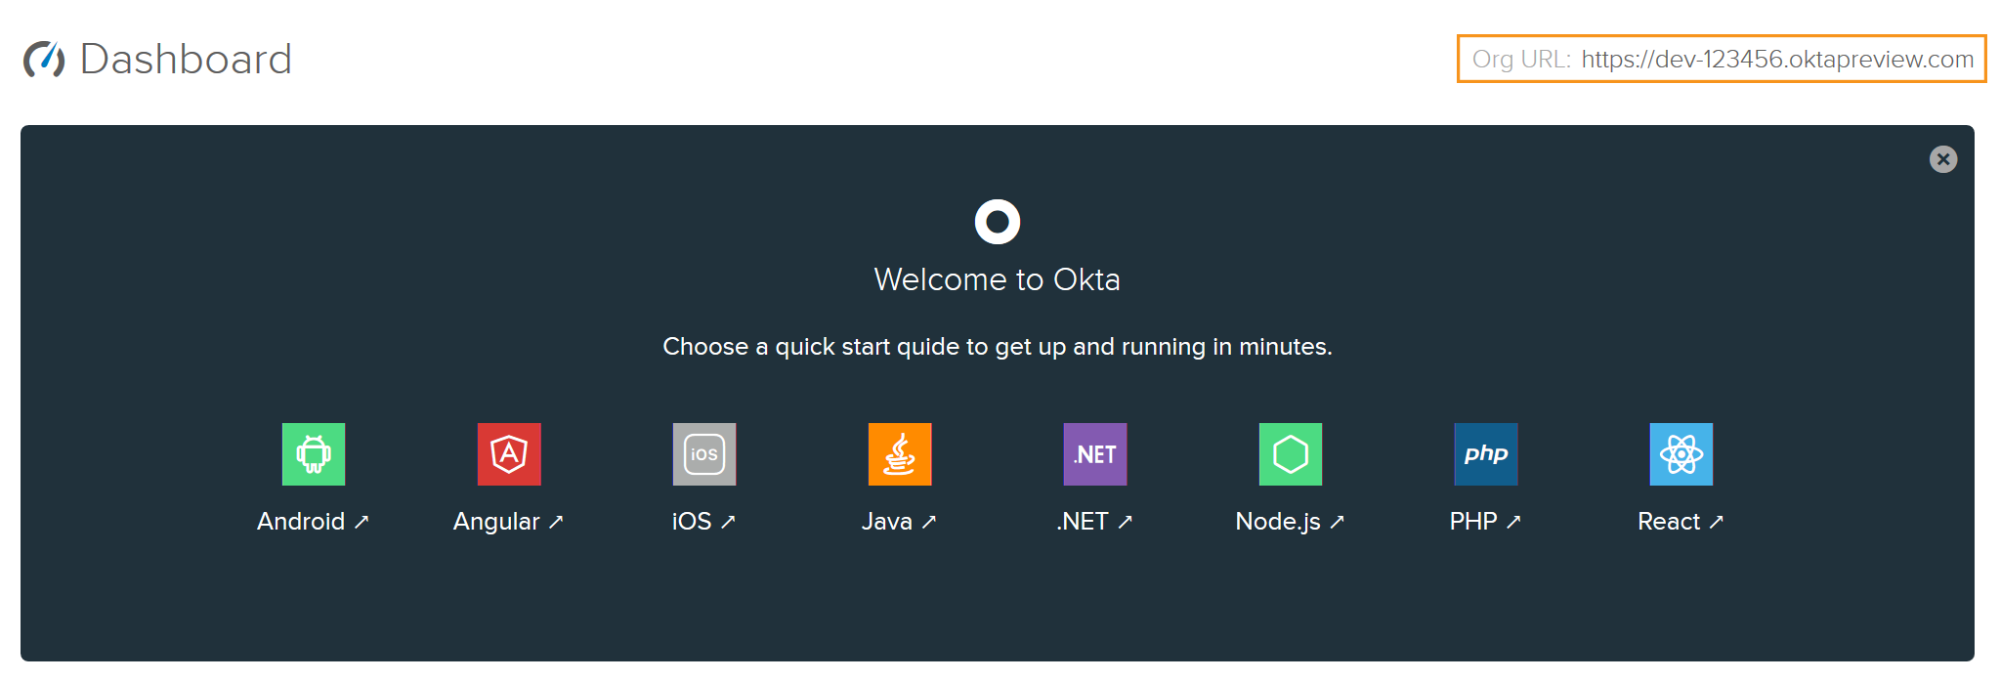
From the dashboard go to the ‘Applications’ tab and from there ‘Add Application’. You’re creating a native Android application, so it’s best to pick the ‘Native’ platform template.
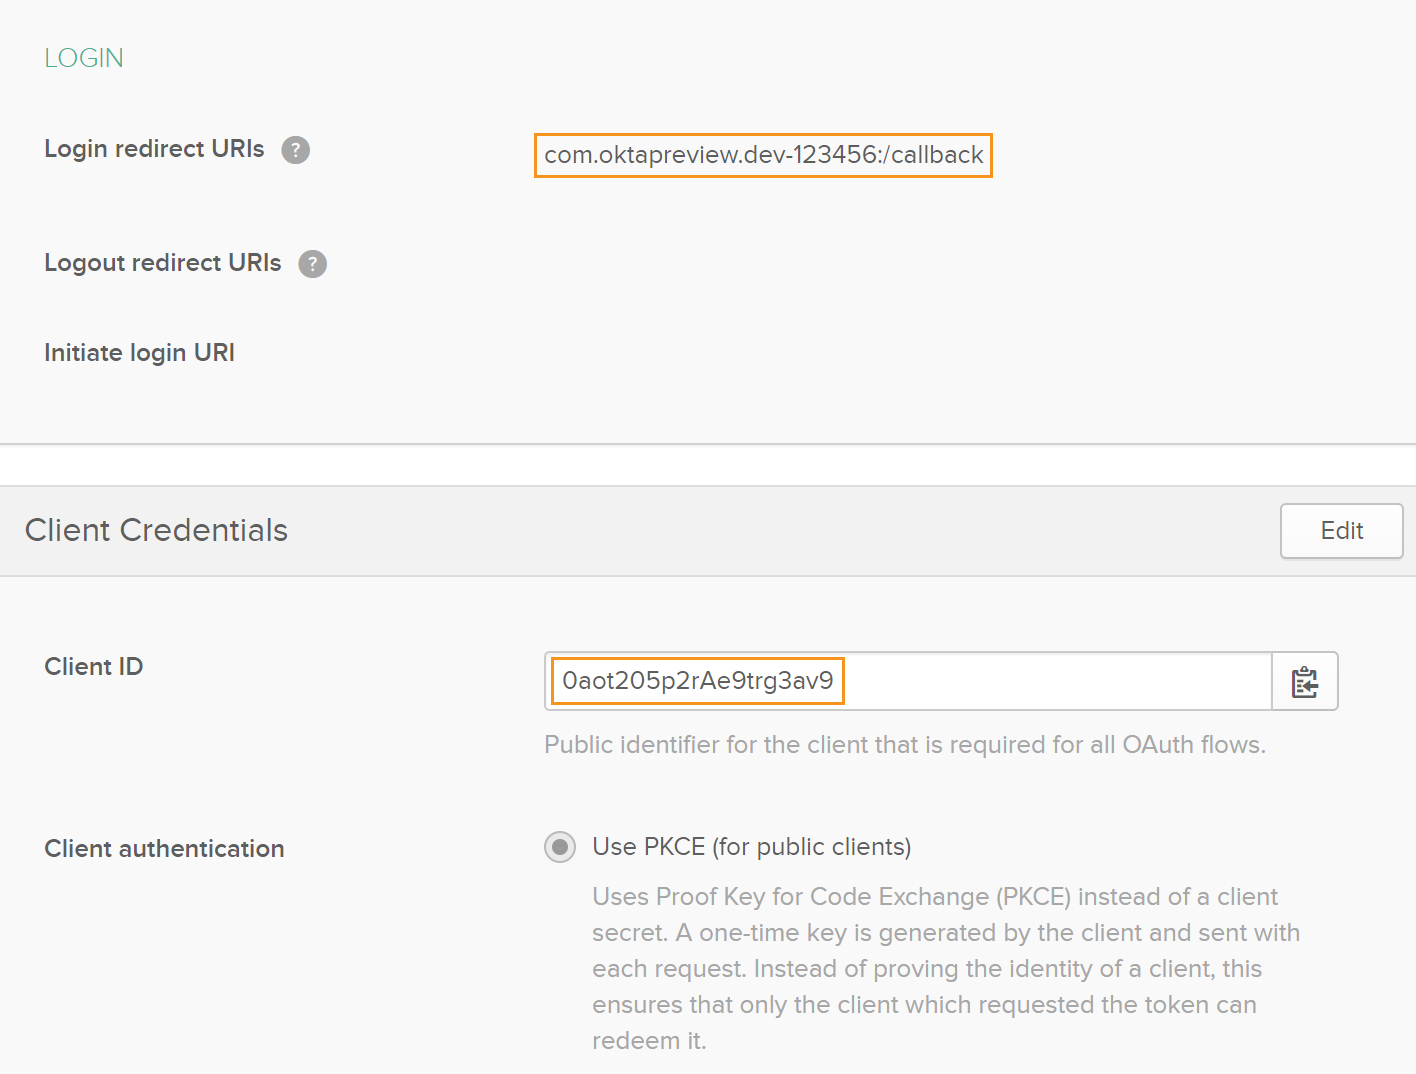
From this page add a name for your application and leave everything else as default. Once saved take note of your Login redirect URIs and Client ID as you’ll be needing these next.
So you can use these three values from Okta with ease in the future, I would recommend putting them in their own static class within a new directory for the authentication logic:
public static class Configuration
{
    public const string ClientId = "{yourClientId}";

    public const string LoginRedirectUri = "{yourRedirectUri}";

    public const string OrgUrl = "https://{yourOktaDomain}";
}
Create the Authentication Provider
Let’s get the boilerplate code out of the way. You need to configure the app to inform it of your redirect URI scheme. The scheme is your login redirect URI (in standard reverse domain name form) without the path. For example, from the above screenshot my scheme would be ‘com.oktapreview.dev-123456’.
The easiest way to do this is to insert the below intent filter snippet into your AndroidManifest.xml file in the Properties folder of your solution. Add the following XML within the Application tag and change the scheme value to your own:
<activity android:name="net.openid.appauth.RedirectUriReceiverActivity">
    <intent-filter>
        <action android:name="android.intent.action.VIEW" />
        <category android:name="android.intent.category.DEFAULT" />
        <category android:name="android.intent.category.BROWSABLE" />
        <data android:scheme="{yourRedirectRriScheme}" />
    </intent-filter>
</activity>
You also need to define the model for the result of your authorization with a simple class. While I won’t be using all the values I’ve written below within the code, I will show how to populate them for you to use after. As this is part of your application’s model, create a folder called Models and add an AuthorizationResult.cs class inside it. Then, add the following code:
public class AuthorizationResult
{
    public string AccessToken { get; set; }

    public string IdentityToken { get; set; }

    public bool IsAuthorized { get; set; }

    public string RefreshToken { get; set; }

    public string Scope { get; set; }
}
Android doesn’t have a global state for you to work with, and so if you want to pass simple values between activities, the best way to do this is with the Extras functionality on the Intent object. An Intent is a predefined class in Android and another core concept to understand. It is the abstraction of an operation to be performed (i.e. your ‘intentions’), and to navigate forward to another activity you need to create an instance of this class with which activity you ‘intend’ to go to. The Extras properties on the Intent object are in effect just a dictionary of keys to object values and are accessed by Put and typed Get methods.
While these methods keep the usage relatively clear and easy I personally like to keep all access to them within their own class (to be precise, an extensions class), to maintain a better separation of concerns. This is extremely useful as you don’t need to access the keys across classes and can assure type safety when putting and getting these values. In your authorization provider you’ll be wanting to: store the AuthState, be able to check whether it’s there, and return it if it is. Create a new folder called Extensions in the root of the solution. Then add a new class called IntentExtensions.cs. Make the class public and static, then add the following code inside the class:
public const string AuthStateKey = "authState";

public static string GetAuthStateExtra(this Intent intent)
{
    return intent.GetStringExtra(AuthStateKey);
}

public static bool HasAuthStateExtra(this Intent intent)
{
    return intent.HasExtra(AuthStateKey);
}

public static void PutAuthStateExtra(this Intent intent, AuthState authState)
{
    intent.PutExtra(AuthStateKey, authState.JsonSerializeString());
}

public static bool TryGetAuthStateFromExtra(this Intent intent, out AuthState authState)
{
    authState = null;

    if (!intent.HasAuthStateExtra())
    {
        return false;
    }

    try
    {
        authState = AuthState.JsonDeserialize(intent.GetAuthStateExtra());
    }
    catch (JSONException)
    {
        return false;
    }

    return authState != null;
}
Now it’s time to define the authorization provider, AuthorizationProvider.cs in the Authentication folder you created before for the Configuration.cs class. Firstly, remove all the using statements inside the newly created class, then declare the configuration as static readonly variables:
private static readonly Uri ConfigurationEndpoint =
    Uri.Parse($"{Configuration.OrgUrl}/oauth2/default/.well-known/openid-configuration");

private static readonly string[] Scopes = new[] { "openid", "profile", "email", "offline_access" };
The configuration endpoint is a standard in OpenID as the discovery endpoint to find all that’s supported. Note here I’ve written this is using the ‘default’ provider name. If you have a different provider, you’ll want to change this here. Also note that this is using the Android.Net flavour of the Uri class, and not the System version - you’ll need to add the former to your usings or fully qualify the type for this to work. The Scopes variable, like any other OpenID system, defines what we’re authorized to access.
Next you should declare your member variables:
private AuthorizationRequest authorizationRequest;
private PendingIntent completedIntent;

private AuthState authorizationState;

private readonly AuthorizationService authorizationService;
private readonly Context context;
private readonly TaskCompletionSource<bool> taskCompletionSource = new TaskCompletionSource<bool>();
A quick explanation on each:
- The authorization request and completed intent are parameters created for use in making the authorization call. I’ve written them as global variables here to minimise the amount of passing parameters into different methods.
- The authorizationState variable as it’s named defines the current given authorization state.
- The authorizationService variable contains an instance of the authorization service.
- The context variable here is of the calling activity, so you can reference it when necessary.
- Finally, the taskCompletionSource enables you to make all these calls asynchronously and then return once complete.
Now you should define the values of these readonly variables in your constructor, and declare the public methods your code will call:
public AuthorizationProvider(Context context)
{
    authorizationService = new AuthorizationService(context);
    this.context = context;
}

public async Task<AuthorizationResult> SignInAsync()
{
    ...
}

public void NotifyCallback(Intent intent)
{
    ...
}
The SignInAsync method is as you might have guessed an asynchronous method to sign a user in. This returns the AuthorizationResult class you wrote earlier. NotifyCallback on the other hand is for the calling activity, once it has returned from the external sign in page, to call back to the authorization provider and let it know it’s done. The sign in method I’ve broken out into multiple subroutines, and looks like this:
AuthorizationServiceConfiguration serviceConfiguration = await AuthorizationServiceConfiguration.FetchFromUrlAsync(ConfigurationEndpoint);
BuildAuthorizationRequest(serviceConfiguration);
BuildCompletedIntent(serviceConfiguration);
return await RequestAuthorization();
In this you have defined the service configuration, built the authorization request and the intent to call once the authorization has been completed, and then await the request of authorization. To build the authorization request is as follows:
private void BuildAuthorizationRequest(AuthorizationServiceConfiguration serviceConfiguration)
{
    AuthorizationRequest.Builder builder = new AuthorizationRequest.Builder(
        serviceConfiguration,
        Configuration.ClientId,
        ResponseTypeValues.Code,
        Uri.Parse(Configuration.LoginRedirectUri));

    builder.SetScope(string.Join(" ", Scopes));

    authorizationRequest = builder.Build();
}
The job of this method is to abstract away the AuthorizationRequest.Builder work and create the request. Next you need to build the Intent for once the operation has completed:
private void BuildCompletedIntent(AuthorizationServiceConfiguration serviceConfiguration)
{
    Intent intent = new Intent(context, typeof(MainActivity));
    intent.PutAuthStateExtra(new AuthState());

    completedIntent = PendingIntent.GetActivity(context, authorizationRequest.GetHashCode(), intent, 0);
}
The ‘intention’ that you want to perform here is to return to your MainActivity with a new AuthState attached. Lastly in this flow is to deal with executing the request:
private async Task<AuthorizationResult> RequestAuthorization()
{
    authorizationService.PerformAuthorizationRequest(authorizationRequest, completedIntent);

    await taskCompletionSource.Task;

    return new AuthorizationResult()
    {
        AccessToken = authorizationState?.AccessToken,
        IdentityToken = authorizationState?.IdToken,
        IsAuthorized = authorizationState?.IsAuthorized ?? false,
        RefreshToken = authorizationState?.RefreshToken,
        Scope = authorizationState?.Scope
    };
}
As PerformAuthorizationRequest is synchronous and returns void, the code awaits upon the taskCompletionSource member, knowing it will only ever be set once a response has been retrieved. At this very same point you know the authorization state will be populated (if everything succeeded), and so you can return their values as part of the AuthorizationResult.
The second public method NotifyCallback, as I mentioned before, is what you want the MainActivity class to call back on, once your above completedIntent is run. In this method you want to verify the response, update the state appropriately, and if successful, perform a token exchange request:
if (!intent.TryGetAuthStateFromExtra(out authorizationState))
{
    taskCompletionSource.SetResult(false);
    return;
}

AuthorizationResponse authorizationResponse = AuthorizationResponse.FromIntent(intent);
AuthorizationException authorizationException = AuthorizationException.FromIntent(intent);

authorizationState.Update(authorizationResponse, authorizationException);

if (authorizationException != null)
{
    taskCompletionSource.SetResult(false);
    return;
}

authorizationService.PerformTokenRequest(authorizationResponse.CreateTokenExchangeRequest(), ReceivedTokenResponse);
Here you can see in the fail cases I set the result of taskCompletionSource to false, and that will unblock the RequestAuthorization method above. Also, the PerformTokenRequest method takes in a delegate, ReceivedTokenResponse, to be run once it has completed. This method is as follows:
private void ReceivedTokenResponse(TokenResponse tokenResponse, AuthorizationException authorizationException)
{
    authorizationState.Update(tokenResponse, authorizationException);
    taskCompletionSource.SetResult(true);
}
At this point you should have all the authorization data you need, and so can update the state appropriately (where you’ll find the values to return from the sign in method) and set the result to unblock the taskCompletionSource task.
Implement Authentication into Your Xamarin Interface
As a clean-up if you so wish, feel free to remove all references to the ‘Floating Action Bar’ (also written as ‘FAB’) within the main activity class/axml files as they’re unnecessary bloat at this stage.
To allow the user to sign in you now need to implement this functionality into the UI. Given the default design, the most intuitive way to do this would be to add an item to the overflow menu in the top right corner. You can do this by editing the menu_main.xml file in the ‘Resources -> menu’ folder, and adding this item as a child of the menu tag:
<item
    android:id="@+id/action_signin"
    android:orderInCategory="100"
    android:title="@string/action_signin"
    app:showAsAction="never" />
With this code you’ve created a new option with a title to be defined in the string resources file. As mentioned before in Android it’s best practice to put all user facing text in the string resources file. To declare this data, edit the strings.xml file in the ‘Resources -> values’ folder and add these lines:
<string name="action_signin">Sign In</string>
<string name="welcome_message_format">Hi, %1$s!</string>
Not only have I declared a string for the ‘Sign In’ button here, but I’ve also added above a string for a welcome message to the user once they have signed in. The equivalent to the C# code of this string would be “Hi, {0}!”`, where the placeholder is of type string.
Note with all updates to these Resources-based files, the Resource.designer.cs class will automatically be regenerated with new IDs for each object you’ve created, that can be referenced within your code. If this isn’t working for a particular file then select it in Solution Explorer and look at the Properties window. Make sure the CustomTool property is set to the value MSBuild:UpdateGeneratedFiles, as this is likely missing and preventing the designer file from recognising it as a resource.
Next add a ProgressBar to the existing activity_main.axml layout file:
<ProgressBar
    android:id="@+id/signin_progress"
    android:layout_width="wrap_content"
    android:layout_height="wrap_content"
    android:layout_gravity="center"
    android:paddingBottom="12dp"
    android:visibility="gone" />
This ProgressBar (or spinner, as the case is), has an ID you can reference with code, and is set up to sit around the centre of the screen. The visibility is set to gone for now, but once your authorization code is running you can set it to visible and inform the user that the app is busy.
Now you have a button to open authentication and a progress spinner to inform the user the app is busy, it’s time to use them. Within your MainActivity class add the following property to the Activity attribute (above the class header):
LaunchMode = LaunchMode.SingleTask
This property ensures there is only one instance of the MainActivity class, and you don’t keep opening new ones. Once you’ve done this, add a static member variable for the AuthorizationProvder you wrote above and create an instance of it within the existing override of the OnCreate method. Note this should be done after the existing code within the method:
private static AuthorizationProvider authorizationProvider;

protected override void OnCreate(Bundle savedInstanceState)
{
    ...

    authorizationProvider = new AuthorizationProvider(this);
}
Next, override the OnNewIntent method. The purpose of this is when a new intent of this class is created (i.e. when the external sign in window returns), you call the NotifyCallback method from the AuthorizationProvider. Also included in this is a quick check to make sure it’s the expected flow:
protected override void OnNewIntent(Intent intent)
{
    base.OnNewIntent(intent);

    if (intent != null && intent.Data.Path.Equals("/callback", StringComparison.OrdinalIgnoreCase))
    {
        authorizationProvider.NotifyCallback(intent);
    }
}
Now add the code behind the menu item you added. In the existing override of the OnOptionsItemSelected method, add an if statement with a call to a new method that will handle the sign in process as follows:
if (id == Resource.Id.action_signin)
{
    OnSignInAttempted();
    return true;
}
This new method will start by making the ProgressBar you added moments ago visible; to retrieve any component from the layout file, use the generic method FindViewById and enter the component’s ID as its argument. After this, make a call to the SignInAsync method and await its result. Once the call has returned the result is then verified as authorized. If this authorization failed for whatever reason an error dialog appears, and the progress spinner disappears again. I’ll leave detailing the success case for now as you still need somewhere to go in that instance:
private async void OnSignInAttempted()
{
    ProgressBar signInProgress = FindViewById<ProgressBar>(Resource.Id.signin_progress);
    signInProgress.Visibility = ViewStates.Visible;

    AuthorizationResult authorizationResult = await authorizationProvider.SignInAsync();

    if (!string.IsNullOrWhiteSpace(authorizationResult.AccessToken) && authorizationResult.IsAuthorized)

    {
        // Placeholder: Success case
    }
    else
    {
        // Display an error to the user
        AlertDialog authorizationErrorDialog = new AlertDialog.Builder(this)
            .SetTitle("Error!")
            .SetMessage("We were unable to authorize you.")
            .Create();

        authorizationErrorDialog.Show();
        signInProgress.Visibility = ViewStates.Gone;
    }
}
When the user is authenticated you should redirect them to the next page of your experience. If you recall earlier each page is represented by an Activity, and so you need to create a new one now.
To start, within the ‘Resources -> layout’ folder you’ll need to create the new activity layout file “activity_dashboard.axml”. The easiest way to do this is by going to the New Item… option in the context menu and selecting the ‘Android Layout’ template. Within your new layout file add a simple TextView component to display text like this:
<LinearLayout xmlns:android="http://schemas.android.com/apk/res/android"
    android:orientation="vertical"
    android:layout_width="match_parent"
    android:layout_height="match_parent"
    android:gravity="center">

    <TextView
        android:id="@+id/welcome_message"
        android:textAppearance="?android:attr/textAppearanceMedium"
        android:layout_width="wrap_content"
        android:layout_height="wrap_content"
        android:layout_centerInParent="true" />

</LinearLayout>
In this snippet you have a TextView component with a referenceable ID that’s centered in the middle of the page, of which will display a welcome message. Next create a corresponding activity class ‘DashboardActivity’ by means of the ‘New Item…’ option in the context menu from the project in the solution explorer and selecting the ‘Activity’ template. To link this class to its layout file, you need to call the SetContentView function in the generated OnCreate() method (under the inherited base method invocation):
SetContentView(Resource.Layout.activity_dashboard);
To personalise your welcome message, you’ll want to pass the user’s name to your new activity. If you remember earlier the best way to do this was with Extras on the intent, and you created an extensions class to handle this. Like before, add new methods for ‘Put’ and ‘Get’ of a ‘name’ extra in the IntentExtensions.cs file you created above:
private const string NameKey = "Name";

public static void PutNameExtra(this Intent intent, string name)
{
    intent.PutExtra(NameKey, name);
}

public static string GetNameExtra(this Intent intent)
{
    return intent.GetStringExtra(NameKey);
}
Now using this extended functionality, after the call to SetContentView you did in the OnCreate() method, retrieve the user’s name and set the TextView component’s text appropriately:
string name = Intent.GetNameExtra();
TextView welcomeMessage = FindViewById<TextView>(Resource.Id.welcome_message);
welcomeMessage.Text = Resources.GetString(Resource.String.welcome_message_format, name);
In this extract, upon retrieving the TextView instance its value is set to your welcome message, of which is created using the Android Resources equivalent of string.Format().
With this your dashboard activity is complete, and you now need to call to it. In the placeholder for the success case I left open from the OnSignInAttempted method, you can achieve this by adding the following code:
JwtSecurityTokenHandler tokenHandler = new JwtSecurityTokenHandler();
JwtSecurityToken jsonToken = tokenHandler.ReadJwtToken(authorizationResult.IdentityToken);
IEnumerable<Claim> claims = jsonToken?.Payload?.Claims;
string name = claims?.FirstOrDefault(x => x.Type == "name")?.Value;

Intent dashboardIntent = new Intent(this, typeof(DashboardActivity));
dashboardIntent.PutNameExtra(name);
StartActivity(dashboardIntent);
Finish();
The first block reads the token and retrieves the user’s name (if it exists). In the second a new Intent is created for the dashboard activity, the user’s name is stored in this Intent using your above-defined extension method, and then the activity is started (i.e. navigated to). To prevent the user from navigating back to this page afterwards, the code ends by calling the Finish() method.
Run Your Android App
Now it’s time to launch your application using your chosen device!
If you’re debugging using the emulator this should be as simple as hitting F5 of which will first open and load the emulator, and then the code will deploy to it. As a side note you don’t need to close the emulator between run/debug attempts, as it only needs to redeploy the app.
If you’re debugging using a device that hasn’t been used for this purpose before, you’ll need to set the device up first. Do this by enabling developer options and within the new menu, switching on ‘Android debugging’ under the ‘Debugging’ header. After this, just plug the device in, accept the dialog on your device confirming this is a safe debugging connection, and you should be able to deploy and run your app with F5. Note physical devices have higher precedence than the emulator and will switch to it as the default debugging option when plugged in.
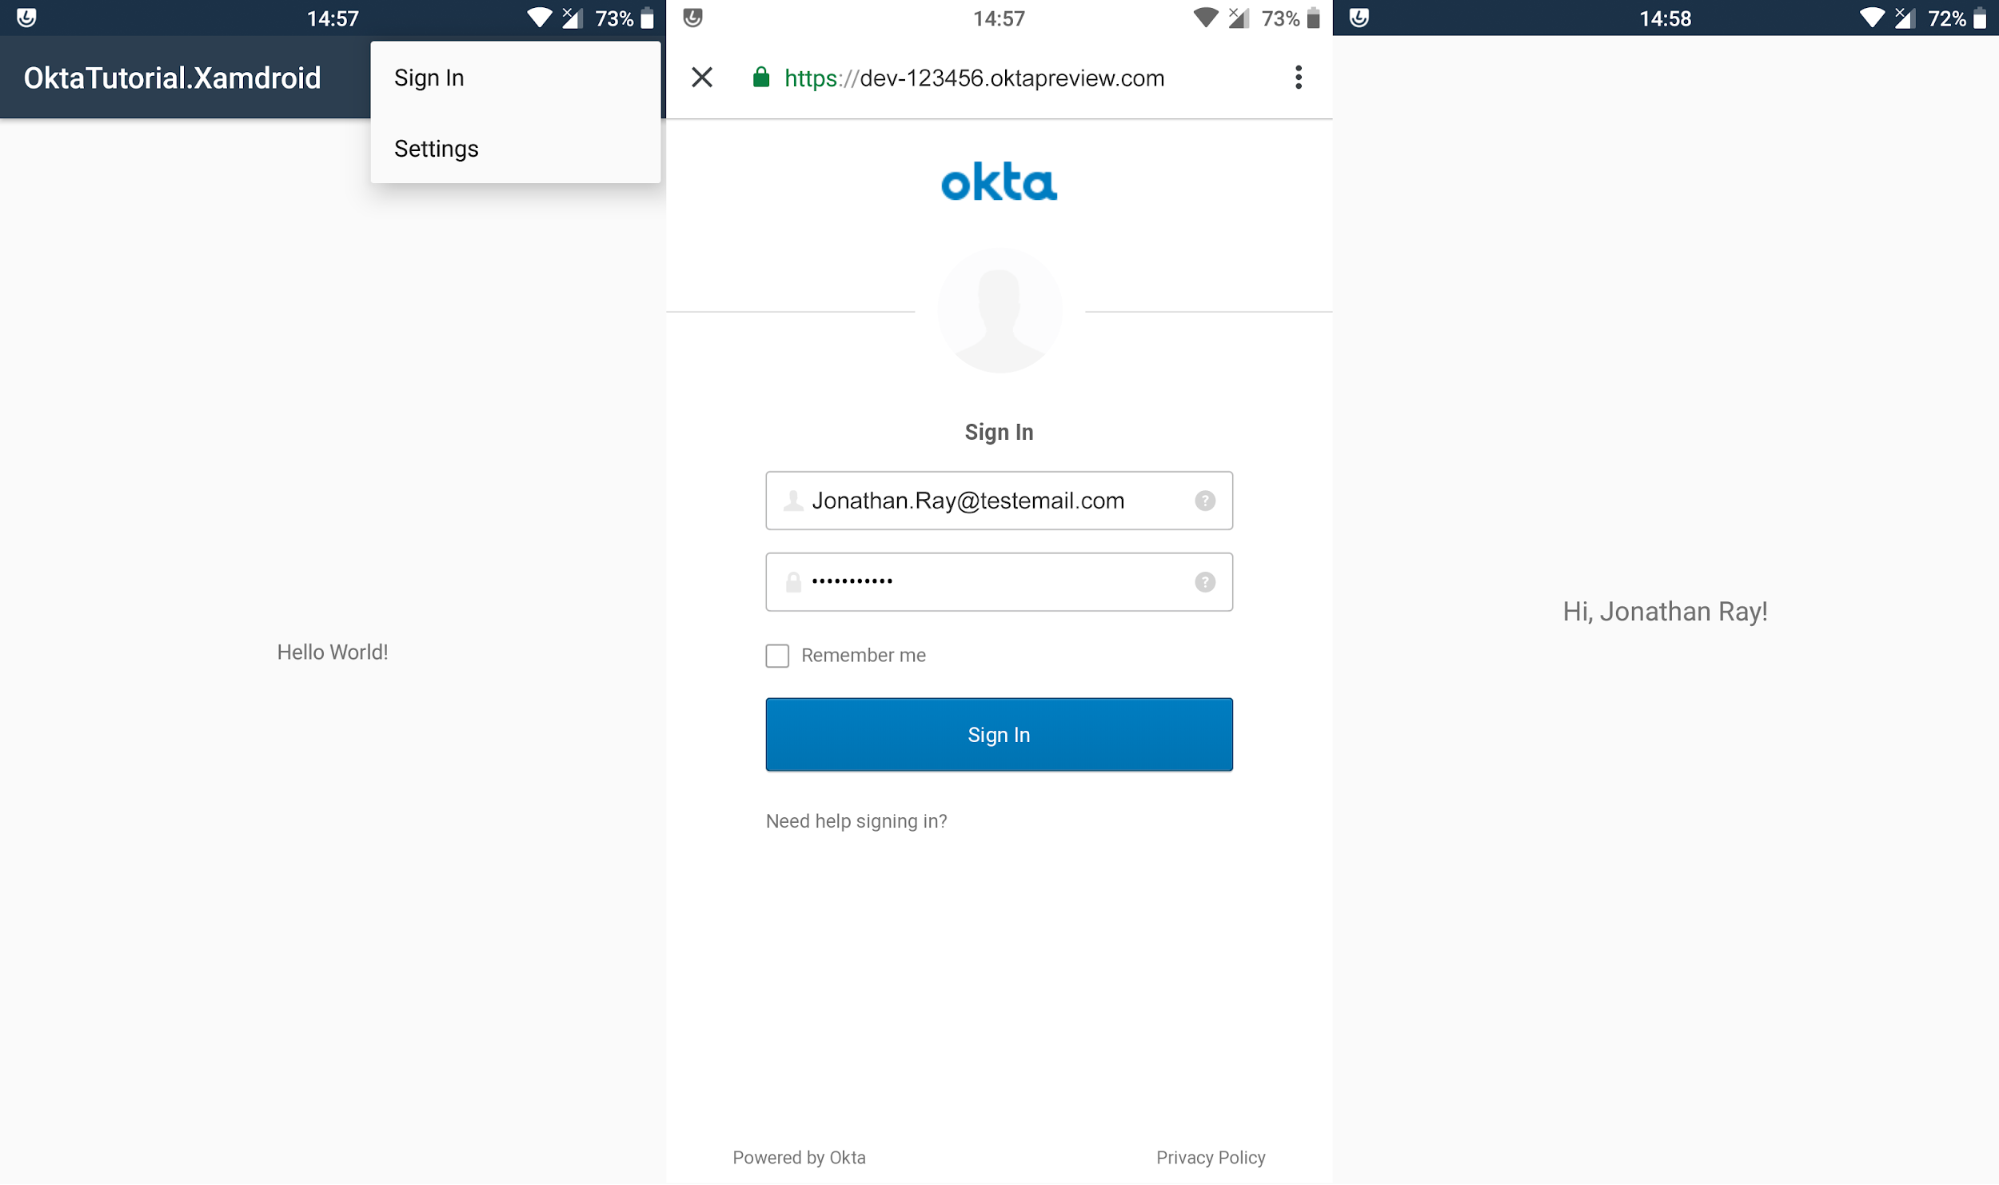
Once your app has deployed and loaded up, you’ll be greeted by the default single page template. Open the menu in the top right corner to sign in, and once you’ve entered your details you should return to this page with the spinning progress bar before automatically being sent to the dashboard page with your welcome message:
Learn More About Xamarin, OpenID Connect, and Secure Authentication
If you’ve followed along with all these steps you now have a basic Android app built using Xamarin.Android, with fully functioning user authentication based on OpenID and the Okta service. From here you can easily expand on the dashboard activity to implement your functionality.
To see the code from this post in full head on over to our GitHub page.
If this tutorial has whetted your appetite for Xamarin development and you’d like to learn more, then I’d strongly suggest you have a look at these other great articles:
- Add Identity Management to Your Android App
- Add Authentication to Your Xamarin.Forms App with OpenID Connect
- Build an App for iOS and Android with Xamarin
As always if you have any questions, comments, or concerns about this post feel free to leave a comment below. For other great content from the Okta Dev Team, follow us on Twitter @OktaDev, Facebook, LinkedIn and YouTube!
Okta Developer Blog Comment Policy
We welcome relevant and respectful comments. Off-topic comments may be removed.