Build an App for iOS and Android with Xamarin
Xamarin is a cross-platform technology that makes it possible to build native applications for Android and iOS using a single, shared codebase. Like other technologies such as React Native and NativeScript, it allows development teams to spend less time writing code for both platforms.
Xamarin is open-source (and free). Under the hood, it uses Mono (a version of the Microsoft .NET runtime), so Xamarin apps are usually written in C#. You can build Xamarin apps on Windows using Visual Studio, or Mac using Visual Studio for Mac. Even though Xamarin apps are not written in Swift (or Java), they still look and feel like real, native apps on the device.
In this tutorial, I’ll show you how to use Xamarin to build a basic app for both iOS and Android, even if you’ve never done any app development before!
Set Up Xamarin on Windows
Skip to the next section if you have a Mac!
If you don’t have Visual Studio installed, download the free Community Edition from Microsoft.
When you install Visual Studio, be sure to pick the Mobile development with .NET workload, which installs the Xamarin tools you need:
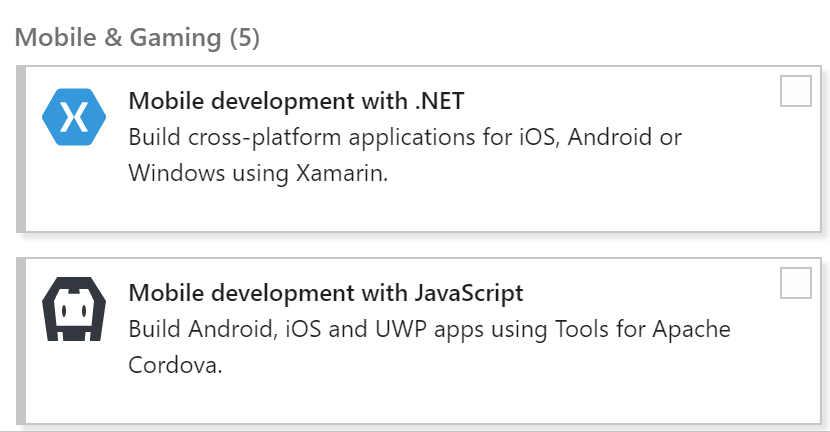
If Visual Studio is already installed, open the Visual Studio Installer to make sure you have the above workload selected.
Once you have these tools installed, you’re ready to create a Xamarin project! Skip the next section.
Set Up Xamarin on Mac
If you have a Mac, you’ll need to install Visual Studio for Mac. Follow the official instructions to install the free Community Edition.
Once the application is installed, you’re ready to create a Xamarin project!
Xamarin and Xamarin Forms
The base Xamarin SDK contains API bindings for each mobile platform, so you can call Android or iOS APIs from C# code. This allows you to build native apps using shared C# code, but you still need to design the UI separately for each platform.
Xamarin.Forms is an additional library that makes it possible to build your UI once (in XAML, a markup language for describing UI layouts). Xamarin.Forms then does the hard work of translating your XAML layout into the appropriate UI elements on the target platform. You can drop down to the “lower” Xamarin SDK level and interact with the platform APIs whenever you need to.
Deciding whether to use Xamarin.Forms in your project depends on how complex your app is. If you’re building an app that needs UI ultra-tailored for each platform or includes a lot of complex user interactions (such as a game), you’re better off with base Xamarin.
However, if you’re building a straightforward app that doesn’t need much platform-specific functionality or custom UI, using Xamarin.Forms means you can write even less code. Data-entry apps, productivity tools, and prototypes are great candidates. Since the goal of this tutorial is building a simple demo app, you’ll use Xamarin.Forms here!
Create a New Xamarin.Forms Project
In Visual Studio, choose File - New Project, pick the Cross-Platform category, and choose the Cross-Platform App (Xamarin.Forms) template. Name the project HelloWorldApp.
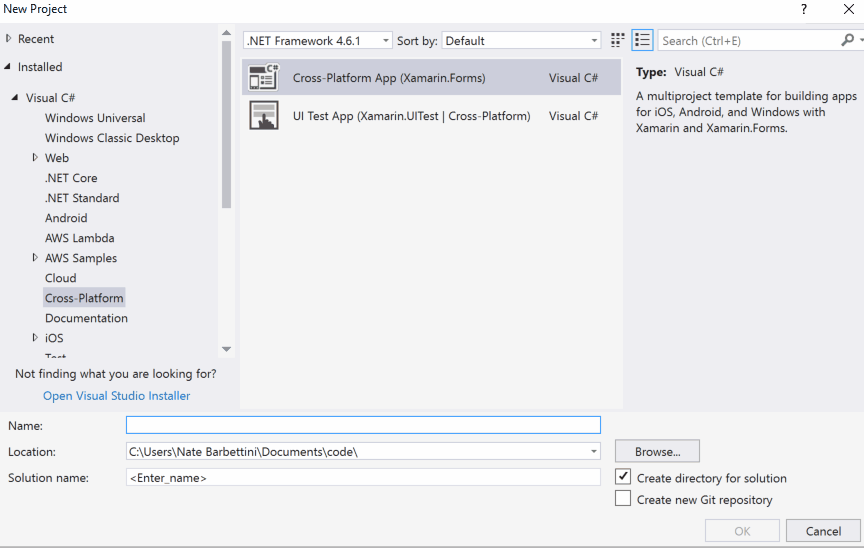
Then, pick the Blank App template and the platforms you want to build the app for. Choose Xamarin.Forms as the UI Technology, and .NET Standard as the Code Sharing Strategy:

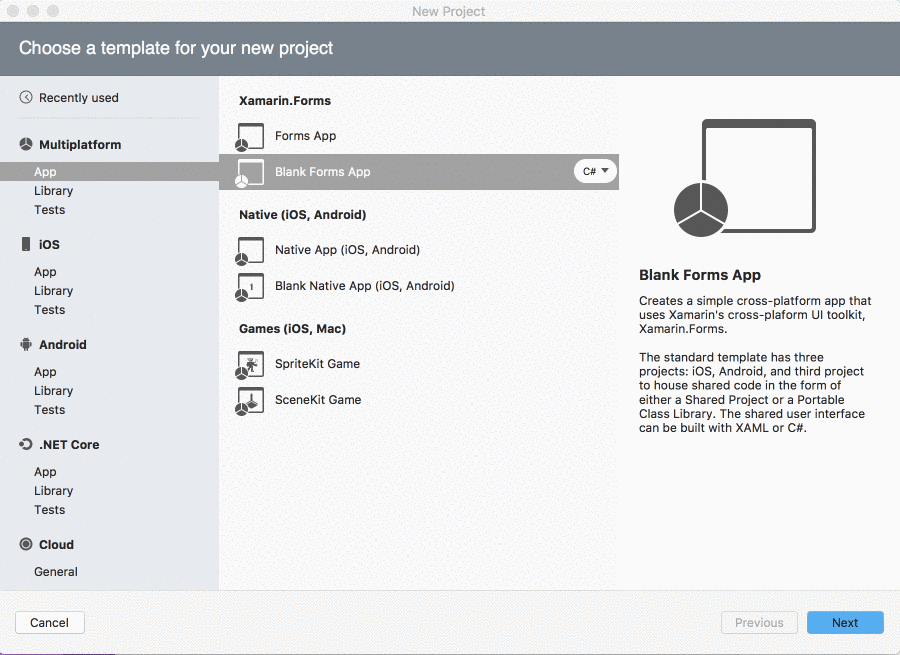
In Visual Studio for Mac, choose File - New Solution, pick the Multiplatform - App category, and choose the Blank Forms App template:
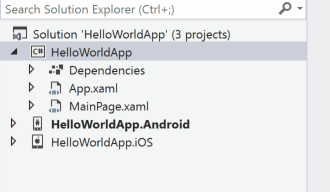
Creating the new project may take a few minutes. The Blank App template creates a solution with a few sub-projects:
- HelloWorldApp: Contains the XAML and shared code for each platform-specific project.
- HelloWorldApp.Android (or Droid): Android-specific code. For a simple project, you won’t have to change much here.
- HelloWorldApp.iOS: iOS-specific code. You won’t have to change much here, either.
If you picked Windows (UWP) as a platform, your solution will contain an additional project targeting Windows devices.
In this tutorial, you’ll only need to modify the shared code project: HelloWorldApp.
Add a Page
UI views are called “pages” in Xamarin.Forms lingo, and your app already contains one called MainPage (or HelloWorldAppPage in Visual Studio for Mac). Double-click the XAML file in the Solution Explorer, and replace everything within the <ContentPage> tags with this markup:
<ContentPage.Padding>
    <OnPlatform x:TypeArguments="Thickness"
            iOS="20, 40, 20, 20"
            Android="20, 20, 20, 20"
            WinPhone="20, 20, 20, 20" />
</ContentPage.Padding>
<ContentPage.Content>
    <StackLayout VerticalOptions="FillAndExpand"
                HorizontalOptions="FillAndExpand"
                Orientation="Vertical"
                Spacing="15">
        <Label Text="Enter your name" />
        <Entry x:Name="NameEntry" Text="Jane Doe" />
        <Button x:Name="SayHelloButton"
                Text="Say Hello"
                Clicked="SayHelloButtonClicked" />
    </StackLayout>
</ContentPage.Content>
This XAML markup creates a basic layout containing Label, Entry (text box), and Button elements. The element names (specified with x:Name) will be used to refer to these elements later in code. These XAML elements are generic and aren’t yet tied to a specific platform. Xamarin.Forms will automatically translate the elements in proper UIButton or EditText views when your app runs on iOS or Android.
The Clicked attribute on the Button element wires up the button click event to a handler called SayHelloButtonClicked, which doesn’t exist yet. You’ll write that next.
Add Code to the Page
Each XAML file is paired with a C# code file, sometimes called a “code-behind”. Open up the code for the MainPage.xaml (or HelloWorldAppPage.xaml) file by expanding it in the Solution Explorer and selecting the MainPage.xaml.cs file.
Below the public MainPage() method, add the new SayHelloButtonClicked method:
private async void SayHelloButtonClicked(object sender, EventArgs e)
{
    var name = NameEntry.Text;
    await DisplayAlert("Greeting", $"Hello {name}!", "Howdy");
}
You may need to add the following declaration at the top of the file:
using System;
Because it’s referenced in the Clicked attribute, this method will run when the button is pressed or tapped on the XAML page. First, the value of the textbox is assigned to the name variable, and then the DisplayAlert method is called to display a modal alert on the device.
That’s it! Your new Xamarin app is ready to go. To test it, you can use a simulator, or you can use Xamarin Live Player to test it on a live device.
Test Your Xamarin App on Your Own Device
The quickest (and coolest) way to test a Xamarin project is with Xamarin Live Player, a small app you can download onto your own phone or device. After downloading the app, pair it with Visual Studio. Then, pick Live Player as the device target.
Start debugging by pressing the play icon, or choose Run - Start Debugging on the Mac. You’ll be asked to scan a QR code to pair Visual Studio with your device, and Live Player will connect to your computer. (If it hangs, make sure your computer and your device are on the same wi-fi network).
After Live Player connects, you’ll be able to immediately start using your app on your device! You can even make changes to the code in Visual Studio and Live Player will refresh the app on your device automatically. Super cool.
Test Your Xamarin App on Android
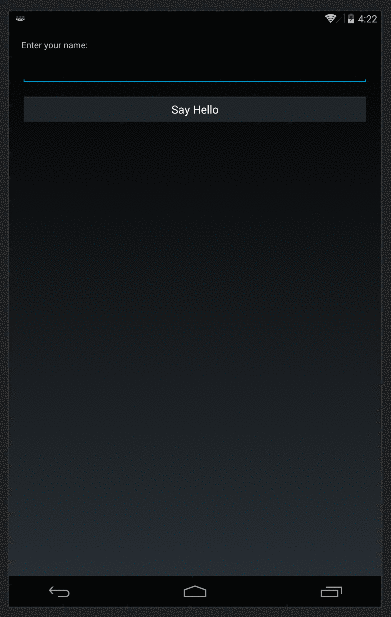
If you have the Visual Studio Android Emulator installed, testing the Android version of your Xamarin app is simple. In the Visual Studio toolbar, pick the HelloWorldApp.Android project and choose an Android device to emulate. Then, click the play button to start the emulator.
The Android emulator can be slow to load, so give it some time. If everything builds properly, you’ll see your app running on Android:
Test Your Xamarin App on iOS
Testing your Xamarin app on iOS is a little trickier, because it requires a Mac to provide the simulator. (Unless you’re already on a Mac and using Visual Studio for Mac, in which case, you’re good to go!)
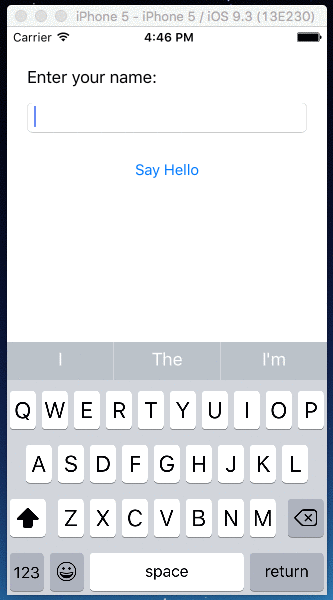
If you’re on Windows and have a Mac handy, follow the official instructions to set up the Mac agent and connect it to Visual Studio. Then, pick the HelloWorld.iOS project, and switch the architecture to iPhone Simulator. Choose a device version and click play.
After the project builds, the simulator will launch on the Mac:
Next Steps
This tutorial only scratches the surface. There’s a ton more you can do with Xamarin!
Here’s some further reading:
-
Developing Enterprise Apps using Xamarin.Forms and the accompanying free eBook
Do you want to learn more about Xamarin? What about other cross-platform app stacks like React Native, NativeScript, or Flutter? Let me know in the comments below!
Okta Developer Blog Comment Policy
We welcome relevant and respectful comments. Off-topic comments may be removed.