On this page
Configure a user identification policy
This guide describes how to use the Policies API (opens new window) to manage user identification policies in your org. Use a System Log query to monitor policy evaluation events.
Notes:
- This document is only for Okta Identity Engine. See Identify your Okta solution (opens new window) to determine your Okta version.
- To configure a user identification policy rule in the Admin Console, see Create a user identification policy rule (opens new window).
What you need
- Okta Integrator Free Plan org (opens new window)
- Okta Verify activated (opens new window) as an authenticator, with the Okta FastPass method enabled (opens new window)
- An existing app sign-in policy for the app that you want to configure
- A test user account (opens new window)
- A test group (opens new window) in your org that includes the test user
About user identification policies
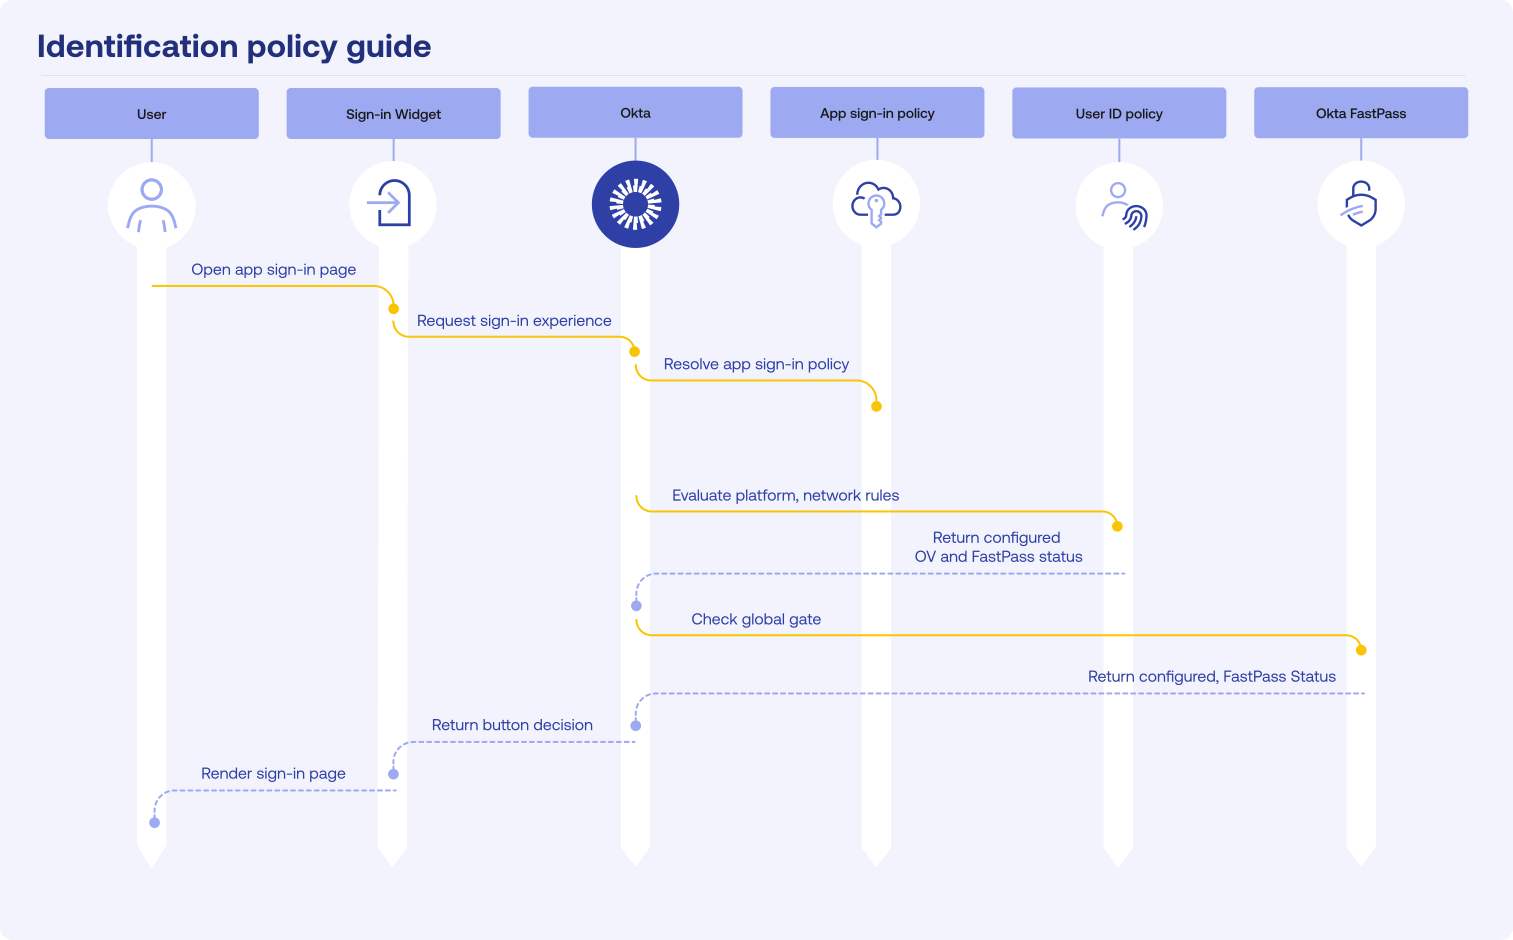
A user identification policy controls the pre-identification experience on the Sign-In Widget for an app. It applies before a user enters their username. Currently, the policy controls whether the Sign in with Okta FastPass button appears on the Sign-In Widget.
Previously, the Sign in with Okta FastPass button was an org-wide authenticator setting. The user identification policy moves this control to a per-app policy, so that you can show or hide the button for each app.
Relationship to app sign-in policies
Each user identification policy maps one-to-one to an app sign-in policy. Okta creates, maps, clones, and removes the user identification policy automatically with its app sign-in policy. You can't create, activate, update, deactivate, remove, map, or clone a user identification policy directly.
If you call one of those operations directly, Okta returns the following error:
This operation isn't supported in the user identification policy.
You manage only the rules on the policy. You can create, update, and delete rules, but you can't deactivate or remove the default rule.
To apply different button settings to different apps, create separate sign-in policies and assign apps to each one. Each sign-in policy automatically gets its own user identification policy with its own default rule. See Configure app sign-in policies.
Note: The user identification policy is closely related to the device signal collection policy, which also works as part of your app sign-in policies.
Rule conditions and settings
User identification policy rules support platform (opens new window) and network (opens new window) conditions only.
Each rule sets actions.userIdentification.settings.securityMethods.fastpass.showSignInButton to one of the following values:
ALWAYS: Show the Sign in with Okta FastPass button on the Sign-In Widget.NEVER: Hide the Sign in with Okta FastPass button on the Sign-In Widget.
Note: You can only set
showSignInButtontoALWAYSwhen Okta Verify is configured and Okta FastPass is enabled. Otherwise, Okta returns the following error:This rule can't be saved. Okta FastPass isn't enabled for this org. To save this rule, enable Okta FastPass in the Okta Verify authenticator.
How user identification works at sign-in
The following diagram shows how Okta evaluates the user identification policy to decide whether to show the Sign in with Okta FastPass button.
How to configure a user identification policy
To configure a user identification policy in your org, follow these steps:
- Find the user identification policy for your app sign-in policy.
- Create a user identification policy rule to show or hide the button.
- Update a user identification policy rule when you need to change the setting.
- Review the System Log to confirm that the policy is evaluated.
Find the user identification policy
Use the List all policies (opens new window) endpoint to find the user identification policy for your app.
- Set the
typequery parameter toUSER_IDENTIFICATION. - Send the
GET /api/v1/policies?type=USER_IDENTIFICATIONrequest. - In the response, find the policy for your app and copy its
idinto a text editor.
List user identification policies response example
[
    {
        "type": "USER_IDENTIFICATION",
        "id": "policyId",
        "status": "ACTIVE",
        "name": "Policy name",
        "description": "Policy description",
        "priority": 1,
        "system": false,
        "conditions": null,
        "created": "2025-04-25T17:35:02.000Z",
        "lastUpdated": "2025-04-25T17:35:02.000Z",
        "_links": {
            "self": {
                "href": "https://{yourOktaDomain}/api/v1/policies/{policyId}",
                "hints": {
                    "allow": [
                        "GET"
                    ]
                }
            },
            "rules": {
                "href": "https://{yourOktaDomain}/api/v1/policies/{policyId}/rules",
                "hints": {
                    "allow": [
                        "GET",
                        "POST"
                    ]
                }
            },
            "mappings": {
                "href": "https://{yourOktaDomain}/api/v1/policies/{policyId}/mappings",
                "hints": {
                    "allow": [
                        "GET"
                    ]
                }
            }
        }
    }
]
Find the policy from its app sign-in policy
You can also find a user identification policy from its mapped app sign-in policy. Each app sign-in policy (ACCESS_POLICY) includes a userIdentificationPolicy link to its linked user identification policy.
- Set the
typequery parameter toACCESS_POLICY. - Send the
GET /api/v1/policies?type=ACCESS_POLICYrequest. - In the response, find the app sign-in policy for your app.
- Follow the
_links.userIdentificationPolicy.hrefto the linked user identification policy.
List app sign-in policies response example
[
    {
        "type": "ACCESS_POLICY",
        "id": "appSignOnPolicyId",
        "status": "ACTIVE",
        "name": "App sign-in policy",
        "description": "App sign-in policy description",
        "priority": 1,
        "system": false,
        "conditions": null,
        "created": "2025-04-25T17:35:02.000Z",
        "lastUpdated": "2025-04-25T17:35:02.000Z",
        "_links": {
            "self": {
                "href": "https://{yourOktaDomain}/api/v1/policies/{appSignOnPolicyId}",
                "hints": {
                    "allow": [
                        "GET",
                        "PUT",
                        "DELETE"
                    ]
                }
            },
            "rules": {
                "href": "https://{yourOktaDomain}/api/v1/policies/{appSignOnPolicyId}/rules",
                "hints": {
                    "allow": [
                        "GET",
                        "POST"
                    ]
                }
            },
            "mappings": {
                "href": "https://{yourOktaDomain}/api/v1/policies/{appSignOnPolicyId}/mappings",
                "hints": {
                    "allow": [
                        "GET",
                        "POST"
                    ]
                }
            },
            "userIdentificationPolicy": {
                "href": "https://{yourOktaDomain}/api/v1/policies/{policyId}",
                "hints": {
                    "allow": [
                        "GET"
                    ]
                }
            },
            "deactivate": {
                "href": "https://{yourOktaDomain}/api/v1/policies/{appSignOnPolicyId}/lifecycle/deactivate",
                "hints": {
                    "allow": [
                        "POST"
                    ]
                }
            }
        },
        "_embedded": {
            "resourceType": "APP"
        }
    }
]
Review the default rule
Each user identification policy includes a default rule. This is a system rule (system: true) with the lowest priority and no conditions, so it matches any request that no other rule matches. Until you set a value, actions.userIdentification.settings is empty and Okta hides the button, the same as showSignInButton: NEVER. You can update the default rule, but you can't deactivate or remove it. Use the List all policy rules (opens new window) endpoint to review it.
- In the path parameters, set the user identification policy
idas thepolicyId. - Send the
GET /api/v1/policies/{policyId}/rulesrequest.
List user identification policy rules response example
[
    {
        "id": "ruleId",
        "status": "ACTIVE",
        "name": "Catch-all Rule",
        "priority": 99,
        "created": "2025-04-25T17:35:02.000Z",
        "lastUpdated": "2025-04-25T17:35:02.000Z",
        "system": true,
        "conditions": null,
        "actions": {
            "userIdentification": {
                "settings": {}
            }
        },
        "type": "USER_IDENTIFICATION",
        "_links": {
            "self": {
                "href": "https://{yourOktaDomain}/api/v1/policies/{policyId}/rules/{ruleId}",
                "hints": {
                    "allow": [
                        "GET",
                        "PUT"
                    ]
                }
            }
        }
    }
]
Create a user identification policy rule
In this example, create a rule that shows the Sign in with Okta FastPass button for users on the WINDOWS desktop platform from any network.
Use the Create a policy rule (opens new window) endpoint to create a user identification policy rule.
Create your own POST request body or copy the example request and input your values.
- In the path parameters, set the user identification policy
idas thepolicyId. - Set the following request body parameters:
- Enter a value for
name. - Set the
typeasUSER_IDENTIFICATION. - Set
conditions.network.connectionasANYWHERE. - Include
WINDOWSas aDESKTOPplatform condition. - Set
actions.userIdentification.settings.securityMethods.fastpass.showSignInButtonasALWAYS.
- Enter a value for
- Send the
POST /api/v1/policies/{policyId}/rulesrequest.
Create a user identification policy rule request example
{
    "name": "User Identification Rule",
    "conditions": {
        "network": {
            "connection": "ANYWHERE"
        },
        "platform": {
            "include": [
                {
                    "type": "DESKTOP",
                    "os": {
                        "type": "WINDOWS"
                    }
                }
            ]
        }
    },
    "actions": {
        "userIdentification": {
            "settings": {
                "securityMethods": {
                    "fastpass": {
                        "showSignInButton": "ALWAYS"
                    }
                }
            }
        }
    },
    "type": "USER_IDENTIFICATION"
}
Create a user identification policy rule response example
{
    "id": "ruleId",
    "status": "ACTIVE",
    "name": "User Identification Rule",
    "priority": 0,
    "created": "2025-04-25T17:35:02.000Z",
    "lastUpdated": "2025-04-25T17:35:02.000Z",
    "system": false,
    "conditions": {
        "network": {
            "connection": "ANYWHERE"
        },
        "platform": {
            "include": [
                {
                    "type": "DESKTOP",
                    "os": {
                        "type": "WINDOWS"
                    }
                }
            ]
        }
    },
    "actions": {
        "userIdentification": {
            "settings": {
                "securityMethods": {
                    "fastpass": {
                        "showSignInButton": "ALWAYS"
                    }
                }
            }
        }
    },
    "type": "USER_IDENTIFICATION",
    "_links": {
        "self": {
            "href": "https://{yourOktaDomain}/api/v1/policies/{policyId}/rules/{ruleId}",
            "hints": {
                "allow": [
                    "GET",
                    "PUT",
                    "DELETE"
                ]
            }
        },
        "deactivate": {
            "href": "https://{yourOktaDomain}/api/v1/policies/{policyId}/rules/{ruleId}/lifecycle/deactivate",
            "hints": {
                "allow": [
                    "POST"
                ]
            }
        }
    }
}
Update a user identification policy rule
To change a rule, update it with the Replace a policy rule (opens new window) endpoint. In this example, update the rule to hide the Sign in with Okta FastPass button.
Create your own PUT request body or copy the example request and input your values.
- In the path parameters, set the user identification policy
idas thepolicyIdand the ruleidas theruleId. - Set
actions.userIdentification.settings.securityMethods.fastpass.showSignInButtonasNEVER. - Send the
PUT /api/v1/policies/{policyId}/rules/{ruleId}request.
Update a user identification policy rule request example
{
    "name": "User Identification Rule",
    "conditions": {
        "network": {
            "connection": "ANYWHERE"
        },
        "platform": {
            "include": [
                {
                    "type": "DESKTOP",
                    "os": {
                        "type": "WINDOWS"
                    }
                }
            ]
        }
    },
    "actions": {
        "userIdentification": {
            "settings": {
                "securityMethods": {
                    "fastpass": {
                        "showSignInButton": "NEVER"
                    }
                }
            }
        }
    },
    "type": "USER_IDENTIFICATION"
}
Update a user identification policy rule response example
{
    "id": "ruleId",
    "status": "ACTIVE",
    "name": "User Identification Rule",
    "priority": 0,
    "created": "2025-04-25T17:35:02.000Z",
    "lastUpdated": "2025-04-25T17:35:02.000Z",
    "system": false,
    "conditions": {
        "network": {
            "connection": "ANYWHERE"
        },
        "platform": {
            "include": [
                {
                    "type": "DESKTOP",
                    "os": {
                        "type": "WINDOWS"
                    }
                }
            ]
        }
    },
    "actions": {
        "userIdentification": {
            "settings": {
                "securityMethods": {
                    "fastpass": {
                        "showSignInButton": "NEVER"
                    }
                }
            }
        }
    },
    "type": "USER_IDENTIFICATION",
    "_links": {
        "self": {
            "href": "https://{yourOktaDomain}/api/v1/policies/{policyId}/rules/{ruleId}",
            "hints": {
                "allow": [
                    "GET",
                    "PUT",
                    "DELETE"
                ]
            }
        },
        "deactivate": {
            "href": "https://{yourOktaDomain}/api/v1/policies/{policyId}/rules/{ruleId}/lifecycle/deactivate",
            "hints": {
                "allow": [
                    "POST"
                ]
            }
        }
    }
}
Review the System Log
Review your System Log events to confirm that your user identification policy is evaluated correctly. Okta includes the rule as a target of the policy.evaluate_sign_on event type. See System Log query and Event Types.
Test your policy with a policy simulation
You can use the policy simulation endpoint to test how your user identification policy rules evaluate for a given user and device context. Do this before you go live. Policy simulation returns the matched rule and the resulting showSignInButton value. See Test your policies with access simulations.
Next steps
- Configure app sign-in policies: Create more sign-in policies and assign apps to each one. Each sign-in policy automatically gets its own user identification policy. This lets you control the Sign in with Okta FastPass button independently per app or group of apps.
- Multibrand architecture: If you're building a multibrand experience, assign each app to its own sign-in policy to control the Okta FastPass button per brand independently.
- Device signal collection policies: A closely related policy that also works with app sign-in policies to control the pre-identification experience on the Sign-In Widget.
- Customize the Sign-In Widget: Further customize the sign-in experience for your app.
- System Log query: Query System Log events to monitor user identification policy evaluation in production.