On this page
Plan self-service registration flows
Learn about self-service registration (SSR) and three key aspects that you can customize for your specific use cases.
Overview of self-service registration
Self-service registration allows users to create an account and sign in to an app on their own.
A combination of policies that you can set in the Admin Console or with the Policies API lets you choose which data to collect during registration. You also choose the authenticators available for enrollment and the authentication requirements for enrolling those authenticators. You can also use an inline hook and custom code for further customization.
For more information about SSR, see:
Note: If you plan to use an Okta-hosted Sign-In Widget for your sign-up form, note that the SSR flow follows the standard OpenID Connect (OIDC) protocol. Users are first redirected to an Okta-hosted page where they complete the registration form. After they register, Okta redirects them back to your app with an authorization code, which your app exchanges for tokens to sign the user in.
Default SSR state
SSR is disabled by default. There are two main policies that control SSR.
- User profile policies: This policy type controls the attributes that are collected when users register and has a setting to enable SSR. The default user profile policy doesn't allow SSR
- Authenticator enrollment policies: This policy type controls which authenticators are available for users to enroll during registration. The default authenticator enrollment policy requires users to create a password. You can add other authenticators to the default policy or create an authenticator enrollment policy.
You can enable a basic SSR flow by creating a new user profile policy. These are the default settings for a new user profile policy that allows self-service registration:
- The user profile policy prompts users for their first name, family name, and email address. Those are the basic Universal Directory (UD) attributes required to create a user profile and activate an Okta account.
- Users must verify their email address before the account is activated.
- Progressive enrollment is enabled. If you add other UD attributes as optional, then users are prompted to provide that information when they sign in again, after their initial registration.
- There’s one default identifier that allows users to sign in with their username. You can add other identifiers. See Multiple identifiers (opens new window).
- The registration form has default text and labels. You can customize the text and labels to match your brand and use case.
- The user profile policy isn't assigned to any apps. You must assign the policy to an app for users to see the registration form when they try to sign in to that app.
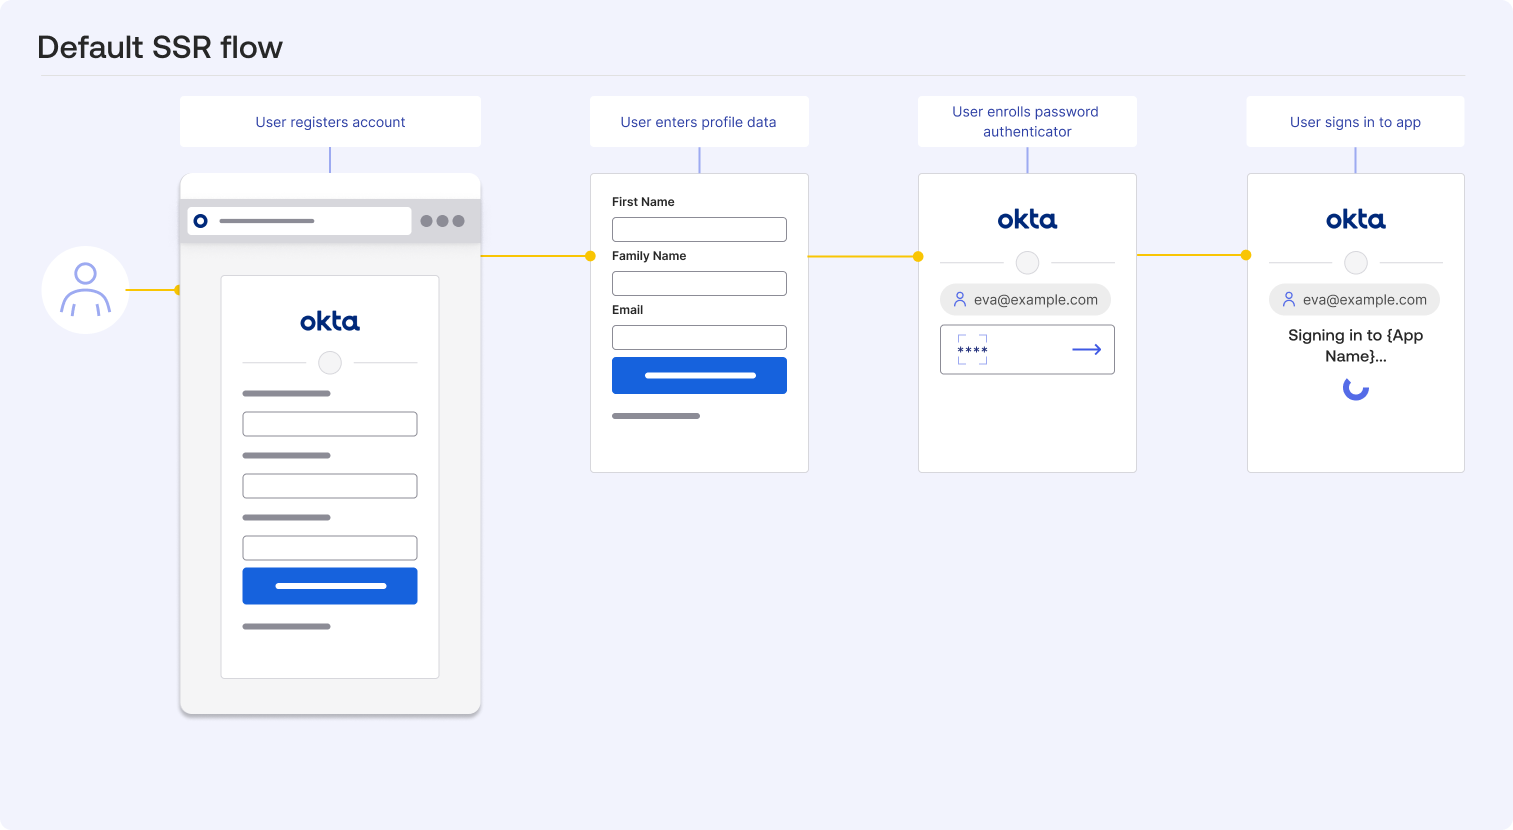
Default SSR flow diagram
This diagram shows the default SSR flow when you enable SSR with a user profile policy.
Ways to customize your SSR flow
You can customize how Okta handles SSR through a combination of policies, an inline hook, and widget customization.
Use policies to control SSR flows
Policies allow you to change the registration logic directly in the Admin Console without updating your app's code. You can also use the Policies API to update these policies. There are three primary policies that control the SSR experience:
- User profile policy
- Authenticator enrollment policy
- Okta account management policy
There are two other policies that don't have the same direct impact on the SSR flow but still influence the overall registration experience:
- Password policy: This policy determines the complexity requirements for passwords. If you require users to create a password during registration, then the password policy settings determine the requirements for that password. You can also control how users recover their passwords with the password policy, which can impact users immediately after they register if they forget their password.
- App sign-in policy: This policy controls the conditions that determine how and when users can sign in to your app. You can use this to block sign-ins from certain locations or devices, which can impact users immediately after they register.
User profile policy
The user profile policy controls the attributes collected during registration. You can use this to map specific data from your UD to the registration form.
For example, if your app requires a business-specific attribute, such as a department name or a specific organization ID, you can set it as a required field in the user profile policy to ensure it's captured when users register.
Tip: Use progressive enrollment to avoid overwhelming users with too many fields during registration. Start with the most essential attributes and then prompt for additional information when the user signs in again. See Progressive enrollment (opens new window).
Keep in mind that the user profile policy and progressive enrollment are applied at the app level. Users must sign in to the app that progressive enrollment is enabled for to see the additional fields when they sign in again.
Authenticator enrollment policy
The authenticator enrollment policy defines which authenticators are available for users to register and use. You can set certain authenticators as required or optional during registration, and you can specify which authenticators are available based on user attributes or other conditions.
For example, you can configure the policy to allow or require users to enroll a passkey when they create their account to ensure high-assurance authentication from day one. You can also disable the Password authenticator if you have other higher-assurance authenticators that you want your users to enroll.
Okta account management policy
The Okta account management policy controls the security requirements for enrolling authenticators. You can use this policy to require users to verify their email or phone number before they can enroll certain authenticators. Or you can require them to authenticate with an existing authenticator before enrolling a new one.
For example, you can allow users to register a passkey by requiring them to authenticate with a password first.
Note: The Okta account management policy also controls how users unenroll authenticators, recover their passwords, and unlock their accounts.
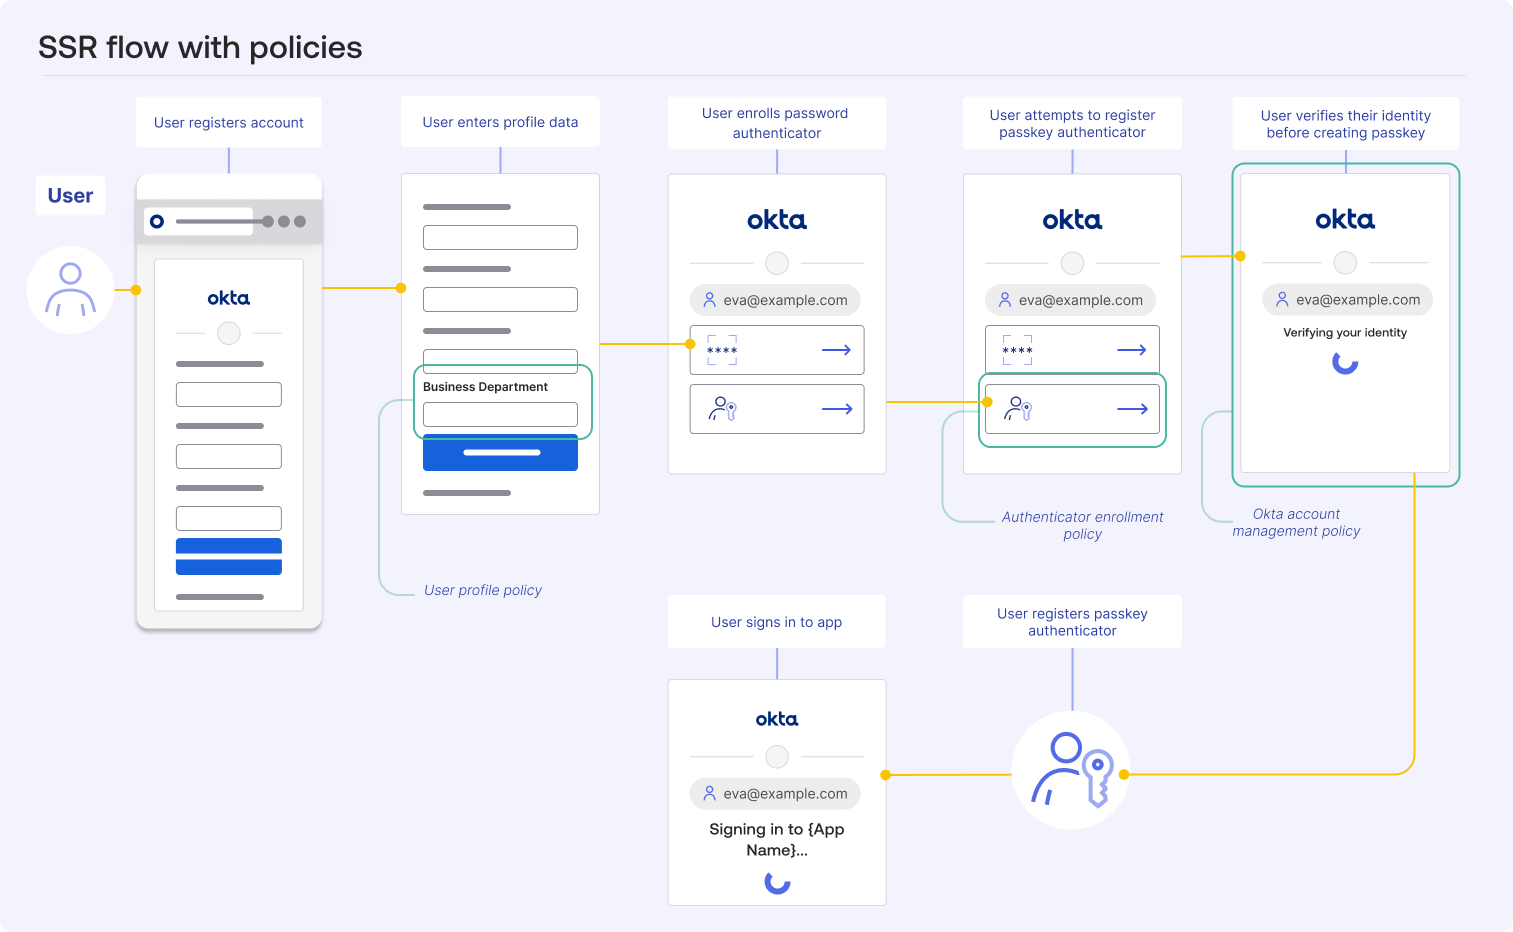
SSR flow diagram with policies
This diagram shows how the user profile policy, authenticator enrollment policy, and Okta account management policy work together to control the SSR flow.
- The user profile policy adds the Business Department field to the registration form.
- The authenticator enrollment policy makes the passkeys authenticator available during registration. Make other authenticators available for enrollment by adding them to the relevant authenticator enrollment policy.
- The Okta account management policy requires users to verify their identity before they enroll a passkey.
Tip: You can configure your policies in different ways to reduce the number of steps that users have to go through during registration.
For example, add the password field to the registration form with the user profile policy and then not require users to verify their email before they enroll the password authenticator. This allows users to register and enroll an authenticator in fewer steps.
Use an inline hook to customize the SSR flow
The registration inline hook allows you to customize the SSR flow with your own business logic by inserting a call to your external service during the SSR flow. You must set up an external service to host your code. Then, configure the registration inline hook to call that service at the right point in the SSR flow. You can set up a registration inline hook in the Admin Console or with the Inline Hooks API.
The hook triggers after the user submits the registration form but before the user account is created in Okta.
Consider the following examples for ways to customize your SSR flow using a registration inline hook:
- Domain validation: Validate the domain of a user trying to register and deny requests from unauthorized or public email providers. See Set up for profile enrollment (SSR) scenario for an example of how to do this.
- Input restrictions: Use an inline hook to restrict certain inputs in the registration form. For example, you can check the
loginattribute for forbidden characters (like emojis or specific symbols) and deny access if a user attempts to register with them. - Verify user identity with an access key: Check a user-supplied access key or code against an external system before allowing registration or access.
- Enrich a profile with customer ID from a CRM: Retrieve and add a unique customer identifier from your CRM system to the user’s profile during the registration or update process.
- Trigger an approval flow: Initiate a manager or administrator approval process before finalizing user provisioning or access.
- Trigger marketing content: Add new users to an automated marketing sequence based on user attributes or certain events.
- Block known bad actors: Integrate with a third-party threat intelligence service to block registration attempts from known malicious IP addresses or email domains.
For implementation details, see:
- Registration inline hook
- API reference for a registration inline hook (opens new window)
- Hooks in the Okta Sign-In Widget (opens new window)
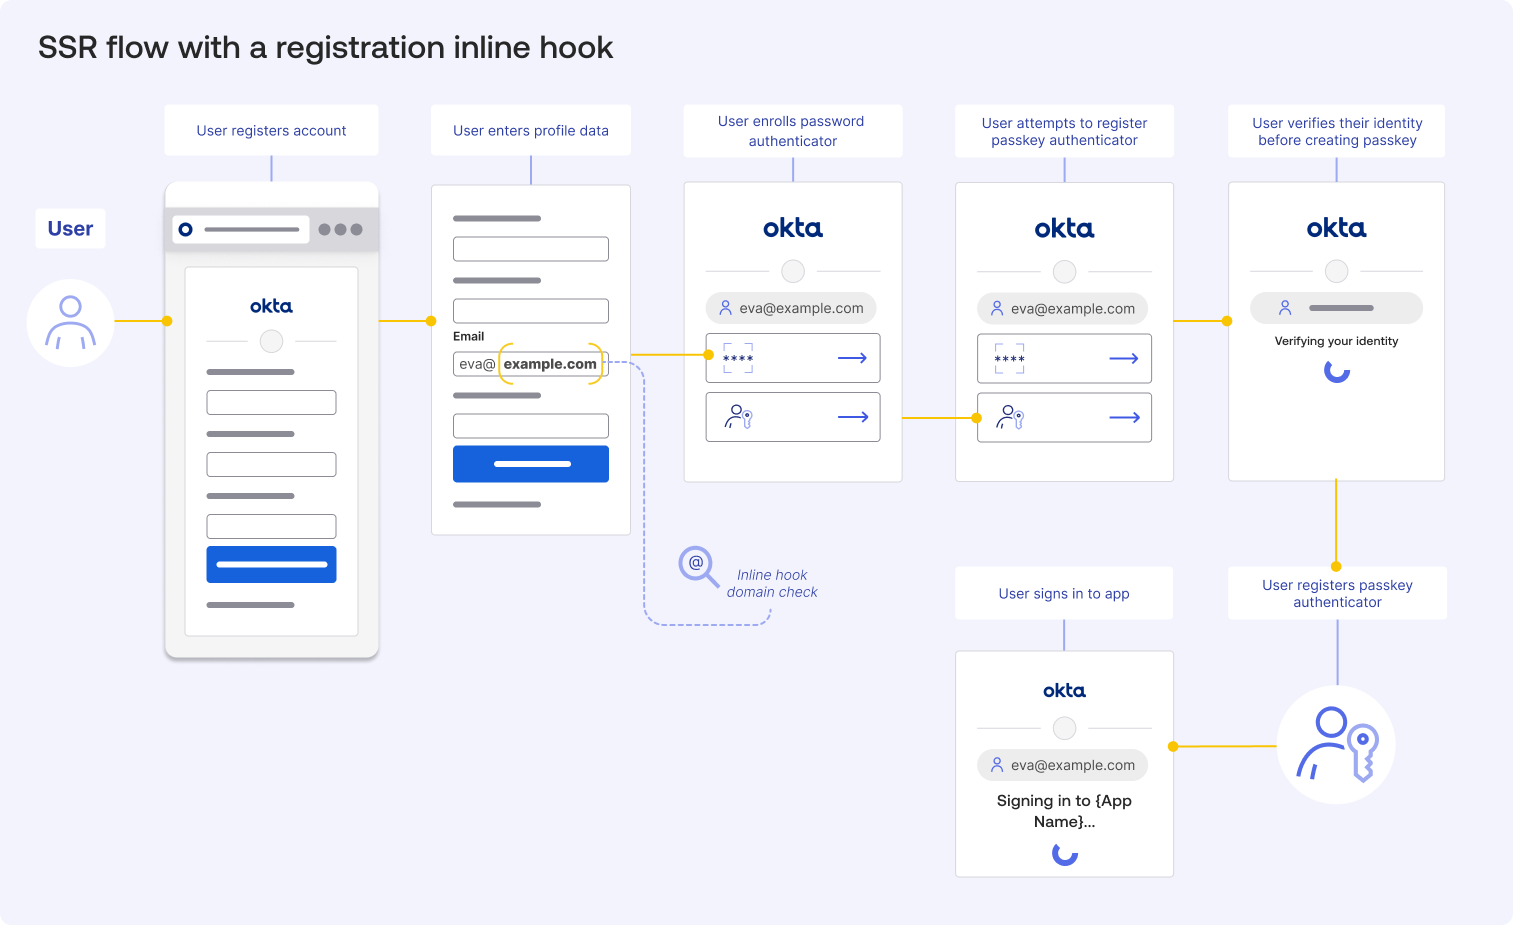
SSR flow diagram with registration inline hook
This diagram shows where the registration inline hook fits into the SSR flow. The inline hook triggers when a user enters their email address, and the domain is checked by the external service.
Review the examples in the previous section for ideas on how to use the registration inline hook.
Customize the widget with the code editor
At this point you've learned how to customize the SSR flow using different methods available in the Admin Console and Okta APIs. The following section explains how to customize the Okta Sign-In Widget with custom code.
With custom code, you can extend the SSR flow with your own scripts and styles. This allows you to enhance the UI and add functional elements that aren't part of the standard widget.
However, the process for adding custom code depends on your deployment model.
- Okta-hosted model: When using this model, the SSR flow uses the Okta-hosted Sign-In Widget. You can add custom code to the page template using the code editor in the Admin Console. This allows you to inject scripts and styles directly into the Okta-hosted page while Okta continues to manage the core widget logic and security updates.
- Self-hosted model: When using this model, the SSR flow uses the self-hosted Sign-In Widget. You manage the code within your app's own source files. You host the widget library yourself and attach lifecycle hooks to the widget instance directly within your app's logic before calling the
.showSignInToGetTokens()or.renderEl()methods.
Okta recommends the Okta-hosted model for most use cases because it balances security with ease of use. It uses the Okta-hosted widget as its backend and frontend foundation, which offers a secure and customizable experience with minimal maintenance.
See:
- Style the Sign-In Widget (third generation)
- Unlock the Secrets of a Custom Sign-In Page with Tailwind and JavaScript (opens new window)
- Stretch Your Imagination and Build a Delightful Sign-In Experience (opens new window)
- Multibrand architecture
- Add design tokens to your code
How to insert custom code into the Okta-hosted widget
You must have a custom domain configured to customize the Okta-hosted widget. After you configure a custom domain, you can insert your own scripts and styles into the registration page. Okta continues to manage the core Widget logic and security updates. After you configure a custom domain, you can insert your own scripts and styles into the registration page. Okta continues to manage the core widget logic and security updates.
Use the code editor in the Admin Console to add your own scripts and styles to the page. You insert your custom logic by modifying the configuration before the widget renders. When using custom code, ensure that your custom CSS and third-party scripts are loaded in the <head> of the code editor before the widget runs.
Review the following examples for ideas on how to customize your SSR flow.
Use custom code to brand the SSR experience
Custom code is ideal for injecting brand-specific content or legal requirements. For example, you can use the afterRender lifecycle event to inject inline links for your Terms of Service or Privacy Policy directly into the footer of the widget.
Use custom code to build interactive form elements
You can also use custom scripts to build more interactive form elements. This includes implementing custom style pickers, type-ahead components for address lookups, or dynamic help text that updates as a user interacts with specific fields. These extensions help users complete the registration form accurately and reduce drop-off rates.
- Custom style pickers: Create a toggle for light and dark mode that allows users to select their preferred theme for the registration page. When a user selects a theme, your script can dynamically update the widget's CSS classes without requiring a page reload.
- Type-ahead components: Integrate with third-party APIs to provide real-time suggestions as users fill out fields, such as their address or company name. This enhances the user experience and improves data accuracy.
- Dynamic help text: Listen for events on input fields and display contextual tips or validation messages that guide users through the registration process. This is helpful for fields that have strict formatting requirements.
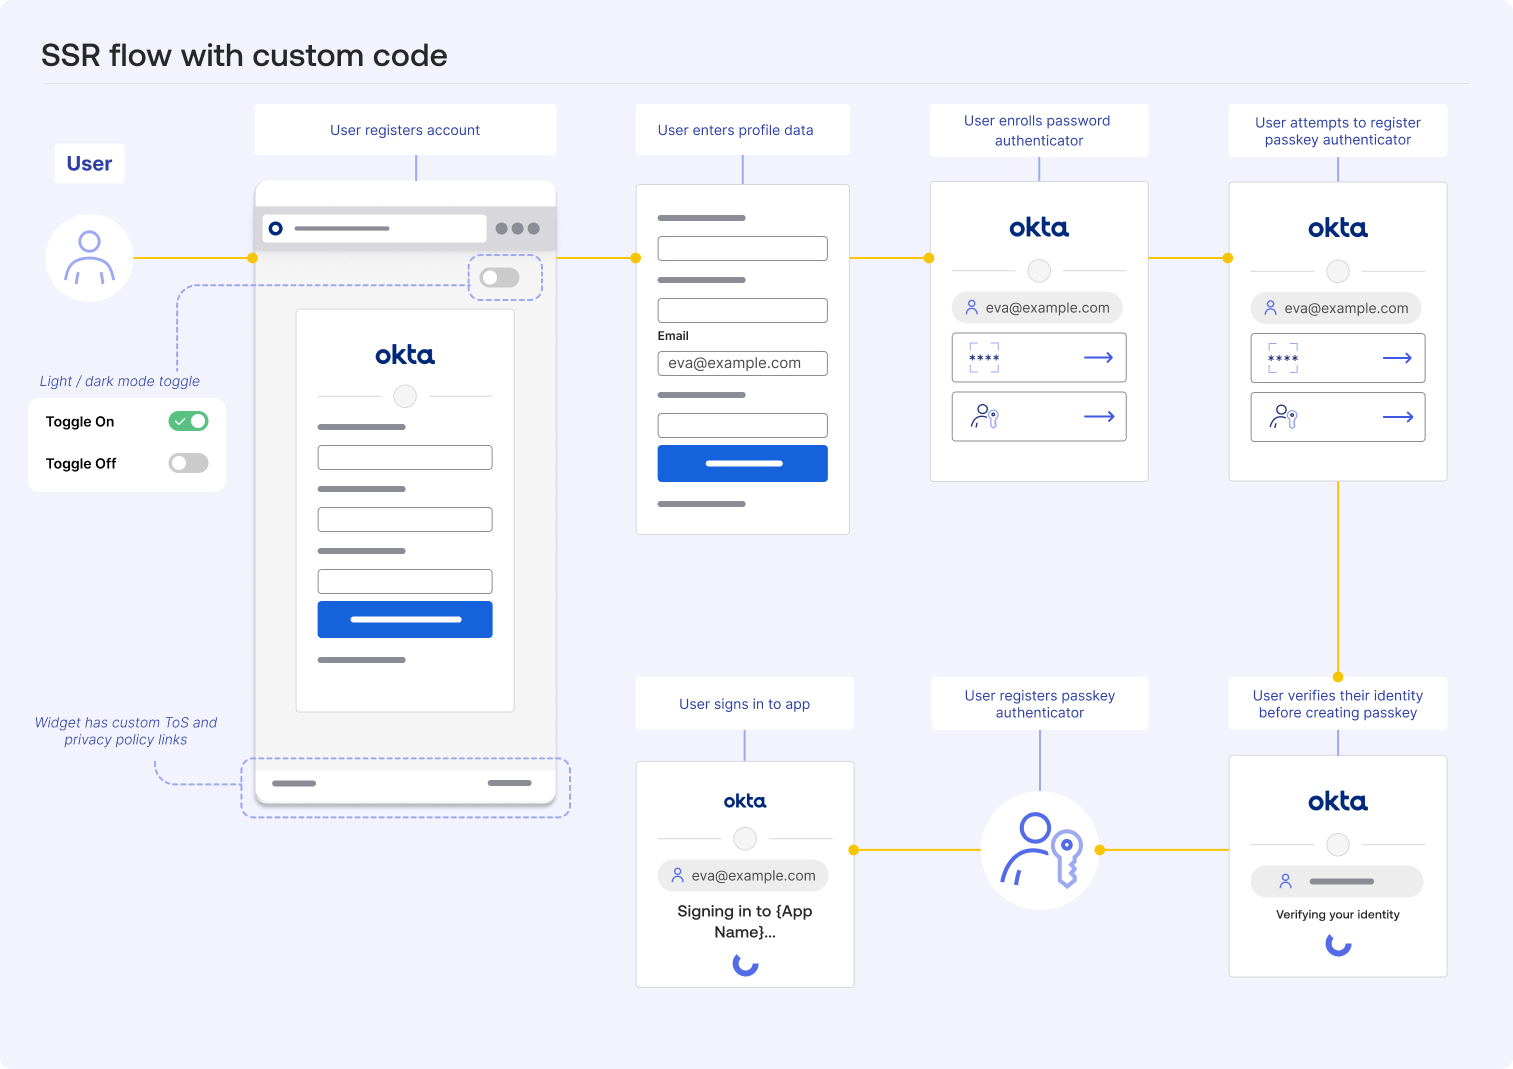
SSR flow diagram with custom code
This diagram shows two different ways to insert custom code into the SSR flow. A light and dark mode toggle is available and custom links are added to the footer of the widget after it renders.
Using custom code in the SSR flow lets you enhance the user experience in different ways. For example, you can use JavaScript to add other interactive elements to the registration form.
Summary
SSR allows users to register and sign in to your app. SSR is disabled by default, but you can enable it with the user profile policy.
User profile policies allow you to control which user attributes are collected during registration. In addition to the user profile policy, you can use the authenticator enrollment policy and Okta account management policy as no-code options to have greater control over the SSR flow.
You can customize the SSR flow using policies, an inline hook, and custom code.
With an inline hook, you can insert a call to an external service during the SSR process to implement custom business logic. With custom code, you can customize the Okta-hosted Sign-In Widget with your own scripts and styles to enhance the UI and add functional elements that aren't part of the standard widget.
Review the following resources to learn how to build and customize your SSR flow:
- Enable and configure the basic self-registration process.
- Use the Policies API (opens new window) to manage policies programmatically.
- Configure a registration inline hook.
- Style the Sign-In Widget (third generation).
- Use custom CSS in the widget by adding design tokens to your code.
- Use the code editor to add your own scripts and styles to the Okta-hosted page.