On this page
External Identity Providers
As a developer building a custom app, you want your users to choose which Identity Provider (IdP) they use to sign in to your app. But first you should understand how IdPs connect to Okta.
What's an IdP? It's a service that creates and maintains identity information and then provides authentication services to your apps. IdPs can significantly reduce sign-in and registration friction. This allows your users to easily access apps without needing to create passwords or remember usernames.
Add an IdP integrationThe big picture
Okta manages connections to other IdPs for your app and sits between your app and the IdP that authenticates your users.
You can use Okta as the user store for your apps. Then, users can sign in with their email and password by default. See our guides for how to sign in users to your web, mobile, and single-page apps.
You can add connections to social IdPs like Apple or Facebook. This is called social login. It allows your users to sign in to your app using credentials from their existing social IdPs. After users authenticate, you sync their existing IdP credentials into your Okta Universal Directory while continuing to use that IdP for user authentication. This eliminates the need to store an additional username and password for that user.
You can add connections to IdPs that you build in-house that support OpenID Connect or SAML protocols. This is also referred to as Inbound Federation or inbound SAML. The SAML flow is initiated with the Service Provider (in this case, Okta) that redirects the user to the IdP for authentication. After authentication, a user is created inside Okta, and the user is redirected back to your app along with an ID token. This allows you to use Okta to proxy between SAML-only IdPs and OpenID Connect-only apps that are normally incompatible.
Note: Social and OpenID Connect IdPs store access tokens that allow subsequent calls to IdPs after the user is authorized. For example, the token may contain the permission to add events to a user's Google calendar. After authentication, your app can use the token on more calls to add events to the user's Google calendar on the user's behalf.
You can add connections to identity verification (IDV) vendors which work like IdPs with a few key differences. IDV vendors verify your user’s identities by requiring them to submit a proof of identity. The proof of identity can be matching a user’s digital identity against a trusted data source or requiring a user to take a selfie as a liveliness check. You can only use IDV vendors with the Okta account management policy.
You can also configure federation between Okta orgs using OIDC or SAML.
Adding any of these IdPs allows users to sign in to your app using their credentials from a specific IdP.
Benefits of using Okta to manage IdPs
You could connect your app directly to an IdP (for example, using an SDK to add a button for Sign in with Google). However, using Okta as the user store for your app and letting Okta manage the IdP connections has some benefits:
No custom code: Your app only needs to talk to Okta, and Okta does the rest.
One protocol: Your app uses OpenID Connect to talk to Okta. Okta handles whatever protocols the other IdPs use, and this is transparent to your app.
Single user store: All users are stored in Okta. You can capture the profile attributes from an IdP user and store those attributes in the Okta Universal Directory.
Profile sync: If a user updates their profile at the IdP, those changes appear in Okta the next time they use the provider to sign in.
Account linking: Users can use multiple IdPs to sign in, and Okta links those profiles to a single Okta user.
Group sync: Okta supports group sync between Okta and enterprise SAML IdPs and OpenID Connect IdPs. This allows you to specify the groups that users should be added to.
OAuth 2.0 Scope Configuration: Specify OAuth 2.0 scopes to fully control which social profile attributes are linked to Okta.
How Okta connects to external IdPs
Okta sits between your app and the external provider. Your app only needs to talk to Okta, and Okta does the rest.
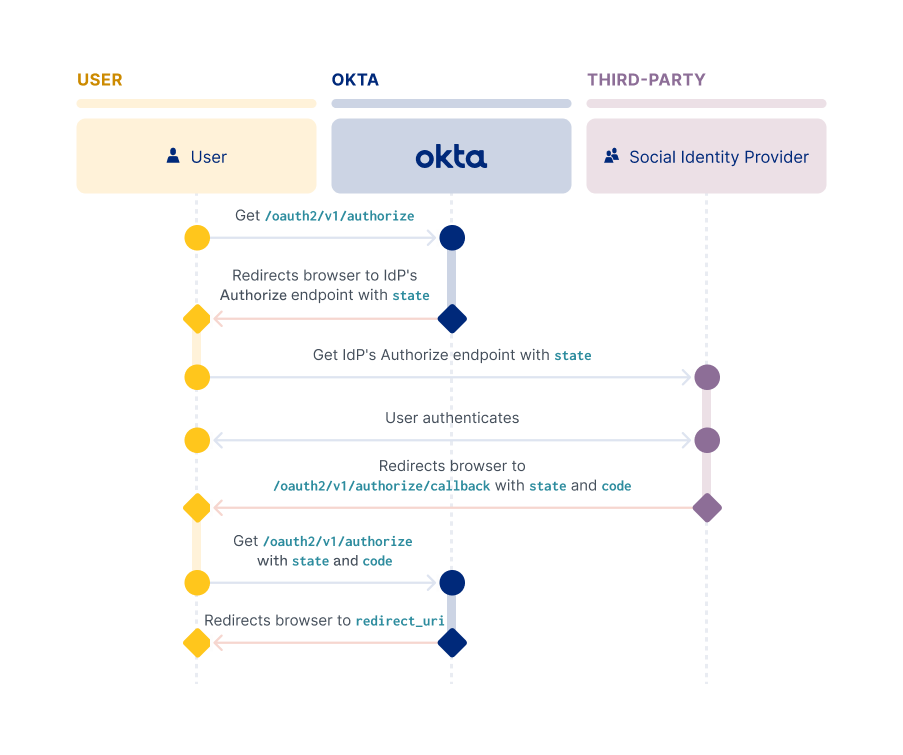
Sign-in process
The sign-in process starts at the /authorize endpoint, and then goes out to the provider and back:
- In your app, the user clicks a button similar to: Sign in with (Identity Provider).
- Your app redirects the browser to Okta.
- Okta redirects the browser to the IdP.
- The user is prompted to sign in at the IdP and to accept the permissions required by your app.
- The IdP redirects the browser back to Okta.
- Okta processes the sign-in request and adds the user to your Okta org's Universal Directory.
- Okta redirects the browser back to your app, just like any other sign-in request.
Account Linking and Just-In-Time provisioning
Use account linking to help create a unified view of your users within your org. Also, you can use Just-In-Time (JIT) provisioning. This creates a seamless experience for users that sign in to your app for the first time using their credentials from another IdP.
Account Linking
Users can use multiple IdPs to sign in, and Okta can link all of those profiles to a single Okta user. This is called account linking. For example, a user signs in to your app using a different IdP than they used for registration. Account linking can then establish that the user owns both identities. This allows the user to sign in from either account.
Account linking is configured at the IdP level. When you create an IdP, these values are set by default:
- Account matching with Persistent Name ID (SAML IdPs only):
Enabled - Account Link Policy:
Disabled - Match Against:
Okta Username - IdP username:
idpuser.emailNote: For a SAML IdP, select an IdP username from the dropdown list or enter an expression.
To enable account linking, select Automatic from the Account Link Policy dropdown list, and then leave the other two defaults. With these settings, when a user signs in with an external IdP, Okta searches the Universal Directory for a user's profile to link. The user profile is found when the IdP username value (email) passed by the IdP matches the Match against value (username).
Note: See Create an Identity Provider (opens new window) for API examples of creating an IdP and the
policy.accountLinkparameter values needed to configure account linking.
JIT provisioning
When a user initially signs in to your app using another IdP, implement JIT provisioning (opens new window) to automatically create them an Okta account. JIT account creation and activation only work for end users who aren't already Okta users.
Note: See Add an Identity Provider (opens new window) for API examples of creating an IdP and the
policy.accountLinkparameter values needed to configure account linking.
You can apply granular control over account linking and JIT by defining a policy and then rules for the policy. You can base a policy on various factors, such as location, group definitions, and authentication type. A specific policy rule can then be created for the groups that have been assigned to your app. You can create multiple policies with more or less restrictive rules and apply them to different groups.
You can also set up group sync to specify the groups that users should be added to. Group sync enables profile sourcing so that a user's profile gets updated each time that the user signs in. This allows you to always have the most recent data about your users.
IdP Discovery
You can define logic to determine which IdP individual end users are routed to when they authenticate. You can define that logic only if you have more than one IdP configured in your org. For example, if you have just one external IdP, in addition to Okta itself also serving as an IdP. This functionality is called IdP Discovery, or IdP routing rules. You can configure it by using the IdP Discovery policy (opens new window).
To control which IdP Okta redirects federated users to when re-authentication is required, use the identity claims sourcing policy. Early Access
The Okta Sign-In Widget (version 2.5.0 or above) interacts with the IdP Discovery policy to redirect end users to the IdP determined by the policy.
Note: Version 1 of the Okta API supports IdP Discovery with the Okta-hosted widget only.
Orgs that interact directly with the Okta Authentication API to implement the user sign-in flow rather than using the widget, can still integrate IdP Discovery. Integrate IdP Discovery into your sigh-in flow by including a call to the Okta WebFinger endpoint. This endpoint returns the IdP name that should be used for a given user, as determined by the org's defined IdP Discovery Policy.
Add an IdP integration