How to Create a Secure CI/CD Pipeline Using Okta Terraform
Embarking on a DevOps journey can be exciting and daunting, especially for beginners. The landscape is vast, and the learning curve can feel steep. One of the most common challenges is setting up and managing a robust Continuous Integration/Continuous Deployment (CI/CD) pipeline that ensures seamless integration and delivery of code changes. This guide aims to simplify that process by walking you through setting up a CI/CD pipeline for Okta using Terraform, AWS, and GitHub Actions.
Overcoming DevOps challenges securely
Getting started with DevOps often presents a series of challenges:
- Running Locally: Setting up Terraform locally involves dealing with packages, dependencies, and managing the state file, which can be cumbersome and error-prone.
- Collaboration: Ensuring team members can collaborate effectively requires a consistent and reproducible environment.
Making a setup production-ready introduces further complexities:
- State File Storage: Knowing where and how to store the Terraform state file securely.
- Secrets Management: Safely storing and managing sensitive information like API keys and passwords.
- Automation: Automating the deployment process to ensure reliability and efficiency.
In this post, we’ll use Okta, Terraform, AWS, GitHub, and GitHub actions to create a secure CI/CD pipeline.
Table of Contents
- Overcoming DevOps challenges securely
- CI/CD pipeline architecture using Terraform, AWS, Okta, and GitHub
- CI/CD workflow overview
- Store Terraform files in source control
- Connect to Okta securely using OAuth 2.0
- Leveraging AWS for Terraform Backend and Secrets Management
- Use GitHub Actions to trigger Terraform commands
- Build the CI/CD pipeline using Terraform and Okta
- Learn more about Okta, Terraform, CI/CD patterns, and OAuth 2.0
By the end of this post, you’ll have a solid understanding of how to set up a CI/CD pipeline tailored for Okta and the knowledge to start implementing infrastructure as code with Terraform.
Let’s dive in and take the first step towards mastering DevOps with a practical, hands-on approach!
Prerequisites
You’ll need the following tools installed on your local machine. Follow the installation instructions through the provided links.
- IDE with a Terraform plugin, such as Visual Studio Code or IntelliJ IDEA
Choosing the proper Integrated Development Environment (IDE) with a Terraform plugin is crucial for an efficient and error-free workflow. Some essential features to look for in your IDE:
- Variable Declaration Warnings: If your Terraform module requires certain variables, the IDE will alert you when any required variables are not declared.
- Resource Declaration Assistance: When you declare a resource, the IDE will warn you if any required attributes are missing and suggest attributes to add.
- Resource and Attribute Autocompletion: The IDE will autocomplete resource names and attributes when referencing other resources, saving time and reducing errors.
- Git
- Terminal window
You’ll need the following accounts:
- Okta Workforce Identity Cloud Developer Edition account
- GitHub account and a GitHub organization account (You can create a free GitHub organization if you don’t have access to one)
- A free AWS account
CI/CD pipeline architecture using Terraform, AWS, Okta, and GitHub
It is essential to understand the key components and their roles in the CI/CD process. This integration of GitHub, Terraform, AWS, and Okta allows for secure and efficient infrastructure management and deployment. The following overview details each component and its function.
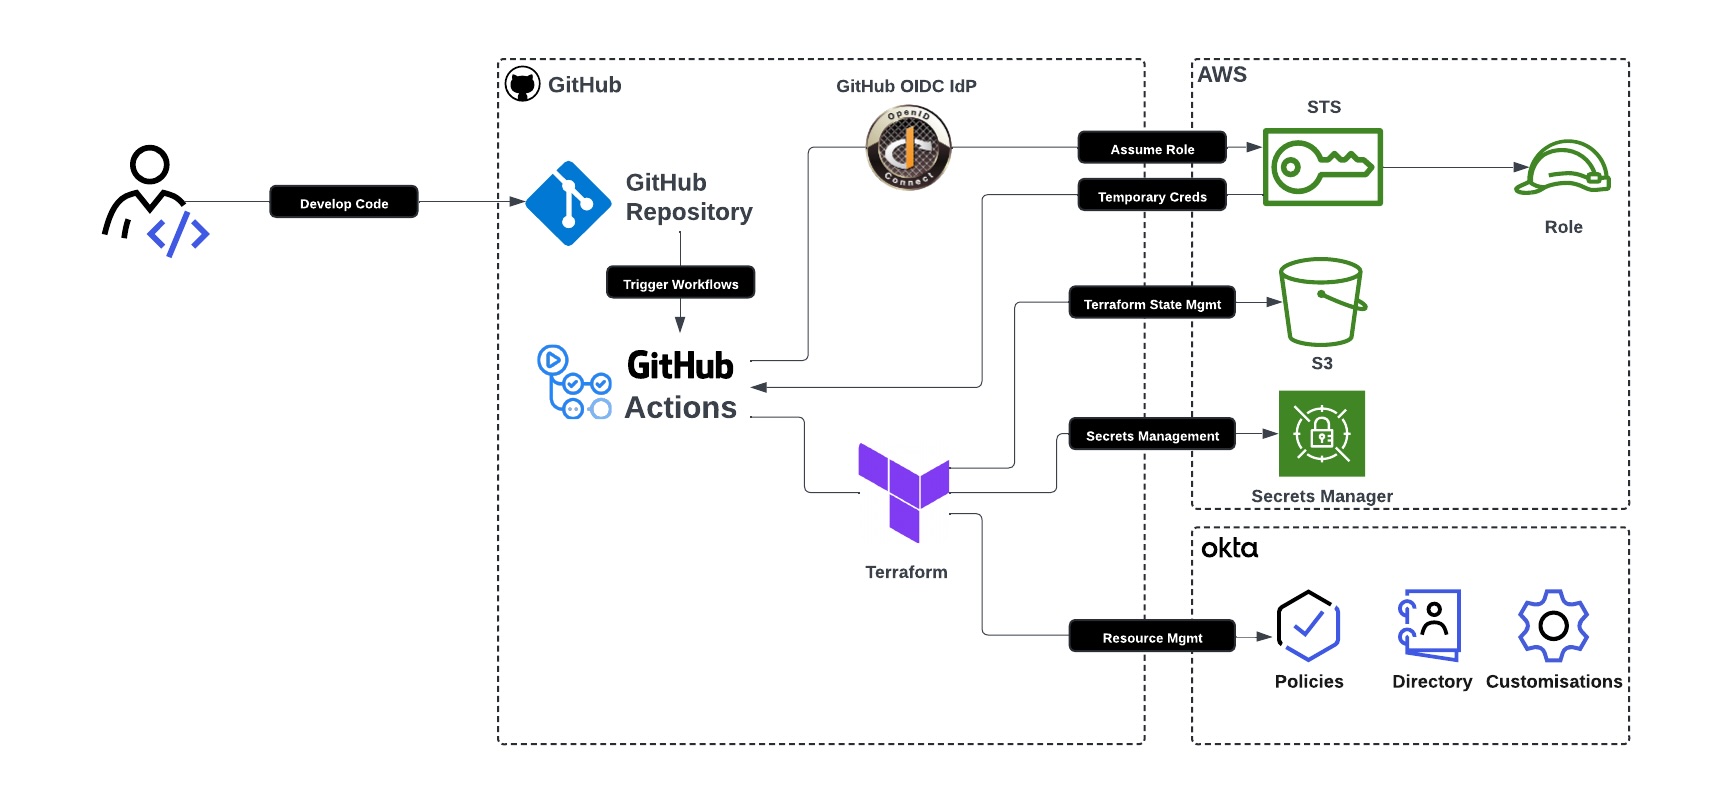
User
- Develop Code: Develops Terraform code on their local machine using a preferred IDE. Uses Git to push code to the GitHub repository.
GitHub Repository
- Code Storage: Stores the Terraform configuration code.
- Triggers Workflow: GitHub Actions checks out code that automates builds using Terraform based on events within the GitHub repository (e.g., push to branches, pull requests, etc.).
GitHub Actions
- Workflows: Workflows are automatically triggered by GitHub repository events and execute the necessary commands to integrate with AWS and Terraform.
- AWS:
- Assume Role: Integrates with AWS IAM STS via GitHub OIDC IdP to authenticate and assume roles with web identity.
- Temporary Credentials: Utilizes temporary credentials returned from AWS IAM STS for Terraform backend operations.
- Terraform: Runs Terraform commands to manage infrastructure.
Terraform
- State Management:
- S3: Utilizes S3 for storing Terraform state files.
- DynamoDB: Uses DynamoDB for state locking to ensure consistency and prevent concurrent operations.
- Secrets Management: Retrieves Okta OAuth2 client credentials private key from AWS Secrets Manager for authentication and authorization to Okta management APIs.
- Okta:
- Resource Management: Leverages Okta APIs via the Terraform Okta provider to manage resources.
CI/CD workflow overview
At a high level, this is what we aim to build out through this article. We’ll set up a CI/CD pipeline that automates infrastructure deployment using GitHub, Terraform, AWS, and Okta. Here’s a simplified overview of the workflow:
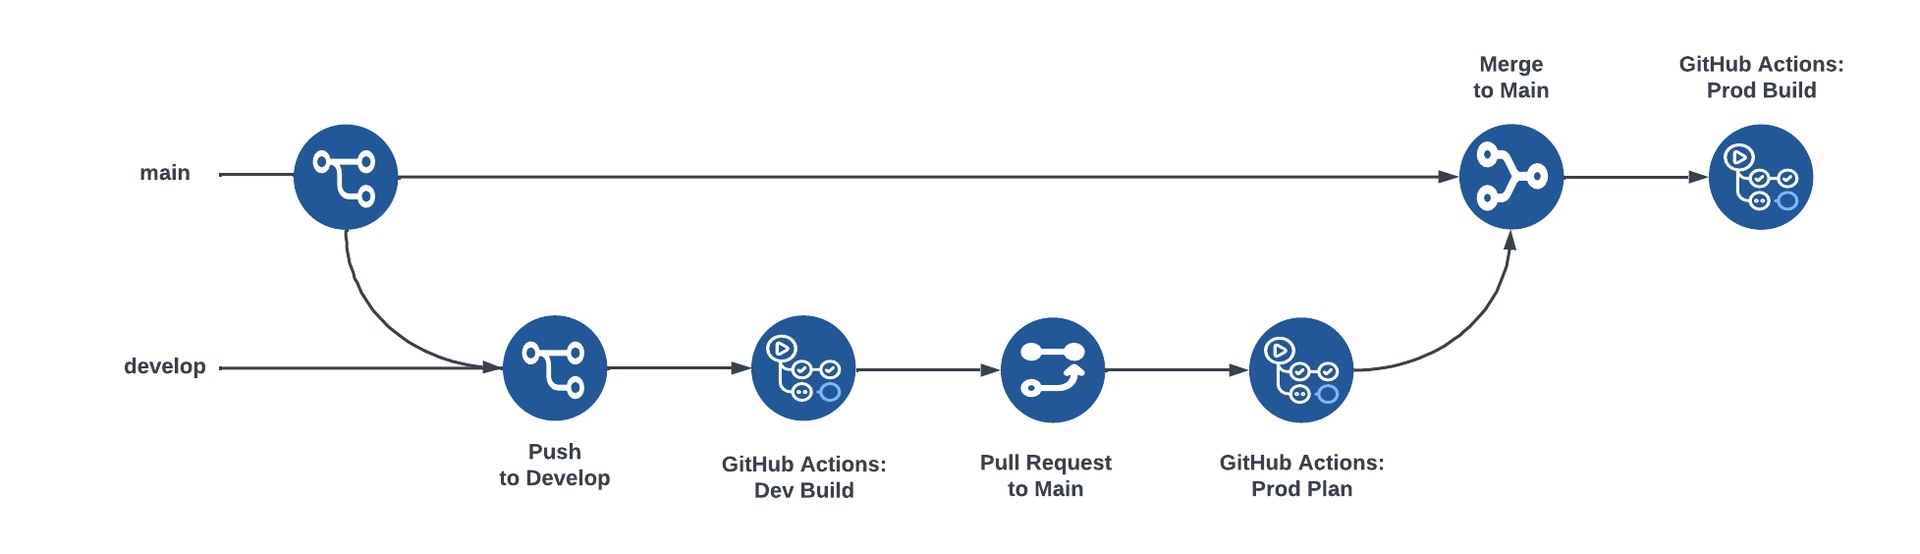
- Branch Creation: Developers create and work on a
developbranch. - Push to Develop: Code changes are committed locally and pushed to the remote
developbranch. - Dev Build: GitHub Actions run Terraform commands to deploy to the development environment. The push to develop automatically triggers this.
- Pull Request to Main: A pull request is made from
developtomainfor code review. Any GitHub Action workflow executions are included in the pull request for review. - Prod Plan: GitHub Actions preview changes for the production environment. This is triggered automatically by the pull request to main, and it lets pull request reviewers validate potential changes before modifying the production environment.
- Merge to Main: The pull request is approved and merged into the
mainbranch. - Prod Build: GitHub Actions runs Terraform commands to deploy to the production environment. The merge to
mainautomatically triggers this.
Store Terraform files in source control
We’ll use GitHub as our code repository and GitHub Actions for our CI/CD workflows, so you’ll need a GitHub account. If you don’t have one, create one at GitHub.
You will also need a GitHub Organization. If you are an enterprise user, you likely already have one. If not, or if you’re experimenting, you can create one for free by following the GitHub Organizations instructions to start creating an Organization.
You’ll create a new repository within your GitHub Organization and then connect it to your local development environment:
- Create a new repository: We created a templated repository for you to use for this guide. Follow the Creating a repository from a template instruction from GitHub and use this sample template. Select your GitHub Organization as the owner and name the repository using a structure such as
{okta-domain-name}-okta-terraform(e.g.,atko-okta-terraform). Ensure you set the repository to Private. This setting is crucial as the repository will run GitHub Actions workflows and have information related to your environment (e.g., AWS resource names). - Clone the Repository: Once you create your repository, copy the clone link and run the following commands in the command line. Replace the variables with your GitHub username, GitHub organization, and repository name:
git clone https://{your_github_username}@github.com/{your-github-organization}/{your-repository-name}.git
cd {your-repository-name}
Connect to Okta securely using OAuth 2.0
We will use the OAuth 2.0 client credentials flow to access Okta APIs. OAuth 2.0 is the most secure method for integrating with Okta APIs, as we can tightly bound authorizations using scopes, and access tokens are short-lived compared to the long-lived SSWS API keys. Furthermore, Okta’s Terraform provider supports OAuth 2.0 Demonstrating Proof-of-Possession (DPoP), which is an additional security mechanism to bind access tokens to a particular client through cryptography, thereby reducing the risk of token replay by a malicious actor.
The Okta OAuth client requires ‘scopes’ to interact with the management API. For this guide, we will interact with the Groups resource in Terraform and corresponding APIs. To understand the corresponding scopes related to a Terraform resource and underlying Management APIs, refer to the Okta API documentation.
Finally, the OAuth client requires an Administrator Role to make administrative changes. We will assign the Organization Administrator role as this contains sufficient permissions for the resources we manage within this build. If you intend to use Terraform to manage your environment ongoing, a Super Administrator may be required (especially for managing resources like Admin Roles). The effective permissions are a combination of the scopes permitted for the client and the Administrator Role - so even though we provide the client ‘Organization Administrator,’ if we only give access to ‘groups’ related scopes, all the client can do via the API is manage groups!
Follow these steps to set up an API Services application in Okta. Navigate to the Okta Admin Console and follow the steps to create the API services application:
- Navigate to Applications > Applications and press the button to Create App Integration
- Select API Services and press Next
- Name your application (e.g., Terraform)
- Press Save
In the General Settings tab, find the Client Credentials section and press Edit to make the following changes:
- Change the Client authentication method to Public key / Private key.
- In the Public Keys section, click Add key and then Generate new key.
- Select the PEM tab and copy the contents to a file you’ll use later.
- Select Done and Save
Navigate to Okta API Scopes tab and make the changes:
- Find
okta.groups.manageand select Grant
Navigate to the Admin roles tab and press Edit assignments. Then apply the following changes:
- In the Role drop-down, select ‘Organization Administrator’, or your preferred Admin Role
- Select Save Changes to finish assigning the role
Repeat these steps to create an API Service Okta application and configure it for any additional environments you manage.
⚠️ Important
Do not save the private key locally. In the next steps, we will securely onboard it to secrets management.
Leveraging AWS for Terraform Backend and Secrets Management
We will utilize AWS for both the Terraform backend and Secrets Management. The Terraform backend will store state files, which track the status of your Okta environment based on previous builds. We will use the GitHub OIDC integration with AWS for Terraform authentication. This allows GitHub to authenticate with AWS using OpenID Connect (OIDC) and assume the necessary role via web identity to interact with required services. This approach eliminates the need for long-lived or persistent secrets (such as AWS access keys and secrets), ensuring a more secure setup.
Store Terraform backend components in AWS
First, let’s create the necessary components for the Terraform backend.
Create an S3 Bucket
Follow the Creating a bucket instructions from AWS to create a bucket. Name the bucket using a structure such as {okta-domain-name}-okta-terraform-state. By default, Block all public access is enabled, which ensures that your bucket contents are private, which is an integral control given that the bucket will contain information about your Okta configuration. I highly recommend enabling Bucket Versioning to version your state files. This is a valuable feature should you need to roll back to previous versions of the state. After you have created the bucket, follow the Viewing the properties for an S3 bucket instructions to navigate to the properties of the bucket and capture the ARN. The ARN will be used later to define the AWS IAM Role Policy. Lastly, we will use folders to organize your different environments’ state files. Follow the Organizing objects in the Amazon S3 console by using folders instructions to create a folder for each environment you manage (e.g. dev and prod).
Create a DynamoDB Table for State Locking
Follow the Create a table in DynamoDB instructions to create a DynamoDB table. Name the table using a structure such as {okta-domain-name}-okta-terraform-{environment} (e.g. atko-okta-terraform-dev). Set the partition key to ‘LockID’ and leave other configuration defaults. Note the table name, we will be using it later in the AWS IAM Role Policy definition. Repeat for any other environments you manage.
For more information on the AWS S3 Terraform backend, please refer to Terraform S3 Backend Documentation.
Manage secrets securely
Next, we will set up AWS Secrets Manager to securely store the private key for authentication and authorization to Okta management APIs.
Follow the Create an AWS Secrets Manager secret instructions to store the OAuth 2.0 private key(s). When configuring the secret, note this is of the secret type Other type of secret, and Plaintext. Ensure you name the secret something meaningful, as this will be referenced in your Terraform configurations, as well as AWS IAM Role Policy definition - follow a structure such as {environment}/okta-terraform-key (e.g., dev/okta-terraform-key). Since it’s a private key, keep any rotation-related configurations as default options. Once the secret has been created, copy the ARN for later use within the AWS IAM Role Policy definition. Repeat for any additional environments you manage.
Set up the IAM policy for the CI/CD pipeline
Next, we’ll create the IAM Policy definition. This policy will be used by the role that GitHub will assume via OpenID Connect (OIDC).
First, we will prepare the IAM policy JSON file. Use the following template and make the necessary replacements using the ARNs you’ve captured from the previous steps.
- Replace
<S3-ARN>with the ARN of your S3 bucket. This grants permission to list the bucket. You can find it under the Properties tab of the S3 Bucket. Example:arn:aws:s3:::akto-okta-terraform - Replace
<S3-ARN>/*with the ARN of your S3 bucket and any folder structures for respective environments. This grants permission to get and update objects in the relevant path. Alternatively, you can use a wildcard (*) for the entire bucket. Example:arn:aws:s3:::akto-okta-terraform/dev/* - Replace
<AWS-Region>,<Account-Number>, and<DynamoDB-Table-Name>with the AWS Region, AWS Account Number (found in the management console toolbar) and DynamoDB Table Name respectively. This grants permission to add and remove rows in the table for the Terraform state file locking process. Include any additional tables for each environment.Example: arn:aws:dynamodb:ap-southeast-2:99123456789:table/akto-okta-terraform-dev - Replace
<SecretsManager-ARN>with the ARN of your Secrets Manager secret. This grants permission to retrieve the secret value. Include any additional ARNs for each environment. Example:arn:aws:secretsmanager:ap-southeast-2:99123456789:secret:dev/akto_okta_terraform_key-QuqiGR
{
    "Version": "2012-10-17",
    "Statement": [
        {
            "Effect": "Allow",
            "Action": "s3:ListBucket",
            "Resource": "<S3-ARN>"
        },
        {
            "Effect": "Allow",
            "Action": [
                "s3:GetObject",
                "s3:PutObject"
            ],
            "Resource": [
                "<S3-ARN>/*"
            ]
        },
        {
            "Effect": "Allow",
            "Action": [
                "dynamodb:DescribeTable",
                "dynamodb:GetItem",
                "dynamodb:PutItem",
                "dynamodb:DeleteItem"
            ],
            "Resource": [
                "arn:aws:dynamodb:<AWS-Region>:<Account-Number>:table/<DynamoDB-Table-Name>"
            ]
        },
        {
            "Effect": "Allow",
            "Action": [
                "secretsmanager:ListSecrets",
                "secretsmanager:GetSecretValue"
            ],
            "Resource": [
                "<SecretsManager-ARN>"
            ]
        }
    ]
}
Follow the Create IAM policies documentation for instructions on creating an IAM Policy. When creating the policy document, use the JSON editor and input the JSON from the previous step. Name the policy something meaningful (e.g. ‘Okta_Terraform_Backend’).
By following these steps, you will have created an IAM policy that provides the necessary permissions for Terraform to interact securely with AWS services.
Configure an OpenID Connect Provider in GitHub
Next, we’ll configure the OIDC Identity Provider for GitHub. Follow the AWS instructions at Create an OpenID Connect identity provider in IAM.
- For the Provider URL, use
https://token.actions.githubusercontent.com - For the Audience, use
sts.amazonaws.com
For more information on integrating GitHub with AWS using OIDC, refer to the GitHub and AWS integration documentation.
Create IAM roles for the CI/CD pipeline
Finally, we’ll create an IAM Role for the GitHub OIDC Identity Provider to assume. This role will link the OIDC Identity Provider via the trusted entity and the policy via permissions.
Follow the instructions for Creating a role for OIDC from AWS. When configuring the Trusted Entity, choose Web Identity, and use the following values for the configurations:
- Identity provider:
token.actions.githubusercontent.com - Audience:
sts.amazonaws.com - GitHub organization:
{your_github_organization}(the unique identifier for your GitHub Organization) - GitHub repository:
{your_github_repository}(the name of your GitHub repository)
For permissions, choose the IAM Policy (‘Okta_Terraform_Backend’, or your name of choosing) you created earlier. Name the role something meaningful (e.g. ‘GitHub_Okta_Terraform_Backend’). Once the role has been created, copy the Role ARN. This is the only variable we need to pass to our pipeline to initialize the backend and retrieve the secret to authenticate and authorize Okta APIs — and it’s not even a secret!
By following these steps, you will have created an IAM Role that GitHub can assume via OIDC, enabling secure interactions with AWS and Okta.
Use GitHub Actions to trigger Terraform commands
GitHub Actions allows us to run our build and deployment activities using Terraform commands executed in a temporary virtual machine.
First, we must store the Role ARN and other environment variables in GitHub. To create and store variables for the GitHub repository, follow the Creating configuration variables for a repository instructions.
- Store the Role ARN: Create a variable named AWS_ROLE_ARN and use the Role ARN for the value (e.g.
arn:aws:iam::<Account-Number>:role/<Role-Name>). - Store the Region: Create a variable named AWS_REGION and use the Region in which the AWS resources were created (e.g.
ap-southeast-2). Refer to the following documentation for more details on Region names: AWS Regions Documentation
Ensure you do this at a ‘Repository’ level and not at an ‘Organization’ level, or the GitHub Actions workflows will not be able to read the variables
Leverage GitHub Actions for the CI/CD workflow
We will use multiple pre-built GitHub Actions to authenticate to AWS and run our Terraform commands. No action is required from you to configure these workflows. At a high level, the configured GitHub Actions workflows will perform the following:
- GitHub Actions Runner: This action checks out your repository onto the runner, allowing you to run Terraform commands against your code.
- AWS Configure AWS Credentials: This action establishes an AWS session using the GitHub OIDC Identity Provider (IdP) and the Assume Role with Web Identity capability. There is no need to manage any secrets or custom scripts, as this action will handle session establishment.
- Terraform CLI: This action runs the Terraform commands.
For more information and to examine the code, see the github/workflows folder within the repository.
Organize the CI/CD and Terraform code files for maintainability
The high-level structure of the repository looks like this:
github/
├─ workflows/
│  ├─ push-main.yml
│  ├─ push-develop.yml
│  ├─ pr-main.yml
terraform/
├─ modules/
│  ├─ {module}/
│  │  ├─ {resource}.tf
│  │  ├─ variables.tf
├─ main.tf
├─ variables.tf
├─ backend-dev.conf
├─ backend-prod.conf
├─ vars-dev.tfvars
├─ vars-prod.tfvars
Review the GitHub Workflows directory
- github/workflows/: This directory contains the GitHub Actions workflow files that define the CI/CD pipeline.
- push-main.yml: Workflow triggered by a push to the main branch.
- push-develop.yml: Workflow triggered by a push to the develop branch.
- pr-main.yml: Workflow triggered by a pull request to the main branch.
Review the Terraform configuration files
- terraform/: The root directory for all Terraform configuration files.
- modules/: This directory contains reusable Terraform modules.
- {module}/: Each module has its own directory.
- {resource}.tf: The Terraform configuration file for specific resources within the module.
- variables.tf: The child module input variables definition file
- {module}/: Each module has its own directory.
- main.tf: The main Terraform configuration file where all providers, modules, and variables are configured.
- variables.tf: The parent module input variables definition file.
- backend-dev.conf: Configuration for the backend components for the development environment. This configuration must be passed in via CLI since named variables cannot be used directly in the backend block.
- backend-prod.conf: This is the configuration for the backend components in the production environment, similar to the development configuration.
- vars-dev.tfvars: Input variable values specific to the development environment.
- vars-prod.tfvars: Input variable values specific to the production environment.
- modules/: This directory contains reusable Terraform modules.
Build the CI/CD pipeline using Terraform and Okta
Now that we have everything set up, let’s actually build something!
First, we will need to update a few files with some of the necessary configurations relevant to your environment. Then we will create a new group in your Okta environment, using variables to declare the group name.
Set up source control branches for Terraform code files
Ensure your local repository is up-to-date with the remote main branch.
git checkout main
git pull origin main
Create and switch to the branch named develop.
git checkout -b develop
Finalize Terraform configuration
Now that we have checked out our code let’s finalize the configurations required for Terraform to interact with our backend, retrieve the necessary secrets, and interact with the Okta Management APIs. Open the repository in your preferred IDE to edit some files.
Backend configuration files
The Terraform backend configuration is stored within the backend-*.conf files and contain configurations relevant to your environments. Within these files, you will find placeholders for the following:
bucket- the name of your bucket (not the ARN!)key- the path to your Terraform state file (i.e. the folder and resultant file name, which defaults toterraform.tfstate)dynamodb_table- the name of your DynamoDB table (not the ARN!)region- the AWS Region
Replace all the placeholders in the backend-*.conf files. There are two placeholders for development and production environments, respectively. Refer to the following example as a reference:
bucket         = "atko-okta-terraform"
key            = "dev/terraform.tfstate"
dynamodb_table = "atko-okta-terraform-dev"
region         = "ap-southeast-2"
Terraform variables (tfvars)
Variables are a critical component within the infrastructure as code configurations allow you to have a single set of configurations while maintaining environment-specific values. Within Terraform, one way to manage such environment-specific values is using ‘tfvars’ files. The ‘tfvars’ file contains a set of variable values specific to an environment. It is passed in via the Terraform CLI in our GitHub Actions workflow when running specific parts of the workflow.
Additional configuration-related variables stored within the vars-*.tfvars files require updates. Within these files, you’ll find placeholders for the following:
region- the AWS Regionokta_org_name- the prefix value for your Okta tenantokta_base_url- the base or suffix value for your Okta tenantokta_scopes- the scopes for the Terraform Okta OAuth 2.0 client applicationokta_client_id- the client ID for the Terraform Okta OAuth 2.0 client applicationokta_private_key_id- the private key ID for the Terraform Okta OAuth 2.0 client application. This is the ‘KID’ value, which can be obtained in the ‘Public Keys’ section of the OAuth 2.0 application configurationokta_secret_id- the AWS Secrets Manager ‘secret name’ for the private key of the Terraform Okta OAuth 2.0 client application. This is the ‘Secret name’ value, not the ‘Secret ARN’.
Replace all the placeholders in the vars-*.tfvars files. Refer to the following example as a reference:
region            = "ap-southeast-2"
okta_org_name     = "atko"
okta_base_url     = "oktapreview.com"
okta_scopes       = [
  "okta.groups.manage"
]
okta_client_id    = "0oaes123y1FekjfoE1d7"
okta_private_key_id = "ievOgRgNc...aJJn5ra_4"
okta_secret_id    = "dev/okta_terraform_key"
Connect Terraform code to Okta resources
The repository includes a directory module containing a resource okta_groups.tf, which we will use to provide a group for your Okta tenant. In doing so, we’ll also go through a core tenet of the previously mentioned variables, where we will define both input and output variables. This may be a little confusing initially, so take some time to understand how the different files and modules interact! The following diagram may help contextualize the various files we are going to step through:

Open terraform/modules/directory/variables.tf and uncomment the following entry. This is the variables file for the directory module and it defines which input variables are required. Each module you develop will have its own variables file.
variable "okta_group_name" {
  type = string
}
Open terraform/modules/directory/okta_groups.tf and uncomment the following entry. This is a resource block. The resource block has two parts: firstly, the resource type, okta_group , and the resource name, okta_test_group. Feel free to change the resource block name (okta_test_group) to something you choose. Within the resource block body are the configuration arguments for the resource. We have one argument defined, which is the name, referencing the input variable okta_group_name
resource "okta_group" "okta_test_group" {
  name = var.okta_group_name
}
Open terraform/variables.tf and uncomment the following entry. This is the variables file for the parent or main module. The variables within this file are assigned via the tfvars files, which are passed in with environment-specific configurations via the Terraform CLI:
variable "okta_group_name" {
  type = string
}
Next, open terraform/main.tf and uncomment the following entry. The main file contains critical configurations for the backend and providers (like Okta or AWS). It also is where we reference any modules, including the directory module, via their path within the local repository. It’s also necessary to pass through any variables within this module block. You can manage variables in two ways:
- Configure the variable values directly within the main file, which may be acceptable for any standardized or non-environment-specific variables
- Reference the parent module variables file like we have done, so in this example:
okta_group_name = var.okta_group_name
Open terraform/dev.tfvars and terraform/prod.tfvars and uncomment the following entry. This sets the value of the okta_group_name variable for each respective environment. Feel free to change it and make the values environment-specific.
okta_group_name = "Okta Test Group GitHub Actions"
Now, we can stage our changes. Use git add to add the changes for the next commit.
git add .
Lastly, commit the changes:
git commit -m "Initial commit"
With the changes committed, we can now push your changes to the remote develop branch.
git push origin develop
GitHub Actions triggers Terraform dev build
GitHub Actions is configured to trigger a build when changes are pushed to the develop branch. The workflow defined in the repository will:
- Authenticate with AWS: Use GitHub OIDC to assume the necessary role.
- Run Terraform Commands: Execute terraform init, terraform plan, and terraform apply to deploy changes to the development environment.
Monitor the action in GitHub to ensure the build completes successfully, and check your Okta environment to observe the creation of the group using the name specified in the tfvars file.
If GitHub Actions has any errors, refer to the error message within the GitHub Actions workflow for further details.
If you missed any configurations within the repository files (e.g.,
backend-*.conforvars-*.tfvars), make the changes locally and perform thegit add,git commit, andgit pushcommands again.If you missed any configurations within Okta (e.g., OAuth 2.0 scopes) or AWS (e.g., IAM Role permissions, etc.), then correct the issue and re-run the GitHub Actions workflow from the GitHub Actions console on a failed workflow.
Create a pull request to merge code from the develop branch to the main branch:
- Navigate to the repository on GitHub.
- Open a pull request from
developtomain. - Provide a detailed description of the changes and any context or considerations for the reviewers.
GitHub Actions trigger Terraform prod plan
When a pull request is opened, GitHub Actions triggers a Terraform plan for the production environment. This plan will:
- Authenticate with AWS: Use GitHub OIDC to assume the necessary role.
- Run Terraform Plan: Execute terraform init, terraform plan to show the potential changes without applying them against the production environment.
Reviewers can inspect the planned output to understand the impact of the changes before merging.
After reviewing and approving the pull request, merge it into the main branch. You can merge using the GitHub Pull Request user interface.
GitHub Actions trigger Terraform prod build
Merging to the main branch triggers a new GitHub Actions workflow. The workflow will:
- Authenticate with AWS: Use GitHub OIDC to assume the necessary role.
- Run Terraform Commands: Execute terraform init, terraform plan, and terraform apply to deploy changes to the production environment.
Monitor the Actions tab to ensure the deployment completes successfully.
Learn more about Okta, Terraform, CI/CD patterns, and OAuth 2.0
In this article, we have outlined the architecture and steps needed to set up a secure and efficient CI/CD pipeline using GitHub Actions, Terraform, AWS, and Okta. By leveraging these technologies, we can automate infrastructure management, ensuring consistency and reducing the risk of manual errors. We covered the integration of GitHub with AWS for secure authentication and authorization, the configuration of Terraform for state management and secrets handling, and the overall workflow for deploying changes from development to production. If you found this post interesting, you may like these resources:
- How to Secure Your Kubernetes Clusters With Best Practices
- How Can DevOps Engineers Use Okta?
- Store ASP.NET Secrets Securely with Azure KeyVault
- How to Deploy a .NET Container with AWS ECS Fargate
Stay tuned for subsequent articles for Okta recommended policies to help get you started with secure-by-design configurations from day one!
Remember to follow us on Twitter and subscribe to our YouTube channel for more exciting content. Leave us a comment below if you have any questions or requests for topics!
Nick Connelly is a seasoned Professional Consultant within the Okta Professional Services team, bringing over a decade of experience in cybersecurity and identity and access management. Passionate about learning new technologies and improving processes, Nick is dedicated to delivering exceptional value for customers by leveraging the latest advancements and best practices in the industry.
Okta Developer Blog Comment Policy
We welcome relevant and respectful comments. Off-topic comments may be removed.