Building a WebAuthn Application with Java

The Web Authentication (WebAuthn) specification, given official approval by the World Wide Web Consortium (W3C) and the FIDO Alliance in 2019, aims to strengthen online security by allowing users to sign in to sites with elements like biometrics and FIDO security keys. The WebAuthn API can replace or supplement less-secure passwords, which may be weak and are often shared.
WebAuthn is supported by default in Firefox and Chrome browsers and can be used in Edge browsers on recent Windows systems. As support for the new standard is built into more devices, more websites will offer this easier, more secure method of authentication.
In this post, I’ll explain what WebAuthn is, how it works, and we’ll build a Java web application that allows a user to register and log in with a supported WebAuthn device.
Table of Contents
- How WebAuthn works
- How to authenticate using WebAuthn in Java
- Get started with WebAuthn and Spring Boot
- Spring JPA data layer overview
- Application properties
- Implementing the WebAuthn server library
- An easier way to WebAuthn
- Why WebAuthn is the future
How WebAuthn works
WebAuthn authenticator generates a public-private key pair, using public-key cryptography, scoped to a specific URI to be used for authentication. The service provider must identify the application based on this key. The private key used to generate the credentials is also kept hidden by the authenticator, so the authenticating software and service provider are less susceptible to malicious actors.
There are two distinct steps for using WebAuthn: credential registration and credential authentication. Registration is the process of generating, scoping, and storing a public key for authentication. Both the authenticator and server will store some information about the other party. Authentication is the process of requesting a credential from an authenticator, then verifying its validity.
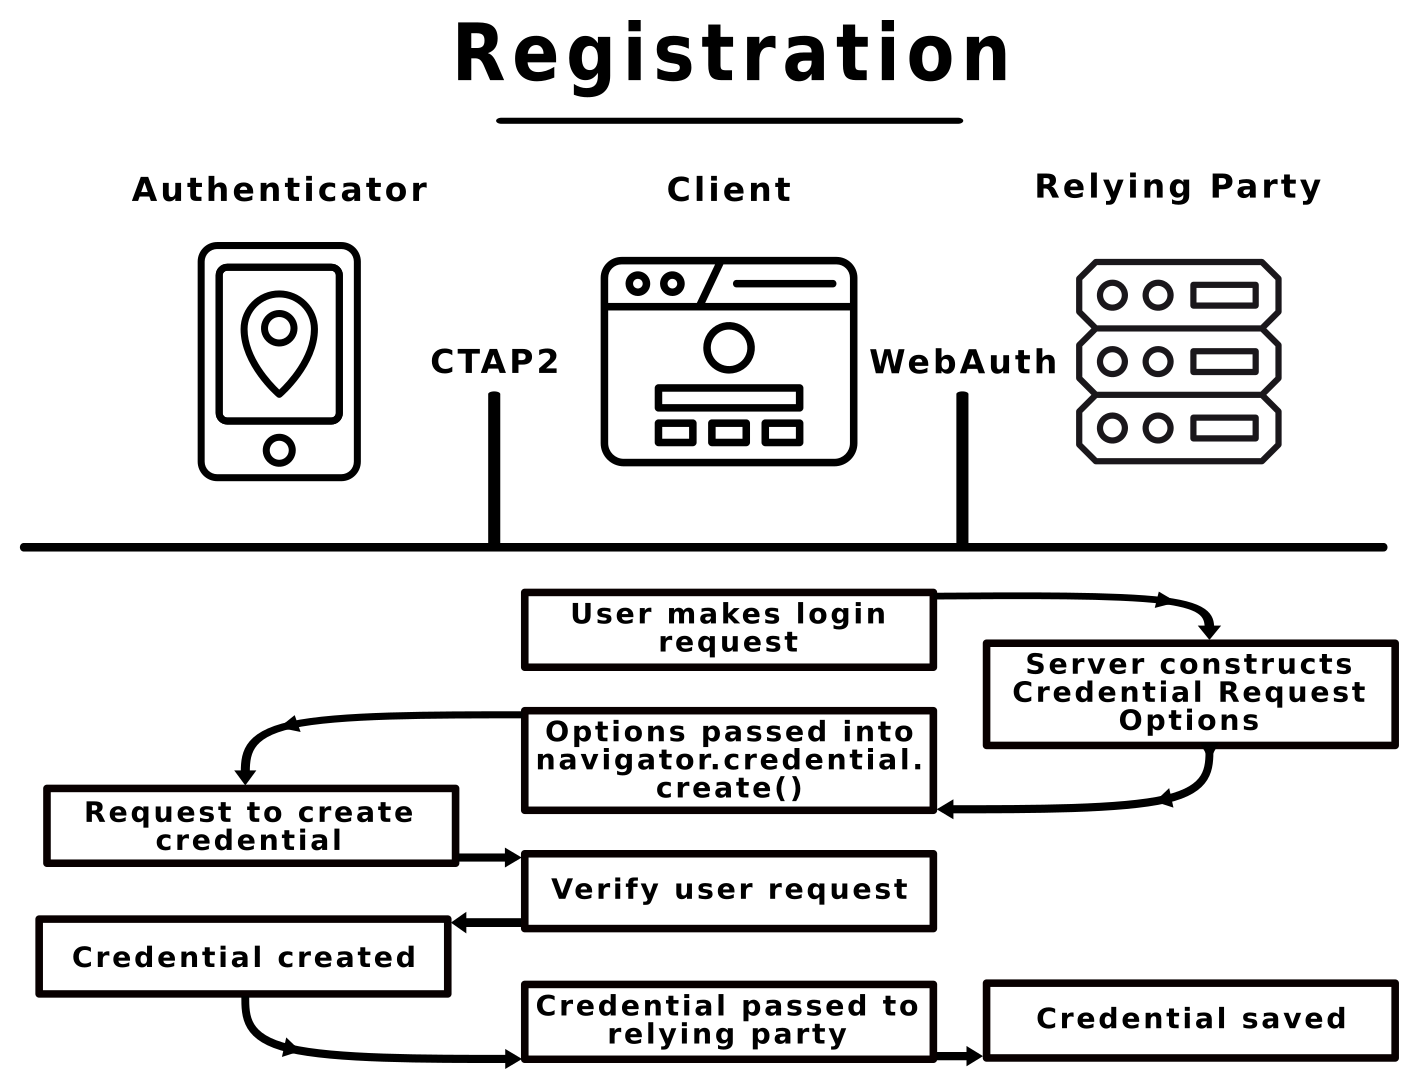
In this application, the user hits a Register button and the server responds with information about the origin of the registration (hostname and origin), a byte-based user handle for identification, a randomly generated challenge nonce, and other optional information about the type of registration the server will accept.
The browser receives this information. A JavaScript function on the client re-encodes and formats the data for the WebAuthn API, and the generated JavaScript object is passed to the browser’s navigator.credentials.create() function.
The WebAuthn API passes the request to a connected authenticator, which normally requests some form of user verification (such as a PIN number or fingerprint), then generates a key pair for future verification and a credential ID to scope the relying party. The public key, credential ID, and challenge nonce, along with optional additional information, are passed back to the service provider; the provider checks the challenge nonce for tampering and then stores the public key and credential ID for future use.

Authentication functions similarly, though the content of the data passed around is slightly different. The user hits a Sign-in button and the service provider sends identifying information (credential ID and a challenge nonce). JavaScript on the client passes that request to the authenticator using the WebAuthn API, then the authenticator verifies the credential and returns a key, which is passed back to the service provider. The service provider verifies the key and performs any steps necessary to grant the user access to appropriate resources, like setting authentication cookies.
How to authenticate using WebAuthn in Java
In this article, you’re going to build a Java application that authenticates users using WebAuthn. To bootstrap a Java web framework that can create and store user sessions, you’ll use Spring Boot to implement the web application, then implement the WebAuthn server, built by the hardware authentication manufacturer Yubico, to create the necessary JSON for the client to create and use credentials.
The final version of the code can be found here. The demo application uses Java 17 and Apache Maven for dependency management.
Get started with WebAuthn and Spring Boot
First, go to the Spring Initializr page and add your dependencies:
- Lombok: A library used to speed up development by automatically generating constructors, getters and setters.
- Spring Data JPA: An ORM (Object-relational mapping) tool to persist data and map Java classes to data objects.
- H2 Database: An in-memory database for simple data persistence. No saved data will exist after application shutdown. For a production-ready application, replace this with a traditional database and edit the
spring.datasource.driver-class-nameproperty. - Spring Web: To handle web requests.
- Thymeleaf: For HTML templating.
After creating and downloading this project, add the Yubico WebAuthn server dependency. The application also needs some server-side caching, used to verify a challenge token that’s generated by the server and then provided by the client after a successful authenticator ceremony. This application uses HttpSession to track challenge tokens.
<dependency>
    <groupId>com.yubico</groupId>
    <artifactId>webauthn-server-core</artifactId>
    <version>1.12.1</version>
</dependency>
Spring JPA data layer overview
The application stores two data object classes: users and credentials. Users are people using the system, and they can have multiple credentials. Credentials contain the information needed to identify and verify a device implementing Client to Authenticator (CTAP2) protocol. CTAP2 is a spec that describes communication between a roaming authenticator and another client/platform at the application layer, as well as bindings to a variety of transport protocols that use different physical media.
User data
There are two goals for the user data: track the existence and uniqueness of the user and their credentials, and enable the creation of two JavaScript objects for the browser to make WebAuthn API requests: PublicKeyCredentialCreationOptions for registration and PublicKeyCredentialRequestOptions for authentication.
Using Spring JPA, the AppUser data class starts with traditional fields for organizing users in a system, an id for database lookup, and a unique username to enable user self-identification.
The displayName and handle fields are used by the server to create WebAuthn requests:
import com.yubico.webauthn.data.ByteArray;
import lombok.Getter;
import lombok.NoArgsConstructor;

import javax.persistence.Column;
import javax.persistence.Entity;
import javax.persistence.GeneratedValue;
import javax.persistence.GenerationType;
import javax.persistence.Id;
import javax.persistence.Lob;

@Entity
@Getter
@NoArgsConstructor
public class AppUser {
    @Id
    @GeneratedValue(strategy = GenerationType.AUTO)
    private Long id;

    @Column(nullable = false, unique = true)
    private String username;

    @Column(nullable = false)
    private String displayName;

    @Lob
    @Column(nullable = false, length = 64)
    private ByteArray handle;
}
The username field is set by the user. It is intended to be displayed by UI elements on the client as part of the registration and authentication process, but it’s also entirely optional in the WebAuthn process. According to the WebAuthn Specification, a nickname string like username is not suitable for identification, so WebAuthn identity requests are made using a user handle, a byte sequence with a maximum length of 64.
Byte data (like the user handle) is stored in the database as a binary large object (BLOB). To convert these data fields to the ByteArray object the application uses, the application implements a JPA AttributeConverter class with the Converter annotation.
import com.yubico.webauthn.data.ByteArray;
import javax.persistence.AttributeConverter;
import javax.persistence.Converter;

@Converter(autoApply = true)
public class ByteArrayAttributeConverter implements AttributeConverter<ByteArray, byte[]> {

    @Override
    public byte[] convertToDatabaseColumn(ByteArray attribute) {
        return attribute.getBytes();
    }

    @Override
    public ByteArray convertToEntityAttribute(byte[] dbData) {
        return new ByteArray(dbData);
    }
}
The application converts data classes into Java objects provided by the Yubico library that can produce JSON-formatted strings the client will pass to the WebAuthn API. The toUserIdentity() function converts a AuthUser data class to a UserIdentity object that can access the username, the screen name, and the all-important user handle. Traditional property getters are created with the Lombok @Getter annotation.
public AppUser(UserIdentity user) {
    this.handle = user.getId();
    this.username = user.getName();
    this.displayName = user.getDisplayName();
}

public UserIdentity toUserIdentity() {
    return UserIdentity.builder()
        .name(getUsername())
        .displayName(getDisplayName())
        .id(getHandle())
        .build();
}
Create a Spring Data CrudRepository to manage the AppUser objects:
import com.yubico.webauthn.data.ByteArray;
import org.springframework.data.repository.CrudRepository;
import org.springframework.stereotype.Repository;

@Repository
public interface UserRepository extends CrudRepository<AppUser, Long> {
    AppUser findByUsername(String name);
    AppUser findByHandle(ByteArray handle);
}
Credential data
The server also stores information about the user’s credentials. There is a standard id and a name field used to identify the authenticator on the server side.
To authenticate a credential, the server constructs an AssertionRequest Java object that contains the server-side information about any credential. The AssertionRequest is converted into JSON and sent to the browser, which it turns into PublicKeyCredentialRequestOptions during the WebAuthn authentication ceremony. The required fields are a credentialId, a random byte array created by the authenticator that identifies the scope of a credential. A publicKey is also required, which is another array of bytes. This is generated by the authenticator’s cryptographic algorithm and is used to check the authenticity of a credential signature provided during authentication.
import com.yubico.webauthn.RegistrationResult;
import com.yubico.webauthn.data.AttestedCredentialData;
import com.yubico.webauthn.data.AuthenticatorAttestationResponse;
import com.yubico.webauthn.data.ByteArray;
import lombok.Getter;
import lombok.NoArgsConstructor;

import javax.persistence.Column;
import javax.persistence.Entity;
import javax.persistence.GeneratedValue;
import javax.persistence.GenerationType;
import javax.persistence.Id;
import javax.persistence.Lob;
import javax.persistence.ManyToOne;
import java.util.Optional;

@Entity
@Getter
@NoArgsConstructor
public class Authenticator {

    @Id
    @GeneratedValue(strategy = GenerationType.AUTO)
    private Long id;

    @Column
    private String name;

    @Lob
    @Column(nullable = false)
    private ByteArray credentialId;

    @Lob
    @Column(nullable = false)
    private ByteArray publicKey;

    @ManyToOne
    private AppUser user;

    /* The authenticator potentially provides a range of additional information. This
     * application stores some of it to enable functionality that could be useful for
     * a production-quality web authentication project.
    */

    @Column(nullable = false)
    private Long count;

    @Lob
    @Column(nullable = true)
    private ByteArray aaguid;
}
The W3 recommendation strongly encourages authenticators to implement a signature count field that increments each time the authenticator is used. By storing the 32-bit signCount integer provided by the authenticator, the server can verify how many times the authenticator has been used. Increasing counts are expected; if the authenticator reports a decreasing count, it should raise a red flag.
The aaguid field is an identifier that should be provided by authenticators (but isn’t always), which identifies the type of credential used. This can be used to verify the authenticator’s make and model. Also, it can be useful for denying access for outdated authenticators with known security vulnerabilities.
The credential data class has one constructor that uses the Yubico RegistrationResult and the AuthenticatorAttestationResponse object (converted from JavaScript to Java), along with a username and name for the credential.
public Authenticator(RegistrationResult result,
                     AuthenticatorAttestationResponse response,
                     AppUser user,
                     String name) {
    Optional<AttestedCredentialData> attestationData = response.getAttestation()
        .getAuthenticatorData()
        .getAttestedCredentialData();
    this.credentialId = result.getKeyId().getId();
    this.publicKey = result.getPublicKeyCose();
    this.aaguid = attestationData.get().getAaguid();
    this.count = result.getSignatureCount();
    this.name = name;
    this.user = user;
}
Create another CrudRepository to mange the Authenticator objects.
import java.util.List;
import java.util.Optional;

import com.yubico.webauthn.data.ByteArray;
import org.springframework.data.repository.CrudRepository;
import org.springframework.stereotype.Repository;

@Repository
public interface AuthenticatorRepository extends CrudRepository<Authenticator, Long> {
    Optional<Authenticator> findByCredentialId(ByteArray credentialId);
    List<Authenticator> findAllByUser (AppUser user);
    List<Authenticator> findAllByCredentialId(ByteArray credentialId);
}
Application properties
Create a configuration bean to hold the application’s properties:
import java.util.Set;
import org.springframework.boot.context.properties.ConfigurationProperties;
import org.springframework.context.annotation.Configuration;
import lombok.Getter;
import lombok.Setter;

@Configuration
@Getter
@Setter
@ConfigurationProperties(prefix = "authn")
public class WebAuthProperties {
    private String hostName;
    private String display;
    private Set<String> origin;
}
Add configuration for localhost in your src/main/resources/application.properties:
authn.hostname=localhost
authn.display=Spring Boot WebAuthn Sample Application
authn.origin=http://localhost:8080
Implementing the WebAuthn server library
Now that the data classes exist, the next step is building classes that retrieve and store data from the WebAuthn API. Yubico provides the CredentialRepository interface to handle credential storage and lookup. The demo application’s RegistrationService class overrides the five functions needed for the interface to function.
import com.yubico.webauthn.CredentialRepository;
import com.yubico.webauthn.RegisteredCredential;
import com.yubico.webauthn.data.ByteArray;
import com.yubico.webauthn.data.PublicKeyCredentialDescriptor;
import org.springframework.beans.factory.annotation.Autowired;
import org.springframework.stereotype.Repository;
import lombok.Getter;

import java.util.List;
import java.util.Optional;
import java.util.Set;
import java.util.stream.Collectors;

@Getter
@Repository
public class RegistrationService implements CredentialRepository {

    @Autowired
    private UserRepository userRepo;

    @Autowired
    private AuthenticatorRepository authRepository;

    // methods added in next section
}
Data interface
The getCredentialIdsForUsername() function is used during credential registration. Any associated credential IDs stored in the database are returned as a set of PublicKeyCredentialDescriptor objects. This list of existing credential IDs is passed to the WebAuthn API as a list of excluded credentials to prevent the same credential from being registered twice.
@Override
public Set<PublicKeyCredentialDescriptor> getCredentialIdsForUsername(String username) {
    AppUser user = userRepo.findByUsername(username);
    List<Authenticator> auth = authRepository.findAllByUser(user);
    return auth.stream()
            .map(credential ->
                PublicKeyCredentialDescriptor.builder()
                    .id(credential.getCredentialId())
                    .build())
            .collect(Collectors.toSet());
}
The getUserHandleForUsername() function is called during credential authentication when the user provides a username. The authenticator looks up generated credentials with the help of the user handle byte array, which the server needs to store for this purpose. The demo application uses this function to look up the user handle that’s passed into the navigator.credential.get() function in the browser.
@Override
public Optional<ByteArray> getUserHandleForUsername(String username) {
    AppUser user = userRepo.findByUsername(username);
    return Optional.of(user.getHandle());
}
The getUsernameForUserHandle() function lets applications handle logins without usernames. The server organizes and recognizes users by means of usernames, but only user handles are necessary for the WebAuthn API to function. getUsernameForUserHandle can be used in login flows that don’t require usernames upfront. Hypothetically, an application could entirely dispense with usernames and identify users exclusively by unique byte array identifiers, though this application does not explore that possibility.
@Override
public Optional<String> getUsernameForUserHandle(ByteArray userHandle) {
    AppUser user = userRepo.findByHandle(userHandle);
    return Optional.of(user.getUsername());
}
The lookup() function is active during the final step of credential verification. A registered authenticator provides an assertion signature and a credential ID to the browser’s WebAuthn API, which is sent to the server. The server looks up a stored credential using the credential ID and user handle provided by the authenticator. At this point, the server will use the object returned by this lookup function to validate the assertion signature (and optionally the signature count) from the authenticator.
@Override
public Optional<RegisteredCredential> lookup(ByteArray credentialId, ByteArray userHandle) {
    Optional<Authenticator> auth = authRepository.findByCredentialId(credentialId);
    return auth.map(credential ->
        RegisteredCredential.builder()
            .credentialId(credential.getCredentialId())
            .userHandle(credential.getUser().getHandle())
            .publicKeyCose(credential.getPublicKey())
            .signatureCount(credential.getCount())
            .build()
    );
}
In a similar way, the lookupAll() function returns a set of RegisteredCredential objects. Instead of validating the authenticator’s signature, this function ensures that there aren’t multiple credentials registered with the same credential ID.
@Override
public Set<RegisteredCredential> lookupAll(ByteArray credentialId) {
    List<Authenticator> auth = authRepository.findAllByCredentialId(credentialId);
    return auth.stream()
            .map(credential ->
                RegisteredCredential.builder()
                    .credentialId(credential.getCredentialId())
                    .userHandle(credential.getUser().getHandle())
                    .publicKeyCose(credential.getPublicKey())
                    .signatureCount(credential.getCount())
                    .build())
            .collect(Collectors.toSet());
}
Yubico provides a RelyingParty object that’s responsible for handling all authentication requests on the server, so the application constructs and provides that object to all controllers. Because WebAuthn credentials are scoped to only one website, the hostname, origin, and a display name for the website are all provided by the relying party.
In the AppApplication class define the RelyingParty bean:
@Bean
public RelyingParty relyingParty(RegistrationRepository registrationRepository,
                                 WebAuthProperties properties) {
    RelyingPartyIdentity rpIdentity = RelyingPartyIdentity.builder()
        .id(properties.getHostName())
        .name(properties.getDisplay())
        .build();

    return RelyingParty.builder()
        .identity(rpIdentity)
        .credentialRepository(registrationRepository)
        .origins(properties.getOrigin())
        .build();
}
Authentication controllers
The web controller for the application creates routes and constructs the data needed for the client to make WebAuthn API requests by:
- Constructing JSON strings used in the registration and authentication ceremonies.
- Caching intermediary information necessary for the secure execution of a ceremony (the challenge nonce).
- Passing information from the browser’s credential creation ceremony to the data storage classes.
Create an AuthController class:
import com.yubico.webauthn.RelyingParty;
import org.springframework.stereotype.Controller;

@Controller
public class AuthController {

    private RelyingParty relyingParty;
    private RegistrationService service;

    AuthController(RegistrationService service, RelyingParty relyingPary) {
        this.relyingParty = relyingPary;
        this.service = service;
    }

    @GetMapping("/")
    public String welcome() {
        return "index";
    }

    @GetMapping("/login")
    public String loginPage() {
        return "login";
    }

    @GetMapping("/register")
    public String registerUser(Model model) {
        return "register";
    }
}
Both registration and authentication ceremonies happen in two steps. The client makes an initial request to the server with some identifier. The code below uses the username, but the user handle works as well. After prompting the user for a unique username, the server constructs a PublicKeyCredentialCreationOptions for registration, which contains the user handle, the domain of the key, and a challenge token.
Registration endpoints:
public String newUserRegistration(@RequestParam String username,
                                  @RequestParam String display,
                                  HttpSession session) {
    AppUser existingUser = service.getUserRepo().findByUsername(username);
    if (existingUser == null) {

        byte[] bytes = new byte[32];
        random.nextBytes(bytes);
        ByteArray id = new ByteArray(bytes);

        UserIdentity userIdentity = UserIdentity.builder()
                .name(username)
                .displayName(display)
                .id(id)
                .build();
        AppUser saveUser = new AppUser(userIdentity);
        service.getUserRepo().save(saveUser);
        String response = newAuthRegistration(saveUser, session);
        return response;
    } else {
        throw new ResponseStatusException(HttpStatus.CONFLICT, "Username " + username
            + " already exists. Choose a new name.");
    }
}

@PostMapping("/registerauth")
@ResponseBody
public String newAuthRegistration(@RequestParam AppUser user, HttpSession session) {
    AppUser existingUser = service.getUserRepo().findByHandle(user.getHandle());
    if (existingUser != null) {
        UserIdentity userIdentity = user.toUserIdentity();
        StartRegistrationOptions registrationOptions = StartRegistrationOptions.builder()
            .user(userIdentity)
            .build();
        PublicKeyCredentialCreationOptions registration = relyingParty.startRegistration(registrationOptions);
        session.setAttribute(userIdentity.getDisplayName(), registration);
        try {
            return registration.toCredentialsCreateJson();
        } catch (JsonProcessingException e) {
            throw new ResponseStatusException(HttpStatus.INTERNAL_SERVER_ERROR,
                "Error processing JSON.", e);
        }
    } else {
        throw new ResponseStatusException(HttpStatus.CONFLICT, "User " + user.getUsername()
            + " does not exist. Please register.");
    }
}
Authentication endpoints:
@PostMapping("/login")
@ResponseBody
public String startLogin(@RequestParam String username, HttpSession session) {
    AssertionRequest request = relyingParty.startAssertion(StartAssertionOptions.builder()
        .username(username)
        .build());
    try {
        session.setAttribute(username, request);
        return request.toCredentialsGetJson();
    } catch (JsonProcessingException e) {
        throw new ResponseStatusException(HttpStatus.BAD_REQUEST, e.getMessage());
    }
}

@PostMapping("/finishauth")
@ResponseBody
public ModelAndView finishRegisration(@RequestParam String credential,
                                      @RequestParam String username,
                                      @RequestParam String credname,
                                      HttpSession session) {
    try {
        AppUser user = service.getUserRepo().findByUsername(username);
        PublicKeyCredentialCreationOptions requestOptions =
            (PublicKeyCredentialCreationOptions) session.getAttribute(user.getUsername());
        if (requestOptions != null) {
            PublicKeyCredential<AuthenticatorAttestationResponse, ClientRegistrationExtensionOutputs> pkc =
                PublicKeyCredential.parseRegistrationResponseJson(credential);
            FinishRegistrationOptions options = FinishRegistrationOptions.builder()
                .request(requestOptions)
                .response(pkc)
                .build();
            RegistrationResult result = relyingParty.finishRegistration(options);
            Authenticator savedAuth = new Authenticator(result, pkc.getResponse(), user, credname);
            service.getAuthRepository().save(savedAuth);
            return new ModelAndView("redirect:/login", HttpStatus.SEE_OTHER);
        } else {
            throw new ResponseStatusException(HttpStatus.INTERNAL_SERVER_ERROR,
                "Cached request expired. Try to register again!");
        }
    } catch (RegistrationFailedException e) {
        throw new ResponseStatusException(HttpStatus.BAD_GATEWAY, "Registration failed.", e);
    } catch (IOException e) {
        throw new ResponseStatusException(HttpStatus.BAD_REQUEST, "Failed to save credenital, please try again!", e);
    }
}

@PostMapping("/welcome")
public String finishLogin(@RequestParam String credential,
                          @RequestParam String username,
                          Model model,
                          HttpSession session) {
    try {
        PublicKeyCredential<AuthenticatorAssertionResponse, ClientAssertionExtensionOutputs> pkc;
        pkc = PublicKeyCredential.parseAssertionResponseJson(credential);
        AssertionRequest request = (AssertionRequest)session.getAttribute(username);
        AssertionResult result = relyingParty.finishAssertion(FinishAssertionOptions.builder()
            .request(request)
            .response(pkc)
            .build());
        if (result.isSuccess()) {
            model.addAttribute("username", username);
            return "welcome";
        } else {
            return "index";
        }
    } catch (IOException e) {
        throw new RuntimeException("Authentication failed", e);
    } catch (AssertionFailedException e) {
        throw new RuntimeException("Authentication failed", e);
    }
}
NOTE: These requests require server state to work properly. The authentication request includes a challenge nonce generated as part of the
StartRegistrationOptionsandAssertionRequestobjects. The reply from the client must include this nonce, so the server uses the session to cache the short-lived challenge by caching the full registration (or assertion) request object.
Information is sent to the browser, where it’s encoded and passed to the WebAuthn API as a PublicKeyCredential object. The response containing all the data needed for verification is sent to the server and used to create or verify a credential.
Start the registration ceremony
To kick off the registration ceremony, the client submits a uniquely identifying piece of information using a fetch request—in this case, a username. The server verifies that the username is unique and then creates and saves a 16-byte user handle. Configuration information about the server (like hostname and origin) was included in the RelyingParty bean when the server was created. This bean takes a PublicKeyCredentialRequestOptions object to collect the user information, and generates a challenge field, a random buffer of at least 16 bytes long. This object is cached on the server to preserve the challenge field, then turned into a JSON string and sent to the client.
IMPORTANT: You will need to grab the client code from the example’s GitHub repository. Copy the
staticandtemplatesfolders to your project’ssrc/main/resourcesdirectory.# CSS curl --create-dirs -O --output-dir src/main/resources/static/css https://raw.githubusercontent.com/oktadev/webauthn-java-example/main/src/main/resources/static/css/tachyons.css # JS curl --create-dirs -O --output-dir src/main/resources/static/javascript https://raw.githubusercontent.com/oktadev/webauthn-java-example/main/src/main/resources/static/javascript/base64js.min.js curl --create-dirs -O --output-dir src/main/resources/static/javascript https://raw.githubusercontent.com/oktadev/webauthn-java-example/main/src/main/resources/static/javascript/custom.js curl --create-dirs -O --output-dir src/main/resources/static/javascript https://raw.githubusercontent.com/oktadev/webauthn-java-example/main/src/main/resources/static/javascript/login.js curl --create-dirs -O --output-dir src/main/resources/static/javascript https://raw.githubusercontent.com/oktadev/webauthn-java-example/main/src/main/resources/static/javascript/registerauth.js # Templates curl --create-dirs -O --output-dir src/main/resources/templates https://raw.githubusercontent.com/oktadev/webauthn-java-example/main/src/main/resources/templates/index.html curl --create-dirs -O --output-dir src/main/resources/templates https://raw.githubusercontent.com/oktadev/webauthn-java-example/main/src/main/resources/templates/register.html curl --create-dirs -O --output-dir src/main/resources/templates https://raw.githubusercontent.com/oktadev/webauthn-java-example/main/src/main/resources/templates/login.html curl --create-dirs -O --output-dir src/main/resources/templates https://raw.githubusercontent.com/oktadev/webauthn-java-example/main/src/main/resources/templates/welcome.html curl --create-dirs -O --output-dir src/main/resources/templates https://raw.githubusercontent.com/oktadev/webauthn-java-example/main/src/main/resources/templates/header.html
Once the information is received by the client, it’s parsed into a JavaScript PublicKeyCredentialCreationOptions object. Then it is passed into the navigator.credentials.create() function as a publicKey option.
.then(credentialCreateJson => ({
    publicKey: {
        ...credentialCreateJson.publicKey,
        challenge: base64urlToUint8array(credentialCreateJson.publicKey.challenge),
    user: {
        ...credentialCreateJson.publicKey.user,
        id: base64urlToUint8array(credentialCreateJson.publicKey.user.id),
    },
    excludeCredentials: credentialCreateJson.publicKey.excludeCredentials.map(credential => ({
        ...credential,
        id: base64urlToUint8array(credential.id),
    })),
    extensions: credentialCreateJson.publicKey.extensions,
    },
}))
.then(credentialCreateOptions =>
    navigator.credentials.create(credentialCreateOptions))
The browser checks with whatever source of authentication is available to it using the “Client to Authenticator Protocol version two” (CTAP2). This check can be implemented by the operating system, browser, or by a standalone authentication device connected by USB or Bluetooth. This device generates a series of fields—the most important are credentialId and publicKey (generated from a private key the authenticator should never share). Next, the browser collates this information into a PublicKeyCredential, which is turned into a JSON object, stringified, and sent back to the server.
.then(publicKeyCredential => ({
    type: publicKeyCredential.type,
    id: publicKeyCredential.id,
    response: {
    attestationObject: uint8arrayToBase64url(publicKeyCredential.response.attestationObject),
    clientDataJSON: uint8arrayToBase64url(publicKeyCredential.response.clientDataJSON),
    transports: publicKeyCredential.response.getTransports && publicKeyCredential.response.getTransports() || [],
    },
    clientExtensionResults: publicKeyCredential.getClientExtensionResults(),
}))
.then((encodedResult) => {
    const form = document.getElementById("form");
    const formData = new FormData(form);
    formData.append("credential", JSON.stringify(encodedResult));
    return fetch("/finishauth", {
        method: 'POST',
        body: formData
    })
})
The server receives the PublicKeyCredential object and verifies the challenge field against the cached PublicKeyCredentialCreationOptions object. It checks the origin of the response, then creates a new credential data object by saving the PublicKey and credentialId. The server also saves some helpful information like a user-friendly name, the associated user_id for username and user handle lookup, and the AAGUID field associated with the authenticator. In addition, it creates a count field for tracking the number of times the credential has been used. A simple application would probably only need to store publicKey and credentialId for the credential.
Client JavaScript overview
The client is generating JavaScript objects containing byte fields that are Base64Url encoded. Don’t confuse this with regular base64 encoding. Base64Url is mostly the same, but it encodes - and _, whereas the more familiar base64 encodes + and \. This enables Base64Url to safely encode filenames and URLs. When encoding and decoding strings, be sure that the application is using the correct data encoding.
Also, be aware that the registration and authentication ceremonies performed by the client produce and consume byte fields in the form of Uint8Array. The demo application uses the base64js library to handle the encoding of these fields to and from Base64Url encoding to Uint8Array objects.
function base64urlToUint8array(base64Bytes) {
    const padding = '===='.substring(0, (4 - (base64Bytes.length % 4)) % 4);
    return base64js.toByteArray((base64Bytes + padding).replace(/\//g, "_").replace(/\+/g, "-"));
}

function uint8arrayToBase64url(bytes) {
    if (bytes instanceof Uint8Array) {
        return base64js.fromByteArray(bytes).replace(/\+/g, "-").replace(/\//g, "_").replace(/=/g, "");
    } else {
        return uint8arrayToBase64url(new Uint8Array(bytes));
    }
}
Authentication ceremony
Registering a credential is the first step in the authentication ceremony. Using a credential is similar, but the JSON objects provided to and produced by the client are slightly different. Additionally, the function the client calls is navigator.credentials.get() instead of create().
The client provides a username, which is sent to the server using a fetch request. This triggers the creation of an AssertionRequest request object, which includes an associated publicKey, a list of allowed credentialIds, and a generated challenge (creating the requirement that the AssertionRequest is cached server-side for security).
This AssertionRequest is passed to the client in a JSON response body. Any byte fields are again converted into Uint8Array objects, and the object is passed into navigator.credentials.get(). The resulting AuthenticatorAssertionResponse is Base64Url encoded and sent to the server as a JSON string. clientDataJson, like the server origin and challenge, are checked for tampering against the cached AssertionRequest; authenticatorData like signatureCount is updated and saved; and, most importantly, the signature field is checked against the stored publicKey generated during the creation ceremony. If all of these checks pass, the user is assigned a session, successfully signed in, and granted access to the application.
Testing the application
To test this application, pull out any CTAP2-compliant authentication device. The easiest is activating WebAuthn emulation in Chrome. Using one of these devices, open the network inspector and watch the network requests to get a sense of the data passed back and forth between the client and server.
There are other devices that can be used for WebAuthn. For a complete list, you can do a search for FIDO-certified products:
- Chromebook PIN
- Windows Hello
- YubiKey
- Apple Touch ID
Start the application using your favorite IDE or run:
mvn spring-boot:run
Then open your browser to http://localhost:8080.
An easier way to WebAuthn
Walking through this sample is a great way to learn how WebAuthn works in Java, but it’s still only part of an overall login experience. Your application needs a way to deal with other user scenarios, such as what to do when someone loses their YubiKey or drops their phone in a pool. Both Okta and Auth0 make it easy to add WebAuthn factor support to your application without applying any of the code above.
Why WebAuthn is the future
Associating devices with sign-ins provides a powerful tool to make many of the challenges, failures, and abuses of passwords a thing of the past. Once initial development is complete, user registration is simpler, more secure, and more sustainable. Using the WebAuthn specification, developers can create passwordless applications with an increasingly broad and accessible range of hardware authenticators.
You can learn more about WebAuthn by testing out our tool webauthn.me
Check out these posts for more information about WebAuthn:
- WebAuthn: A Developer’s Guide to What’s on the Horizon
- How to Use WebAuthn in C#
- How to Get More Internet Users to Enable 2FA on Their Accounts
If you have any questions about this post, please add a comment below. For more interesting content, follow @oktadev on Twitter, connect with us on LinkedIn, and subscribe to our YouTube channel.
John is a developer and writer working in Chicago. Failure and success both create growth, and growth never stops.
Okta Developer Blog Comment Policy
We welcome relevant and respectful comments. Off-topic comments may be removed.