Setup a Mute Indicator Light for Zoom with Hammerspoon
In this post, I’m going to show you how to set up a light that will turn on when you’re in a Zoom call. The color of the light will show your mute status, red will indicate that you’re muted, and green if you are not muted.
Because Zoom doesn’t provide a native interface for determining mute status, I will instead use a tool called Hammerspoon to accomplish this.
Note: Unlike most software for macOS, Hammerspoon requires a bit of effort to get working. Be ready to use of your terminal and favorite text editor to get Hammerspoon configured.
What is Hammerspoon?
If you aren’t familiar with Hammerspoon, it can be a bit hard to describe. I think of it as a programmer’s multi-tool for modifying the behavior and extending the capabilities of macOS. Hammerspoon does this by exposing a large variety of macOS functionality via a clean Lua interface.
The malleable nature of Hammerspoon gives it a lot of power, but it also makes it hard to describe. You can use Hammerspoon to configure hotkeys, act as a window manager, set timers, track your time, automate tasks, create desktop widget and more. I learned how to use Hammerspoon via the excellent blogs posts “Give your computer superpowers with a Hypekey and Hammerspoon” and “Hammerspoon: A Better, Better Hyper Key”. I recommend these posts if you want to learn more about Hammerspoon after you read this blog post.
How to install Hammerspoon
If you use Homebrew, you should be able to install Hammerspoon via brew:
brew cask install hammerspoon
Otherwise, review “How do I install it?” on hammerspoon.org.
Once you’ve installed Hammerspoon, you’ll want to make sure that you have a configuration file for it.
Do this by making sure that you have a ~/.hammerspoon directory with a file named init.lua in it using these commands:
mkdir ~/.hammerspoon
touch ~/.hammerspoon/init.lua
Install the Zoom Spoon
The next thing that you’ll need to do is install the unofficial Hammerspoon plug-in I wrote for Zoom. Hammerspoon calls plug-ins “Spoons” so I call this unofficial plugin the Zoom Spoon.
Spoons are installed into their own sub-directories in the ~/.hammerspoon/Spoons/ directory.
The code for my unofficial Zoom Spoon is stored on GitHub, so we’ll be using git to install the Zoom Spoon for Hammerspoon.
Start by making sure that you have a Spoons directory in your Hammerspoon configuration directory:
mkdir -p ~/.hammerspoon/Spoons
Next, use git to check out a copy of my unofficial Zoom Spoon:
cd ~/.hammerspoon/Spoons
git clone https://github.com/jpf/Zoom.spoon.git
Getting Familiar with Hammerspoon and Testing Out the Unofficial Zoom Spoon
At this point, you should have Hammerspoon and my unofficial Zoom Spoon installed. So now I’m going to show you how to test out your setup and make sure it’s working.
The first thing you’ll need to do is to launch Hammerspoon. Note that Hammerspoon is a GUI app, so navigate to where you installed the Hammerspoon app and launch it.
After launching Hammerspoon, make sure that it has the “Show menu icon” preference selected. Do this by opening Preferences for Hammerspoon and selecting Show menu icon, or by running this command:
defaults write "org.hammerspoon.Hammerspoon" "MJShowMenuIconKey" '1'
At this point, you should see a new icon that looks like a hammer with a spoon handle in your menu bar. You may need to restart Hammerspoon if you don’t see this icon.
When you can see the icon, click on the icon and select Open Config from the menu. This will open up the ~/.hammerspoon/init.lua configuration for Hammerspoon in your favorite text editor.
Once the ~/.hammerspoon/init.lua configuration file is open, use your favorite text editor to add the following lines to the file:
hs.loadSpoon("Zoom")
spoon.Zoom:start()
Save the file, then click on the Hammerspoon menu icon, and select Reload config, then click on the the Hammerspoon menu icon again to select Console.
At this point, should see the Hammerspoon console, and it should look like this:
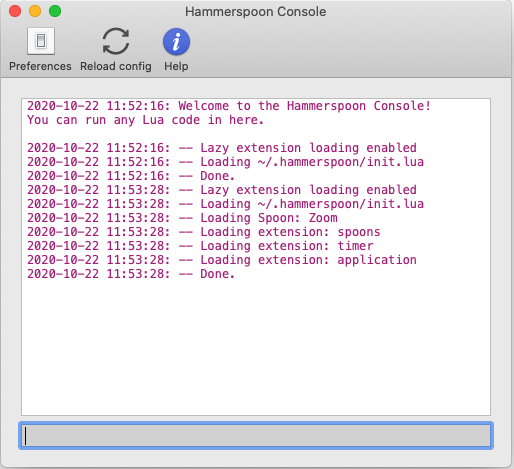
Now, at first glance, this console appears to be just a message log. Not so! You can also interactively run Lua in this console, which is exactly what we’re going to do now.
To test out the unofficial Zoom Spoon, run this command in the Hammerspoon console:
spoon.Zoom:inMeeting()
If Zoom is already open, and in a meeting, this command should return true otherwise, it’ll return false
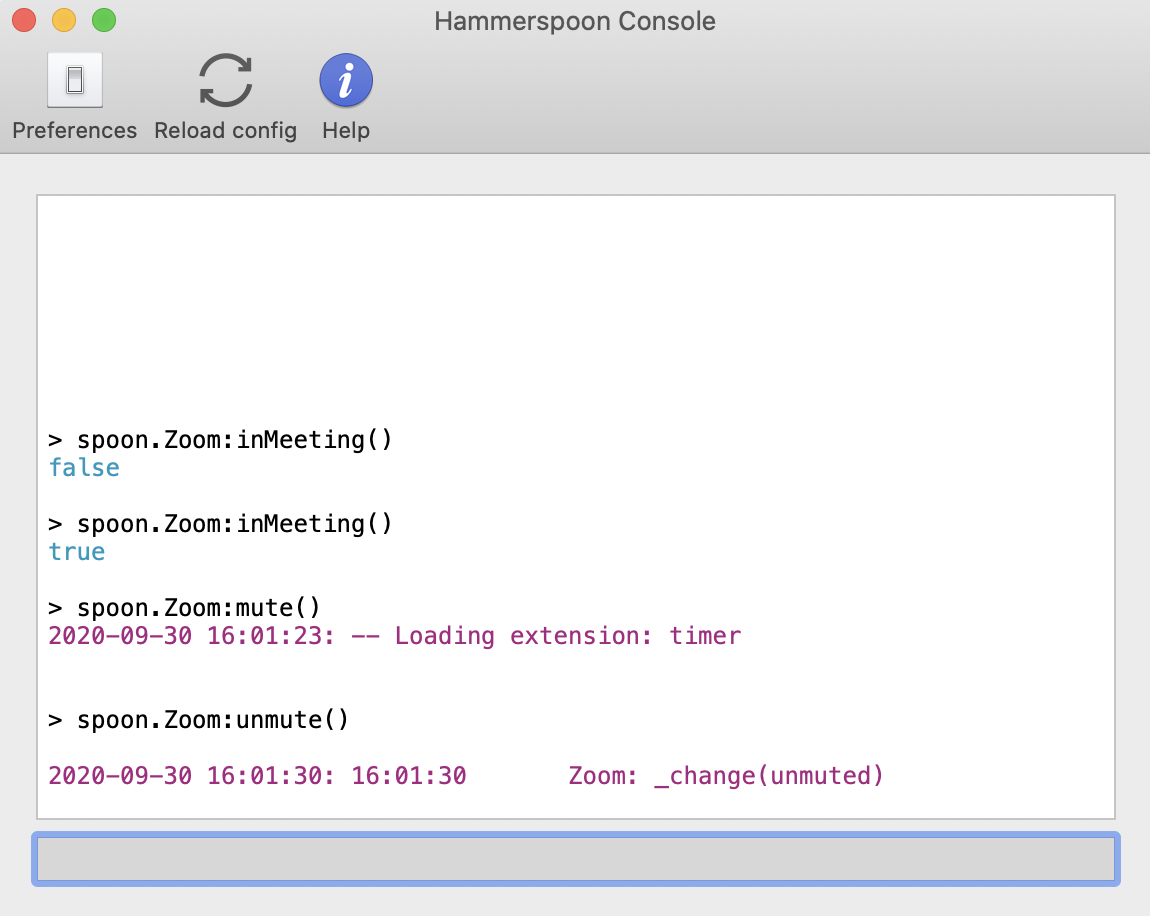
If the command returned false like in the image above, then quit and reopen Zoom, start a meeting, and re-run the command. This time around, it should return true
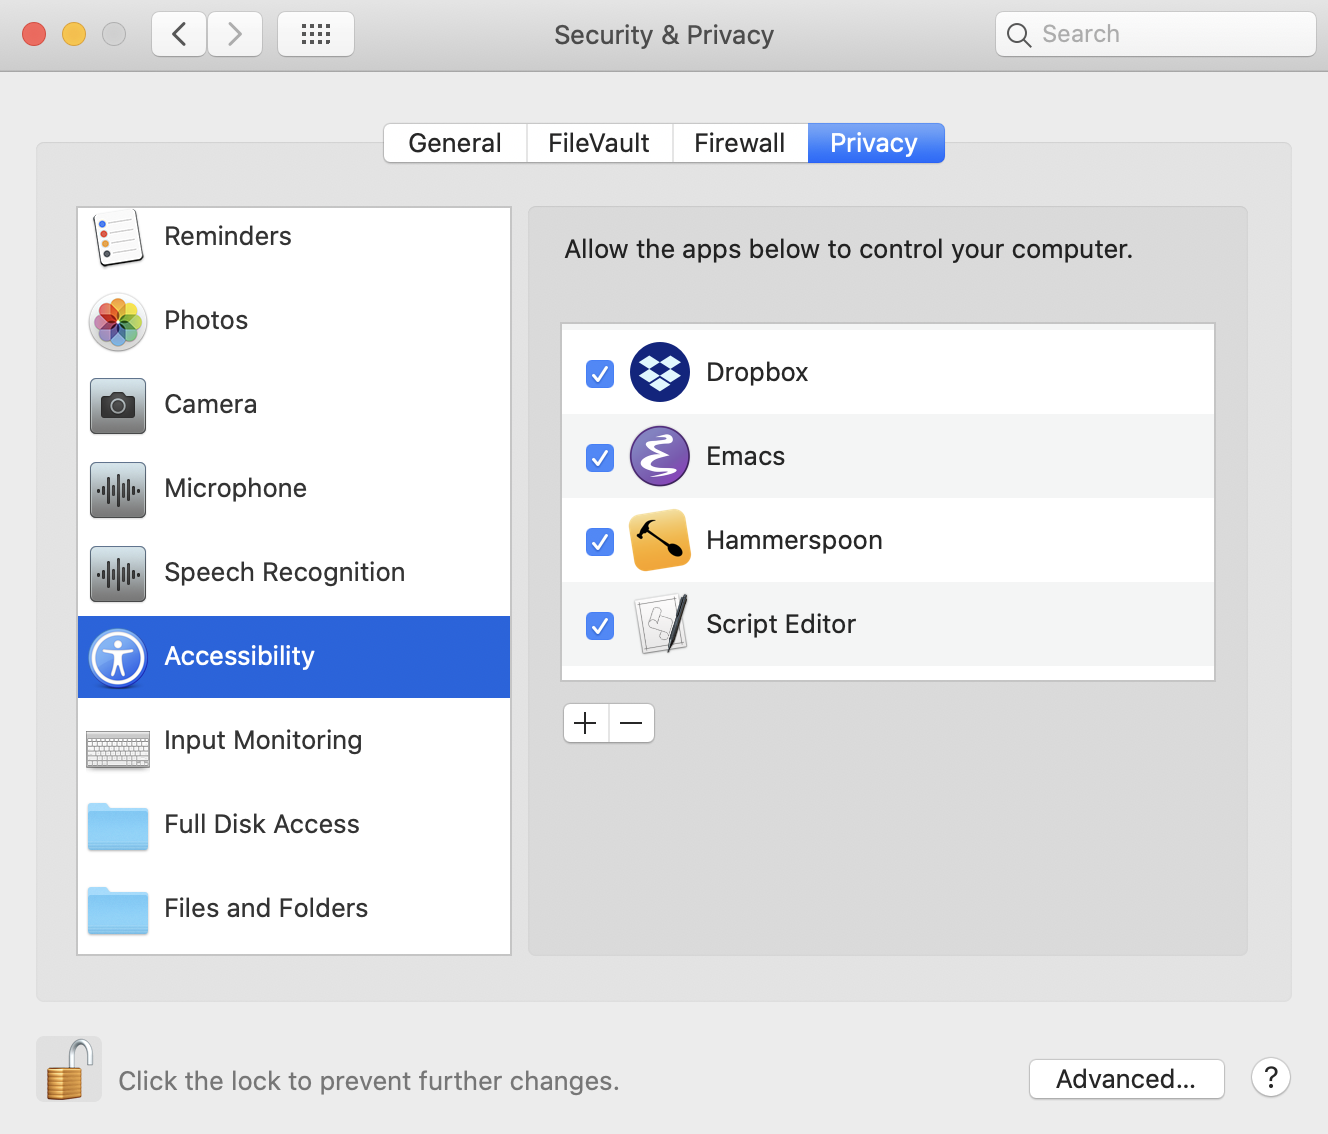
If this doesn’t work, it probably means that you need to give Hammerspoon permission to control your computer. To do this, open System Preferences, and go to Security & Privacy > Privacy > Accessibility, unlock the preference pane to make changes, then select the checkbox next to “Hammerspoon” to allow Hammerspoon to inspect the state of Zoom.
Once you get the spoon.Zoom:inMeeting() command working, two others for you to try are spoon.Zoom:mute() and spoon.Zoom:unmute() try out both while you have a live Zoom meeting running and see what happens!
Configure Hammerspoon to use the Zoom Spoon
At this point, you should be able to run the spoon.Zoom:mute() and spoon.Zoom:unmute() commands to mute and unmute a Zoom meeting. However, this isn’t really any more useful than what you can already do with Zoom, so in this section I’ll be showing you how to set up a mute indicator in your menu bar.
Note: Zoom provides a global mute and unmute hotkey out of the box! If all you care about is a global mute and unmute hotkey, I suggest using that!
Because I assume that most people don’t have a blink(1) USB LED already, I’m going to show you how to do the next best thing which is to simulate this LED in your menu bar.
To get this set up, use the Hammerspoon menu icon and select “Open Config” to open the ~/.hammerspoon/init.lua file in your favorite text editor, then edit the file to look like this:
-- This lets you click on the menu bar item to toggle the mute state
zoomStatusMenuBarItem = hs.menubar.new(nil)
zoomStatusMenuBarItem:setClickCallback(function()
    spoon.Zoom:toggleMute()
end)

updateZoomStatus = function(event)
  hs.printf("updateZoomStatus(%s)", event)
  if (event == "from-running-to-meeting") then
    zoomStatusMenuBarItem:returnToMenuBar()
  elseif (event == "muted") then
    zoomStatusMenuBarItem:setTitle("🔴")
  elseif (event == "unmuted") then
    zoomStatusMenuBarItem:setTitle("🟢")
  elseif (event == "from-meeting-to-running") then
    zoomStatusMenuBarItem:removeFromMenuBar()
  end
end

hs.loadSpoon("Zoom")
spoon.Zoom:setStatusCallback(updateZoomStatus)
spoon.Zoom:start()

hs.hotkey.bind('', 'f5', function()
  spoon.Zoom:toggleMute()
end)
After you’ve finished editing the configuration file, save it, then use the Hammerspoon menu icon to select Reload Config.
Now it’s time to test it out. After selecting Reload Config from the Hammerspoon menu icon, reload Zoom and start a meeting. Shortly after the meeting starts, you should see a new menu icon appear in your menu bar. The icon will be green if you are unmuted and red if you are muted. Pressing the F5 key will toggle between the muted and unmuted states and then update the menu icon as appropriate.
Note: The status indicator light will only change if you use the Hammerspoon key (F5 in this case). It should be possible soon to keep it in sync no matter how Zoom is muted or unmuted, just not at the time that I’m writing this.
Setting up a blink(1) USB LED (and a giveaway!)
Now that we’ve gotten a menu icon to show the mute status for a Zoom meeting, let’s take it one step further and set up a physical light to be a mute status indicator!
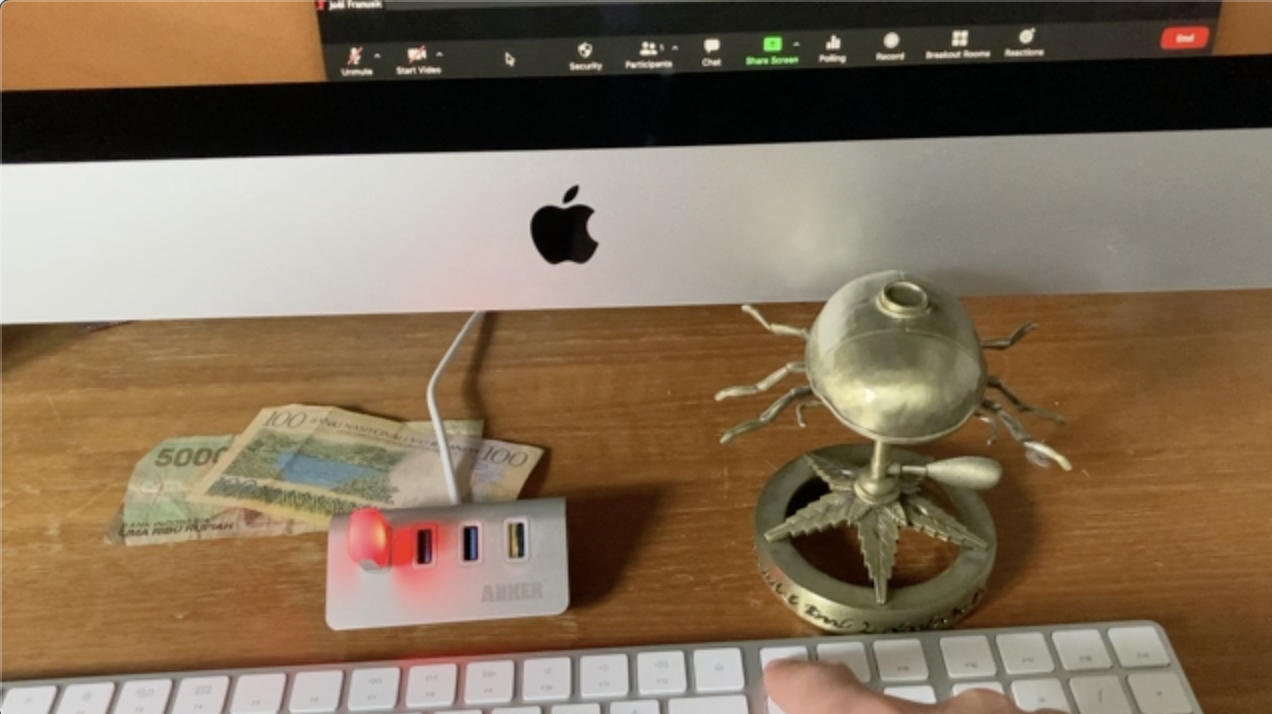
The light that I’m using is called a blink(1) and is available on Amazon for about ~$30. The nice thing about this light is that it doesn’t require any special drivers to get working, you just plug it in and start using it.
Win a blink(1) USB LED light! I’m raffling off three blink(1) USB LED lights. To enter the raffle follow @oktadev on Twitter and then post a tweet mentioning this blog post. On October 31st, I will search for tweets that mention this blog post that were made by people who also follow @oktadev on Twitter. Of those people, I will select three people at random and give each one a blink(1) USB LED.
Now, there are many ways to interface with the blink(1) light, but my programming language of choice is Python, that’s what I’m going to use in this post.
To use the blink(1) light from Python, you’ll need to install the blink1 Python SDK. I use virtualenv to keep my Python packages tidy, so let’s start with that.
Start by creating a directory for this project. I’m suggesting a directory name in the command below, but you should change it to something that makes sense for you.
mkdir ~/blink
Next, cd to the directory you just created and make a new virtualenv for Python.
cd ~/blink
virtualenv venv
At this point, the virtualenv should be activated. Your prompt will contain (venv) if so. If you don’t see (venv) in your prompt, try running:
source venv/bin/activate
Now you’re ready to install the Python SDK for the blink(1) light:
pip install blink1
With the blink1 package installed, we’re ready to write some code that uses it. Below is the source code for a small Python program that I wrote to control the blink(1) light from the command line:
#!/usr/bin/env python3
from blink1.blink1 import Blink1
import sys
import argparse

parser = argparse.ArgumentParser()
parser.add_argument("-r", "--red", default=0, type=int, help="Value for red (0 - 255)")
parser.add_argument("-g", "--green", default=0, type=int, help="Value for green (0 - 255)")
parser.add_argument("-b", "--blue", default=0, type=int, help="Value for blue (0 - 255)")
parser.add_argument("-d", "--delay", default=50, type=int, help="Light shift time in milliseconds")
args = parser.parse_args()

b1 = Blink1()
b1.fade_to_rgb(args.delay, args.red, args.green, args.blue)
Copy the code above into a file named blink.py and then try running it from the command line:
python blink.py --green 128
This should turn the light green at about half brightness.
Turn it off with this command:
python blink.py
Connecting Hammerspoon to the blink(1) USB LED
Now that you have a working Hammerspoon setup and a working Python script to control the blink(1) light, it’s time to tie them together!
Start by selecting Open Config from the Hammerspoon menu icon, then edit the ~/.hammerspoon/init.lua file to look like the code below. Make sure to replace the path to the Python scripts with the path for your system!
updateZoomStatus = function(event)
  hs.printf("updateZoomStatus(%s)", event)
  if (event == "from-running-to-meeting") then
    zoomStatusMenuBarItem:returnToMenuBar()
  elseif (event == "muted") then
    hs.execute([["/Users/joel/Projects/mute/venv/bin/python" "/Users/joel/Projects/mute/blink.py" "--red" "128"]])
    zoomStatusMenuBarItem:setTitle("🔴")
  elseif (event == "unmuted") then
    hs.execute([["/Users/joel/Projects/mute/venv/bin/python" "/Users/joel/Projects/mute/blink.py" "--green" "128"]])
    zoomStatusMenuBarItem:setTitle("🟢")
  elseif (event == "from-meeting-to-running") then
    hs.execute([["/Users/joel/Projects/mute/venv/bin/python" "/Users/joel/Projects/mute/blink.py"]])
    zoomStatusMenuBarItem:removeFromMenuBar()
  end
end
Once you’ve finished modifying the updateZoomStatus() function, save the file, then use the Hammerspoon menu icon to select the Reload Config menu item.
Try it all out by reloading Zoom and starting a meeting. If it’s all set up correctly, the blink(1) light should turn on shortly after the meeting starts!
Note for Zoom employees
If you are an employee of Zoom, I have a special message for you: I wish I could have made a mute indicator light without Hammerspoon.
My ideal way to integrate with Zoom would be to configure it to call a command line application every time the state changed inside of Zoom. In this dream scenario, I imagine opening up the Zoom preferences and putting the path to an executable file into a field somewhere. From then on, Zoom would call that executable file passing the event over the command line. In essence, I’d like to turn the updateZoomStatus() Lua function in my Hammerspoon configuration into a command line script.
Did it work for you?
As always, I’d love to hear what you thought of this post. Did it work for you? Did you run into issues? Let me know by commenting below or by reaching out to me on Twitter where I’m @jf.
If you liked this post, you might also like these other posts about Python and Okta:
- Flask Tutorial: Simple User Registration and Login
- Build a Simple CRUD App with Python, Flask, and React
Also, be sure to follow us on Twitter and subscribe to our YouTube Channel for updates on new posts and videos.
Lastly, I want to thank the following people for their help with this post: Jeff Lindsay, Brian Demers, Tyler Neylon, Kyle Conroy, Matt Raible, Micah Silverman
Okta Developer Blog Comment Policy
We welcome relevant and respectful comments. Off-topic comments may be removed.