How to Customize Your Angular Build With Webpack
If you’re a frontend dev in the world today you’ve probably heard of (and possibly even used) webpack. The Angular build process uses webpack behind the scenes to transpile TypeScript to JavaScript, transform Sass files to CSS, and many other tasks. To understand the importance of this build tool, it helps to understand why it exists.
Browsers have very limited support for JavaScript modules. In practice, any JavaScript application loaded into the browser should be contained in a single source file. On the other hand, it is good software development practice to separate out code into modules contained in separate files. When deploying a JavaScript application for the browser, the modules must then be built into a single source file. Bundling multiple modules into a single file is the main purpose of webpack.
Webpack is not limited to simply bundling source files. Because it can support a multitude of plugins, it can perform many additional tasks. Webpack module loaders are able to parse different file types. This allows, for example, Angular TypeScript files to use the import statement to import stylesheet files. Usually, webpack is hidden behind the Angular command-line tool. But in some cases, it may be necessary to tweak the configuration of webpack when building an Angular application.
In earlier versions of Angular, it was possible to eject the webpack configuration and modify it directly. With Angular 8, access to the base configuration has been disabled. But it is still possible to extend the webpack configuration and add additional loaders or configuration options. In this tutorial, I will be showing you how to create an Angular 8 application and tweak the webpack configuration.
Prerequisites: Node.js v12+.
Table of Contents
- Set Up Angular With Webpack
- Implement the Angular Application
- Add Angular Authentication
- Learn More About Angular and Webpack
Note: In May 2025, the Okta Integrator Free Plan replaced Okta Developer Edition Accounts, and the Okta CLI was deprecated.
We preserved this post for reference, but the instructions no longer work exactly as written. Replace the Okta CLI commands by manually configuring Okta following the instructions in our Developer Documentation.
Set Up Angular With Webpack
I will assume that you have a general knowledge of JavaScript and Angular and that you have installed node and the npm package manager on your system. To start you will need to globally install the Angular command-line tool. Open a terminal and install Angular with the following command.
npm install -g @angular/cli@8.3.20
Depending on your system you may have to run this command with administrator permissions using sudo. Now navigate into a directory of your choice and create a new Angular application by running the command below.
ng new angular-webpack-demo --routing --style css
To allow customization of the webpack configuration, you will need to install the custom webpack Angular builder. Navigate into the newly created directory angular-webpack-demo and run the following command.
npm install -D -E @angular-builders/custom-webpack@8.4.1
You will be using the webpack-define plugin to inject global value definitions into your code. As an example, this could be used to feature flag parts of your applications.
To enable custom webpack configurations, open the angular.json configuration file. Locate the line "builder": "@angular-devkit/build-angular:browser" inside the architect.build section. Replace it with the following lines.
"builder": "@angular-builders/custom-webpack:browser",
Now, inside architect.build.options add the following property.
"customWebpackConfig": {
  "path": "./custom-webpack.config.js"
},
This adds the custom-webpack.config.js to the default webpack configuration for the ng build command. To also enable the configuration for the ng serve command, locate the line "builder": "@angular-devkit/build-angular:dev-server", and replace it with the code below.
"builder": "@angular-builders/custom-webpack:dev-server",
Now create the file custom-webpack.config.js and paste the following content into it.
const webpack = require('webpack');

module.exports = {
  plugins: [
    new webpack.DefinePlugin({
      'STABLE_FEATURE': JSON.stringify(true),
      'EXPERIMENTAL_FEATURE': JSON.stringify(false)
    })
  ]
};
This creates two global constants, STABLE_FEATURE and EXPERIMENTAL_FEATURE, and makes them available in your application. To read more about the usage of the DefinePlugin, please see the DefinePlugin’s documentation.
Implement the Angular Application
To make it easier to create a clean responsive layout, install Bootstrap and its Angular components. In your terminal run the command below.
ng add ngx-bootstrap@5.2.0
Now start your favorite IDE and open the file src/styles.css.html. Add the following line to include the stylesheet for the bootstrap library.
@import "~bootstrap/dist/css/bootstrap.css";
Open src/app/app.component.html and replace the default content with the following.
<nav class="navbar navbar-expand navbar-light bg-light">
  <ul class="navbar-nav mr-auto">
    <li class="nav-item">
      <a class="nav-link" [routerLink]="['']">
        Home
      </a>
    </li>
    <li class="nav-item">
      <a class="nav-link" [routerLink]="['demo']">
        Demo
      </a>
    </li>
  </ul>
</nav>
<router-outlet></router-outlet>
The router-outlet element serves as the container for the router. This means that different components can be loaded into this placeholder by changing the URL in the browser’s navigation bar. Create two components to be placed into the router-outlet and call them Home and Demo. Open the terminal again and run the following commands.
ng generate component home
ng generate component demo
Now open src/app/app-routing.module.ts and add routes for these components.
import { NgModule } from '@angular/core';
import { Routes, RouterModule } from '@angular/router';
import { HomeComponent } from './home/home.component';
import { DemoComponent } from './demo/demo.component';

const routes: Routes = [
  {
    path: '',
    component: HomeComponent
  },
  {
    path: 'demo',
    component: DemoComponent,
  },];

@NgModule({
  imports: [RouterModule.forRoot(routes)],
  exports: [RouterModule]
})
export class AppRoutingModule { }
Next, place some content into the home page. Open src/app/home/home.component.html and replace the default content with the following code.
<div class="container">
  <div class="row mt-5">
    <div class="col-sm">
      <h1>Angular Webpack Demo</h1>
    </div>
  </div>
</div>
The DemoComponent will display content depending on the feature flags that you defined in the webpack configuration. Open src/app/demo/demo.component.ts and paste the following code into it.
import { Component, OnInit } from '@angular/core';

declare const STABLE_FEATURE: boolean;
declare const EXPERIMENTAL_FEATURE: boolean;

@Component({
  selector: 'app-demo',
  templateUrl: './demo.component.html',
  styleUrls: ['./demo.component.css']
})
export class DemoComponent implements OnInit {
  stableFeature: string;
  experimentalFeature: string;

  constructor() { }

  ngOnInit() {
    this.stableFeature = STABLE_FEATURE ? 'Stable feature enabled' : 'Stable feature disabled';
    this.experimentalFeature = EXPERIMENTAL_FEATURE ? 'Experimental feature enabled' : 'Experimental feature disabled';
  }
}
Note the declarations of STABLE_FEATURE and EXPERIMENTAL_FEATURE at the top of the file. These are needed for TypeScript to know that the two constants exist. But also notice that no values are assigned here.
Next, open src/app/demo/demo.component.html and replace the contents with the following lines.
<div class="container">
  <div class="row mt-5">
    <div class="col-sm col-md-8 offset-md-2">
      <h2>Demo Features</h2>
      <p>
        {{stableFeature}}
      </p>
      <p>
        {{experimentalFeature}}
      </p>
    </div>
  </div>
</div>
Add Angular Authentication
Almost every web application will need some sort of user authentication. Using the Okta Angular SDK it is really easy to add state of the art single sign-on authentication to any Angular app.
Before you begin, you’ll need a free Okta developer account. Install the Okta CLI and run okta register to sign up for a new account. If you already have an account, run okta login.
Then, run okta apps create. Select the default app name, or change it as you see fit.
Choose Single-Page App and press Enter.
Use http://localhost:4200/callback for the Redirect URI and accept the default Logout Redirect URI of http://localhost:4200.
What does the Okta CLI do?
The Okta CLI will create an OIDC Single-Page App in your Okta Org. It will add the redirect URIs you specified and grant access to the Everyone group. It will also add a trusted origin for http://localhost:4200. You will see output like the following when it’s finished:
Okta application configuration:
Issuer:    https://dev-133337.okta.com/oauth2/default
Client ID: 0oab8eb55Kb9jdMIr5d6
NOTE: You can also use the Okta Admin Console to create your app. See Create an Angular App for more information.
Open the terminal in your application directory and add the Okta package to your Angular application by running the command below.
npm install -E @okta/okta-angular@3.0.1
Now open src/app/app.module.ts and add the import of the Okta authentication module to the top of the file. Add a config object with your Okta settings too.
import { OKTA_CONFIG, OktaAuthModule } from '@okta/okta-angular';

const oktaConfig = {
  issuer: 'https://{yourOktaDomain}/oauth2/default',
  clientId: '{clientId}',
  redirectUri: window.location.origin + '/callback'
};
Further down in the same file, add the authentication module to the imports array, and provide your config to the Okta Angular SDK.
imports: [
  ...
  OktaAuthModule
]
providers: [{ provide: OKTA_CONFIG, useValue: oktaConfig }],
Next, open src/app/app.component.ts and replace the contents with the following code.
import { Component, OnInit } from '@angular/core';
import { OktaAuthService } from '@okta/okta-angular';

@Component({
  selector: 'app-root',
  templateUrl: './app.component.html',
  styleUrls: ['./app.component.css']
})
export class AppComponent implements OnInit {
  title = 'angular-webpack-demo';
  isAuthenticated: boolean;

  constructor(public oktaAuth: OktaAuthService) {
    // subscribe to authentication state changes
    this.oktaAuth.$authenticationState.subscribe(
      (isAuthenticated: boolean) => this.isAuthenticated = isAuthenticated
    );
  }

  ngOnInit() {
    // get authentication state for immediate use
    this.oktaAuth.isAuthenticated().then((auth) => {this.isAuthenticated = auth});
  }

  login() {
    this.oktaAuth.signInWithRedirect();
  }

  logout() {
    this.oktaAuth.signOut();
  }
}
This adds a flag isAuthenticated to the application component that tracks the authentication status of the user. The component also contains two callbacks for logging the user in and out. Now open src/app/app.component.html and add the login and logout buttons by pasting the code below at the end inside the <nav> element.
<span>
  <button class="btn btn-primary" *ngIf="!isAuthenticated" (click)="login()"> Login </button>
  <button class="btn btn-primary" *ngIf="isAuthenticated" (click)="logout()"> Logout </button>
</span>
Open src/app/app-routing.module.ts again and add the import of the Okta callback component and the auth guard to the top of the file.
import { OktaCallbackComponent, OktaAuthGuard } from '@okta/okta-angular';
Next, register the callback component to the callback route by adding the following entry to the routes array.
{
  path: 'callback',
  component: OktaCallbackComponent
}
Finally, add the route guard to route entry for the demo component.
{
  path: 'demo',
  component: DemoComponent,
  canActivate: [OktaAuthGuard]
}
Well done! You have completed the implementation of an Angular application with a custom webpack configuration. You can try out the application by opening the terminal again and running the following command.
ng serve
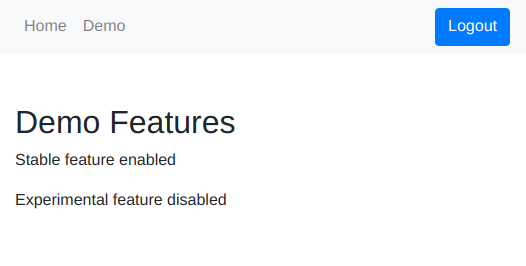
Open your browser and navigate to http://localhost:4200 and you will see your application. If you click on the Demo link at the top, you should be prompted to log in. After successfully signing on with the Okta service, you should see something like this.
Learn More About Angular and Webpack
In this tutorial, I have shown you how to create a simple Angular web application with a custom webpack configuration. Starting with Angular 8, access to the internal webpack configuration has been restricted. It is still possible, however, to extend the configuration object with a custom configuration. This allows you to register custom loaders or additional webpack plugins. In the example presented here, I demonstrated how to use the DefinePlugin to define global constants through the configuration. This might be useful for feature flagging parts of your application.
As always, you can find the source code for this tutorial on GitHub in the oktadeveloper/okta-angular-webpack-example.
If you want to learn more about Webpack, Angular, and authentication, check out the links below.
- Use the Okta CLI to Quickly Build Secure Angular Apps
- Build a Basic CRUD App with Angular and Node
- Use Angular Schematics to Simplify Your Life
- Build Secure Login for Your Angular App
- Angular 8 + Spring Boot 2.2: Build a CRUD App Today!
- Build a Desktop Application with Angular and Electron
If you have any questions about this post, please add a comment below. For more high-tech content, follow @oktadev on Twitter, or subscribe to our YouTube channel!
Changelog:
- Apr 1, 2021: Updated to use Okta Angular SDK v3.0.1. You can see the changes in the example app on GitHub. Changes to this article can be viewed in oktadeveloper/okta-blog#652.
Okta Developer Blog Comment Policy
We welcome relevant and respectful comments. Off-topic comments may be removed.