Tutorial: Create and Verify JWTs in Java

Java support for JWT (JSON Web Tokens) used to require a lot of work: extensive customization, hours lost resolving dependencies, and pages of code just to assemble a simple JWT. Not anymore!
This tutorial will show you how to use an existing JWT library to do two things:
- Generate a JWT
- Decode and verify a JWT
You’ll notice the tutorial is pretty short. That’s because it’s that easy. If you’d like to dig deeper, take a look at the JWT Spec or dive into this longer post about using JWTs for token authentication in Spring Boot apps.
What are JWTs?
JSON Web Tokens are JSON objects used to send information between parties in a compact and secure manner. The JSON spec, or Javascript Object Notation, defines a way of creating plain text objects using key value pairs. It’s a compact way of structuring data built upon primitive types (numbers, strings, etc…). You’re probably already pretty familiar with JSON. It’s like XML without all the brackets.
Tokens can be used to send arbitrary state between parties. Often here “parties” means a client web application and a server. JWTs have many uses: authentication mechanism, url-safe encoding, securely sharing private data, interoperability, data expiration, etc.
In practice, this information is often about two things: authorization and session state. JWTs can be used by a server to tell the client app what actions the user is allowed to execute (or what data they are allowed to access).
JWTs are often also used to store state-dependent user data for a web session. Because the JWT is passed back and forth between the client app and the server, it means that state data does not have to be stored in a database somewhere (and subsequently retrieved on every request); because of this, it scales well.
Let’s take a look at an example JWT (taken from jsonwebtoken.io)
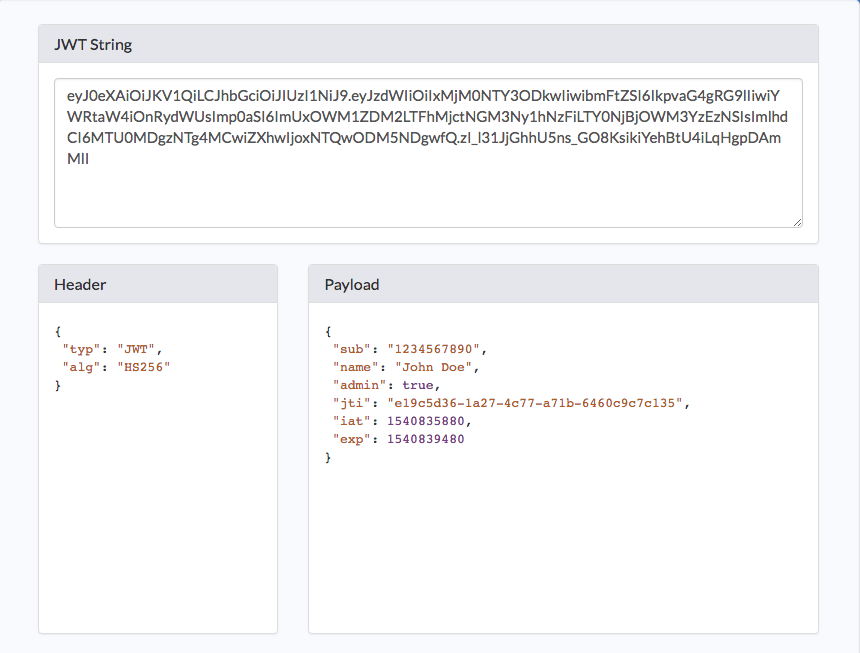
JWTs have three parts: a header, a body, and a signature. The header contains info on how the JWT is encoded. The body is the meat of the token (where the claims live). The signature provides the security.
There’s a lot of detail we’re not going to go into here regarding how tokens are encoded and how information is stored in the body. Check out the previously mentioned tutorial if you want.
Don’t forget: cryptographic signatures do not provide confidentiality; they are simply a way of detecting tampering with a JWT, and unless a JWT is specifically encrypted, they are publicly visible. The signature simply provides a secure way of verifying the contents.
Great. Got it? Now you need to make a token with JJWT! For this tutorial, we’re using an existing JWT library. Java JWT (a.k.a., JJWT) was created by Les Hazlewood (lead committer to Apache Shiro, former co-founder and CTO at Stormpath, and currently Okta’s very own Senior Architect), JJWT is a Java library that simplifies JWT creation and verification. It is based exclusively on the JWT, JWS, JWE, JWK and JWA RFC specifications and open source under the terms of the Apache 2.0 License. The library also adds some nice features to the spec, such as JWT compression and claims enforcement.
Generate a Token in Java
This parts super easy. Let’s look at some code. Clone the GitHub repo:
 git clone https://github.com/oktadeveloper/okta-java-jwt-example.git
 cd okta-java-jwt-example
This example is pretty basic, and contains a src/main/java/JWTDemo.java class file with two static methods: createJWT() and decodeJWT(). Cunningly enough, these two methods create a JWT and decode a JWT. Take a look at the first method below.
public static String createJWT(String id, String issuer, String subject, long ttlMillis) {

    //The JWT signature algorithm we will be using to sign the token
    SignatureAlgorithm signatureAlgorithm = SignatureAlgorithm.HS256;

    long nowMillis = System.currentTimeMillis();
    Date now = new Date(nowMillis);

    //We will sign our JWT with our ApiKey secret
    byte[] apiKeySecretBytes = DatatypeConverter.parseBase64Binary(SECRET_KEY);
    Key signingKey = new SecretKeySpec(apiKeySecretBytes, signatureAlgorithm.getJcaName());

    //Let's set the JWT Claims
    JwtBuilder builder = Jwts.builder().setId(id)
            .setIssuedAt(now)
            .setSubject(subject)
            .setIssuer(issuer)
            .signWith(signatureAlgorithm, signingKey);

    //if it has been specified, let's add the expiration
    if (ttlMillis > 0) {
        long expMillis = nowMillis + ttlMillis;
        Date exp = new Date(expMillis);
        builder.setExpiration(exp);
    }

    //Builds the JWT and serializes it to a compact, URL-safe string
    return builder.compact();
}
To summarize, the createJWT() method does the following:
- Sets the hashing algorithm
- Gets the current date for the Issued At claim
- Uses the SECRET_KEY static property to generate the signing key
- Uses the fluent API to add the claims and sign the JWT
- Sets the expiration date
This could be customized to your needs. If, for example, you wanted to add different or custom claims.
Decode a Token
Now take a look at the even simpler decodeJWT() method.
public static Claims decodeJWT(String jwt) {
    //This line will throw an exception if it is not a signed JWS (as expected)
    Claims claims = Jwts.parser()
            .setSigningKey(DatatypeConverter.parseBase64Binary(SECRET_KEY))
            .parseClaimsJws(jwt).getBody();
    return claims;
}
The method again uses the static SECRET_KEY property to generate the signing key, and uses that to verify that the JWT has not been tampered with. The method will throw io.jsonwebtoken.SignatureException exception if the signature does not match the token. If the signature does match, the method returns the claims as a Claims object.
That’s pretty much it!
Run the JUnit Tests
For extra credit, you can run the JUnit tests in the example project. There are three tests, and they demonstrate some basic features on the JJWT library. The first test shows the happy path, creating and successfully decoding a valid JWT. The second test shows how the JJWT library will fail when you attempt to decode a totally bogus string as a JWT. The last test shows how a tampered-with JJWT will cause the decodeJWT() method to throw a SignatureException.
You can run these tests from the command line using:
./gradlew test -i
The -i is to set Gradle’s log level to Info so that we see the simple logging output from the tests.
Learn More About Working with JWTs in Your Java Apps
The JJWT library makes it super easy to create and verify JWTs. Just specify a secret key and some claims, and you’ve got a JJWT. Later, use the same secret key to decode the JJWT and verify its contents.
Creating and using JJWTs is now so easy, why aren’t you using them?
Don’t forget SSL! Remember that unless JWTs are encrypted, the information encoded within them is generally only Base64 encoded, which any small child and some pets can read. So unless you want China, Russia, and the FBI reading all of your session data, encrypt it using SSL.
Baeldung has a pretty good in depth tutorial on Java and JWTs.
Also, here are some more links from the Okta blog to keep you going:
- Simple Token Authentication for Java Apps
- Get Started with Spring Boot, OAuth 2.0, and Okta
- 10 Excellent Ways to Secure Your Spring Boot Application
- What Happens If Your JWT Is Stolen?
- JWT Analyzer & Inspector Chrom Plugin
- Encode or Decode JWTs online
If you have any questions about this post, please add a comment below. For more awesome content, follow @oktadev on Twitter, like us on Facebook, or subscribe to our YouTube channel.
Okta Developer Blog Comment Policy
We welcome relevant and respectful comments. Off-topic comments may be removed.