What Happens If Your JWT Is Stolen?
All of us know what happens if our user credentials (email and password) are discovered by an attacker: they can log into our account and wreak havoc. But a lot of modern applications are using JSON Web Tokens (JWTs) to manage user sessions—what happens if a JWT is compromised? Because more and more applications are using token-based authentication, this question is increasingly relevant to developers and critical to understand if you’re building any sort of application that uses token-based authentication.
To help explain the concepts fully, I’ll walk you through what tokens are, how they’re used, and what happens when they’re stolen. Finally: I’ll cover what you should actually do if your token has been stolen, and how to prevent this in the future.
This post was inspired by this StackOverflow question. My response to that question has become one of my most popular responses on StackOverflow to date!
What is a Token?

A token in the context of web development is nothing more than an arbitrary value that represents a session. Tokens can be strings like “abc123” or randomly generated IDs like “48ff796e-8c8a-46b9-9f25-f883c14734ea”.
A token’s purpose is to help a server remember who somebody is. Take API services, for example: if you have an API key that lets you talk to an API service from your server-side application, that API key is what the API service uses to “remember” who you are, look up your account details, and allow (or disallow) you from making a request. In this example, your API key is your “token”, and it allows you to access the API.
However, when most people talk about tokens today, they’re actually referring to JWTs (for better or worse).
What is a JSON Web Token (JWT)?
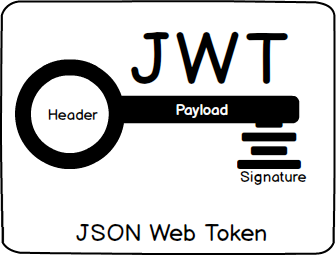
JSON Web Tokens are special types of tokens that are structured in such a way that makes them convenient to use over the web. They have a handful of defining traits:
- They are represented as normal strings. Here’s a real JWT:
eyJhbGciOiJIUzI1NiIsInR5cCI6IkpXVCJ9.eyJzdWIiOiIxMjM0NTY3ODkwIiwibmFtZSI6IlJhbmRhbGwgRGVnZ2VzIiwiaWF0IjoxNTE2MjM5MDIyfQ.sNMELyC8ohN8WF_WRnRtdHMItOVizcscPiWsQJX9hmwBecause JWTs are just URL safe strings, they’re easy to pass around via URL parameters, etc.
- They contain JSON-encoded data. This means you can have your JWT store as much JSON data as you want, and you can decode your token string into a JSON object. This makes them convenient for embedding information.
- They’re cryptographically signed. Understanding how this works is a topic unto itself. For now, just know that it means any trusted party who has a JWT can tell whether or not the token has been modified or changed. This means if your application or API service generates a token that says someone is a “free” user and someone later alters the token to say they are an “admin” user, you’ll be able to detect this and act accordingly. This property makes JWTs useful for sharing information between parties over the web where trust is difficult to come by.
Here’s a small code snippet which creates and validates a JWT in JavaScript using the njwt library. This example is purely here to show you at a glance how to create a JWT, embed some JSON data in it, and validate it.
const njwt = require("njwt");
const secureRandom = require("secure-random");

// This is a "secret key" that the creator of the JWT must keep private.
var key = secureRandom(256, { type: "Buffer" });

// This is the JSON data embedded in the token.
var claims = {
  iss: "https://api.com",
  sub: "someuserid",
  scope: "freeUser",
  favoriteColor: "black"
};

// Create a JWT
var jwt = njwt.create(claims, key);

// Log the JWT
console.log(jwt);
// Jwt {
//  header: JwtHeader { typ: 'JWT', alg: 'HS256' },
//  body:
//   JwtBody {
//     iss: 'https://api.com',
//     sub: 'someuserid',
//     scope: 'freeUser',
//     favoriteColor: 'black',
//     jti: '903c5447-ebfd-43e8-8f4d-b7cc5922f5ec',
//     iat: 1528824349,
//     exp: 1528827949 },
//  signingKey: <Buffer 9c e9 48 a7 b3 c9 87 be 5f 59 90 a5 08 02 9b 98 5c 5e 1c 29 3f b0 33 c5 8c c8 f9 c8 3e 35 f0 7c 20 a0 aa 65 cc 98 47 b6 31 c5 5c d6 4e 6e 25 29 2b d3 ... > }

// The JWT in compacted form (ready for sending over the network)
var token =  jwt.compact();

// Log the compacted JWT
console.log(jwt.compact());
// eyJ0eXAiOiJKV1QiLCJhbGciOiJIUzI1NiJ9.eyJpc3MiOiJodHRwczovL2FwaS5jb20iLCJzdWIiOiJzb21ldXNlcmlkIiwic2NvcGUiOiJmcmVlVXNlciIsImZhdm9yaXRlQ29sb3IiOiJibGFjayIsImp0aSI6IjkwM2M1NDQ3LWViZmQtNDNlOC04ZjRkLWI3Y2M1OTIyZjVlYyIsImlhdCI6MTUyODgyNDM0OSwiZXhwIjoxNTI4ODI3OTQ5fQ.y7ad-nUsHAkI8a5bixYnr_v0vStRqnzsT4bbWGAM2vw

// Verify the JWT using the secret key
njwt.verify(token, key, (err, verifiedJwt) => {
  if (err) throw err;
  console.log("The JWT has been verified and can be trusted!");
  // The JWT has been verified and can be trusted!
});
How are JSON Web Tokens Used?

JWTs are typically used as session identifiers for web applications, mobile applications, and API services. But, unlike traditional session identifiers which act as nothing more than a pointer to actual user data on the server-side, JWTs typically contain user data directly.
The principal reason JWTs have become popular in recent years (having only been around since 2014) is that they can contain arbitrary JSON data. The touted benefit of a JWT over a traditional session ID is that:
- JWTs are stateless and can contain user data directly
- Because JWTs are stateless, no server-side session needs to be implemented (no session database, session cache, etc.)
Because JWTs are stateless, when a server-side application receives a JWT, it can validate it using only the “secret key” that was used to create it — thereby avoiding the performance penalty of talking to a database or cache on the backend, which adds latency to each request.
With that said, let’s take a look at how a JWT would typically be used in a modern web application.
- A client (a browser or mobile client, typically) will visit some sort of login page
- The client will send their credentials to the server-side application
- The server-side application will validate the user’s credentials, typically an email address and password, then generate a JWT that contains the user’s information. The information embedded in the JWT will typically be:
- The user’s first and last name
- The user’s email address or username
- The user’s ID (for server-side lookups, if necessary)
- The user’s permissions (what are they allowed to do?)
- Any other data that is relevant to the application being used
- The server-side application will return this token to the client
- The client will then store this token so that it can be used to identify itself in the future. For web applications, this might mean the client stores the token in HTML5 Local Storage. For server-side API clients, this might mean storing the token on disk or in a secret store.
- When the client makes requests to the server in the future, it will embed the JWT in the HTTP Authorization header to identify itself
- When the server-side application receives a new incoming request, it will check to see if an HTTP Authorization header exists, and if so, it will parse out the token and validate it using the “secret key”
- Finally, the server-side application will process the request if the token is valid and the cycle will be complete
In short: JWTs are used to identify a client. They are keys to the kingdom as far as the client is concerned.
What Happens if Your JSON Web Token is Stolen?

In short: it’s bad, real bad.
Because JWTs are used to identify the client, if one is stolen or compromised, an attacker has full access to the user’s account in the same way they would if the attacker had instead compromised the user’s username and password.
For instance, if an attacker gets ahold of your JWT, they could start sending requests to the server identifying themselves as you and do things like make service changes, user account updates, etc. Once an attacker has your JWT it is game over.
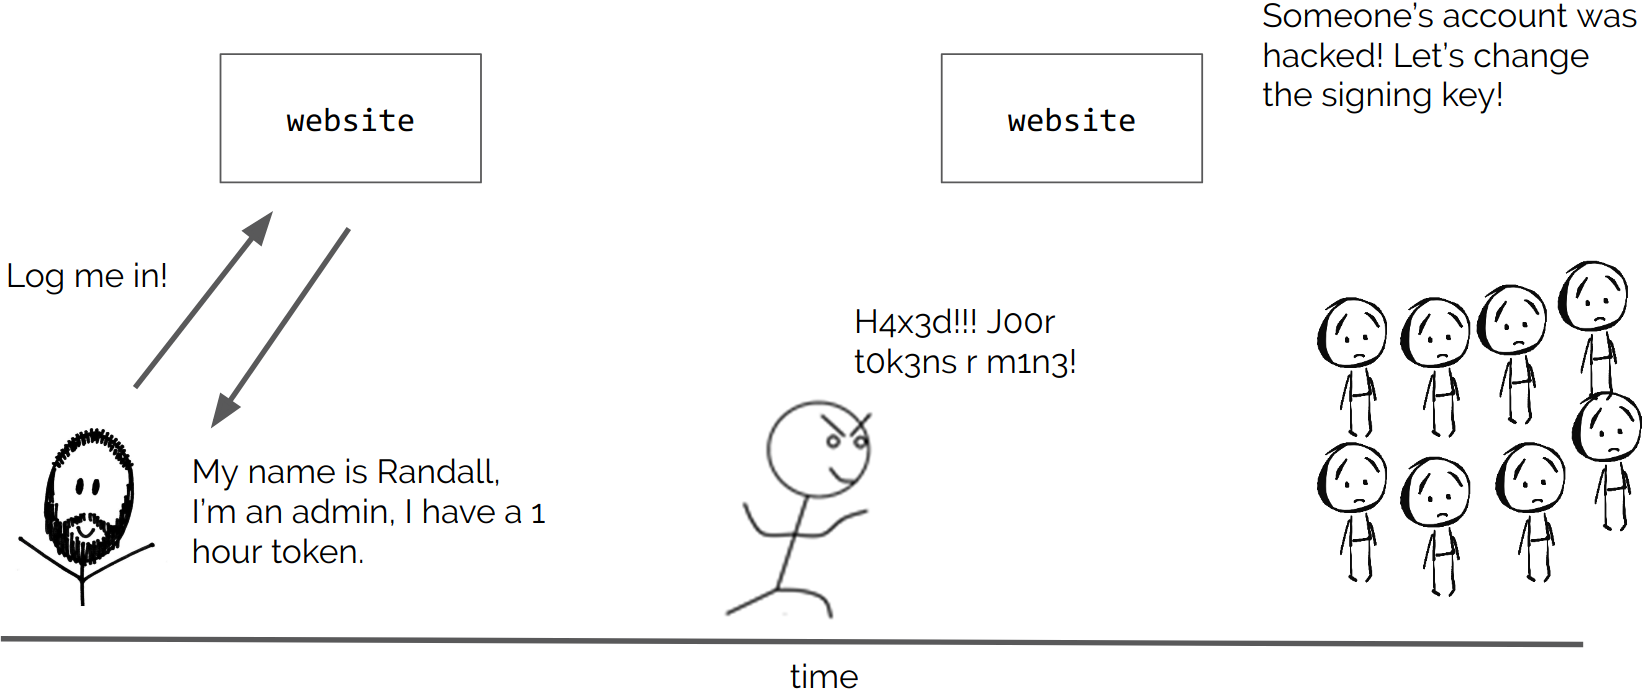
BUT, there is one thing that makes a stolen JWT slightly less bad than a stolen username and password: timing. Because JWTs can be configured to automatically expire after a set amount of time (a minute, an hour, a day, whatever), attackers can only use your JWT to access the service until it expires.
In theory, that sounds great, right? One of the ways token authentication is said to make authentication more “secure” is via short-lived tokens. That’s one of the core reasons token-based authentication has really taken off in recent years: you can automatically expire tokens and mitigate the risk of relying on forever-cached “stateless” tokens.
In the security world, after all, relying on cached data to make sensitive decisions like who can log into a service and what they can do is considered a bad thing. Because tokens are stateless and allow for some speed improvements over traditional session authentication, the only way in which they can remain somewhat “secure” is by limiting their lifespan so they don’t cause too much harm when compromised.
The only problem here is that if an attacker was able to steal your token in the first place, they’re likely able to do it once you get a new token as well. The most common ways this happens is by man-in-the-middling (MITM) your connection or getting access to the client or server directly. And unfortunately, in these scenarios, even the shortest-lived JWTs won’t help you at all.
In general, tokens should be treated like passwords and protected as such. They should never be publicly shared and should be kept in secure data stores. For browser-based applications, this means never storing your tokens in HTML5 Local Storage and instead storing tokens in server-side cookies that are not accessible to JavaScript.
In general, token-based authentication does not provide any additional security over typical session-based authentication relying on opaque session identifiers. While there are certainly a good number of use cases for token-based authentication, knowing how the technology works and where your weak spots are is essential.
Another interesting thing to consider is that in some cases, a stolen JWT can actually be worse than a stolen username and password.
Let’s pretend, for a moment, that your username and password have been compromised. In this scenario, if the app you’re logging into is protected with multi-factor authentication, an attacker needs to bypass additional identity proofing mechanisms in order to gain access to your account.
While guessing or brute-forcing a username and password is a very realistic scenario, being able to compromise a user’s mutli-factor authentication setup can be quite difficult. Bypassing factors like app-based authorization, SMS verification, face ID, touch ID, etc., is a significantly more challenging than guessing a user’s password.
Because of this, a compromised JWT can actually be a greater security risk than a compromised username and password. Imagine the scenario above where the app a user logs into is protected by multi-factor authentication. Once the user logs in and verifies themselves via multi-factor, they are assigned a JWT to prove who they are. If that JWT is stolen, the attacker no longer needs to bypass MFA directly (like they would have to if they only had the user’s username and password)—they can now directly make requests as the user without additional identity proofing. Quite a big risk.
What to Do if Your JWT is Stolen

Once a JWT has been stolen, you’ll be in a bad situation: an attacker can now impersonate a client and access your service without the client’s consent. But, even though you’re in a bad situation, you’ve still got to make the most out of it.
Here are a number of steps to take if a client’s token has been stolen. These recommendations are not suitable for every type of app, but should provide you with some good ideas to help you recover from this security incident:
- Revoke compromised tokens immediately. If you’re using a revocation list on your server to invalidate tokens, revoking a token can instantly boot the attacker out of your system until they get hold of a new token. While it is a temporary solution, it will make the attacker’s life slightly more difficult.
- Force your client to change their password immediately. In the context of a web or mobile app, force your user to reset their password immediately, preferably through some sort of multi-factor authentication flow like the ones Okta provides. Forcing a user to change their password can potentially keep attackers out of their account in the event that an attacker tries to use a compromised token to modify user login credentials. By requiring multi-factor authentication, you can have more confidence that the user resetting their credentials is who they say they are and not an attacker.
- Inspect the client’s environment. Was the user’s phone stolen so an attacker has access to their pre-authenticated mobile app? Was the client accessing your service from a compromised device like a mobile phone or infected computer? Discovering how the attacker got a hold of the token is the only way to fully understand what went wrong.
- Inspect your server-side environment. Was an attacker able to compromise the token from your end? If so, this might involve a lot more work to fix, but the earlier you get started the better.
Once you’ve gone through these steps, you should hopefully have a better understanding of how the token was compromised and what needs to be done to prevent it from happening in the future.
How to Detect Token Compromise

When token compromise does happen, it can cause major problems. Particularly if you (as a service provider) aren’t able to quickly detect that an attacker has compromised a client’s token.
What if you were able to automatically identify when a token was compromised? That would dramatically improve your service’s security, as you could proactively prevent suspicious requests from being fulfilled, thereby protecting your service and your users.
While not easy, this is absolutely possible. Modern machine learning toolkits like TensorFlow allow you to build functional (although complex) pipelines to detect unusual patterns and proactively take charge of the situation.
For example, you could use machine learning to detect unusual client locations. Let’s say you run a website, and your user has logged in from San Francisco and has been making requests for several hours. If you notice that requests start coming from a different geographical region a short time later, you can immediately prevent those requests from being fulfilled, revoke the tokens, and reach out to the user to reset their password, etc.
In a similar manner, you could use machine learning to detect unusual client behavior. If a token is compromised, it’s likely that an attacker will take steps to abuse your service in some way. If you have a user who typically makes five requests per minute on your site, but all of a sudden you notice a massive uptick where the user is making 50+ requests per minute, that might be a good indicator that an attacker has gotten a hold of a user’s token, so you can revoke the tokens and reach out to the user to reset their password.
Pattern detection and recognition through machine learning is a fantastic, modern way to handle some of these more complicated problems.
This is precisely what we do here at Okta — we run an API service that allows you to store user accounts in our service, and we provide developer libraries to handle things like authentication, authorization, social login, single sign-on, multi-factor authentication, etc. When users log into apps powered by Okta, we analyze a number of data points to detect if an account has been compromised, prompt for multi-factor authentication, perform user outreach, etc.
There’s a lot of complexity involved in being proactive about your security, but it’s far better to be prepared than unprepared.
Shameless Plug: If you haven’t checked out our API service, it’s free to use and really fun! You can create an account here: https://developer.okta.com/signup/. And… If you do happen to give it a go, I’d love to hear your thoughts, so please hit me up with any feedback about Okta, token authentication, or JSON Web Tokens. And finally, please follow @oktadev Twitter — we tweet about a lot of interesting security related topics like this.
Happy hacking,
-Randall
PS: Since writing this article, we’ve built a new security site where we’re writing about all sorts of in-depth security topics. If that sounds interesting, please check it out.
Randall Degges runs Evangelism at Okta where he works on security research, development, and education. In his spare time, Randall writes articles and gives talks advocating for security best practices. Randall also builds and contributes to various open-source security tools.
Randall's realm of expertise include Python, JavaScript, and Go development, web security, cryptography, and infrastructure security. Randall has been writing software for ~20 years and has built some of the most-used API services on the internet.
Okta Developer Blog Comment Policy
We welcome relevant and respectful comments. Off-topic comments may be removed.