On this page
Protect your API endpoints
Info: This topic was archived on February 9 2024 and is no longer updated. PHP is no longer a supported language at Okta.
Add a layer of authorization to your web services with Okta API Access Management.
Learning outcomes
- Configure a web API to use Okta.
- Define which endpoints require authorization and which don't.
- Enable Cross-Origin Resource Sharing (CORS) for the API.
- Test that the API is secure.
What you need
- An Okta Integrator Free Plan org (opens new window)
- Postman (opens new window) to test the API
- A recent version of PHP (opens new window) and composer (opens new window) installed.
Sample code
PHP API Quickstart (opens new window)
Note: Several standalone tools can send requests to APIs and allow you to inspect the responses. Our documentation uses Postman and offers Postman Collections (opens new window) to test its APIs more efficiently with a GUI. It also includes HTTP requests as text for those who prefer to use a terminal utility such as cURL (opens new window).
Overview
Applications accessing your web APIs require the same level of authentication and authorization (opens new window) as users accessing your web applications. However, the sign-in flow should be silent and require no human user interaction. Use Okta to grant the correct level of access to your APIs on your behalf.
Use this quickstart to learn how to perform these tasks:
- Check that API Access Management is enabled
- Create and configure a new web API to use Okta
- Configure different levels of access for different endpoints
- Enable CORS for your API
- Test that your API is secure
Tip: You need your Okta org domain to follow this tutorial. It looks like
integrator-123456.okta.com. See Find your Okta domain. Where you see${yourOktaDomain}in this guide, replace it with your Okta domain.
Check that API Access Management is enabled
API Access Management (API AM) is the feature in your org that allows Okta to secure your APIs. When enabled, API AM allows you to create an authorization server that establishes a security boundary for your APIs. All new developer orgs have API AM enabled by default, but it's optional for production orgs. Check that it's enabled in your org as follows:
- Open the Admin Console for your org.
- Sign in to your Okta organization (opens new window) with your administrator account.
- Click Admin in the upper-right corner of the page.
- Go to Security > API to view the API AM area.
If no Authorization Servers tab exists, API AM isn't enabled in your org. Contact your support team to enable this feature in your org or create a new Okta Integrator Free Plan org (opens new window).
Note your authorization server name and audience
This tutorial uses the default custom authorization server to secure your API. Make a note of its name and audience value to configure your API:
- From the API AM area in the Admin Console, select the Authorization Servers tab.
- Go to the entry for the default server and make a note of two values.
- Audience: Found under audience. It should be
api://default. - Authorization Server Name: Found under name. It should be
default.
- Audience: Found under audience. It should be
Moving on, where you see ${yourAudience} and ${yourAuthServerName} in this guide, replace them with your audience and authorization server name.
Note: You can either create a custom authorization server or use the default to protect your APIs. In either case, you need an appropriate licence to use them in production.
Create and configure a new web API to use Okta
Now that you have an authorization server and have noted how to identify it, perform these tasks:
- Create an API project
- Add the required packages to your project
- Configure your API to use Okta
- Create two endpoints to secure
Create an API project
Open a terminal and create a directory
test-apifor your project.Open the new directory and create a simple starter structure for your project:
- public > index.php
- .env
Use the sample code (opens new window) to follow along.
Add the required packages to your project
This quickstart uses several packages to build the API and consume access tokens from Okta. Install each of them with Composer (opens new window):
The PHP dotenv library loads values from the
.envconfig file automatically.composer require vlucas/phpdotenvThe Firebase JWT library encodes and decodes tokens for and from Okta.
composer require firebase/php-jwtThe Guzzle HTTP client library fetches Okta's JWT signing keys.
composer require guzzlehttp/guzzleThe phpfastcache library caches the JWT signing keys to speed up access token validation.
composer require phpfastcache/phpfastcache
Configure your API to use Okta
Earlier you noted your authorization server name and audience. Add these and your Okta domain to your API's configuration.
Add the following properties to .env, replacing the placeholders with your own values.
OKTA_OAUTH2_ISSUER=${yourOktaDomain}/oauth2/${yourAuthServerName}
OKTA_AUDIENCE=${yourAudience}
Create two endpoints to secure
Create two endpoints in your project that cover two different use cases:
api/whoami—a protected endpoint (access-restricted API)api/hello—an endpoint that anonymous users can access (unsecured API)
Open the public > index.php file.
Add the following code to load the environment variables, set up a basic router, and create placeholders for the two endpoints:
<?php
require_once(__DIR__ . '/../vendor/autoload.php');

$dotenv = Dotenv\Dotenv::createImmutable(__DIR__ . '/..');
$dotenv->load();

if (!hasValidAccessToken()) {
   header("HTTP/1.1 401 Unauthorized");
   echo "Unauthorized";
   die();
}

$path = rawurldecode(parse_url($_SERVER['REQUEST_URI'], PHP_URL_PATH));
switch ($path) {

   case '/api/whoami':
      whoami();
      break;

   case '/api/hello':
      hello();
      break;
}

?>
Add the code for the route handlers.
function hello()
{
   echo "Hello World";
}

function whoami()
{
   echo "You are a super developer";
}
Configure different levels of access for different endpoints
In many APIs, all endpoints require authorization. There may be a mix of protected and unprotected endpoints in others. These examples show you how to assign protected and unprotected access to an endpoint.
Require authorization for all endpoints
You can use a middleware function to protect any endpoint so only authenticated users can access it.
Add a function
hasValidAccessToken()inindex.phpto check if a request has a valid access token:function hasValidAccessToken() { // Require an access token is sent in the HTTP Authorization header if (!isset($_SERVER['HTTP_AUTHORIZATION'])) { return false; } $accessToken = explode(' ', $_SERVER['HTTP_AUTHORIZATION'])[1]; $keys = getJWKS(); try { $decoded = \Firebase\JWT\JWT::decode($accessToken, $keys); } catch (\Exception $e) { echo $e->getMessage() . "\n"; return false; } // Check the audience and issuer claims if ($decoded->iss != $_ENV['OKTA_OAUTH2_ISSUER']) return false; if ($decoded->aud != $_ENV['OKTA_AUDIENCE']) return false; return $decoded; }hasValidAccessToken()relies on another functiongetJWKS()to fetch and cache the JWT signing keys from Okta before decoding the access tokens. Add the code forgetJWKS()toindex.php:function getJWKS() { $httpClient = new \GuzzleHttp\Client(); $httpFactory = new \GuzzleHttp\Psr7\HttpFactory(); $cacheItemPool = \Phpfastcache\CacheManager::getInstance('files'); $jwksUri = $_ENV['OKTA_OAUTH2_ISSUER'] . '/v1/keys'; $keySet = new \Firebase\JWT\CachedKeySet( $jwksUri, $httpClient, $httpFactory, $cacheItemPool, 300, // $expiresAfter int seconds to set the JWKS to expire true // $rateLimit true to enable rate limit of 10 RPS on lookup of invalid keys ); return $keySet; }Add the following code to
index.phpto require any request to have a valid access token in the header. Insert this code above theswitchstatement:if (!hasValidAccessToken()) { header("HTTP/1.1 401 Unauthorized"); echo "Unauthorized"; die(); }
Allow anonymous access for specific routes
Configure access on a per-route basis to allow a mix of protected and anonymous endpoints.
Remove the call to
hasValidAccessToken()for all endpoints fromindex.php.Add the call into the particular endpoints that require authentication, for example:
function whoami() {
   $token = hasValidAccessToken();

   if(!$token) {
      header("HTTP/1.1 401 Unauthorized");
      echo "Unauthorized";
      die();
   }

   header("Content-type: application/json");
   echo "You are a super developer";
}
Enable CORS for your API
Enable Cross-Origin Resource Sharing (CORS) (opens new window) only if the API is being called from an application or API hosted on a different domain. For example, if your API is hosted on api.example.com while your application is accessing it from example.com, you must enable CORS.
If you're using a PHP framework like Laravel (opens new window) or Symfony (opens new window), check the documentation for how to enable CORS in the framework. For this quickstart, you can send back the required HTTP headers by adding the following code above the switch statement in index.php:
header('Access-Control-Allow-Origin: *');
Test that your API is secure
You can now test if your endpoint security works as intended. To do this, you will:
- Create an API services integration to represent another machine or service attempting to make requests to the API
- Create a custom scope for the authorization server to assign to the API integration
- Run the API
- Use Postman (opens new window) to
Create an API Services integration
When another machine or service (rather than users) consumes an API, it uses the Client Credentials flow (opens new window) to identify itself and request an access token. Create an API services integration that has this flow enabled.
- Open the Admin Console for your org.
- Go to Applications > Applications to view the current app integrations.
- Click Create App Integration.
- Select API Services as the Sign-in method, and click Next.
- Enter an integration name, and click Save.
The configuration page for the new API services integration appears. Make a note of two values that you use to request your access token:
- Client ID: Found on the General tab in the Client Credentials section.
- Client Secret: Found on the General tab in the Client Credentials section.
Moving on, where you see ${yourClientId} and ${yourClientSecret} in this guide, replace them with your client ID and client secret.
Create a custom scope for the API
Scope is a way to limit an application's access to your API. An access token must include a list of the scopes an app integration can perform. Create a custom scope - effectively, "you can query both endpoints" - for the API.
- Go to Security > API to view the API AM area.
- Select the Authorization Servers tab.
- Go to the entry for the default server and click its name.
- Select the Scopes tab and click Add Scope.
- Enter a name for the scope. For example, "AccessAll".
- Click Create.
- Ensure that the table contains the new scope.
Run Your API
Now, start your server to get your API running.
php -S 127.0.0.1:8080 -t public
Leave your API running locally (or deployed if desired) and proceed to the next step.
Test with Postman
Start Postman if it's not open already. First, you request an access token from Okta and then check your APIs are protected correctly.
Request an access token for the API
Make an HTTP POST request to /token (opens new window) using the client ID and secret you noted earlier.
Select + in the Postman workbench to open a new request tab.
Select GET and change it to POST.
Enter
https://${yourOktaDomain}/oauth2/${yourAuthServerName}/v1/tokenfor the URL.In the Params tab, create two key-value pairs:
- Key:
grant_type, Value:client_credentials - Key:
scope, Value:${yourCustomScope}
- Key:
Select the Authorization tab, and then select Basic Auth for type.
Enter
${yourClientId}for Username and${yourClientSecret}for Password.Select the Headers tab and add two new headers:
- Name: Cache-Control, Value: no-cache
- Name: Content-Type, Value: application/x-www-form-urlencoded
Click Send to receive an access token.
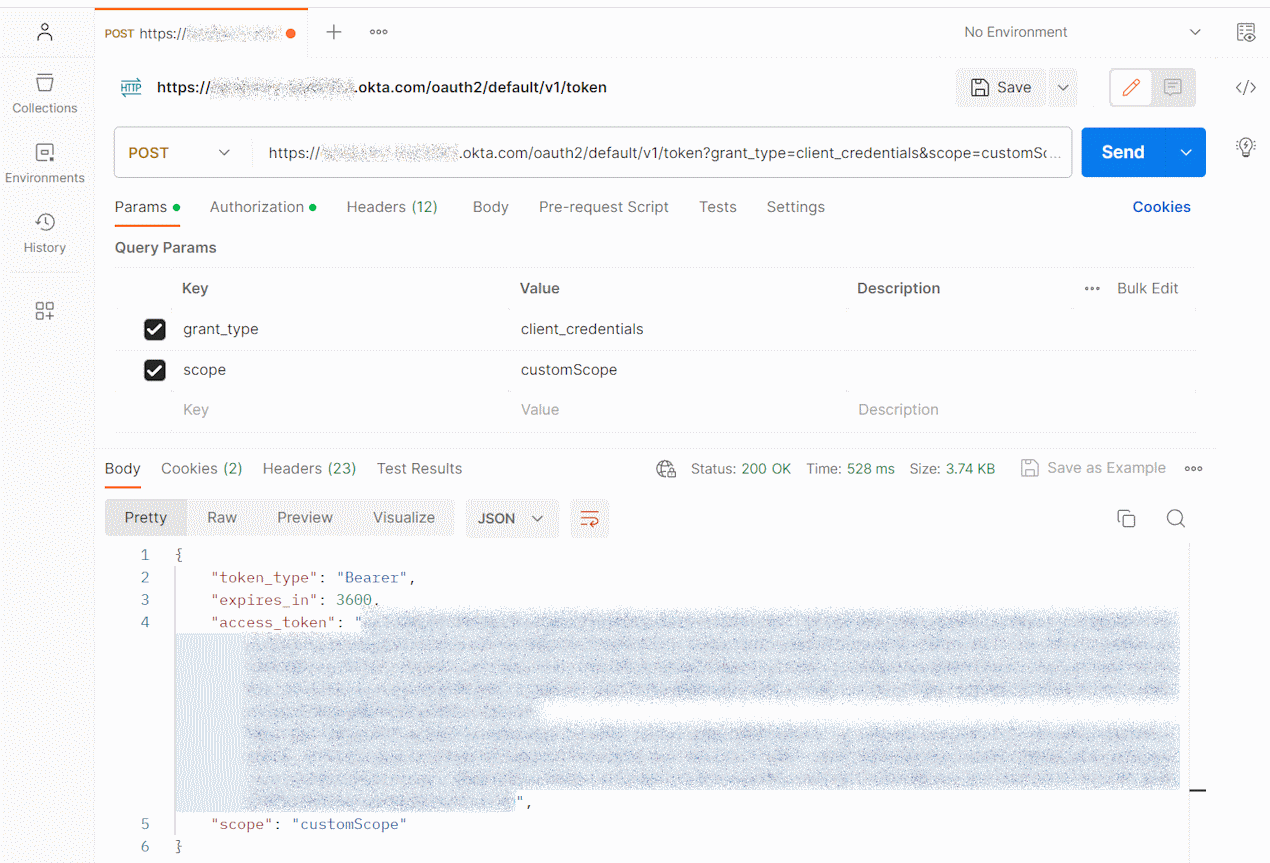
Copy the value returned in the
access_tokenobject field and use it for testing your API in the next section.
Query the hello and whoami endpoints
Now you can test your secured API endpoints. First, test the \whoami endpoint, which requires authorization:
- Select + in the Postman workbench to open a new request tab.
- Enter
https://localhost:8080/api/whoamifor URL. - Select the Authorization tab, and then select Bearer Token for type.
- Enter the token you received earlier for Token.
- Click Send.
- Ensure that you received a
200 OKresponse. - Select the Authorization tab, and then select No Auth for type.
- Ensure that you received a
401 Unauthorizedresponse.
Now test the hello endpoint which doesn't require authorization:
- Select + in the Postman workbench to open a new request tab.
- Enter
https://localhost:8080/api/hellofor URL. - Select the Authorization tab, and then select Bearer Token for type.
- Enter the token you received earlier for Token.
- Click Send.
- Ensure that you received a
200 OKresponse. - Select the Authorization tab, and then select No Auth for type.
- Ensure that you still receive a
200 OKresponse.
Next steps
Learn more about concepts introduced in this guide:
- API Access Management
- Authorization servers
- oAuth 2.0 Credit Credentials flow
- Test the Okta REST APIs using Postman
- Define your own custom OAuth 2.0 scopes, claims, and access policies to support authorization for your APIs.
- Customize tokens returned from Okta from custom claims
Related blog posts