Supercharge Auth with Signals and the New Okta Angular SDK

Have you noticed that the Okta Angular SDK went fully standalone? There’s no NgModule left to import, no importProvidersFrom wrapper to remember, and the guards are plain functions now. If you’ve been waiting for the SDK to look like the rest of your standalone Angular app, this is the release you were waiting for.
In this post, we’ll pick up a small Angular v22 project and finish it. We’ll make the following changes:
- Add authentication using the new
provideOktaAuthprovider function - Protect a route with the SDK’s functional guard
- Load each user’s groups with
rxResourceand a signal input - Move the Okta configuration to runtime loading
We’re calling Okta’s APIs directly for this project, so we don’t have to stand up a separate backend. If you want to jump to the completed project, you can find it in the okta-angular-auth-signals-example GitHub repository. Otherwise, warm up your fingers and let’s get coding!
Note
This post is best for developers familiar with Angular. If you are an Angular newbie, start by building your first Angular app using the tutorial created by the Angular team.
Prerequisites
For this tutorial, you will need the following tools:
- Node.js v22 or greater
- Angular CLI
- An Okta Integrator Free Plan account
- A web browser with good debugging capabilities
- Your favorite IDE
- Terminal window (if you aren’t using an IDE with a built-in terminal)
Table of Contents
- Get the starting Angular project
- Secure the Angular app with OAuth 2.1 and OpenID Connect (OIDC) using Okta
- Add authentication with the standalone Okta Angular provider
- Protect routes with functional route guards
- Add users to your Okta org
- Display users and review Angular’s
rxResourceAPI - Load a user’s groups with
rxResourceand a signal input - Load your Okta configuration at runtime
- Learn more about Angular signals, standalone APIs, and OIDC
Get the starting Angular project
We’re starting from a project instead of building everything from scratch, because a pile of ng generate commands would distract us from the exciting coding parts. Open a terminal window and run the following commands to get a local copy of the starter and install dependencies. Feel free to fork the repo so you can track your changes.
git clone -b starter https://github.com/oktadev/okta-angular-auth-signals-example.git
cd okta-angular-auth-signals-example
npm ci
Open the project in your IDE and take a look around. I already added Okta Angular and Okta Auth JS to the project, along with a few pieces you’d otherwise spend the afternoon typing:
src/app/okta.tsis a service that calls Okta’s user management API. It uses the@Service()decorator to declare a singleton service.src/app/okta.types.tsholds theOktaUserandOktaGroupinterfacessrc/app/okta-auth.interceptor.tsattaches the access token and a proof of possession to Okta requests, and only to Okta requestssrc/app/app.routes.tshas the routes, including the SDK’sOktaCallbackComponentonlogin/callback
Don’t run the app yet. It won’t start, and that’s on purpose – there’s no authentication configuration in the project. The service and the interceptor both ask Angular for an OktaAuth instance, and nothing provides one yet. That’s the first thing you’ll fix.
Secure the Angular app with OAuth 2.1 and OpenID Connect (OIDC) using Okta
You’ll use Okta to handle authentication and authorization for your Angular application securely.
Before you begin, you’ll need an Okta Integrator Free Plan account. To get one, sign up for an Integrator account. Once you have an account, sign in to your Integrator account. Next, in the Admin Console:
- Go to Applications and Resources > Applications
- Click Create App Integration
- In the Sign in Method section, select OIDC - OpenID Connect
- Select Single-Page Application as the application type, then click Next
-
Enter an app integration name
- In the Grant type section, ensure that both Authorization Code and Refresh Token are selected
- Configure the redirect URIs:
- Sign-in redirect URIs:
http://localhost:4200/login/callback - Sign-out redirect URIs:
http://localhost:4200
- Sign-in redirect URIs:
- In the Assignments section, assign a group or keep the default Everyone group assigned for all
- Click Save
Where are my new app's credentials?
Creating an OIDC Single-Page App manually in the Admin Console configures your Okta Org with the application settings. You may also need to configure trusted origins for http://localhost:4200 in Security > API > Trusted Origins.
After creating the app, you can find the configuration details on the app’s General tab:
- Client ID: Found in the Client Credentials section
- Issuer: Found in the Issuer URI field for the authorization server that appears by selecting Security > API from the navigation pane.
Issuer:    https://dev-133337.okta.com/oauth2/default
Client ID: 0oab8eb55Kb9jdMIr5d6
NOTE: You can also use the Okta CLI Client or Okta PowerShell Module to automate this process. See this guide for more information about setting up your app.
Note the Client ID and the Issuer. You’ll need those values in a moment.
One important detail about that issuer. The credentials example above shows an issuer ending in /oauth2/default, which is the custom authorization server Okta creates for you. This project uses the org authorization server instead, so your issuer is your Okta domain with nothing after it, like https://{yourOktaDomain}. We need the org authorization server because it issues access tokens that the Okta management APIs accept, and reading users and groups is the entire point of this app.
In your own applications, you’ll most likely use a custom authorization server for your APIs, since that’s where you control scopes, claims, and access policies. Read Authorization servers to understand which one fits your case.
Grant API scopes to read users and groups
Our app asks Okta for a list of users and each user’s groups, but Okta won’t hand that over merely because we asked nicely. You must grant your application permission to make those calls.
Back in your Okta org, we have a couple of changes to make:
- Navigate to Applications and Resources > Applications
- Select the application you created
- On the General tab, find the General Settings section and press Edit
- Activate the Proof of possession checkbox then press Save
- Open the Okta API Scopes tab, find
okta.users.read, and press Grant
That single scope covers both calls this app makes. Listing a user’s groups counts as reading a user resource, so you don’t need okta.groups.read as well. Handy!
Allow cross-origin requests and protect the access token
Before the app can talk to Okta from a browser, we need to allow cross-origin requests:
- Navigate to Security > API > Trusted Origins
- Confirm you see
http://localhost:4200with both CORS and Redirect enabled
We’re taking a shortcut in the demo by calling the Okta management API directly from the Angular app. Okta’s APIs are a backend that’s already in place, which means we can take the SDK for a spin without having to stand up resource APIs ourselves.
The access token to call Okta’s APIs can perform sensitive admin actions, though, so let’s not send it around as a plain bearer token. Demonstrating Proof of Possession (DPoP) binds the token to a key pair that this browser generates and keeps to itself, so a stolen copy does a thief no good. The starter’s interceptor already sends the DPoP headers on every Okta request, so all that’s left is switching it on.
If you want to learn more about DPoP in an Angular app, you’ll want to check out:
Elevate access token security by demonstrating proof of possession (DPoP). Migrate a SPA to use DPoP in this hands-on project.
Add authentication with the standalone Okta Angular provider
Here’s the part I’ve been looking forward to. Open src/app/app.config.ts. You already have an OktaAuth instance. Replace {yourOktaDomain} and {yourClientId} with the issuer URL and the client ID from the previous section. The issuer value should look something like https://integrator-123.okta.com.
There are a couple of OIDC properties worth calling out:
scopesincludesokta.users.readalongside the usual OIDC scopes, which is how the access token ends up carrying the permission you granted a moment agodpop: trueis the client half of the DPoP setting you switched on in the Okta app configuration. The SDK handles the key pair and the proof headers from here
With the OIDC configuration set, now it’s time to provide Okta authentication to the app. Update the app as shown:
export const appConfig: ApplicationConfig = {
  providers: [
    // other providers such as provideRouter and provideHttpClient here
    provideOktaAuth(
      withOktaConfig({ oktaAuth })
    )
  ]
};
Let’s talk through the code.
provideOktaAuth()is the provider function that registers the SDK. It sits in theprovidersarray next toprovideRouterandprovideHttpClient, exactly like every other Angular provider functionwithOktaConfig({ oktaAuth })passes your configuration in
If you’ve added Okta to an Angular app before, compare that to what you used to write:
importProvidersFrom(
  OktaAuthModule.forRoot({
    oktaAuth: new OktaAuth({ /* config */ })
  })
)
The OktaAuthModule is gone, and so is the importProvidersFrom wrapper that existed only to drag an NgModule into a standalone app. Nothing left to bridge. That’s my favorite kind of API change – the kind where code disappears. 🎉
Protect routes with functional route guards
The dashboard route is wide open right now. Before we close it, let’s see the problem. Start the app:
npm start
Navigate straight to http://localhost:4200/dashboard without signing in. The page renders, the API calls fail, and you get an error message. Not a great experience for anyone.
Open src/app/app.routes.ts and add the guard to the dashboard route:
import { OktaCallbackComponent, canActivateAuthGuard } from '@okta/okta-angular';

export const routes: Routes = [
  // other routes here. We're only updating the dashboard route
  {
    path: 'dashboard',
    loadComponent: () => import('./dashboard/dashboard').then((m) => m.Dashboard),
    canActivate: [canActivateAuthGuard] // add the guard here
  }
];
The canActivateAuthGuard is a CanActivateFn, so it’s a function you drop into the canActivate array. There’s no guard class to instantiate and no provider to register. It has two siblings worth knowing about: canActivateChildAuthGuard for child routes, and canMatchAuthGuard, which pairs nicely with loadChildren because it can reject a route before Angular downloads the lazy-loaded bundle.
Try navigating to /dashboard while signed out now. Okta redirects you to sign in first. Much better!
Add users to your Okta org
When we sign in, we see a user table. And you’re in it!
However, a user portal with only one user isn’t much of a portal, so let’s add a few people to look at. Back in Okta:
- Navigate to Directory > People and press Add person
- Fill in with your favorite first name, last name, and username (email), then press Save
- Repeat a couple of times
Add a totally made-up set of names for more fun. I went with Rosalind Park, Tobias Ferreira, and Ines Alvarez, but this is your org, and I’m not the boss of you.
Ensure you assign the users to your Okta app. Depending on your Okta app’s access policy, users may be automatically assigned to apps, but it’s always good to double check. You went through the effort to create users, so you want to see them in your dashboard, right?
Every user you create automatically joins the built-in Everyone group, which means the groups view you’re about to build has something to show from the first run. Thanks, Okta!
Display users and review Angular’s rxResource API
Time to see what we have. Back in the running app, take a closer look at that table.
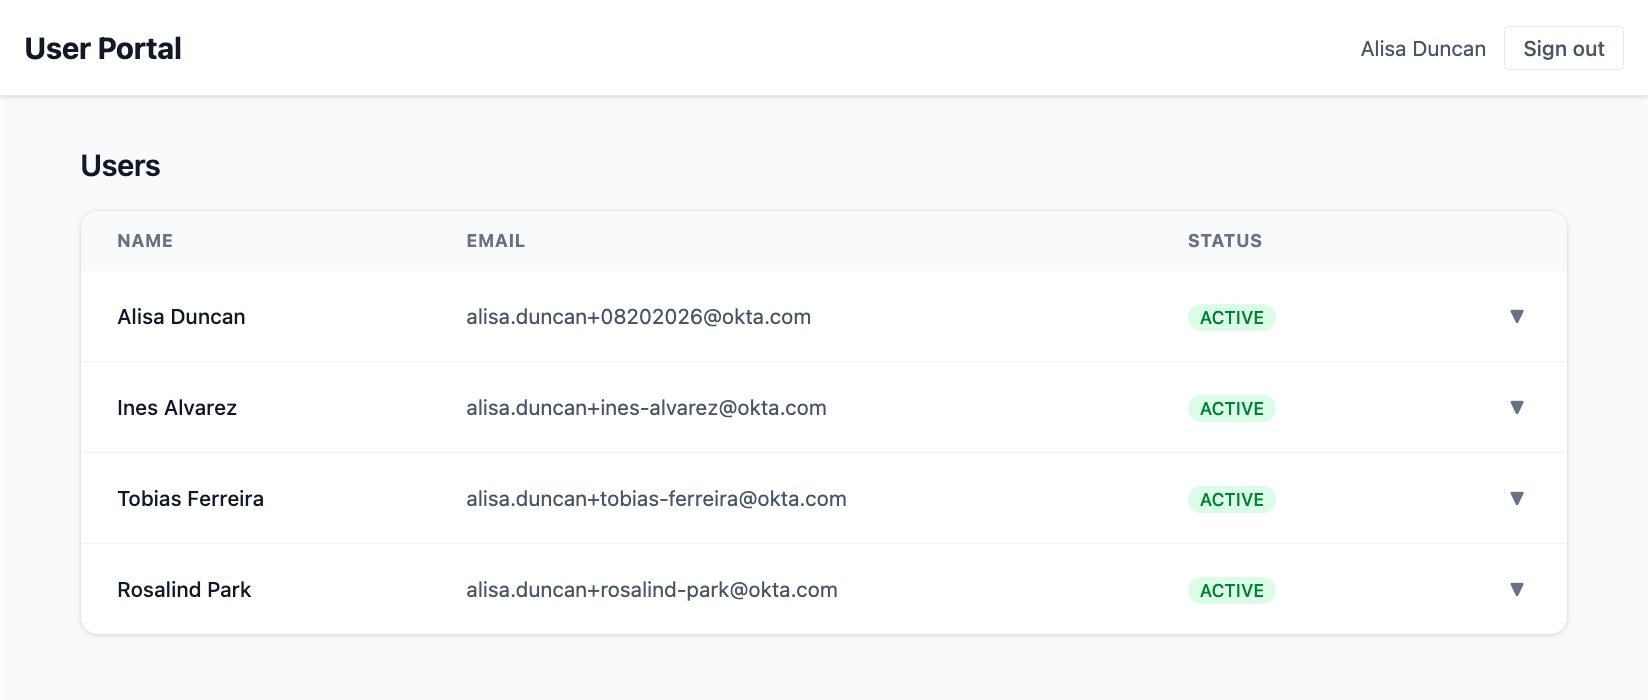
Each row has a toggle button that currently does nothing. We’ll get there.
Before we do, open src/app/dashboard/dashboard.ts and look at how that table gets its data:
usersResource = rxResource({
  stream: () => this.okta.users(),
  defaultValue: []
});
That’s rxResource, the signal-based way to wrap an observable that loads data. You give it a stream, and it hands back a resource exposing value(), isLoading(), and error() as signals, which the template reads directly with @if and @for. No AsyncPipe, no subscription to unwind.
This resource loads once and never changes, because nothing it depends on ever changes. The groups resource you’re about to write is interesting because it has to reload every time you pick a different user.
Load a user’s groups with rxResource and a signal input
Generate a component for the groups view:
ng g c UserGroups --style=none --skip-tests
Open src/app/user-groups/user-groups.ts and replace the contents with this:
import { Component, computed, inject, input } from '@angular/core';
import { rxResource } from '@angular/core/rxjs-interop';
import { Okta as OktaService } from '../okta';
import { OktaUser } from '../okta.types';

@Component({
  selector: 'app-user-groups',
  imports: [],
  templateUrl: './user-groups.html'
})
export class UserGroups {
  private readonly oktaService = inject(OktaService);

  user = input.required<OktaUser>();

  groupsResource = rxResource({
    params: () => this.user().id,
    stream: ({ params: userId }) => this.oktaService.groups(userId),
    defaultValue: []
  });
}
Let’s step through the key parts:
user = input.required<OktaUser>()takes the user from the parent component. Inputs declared with theinput()function are signals, which matters a lot for the next line.paramsis where the reactivity lives. Readingthis.user().idinsideparamssubscribes the resource to that signal, so when the parent passes a different user,paramsrecomputes, and the resource fetches that user’s groups on its own. You don’t wire up an effect, and you don’t call a reload method.streamreceives the resolvedparamsand returns the observable to subscribe to. Destructuring it as{ params: userId }keeps the call readable.defaultValue: []meansvalue()is an empty array instead ofundefinedbefore the first response, so the template doesn’t need a null check.
Create two computed properties, the groupCount and displayGroups properties, in the component below the groupsResource definition:
groupCount = computed(() => this.groupsResource.value().length);
displayGroups = computed(() => this.groupsResource.value().slice(0, 3));
The two computed properties derive from the resource, and they intentionally disagree with each other. groupCount reports every group the user belongs to, while displayGroups caps the list at three. Users in a real org can belong to a long list of groups, and I’d rather show an honest count than let a wall of panels shove the table off your screen.
Now the template. Open src/app/user-groups/user-groups.html and add:
<h2 class="mb-4 text-sm font-semibold text-gray-700">
  {{ user().profile.firstName }} {{ user().profile.lastName }} groups
</h2>

@if (groupsResource.isLoading()) {
  <p class="text-sm text-gray-500">Loading groups...</p>
} @else if (groupsResource.error()) {
  <p class="text-sm text-red-600" role="alert">Failed to load groups.</p>
} @else {
  <p class="py-3">Group count: {{ groupCount() }}</p>

  <div class="grid gap-3 sm:grid-cols-2">
    @for (group of displayGroups(); track group.id) {
      <p>show group info here</p>
    } @empty {
      <p class="text-sm text-gray-500">No groups found.</p>
    }
  </div>
}
Notice the template reads isLoading() and error() straight off the resource, so the loading and failure states come along for free. We’ll replace that show group info here placeholder in the next section.
The next step is handing the component a user. Open src/app/dashboard/dashboard.html and find the row that appears when you toggle a user. Replace its placeholder content with the new component:
<app-user-groups [user]="user" />
Then add UserGroups to the dashboard’s imports array in src/app/dashboard/dashboard.ts:
import { UserGroups } from '../user-groups/user-groups';

@Component({
  selector: 'app-dashboard',
  imports: [UserGroups],
  templateUrl: './dashboard.html'
})
Feel free to start the app and press the toggle on a user. You’ll see a group count of 1 and a single show group info here for the Everyone group. Toggle a different user and watch the panel refill itself – that’s params doing its job. Pretty sweet!
Display group details using signal inputs
The placeholder has served us well, and now it can go. Generate a component for a single group:
ng g c user-groups/group-panel --inline-template --style=none --skip-tests
Open src/app/user-groups/group-panel/group-panel.ts and replace the contents:
import { Component, input } from '@angular/core';

@Component({
  selector: 'app-group-panel',
  template: `
    <div class="rounded-xl border border-gray-200 bg-white p-4 shadow-sm">
      <h3 class="mb-1 text-base font-semibold text-gray-800">{{ heading() }}</h3>
      <p class="text-sm text-gray-600">{{ description() }}</p>
    </div>
  `
})
export class GroupPanel {
  heading = input.required<string>();
  description = input<string>('');
}
This component has no services, no resources, and no idea Okta exists. It takes two inputs and renders them; the separation of concerns is exactly what we want. It makes this component reusable and minimal. Note description has a default of '', because group descriptions in Okta are optional.
Back in src/app/user-groups/user-groups.html, swap the placeholder <p>show group info here</p> for the panel:
<app-group-panel
  [heading]="group.profile.name"
  [description]="group.profile.description ?? ''"
/>
Then import it into the UserGroups component:
import { GroupPanel } from './group-panel/group-panel';

@Component({
  selector: 'app-user-groups',
  imports: [GroupPanel],
  templateUrl: './user-groups.html'
})
Start the app and toggle a user open.
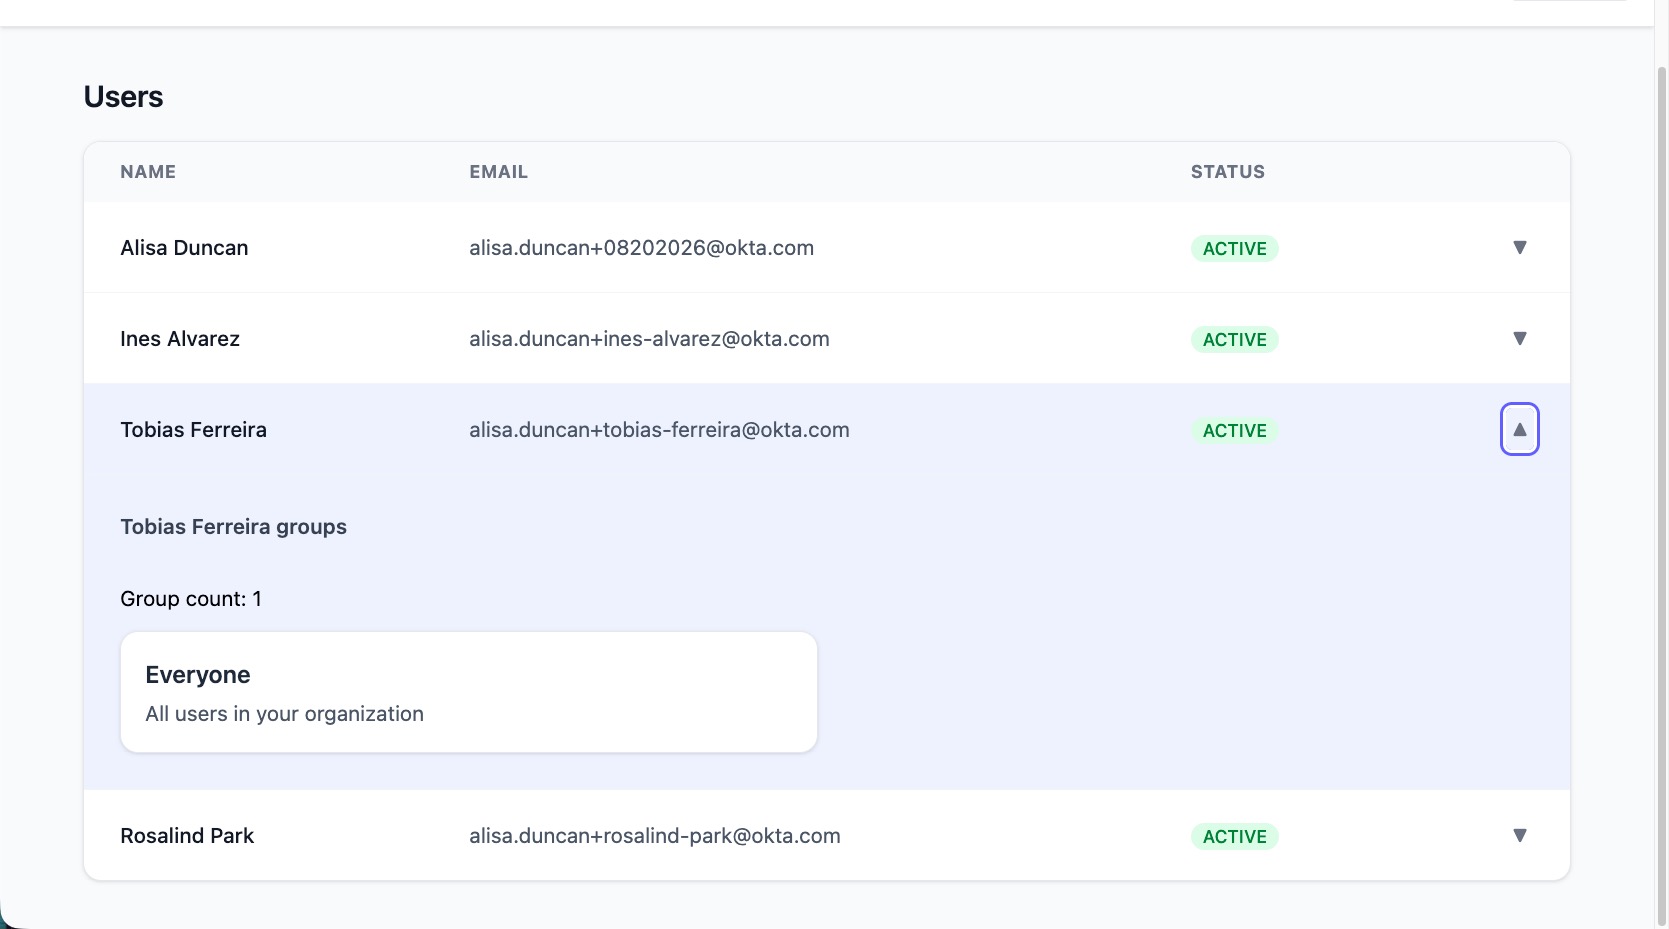
This app is basic, but the data is real, and it reloads when it should. 🏆
One group per user works, but it could be more exciting. We can create more groups and add our users to them.
Back in your Okta org, navigate to Directory > Groups, press Add group, and create a group with a name and description. Then add a couple of your users to it. Read Manage groups if you want the full details. Toggle that user open again, and you’ll see the new panel show up alongside Everyone.
Load your Okta configuration at runtime
Right now, app.config.ts hardcodes the Okta configuration, so changing your issuer or client ID means a rebuild and a redeploy. If you’d rather fetch those values when the app starts, the new SDK still supports it. I wrote about this pattern in Flexible Authentication Configurations in Angular Applications Using Okta, and the good news is it survived the move to standalone providers.
The change has two halves. Set the configuration during app initialization and call provideOktaAuth() with no configuration. Something like this:
async function configInitializer(configService = inject(OktaAuthConfigService)): Promise<void> {
  const response = await fetch('/api/config.json');
  if (!response.ok) {
    throw new Error(`Couldn't load the Okta configuration: ${response.status}`);
  }
  const authConfig = await response.json();

  configService.setConfig({
    oktaAuth: new OktaAuth({
      ...authConfig,
      redirectUri: `${window.location.origin}/login/callback`,
      scopes: ['openid', 'profile', 'offline_access', 'email', 'okta.users.read'],
      pkce: true,
      dpop: true
    })
  });
}

export const appConfig: ApplicationConfig = {
  providers: [
    // remaining providers
    provideAppInitializer(configInitializer),
    provideOktaAuth(),
  ]
};
Let’s talk through what changed.
provideOktaAuth()now takes nowithOktaConfig()feature. The SDK treats its configuration as optional at provide time, and builds theOktaAuthinstance the first time something injects it, which is after initialization finishes.provideAppInitializer()replaces the oldAPP_INITIALIZERmulti-provider. It takes a plain function, so youinject()your dependencies inside it rather than declaring adepsarray. Return a promise, and Angular waits for it before starting the app.fetchreads the configuration. We’re not using Angular’sHttpClienthere, and we’re not coding workarounds to get around the interceptor either.response.okguards the parse. When that path 404s, most servers hand back an HTML error page, andresponse.json()fails with a parse error that tells you nothing about what actually went wrong.
One sequencing detail that will bite you later if you don’t know it now: inject() has to run before your first await. Once you await, you’ve left the injection context and inject() throws. Evaluating it in the parameter list works, as does calling it on the first line of the body. 👀
Runtime configuration lets you point the same app to a different Okta org without rebuilding it. Still the ultimate flexibility!
Before you move on, let’s talk about what belongs in that config file. Fetching it without an access token is fine here. The request stays on your own origin, and the values it returns are already public. The JavaScript bundle includes your issuer and client ID. Anyone can read them out of your app today.
| ⚠️ |
Heads up! Anyone can request /api/config.json, so nothing sensitive goes in it. This is a browser-based app, which means it cannot keep a secret. A single-page app can’t maintain secrets. If a value would hurt you when published, it belongs on a server you control.
|
Learn more about Angular signals, standalone APIs, and OIDC
In this post, you added authentication to a standalone Angular app with provideOktaAuth, protected a route with a functional guard, and loaded each user’s groups with rxResource driven by a signal input. I hope you enjoyed it! You can find the completed project in the okta-angular-auth-signals-example GitHub repository.
If you liked this post, check out these resources.
- Flexible Authentication Configurations in Angular Applications Using Okta
- Secure OAuth 2.0 Access Tokens with Proofs of Possession
- Add Step-up Authentication Using Angular and NestJS
- Angular’s resource and rxResource guide
- Okta Angular SDK on GitHub
Remember to follow us on LinkedIn and subscribe to our YouTube for more exciting content. We also want to hear from you about topics you’d like to see and any questions you may have. Leave us a comment below!
Alisa Duncan is a Senior Developer Advocate at Okta, a full-stack developer, and a community builder who loves the thrill of learning new things. She is a Google Developer Expert in Angular and organizes coding workshops and community events locally and internationally. Her background is primarily working on enterprise software platforms, and she is a fan of all things TypeScript and JavaScript.
Okta Developer Blog Comment Policy
We welcome relevant and respectful comments. Off-topic comments may be removed.