Build and Secure GraphQL APIs with Laravel
GraphQL’s popularity has grown among frontend and backend developers alike. It allows frontend teams to request only the data they need while preventing an explosion of backend endpoints, since all operations can go through one simple endpoint for all models being worked on.
In this tutorial, you will learn how to set up a GraphQL API with Laravel, a free open-source PHP web application framework. You’ll then secure the API so that it’s only accessible to authorized users logging in with Okta.
Note: In May 2025, the Okta Integrator Free Plan replaced Okta Developer Edition Accounts, and the Okta CLI was deprecated.
We preserved this post for reference, but the instructions no longer work exactly as written. Replace the Okta CLI commands by manually configuring Okta following the instructions in our Developer Documentation.
Building the project
The recommended way to create a new Laravel project is to use Laravel Sail, a command-line interface designed for Laravel’s Docker environment. First, create a directory to hold both sets of code for this project—one set for the backend and one for the frontend. Make sure you have the latest versions of Docker and Docker Compose set up as well. If you need help, check Docker’s guide as well as the documentation for Docker Compose.
To bootstrap the Laravel project for this tutorial, you can get a script from laravel.build. It isn’t advisable to pipe scripts from the internet into Bash, so check the script first. If you navigate to this demo code, you will see the generated script. You can change “graphql-demo” to whatever you want to name the project. If it looks okay to you, paste it into your terminal or pipe it directly to Bash using curl -s "https://laravel.build/graphql-demo?with=mysql" | bash.
This will create a new directory, named whatever you used as the path parameter (graphql-demo, in this case), and will set up Laravel for you. Once the script is done downloading Docker Image for Sail, it will prompt you to run cd graphql-demo && ./vendor/bin/sail up. Since you’ll be calling Sail repeatedly, make an alias for it. You can use alias sail=./vendor/bin/sail.
After running the up command, you’ll find Laravel running at http://localhost.
Laravel models
Next set up your Laravel models and migrations. For more interesting data to work with, create some interconnected models. This is similar to building an issue-tracking system. The system will have the following models:
- user
- issue
- comment
If you’d like to copy the files from the public GitHub repository, the models can be found here, and the migrations can be found here.
If you’d prefer to make these models yourself, execute a command with Laravel’s Artisan CLI tool. Because you’re using Sail, execute with sail php artisan <command>.
Then run the following:
sail php artisan make:model -m Issue
sail php artisan make:model -m Comment
The user model and migration already exist by default.
Laravel migrations
The above commands also created the necessary migrations thanks to the -m flag. Update them by following the steps outlined here.
User:
<?php
// database/migrations/2014_10_12_000000_create_users_table.php

use Illuminate\Database\Migrations\Migration;
use Illuminate\Database\Schema\Blueprint;
use Illuminate\Support\Facades\Schema;

class CreateUsersTable extends Migration
{
   /**
    * Run the migrations.
    *
    * @return void
    */
   public function up()
   {
       Schema::create('users', function (Blueprint $table) {
           $table->id();
           $table->string('name');
           $table->string('email')->unique();
           $table->timestamp('email_verified_at')->nullable();
           $table->string('password');
           $table->rememberToken();
           $table->timestamps();
       });
   }

   /**
    * Reverse the migrations.
    *
    * @return void
    */
   public function down()
   {
       Schema::dropIfExists('users');
   }
}
Issue:
<?php
// database/migrations/2021_11_14_031132_create_issues_table.php

use Illuminate\Database\Migrations\Migration;
use Illuminate\Database\Schema\Blueprint;
use Illuminate\Support\Facades\Schema;

class CreateIssuesTable extends Migration
{
   /**
    * Run the migrations.
    *
    * @return void
    */
   public function up()
   {
       Schema::create('issues', function (Blueprint $table) {
           $table->id('id');
           $table->unsignedBigInteger('author_id');
           $table->unsignedBigInteger('assignee_id');
           $table->string('title');
           $table->text('description');
           $table->timestamps();
       });
   }

   /**
    * Reverse the migrations.
    *
    * @return void
    */
   public function down()
   {
       Schema::dropIfExists('issues');
   }
}
Comment:
<?php
// database/migrations/2021_11_14_030557_create_comments_table.php

use Illuminate\Database\Migrations\Migration;
use Illuminate\Database\Schema\Blueprint;
use Illuminate\Support\Facades\Schema;

class CreateCommentsTable extends Migration
{
   /**
    * Run the migrations.
    *
    * @return void
    */
   public function up()
   {
       Schema::create('comments', function (Blueprint $table) {
           $table->id('id');
           $table->unsignedBigInteger('issue_id');
           $table->string('content');
           $table->unsignedBigInteger('author_id');
           $table->timestamps();
       });
   }

   /**
    * Reverse the migrations.
    *
    * @return void
    */
   public function down()
   {
       Schema::dropIfExists('comments');
   }
}
Relationships
Next define some relationships on the models to tie everything together. Your models should look like the ones here.
User:
<?php
// app/Models/User.php

namespace App\Models;

use Illuminate\Contracts\Auth\MustVerifyEmail;
use Illuminate\Database\Eloquent\Factories\HasFactory;
use Illuminate\Database\Eloquent\Relations\HasMany;
use Illuminate\Foundation\Auth\User as Authenticatable;
use Illuminate\Notifications\Notifiable;
use Laravel\Sanctum\HasApiTokens;

class User extends Authenticatable
{
   use HasApiTokens, HasFactory, Notifiable;

   /**
    * The attributes that are mass assignable.
    *
    * @var string[]
    */
   protected $fillable = [
       'name',
       'email',
       'password',
   ];

   /**
    * The attributes that should be hidden for serialization.
    *
    * @var array
    */
   protected $hidden = [
       'password',
       'remember_token',
   ];

   /**
    * The attributes that should be cast.
    *
    * @var array
    */
   protected $casts = [
       'email_verified_at' => 'datetime',
   ];

   public function issues(): HasMany {
       return $this->hasMany(Issue::class, 'author_id', 'id');
   }

   public function comments(): HasMany {
       return $this->hasMany(Comment::class);
   }
}
Issue:
<?php
// app/Models/Issue.php

namespace App\Models;

use Illuminate\Database\Eloquent\Factories\HasFactory;
use Illuminate\Database\Eloquent\Model;
use Illuminate\Database\Eloquent\Relations\BelongsTo;
use Illuminate\Database\Eloquent\Relations\HasMany;

class Issue extends Model
{
   use HasFactory;

   public function author(): BelongsTo {
           return $this->belongsTo(User::class, 'author_id');
   }

   public function assignee(): BelongsTo {
           return $this->belongsTo(User::class, 'assignee_id');
   }

   public function comments(): HasMany {
           return $this->hasMany(Comment::class);
   }
}
Comment:
<?php
// app/Models/Comment.php

namespace App\Models;

use Illuminate\Database\Eloquent\Factories\HasFactory;
use Illuminate\Database\Eloquent\Model;
use Illuminate\Database\Eloquent\Relations\BelongsTo;

class Comment extends Model
{
   use HasFactory;

   public function issue(): BelongsTo {
           return $this->belongsTo(Issue::class);
   }

   public function author(): BelongsTo {
           return $this->belongsTo(User::class, 'author_id');
   }
}
Factories and seeders
Add seeders and factories so you have some data to work with. This allows you to generate as many instances of your models as you like, as well as the pre-populated relationships you just defined. Run the following:
sail php artisan make:seeder SimpleSeeder
sail php artisan make:factory IssueFactory
sail php artisan make:factory CommentFactory
Each of these classes will need tweaking to ensure they are generating the correct data. Modify them as shown below:
database/factories/IssueFactory.php:
<?php

namespace Database\Factories;

use Illuminate\Database\Eloquent\Factories\Factory;

class IssueFactory extends Factory
{
   /**
    * Define the model's default state.
    *
    * @return array
    */
   public function definition()
   {
       return [
           'title' => $this->faker->sentence,
           'description' => $this->faker->sentence,
       ];
   }
}
database/factories/CommentFactory.php:
<?php

namespace Database\Factories;

use Illuminate\Database\Eloquent\Factories\Factory;

class CommentFactory extends Factory
{
   /**
    * Define the model's default state.
    *
    * @return array
    */
   public function definition()
   {
       return [
           'content' => $this->faker->sentence
       ];
   }
}
database/seeders/SimpleSeeder.php:
<?php

namespace Database\Seeders;

use App\Models\Comment;
use App\Models\Issue;
use App\Models\User;
use Illuminate\Database\Seeder;

class SimpleSeeder extends Seeder
{
   /**
    * Run the database seeds.
    *
    * @return void
    */
   public function run()
   {
       User::factory()
           ->has(
               Issue::factory()
                   ->for(User::factory(), 'assignee')
                   ->has(
                       Comment::factory()
                           ->for(User::factory(), 'author')
                           ->count(3)
                   )
                   ->count(5)
           )
           ->count(10)
           ->create();
   }
}
Once you have updated those classes, update DatabaseSeeder.php to call the new SimpleSeeder:
<?php
// database/seeders/DatabaseSeeder.php

namespace Database\Seeders;

use Illuminate\Database\Seeder;

class DatabaseSeeder extends Seeder
{
   /**
    * Seed the application's database.
    *
    * @return void
    */
   public function run()
   {
       $this->call(SimpleSeeder::class);
   }
}
To make sure that everything is working as expected, run the migrations and seeders you just created. This will populate your database with records that can be used by the GraphQL API. Execute the following command:
sail php artisan migrate:fresh --seed
Next you’ll install the GraphQL server.
Installing Lighthouse
There are a few different packages for GraphQL with Laravel. This tutorial will focus on Lighthouse since it has minimal boilerplate and allows you to get going quickly with GraphQL. As with the php artisan commands above, add the sail prefix if you want to install composer dependencies with Sail.
Install the GraphQL dependencies:
sail composer require nuwave/lighthouse mll-lab/laravel-graphql-playground
Lighthouse will create the server for you, while the Playground allows you to test your schema without an external tool.
Once both dependencies are installed, run the following commands to publish the schema and config file from Lighthouse:
sail php artisan vendor:publish --tag=lighthouse-schema
sail php artisan vendor:publish --tag=lighthouse-config
Add the GraphQL API route to the CORS config file. Navigate to config/cors.php and update the paths array to include 'graphql', like this:
'paths' => ['api/*', 'sanctum/csrf-cookie', 'graphql'],
Finally, update the Lighthouse schema at graphql/schema.graphql. Change the contents to the following:
type Query {
   users: [User!]! @all
   user(id: Int! @eq): User @find

   issues: [Issue!]! @all
   issue(id: Int! @eq): Issue @find
}

type User {
   id: ID!
   name: String!
   issues: [Issue!]! @hasMany
}

type Issue {
   id: ID!
   title: String!
   description: String!
   author: User! @belongsTo
   assignee: User! @belongsTo
   comments: [Comment!]! @hasMany
}

type Comment {
   id: ID!
   content: String!
   issue: Issue! @belongsTo
   author: User! @belongsTo
}
This file describes which types are accessible via GraphQL and which attributes they expose, as well as the relationships they can follow.
Demoing without auth
Navigate to the playground site at http://localhost/graphql-playground. The interface will allow you to try out GraphQL with the backend you just made. Enter the following query on the left and click the Play button:
query GetIssues {
  issues {
    id
    title
    description
    author {
      name
    }
    assignee {
      name
    }
    comments {
      id
      content
      author {
        name
      }
    }
  }
}
You should see your seeded data on the right, in the shape you specified in your query.
Next you’ll add authentication to your GraphQL API and allow users to log in via Okta.
Adding authentication
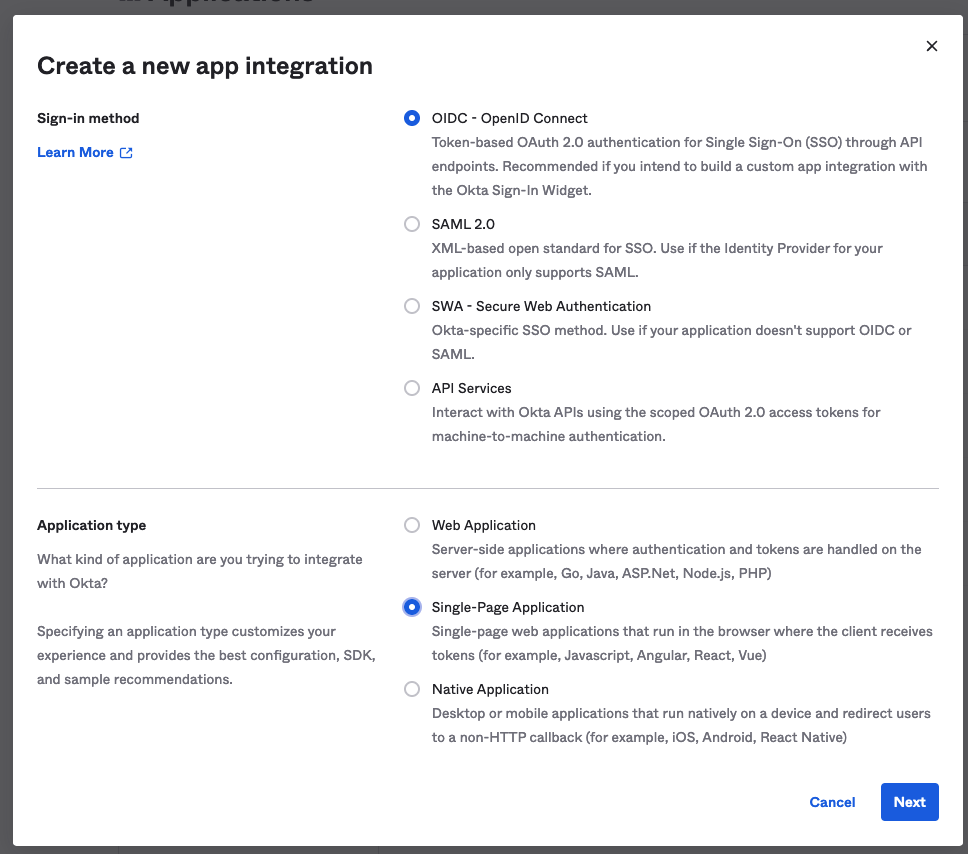
To add auth to your API, you’ll need to do some configuration. Go to the Okta Developer Portal and sign up for a developer account so you can create an application for your frontend. To do this, navigate to Applications > Application in the sidebar and select Create App Integration. Select OIDC as your sign-in method and set your application type as “Single-Page Application.”
On the next page, give your app integration a name like “Laravel GraphQL Demo,” keep the grant type as “Authorization Code,” and change the sign-in redirect and sign-out redirect URIs to port 3000 instead of 8080. For “Controlled Access,” select allow everyone in my organization to access since access levels aren’t important for this tutorial.
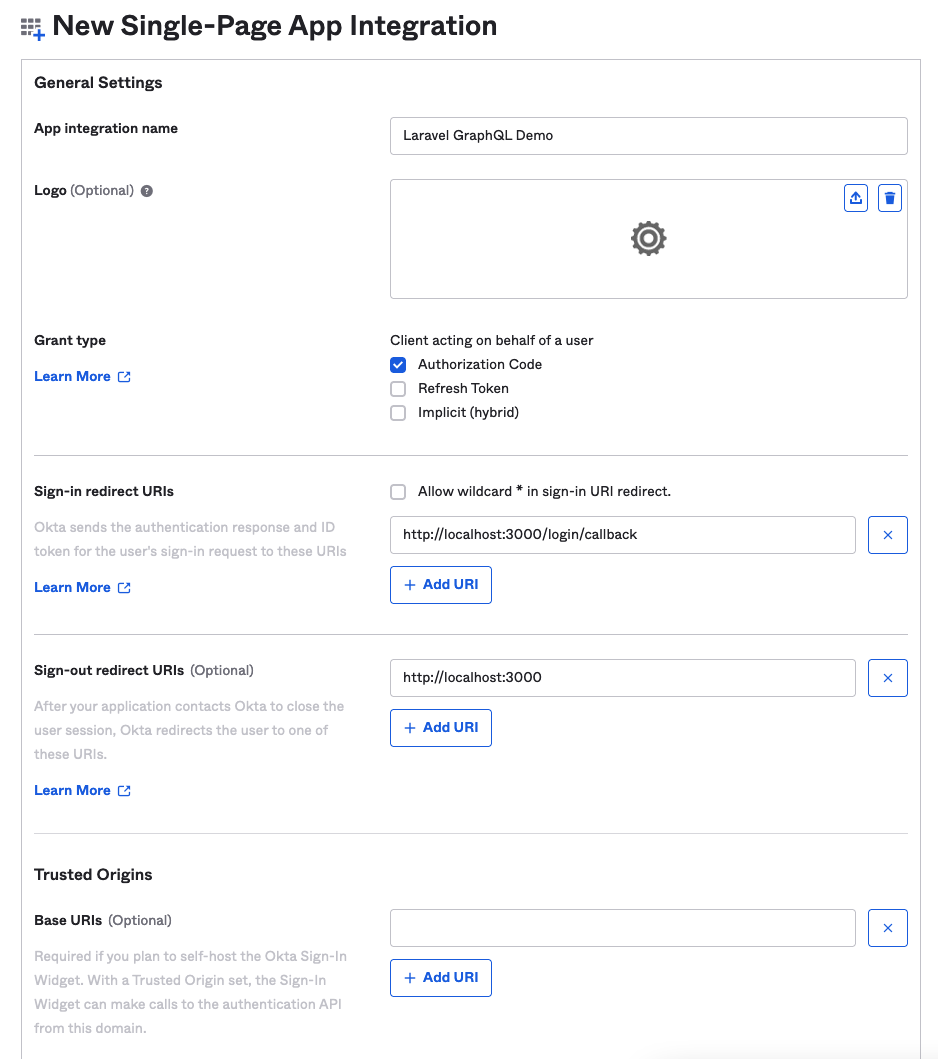
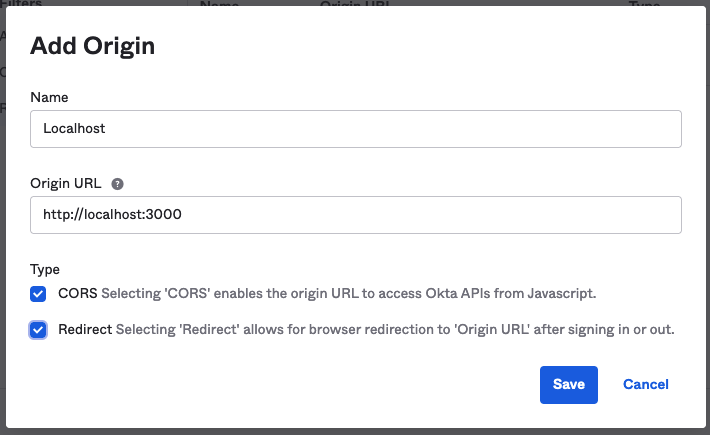
You’ll be given your client ID—make sure to note it. You’ll be able to see your Okta domain, which you should note as well. Before you leave the Okta site, navigate to Security > API to see your issuer URI. Note this and go to the Trusted Origins tab. Click Add Origin, set the origin URL as http://localhost:3000, select the CORS and Redirect checkboxes, and click Save. This will avoid problems with the frontend.
Installing packages
Go back to your terminal and run sail composer require okta/jwt-verifier firebase/php-jwt. This will install the packages needed to verify the Okta access tokens. Then run sail php artisan make:middleware VerifyJwt to create a new class for your middleware. Open it and set its contents as follows:
<?php

namespace App\Http\Middleware;

use Closure;
use Illuminate\Http\Request;
use Illuminate\Support\Facades\Log;
use Okta\JwtVerifier\Adaptors\FirebasePhpJwt;
use Okta\JwtVerifier\JwtVerifierBuilder;

class VerifyJwt
{
   /**
    * Handle an incoming request.
    *
    * @param  \Illuminate\Http\Request  $request
    * @param  \Closure  $next
    * @return mixed
    */
   public function handle(Request $request, Closure $next)
   {
       $jwtVerifier = (new JwtVerifierBuilder())
           ->setAdaptor(new FirebasePhpJwt())
           ->setAudience('api://default')
           ->setClientId(env('OKTA_CLIENT_ID'))
           ->setIssuer(env('OKTA_ISSUER_URI'))
           ->build();

       try {
           $jwtVerifier->verify($request->bearerToken());
           return $next($request);
       } catch (\Exception $exception) {
           Log::error($exception);
       }

       return response('Unauthorized', 401);

   }
}
Once this is attached to Lighthouse’s middleware config, it will allow you to protect your GraphQL API from requests that don’t have valid tokens. The client ID and issuer are coming from environment variables, which need to be set in your .env file. Open that file and append the following:
OKTA_CLIENT_ID=<the client ID you noted earlier>
OKTA_ISSUER_URI=< the issuer URI you noted earlier>
Open config/lighthouse.php and update the ‘middleware’ array to add the middleware to Lighthouse:
...
'middleware' => [
   // Verify BearerToken from Okta
   \App\Http\Middleware\VerifyJwt::class,

   \Nuwave\Lighthouse\Support\Http\Middleware\AcceptJson::class,

   // Logs in a user if they are authenticated. In contrast to Laravel's 'auth'
   // middleware, this delegates auth and permission checks to the field level.
   \Nuwave\Lighthouse\Support\Http\Middleware\AttemptAuthentication::class,

   // Logs every incoming GraphQL query.
   // \Nuwave\Lighthouse\Support\Http\Middleware\LogGraphQLQueries::class,
],
...
You could instead add the JWT verification to the API route guard, but the above method is fine for this tutorial. The graphql-playground shouldn’t be able to reach your API because it doesn’t have a token. To get a token, you’ll configure a simple frontend application to log you into Okta, then use that token to call your API.
If you just want to make sure your API is working, you can clone the frontend from the public GitHub repo. You’ll need to insert your client ID and issuer URL in the App.js file, but it should work out-of-the-box. To build the frontend, read on.
Building the frontend
Since this is for testing purposes, you’ll build a simple frontend with React, the official Okta React library, and Apollo Client.
If you don’t have Node.js and npm, you can get up and running with nvm - node version manager.
From the parent directory (that contains your Laravel project directory), run npx create-react-app graphql-demo-frontend.
This will create a minimal React application for you to build your frontend. To install dependencies, run npm install @apollo/client graphql @okta/okta-react @okta/okta-auth-js react-router-dom@^5.1.6.
The React app will have files in the src/ directory, but most of them aren’t needed. Delete them all and create the following files instead.
index.js
The index.js file mounts your React application onto its root DOM node, but it also handles the creation of Apollo Client, and fetches the Okta JWT from local storage.
Note: Using local storage is fine for this tutorial, but don’t take this approach in production, because changes to the underlying libraries and how they store the token might break it.
import React from 'react';
import ReactDOM from 'react-dom';
import App from './App';

import { ApolloClient, InMemoryCache, ApolloProvider, from, createHttpLink } from '@apollo/client';
import { setContext } from '@apollo/client/link/context';

const oktaTokenStorage = JSON.parse(localStorage.getItem('okta-token-storage'));
const accessToken = oktaTokenStorage?.accessToken?.accessToken;

const httpLink = createHttpLink({
  uri: 'http://localhost/graphql',
});

// inject the access token into the Apollo Client
const authLink = setContext((_, { headers }) => {
  const token = accessToken;
  return {
        headers: {
          ...headers,
          authorization: token ? `Bearer ${token}` : "",
        }
  }
});

const client = new ApolloClient({
  cache: new InMemoryCache(),
  link: from([authLink, httpLink])
});

ReactDOM.render(
  <React.StrictMode>
        <ApolloProvider client={client}>
          <App />
        </ApolloProvider>
  </React.StrictMode>,
  document.getElementById('root')
);
App.js
This file houses the main body of the application and sets up the Okta client. Use your issuer URI and client ID here:
import React from 'react';
import { SecureRoute, Security, LoginCallback } from '@okta/okta-react';
import { OktaAuth, toRelativeUrl } from '@okta/okta-auth-js';
import { BrowserRouter as Router, Route, useHistory } from 'react-router-dom';
import Home from './Home';
import IssueTracker from './IssueTracker';

const oktaAuth = new OktaAuth({
  issuer: <your issuer URI>, // issuer URL
  clientId: <your client ID>, // client id for SPA app
  redirectUri: window.location.origin + '/login/callback'
});

const App = () => {
  const history = useHistory();
  const restoreOriginalUri = async (_oktaAuth, originalUri) => {
      history.replace(toRelativeUrl(originalUri || '/', window.location.origin));
  };

  return (
    <Security oktaAuth={oktaAuth} restoreOriginalUri={restoreOriginalUri}>
      <Route path='/' exact={true} component={Home} />
      <SecureRoute path='/issue-tracker' component={IssueTracker} />
      <Route path='/login/callback' component={LoginCallback} />
    </Security>
  );
};

const AppWithRouterAccess = () => (
  <Router>
        <App />
  </Router>
);

export default AppWithRouterAccess;
Home.js
This component acts like a dashboard, prompting the user to log in via Okta if they’re not authenticated, and giving them the link to the issue tracker if they are:
import { useOktaAuth } from "@okta/okta-react";

const Home = () => {
    const { oktaAuth, authState } = useOktaAuth();

    const login = async () => oktaAuth.signInWithRedirect();
    const logout = async () => oktaAuth.signOut('/');

    if (!authState) {
        return <div>Loading...</div>;
    }

    if (!authState.isAuthenticated) {
        return (
            <div>
                <p>Not Logged in yet</p>
                <button onClick={login}>Login</button>
            </div>
        );
    }

    return (
        <div>
            <p>Logged in!</p>
            <p>
                <a href="/issue-tracker">go to Issue Tracker</a>
            </p>
            <button onClick={logout}>Logout</button>
        </div>
    );
};

export default Home;
IssueTracker.js
This component uses the query you tried earlier in the graphql-playground to fetch data in its desired shape. Because the access token is injected into Apollo Client, the frontend is able to query the backend despite the middleware you put in place. When the data returns, the component renders it as a list.
import * as React from 'react';

import { useQuery, gql } from "@apollo/client";

const ISSUES = gql`
query GetIssues {
  issues {
    id,
    title,
    description,
    author {
      name
    },
    assignee {
      name
    },
    comments {
      id,
      content,
      author {
        name
      }
    }
  }
}
`

export default function IssueTracker() {

    const { loading, error, data } = useQuery(ISSUES);

    console.log({ loading, error, data })

    if (loading) {
        return <div>loading...</div>
    }

    if (error) {
        return <div>
            <code>error.message</code>
        </div>
    }

    return <ul>
        {data.issues.map((issue) => {
            return <li>
                <div>
                    <p>title: {issue.title}</p>
                    <p>description: {issue.description}</p>
                    <p>author: {issue.author.name}</p>
                    <p>assignee: {issue.assignee.name}</p>
                </div>
            </li>
        })}
    </ul>
};
Running the frontend
With these components in place, run npm run start and the frontend will launch at localhost:3000. Navigate there, and when you click Log In you’ll see the Okta login screen. Log in using your Okta Developer account credentials and you’ll be redirected to the Home component. You should see a link to take you to the “issue tracker.” Clicking this link will show you the page populated by data from your GraphQL API.
Go deeper with Okta
You should now have a Laravel GraphQL API secured by Okta which, as you’ve seen, is easy to integrate with your projects and can provide secure, extensible authentication to your applications with minimal configuration.
Laravel, React, and GraphQL are not all that Okta can offer you, however. Check out the huge list of supported integrations, and you’ll be sure to find something that suits your needs.
To view all the code in this tutorial, check GitHub here for the backend and here for the frontend.
If you enjoyed working through this tutorial, you can keep up with our content for developers by following us on Twitter and subscribing to our YouTube channel. If you have any questions, or you want to add suggestions for future tutorials, please add a comment below.
Cameron is a full-stack dev living and working in Melbourne. He's committed himself to the never-ending journey of understanding the intricacies of quality code, developer productivity, and job satisfaction.
Okta Developer Blog Comment Policy
We welcome relevant and respectful comments. Off-topic comments may be removed.