How to Build a Flask SCIM Server Configured for Use with Okta
At a very high level, the SCIM (System for Cross-Identity Management) protocol exists to provision and sync users and groups across various, independent systems. There is some room for nuance in the SCIM spec. In this post we will take a look at some basic SCIM operations. We’ll peek under the hood at the flow between Okta and a SCIM server built in Flask using PostgreSQL as our app database. Even if you’re not a Python dev, hopefully you can take away some of the concepts in this guide for your own SCIM implementation.
What You’ll Need
Setting Up the Flask Server and Postgres DB

- Clone the repo found here, open terminal and
cdinto the project root. - Create a new virtualenv in the root folder with
virtualenv env. - Run the virtual environment with
source env/bin/activate. - Install necessary Python packages with
pip install -r requirements.txt. - Install Postgres.
- Create a new Postgres database named
scim. Enter thepsqlshell by opening a new terminal tab and typingpsql postgres. Create the DB withCREATE DATABASE scim;(Run\listto double-check the database has been created). - Go back to the terminal tab that is in the flask app root. Run the following commands to create migrations and tables in the
scimdatabase:python manage.py db initpython manage.py db migratepython manage.py db upgrade
Feel free to hop back to your Postgres tab and run
\c scimto navigate into the scim db, then\dtto see your new tables:groups,users,link. (linkis a table facilitating the many-to-many relationship between users and groups.) - Everything should be set up now to run the server locally. Finally, run
python app.pyto do so. You should now have your SCIM server running onhttp://localhost:5000.
Set Up Ngrok to Route Requests From Okta to Localhost
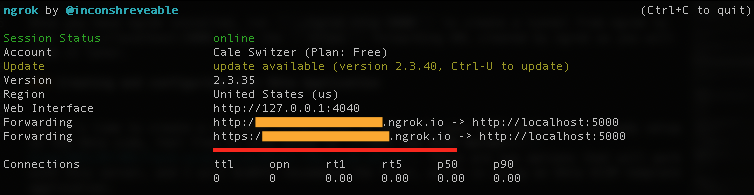
Once you have ngrok installed, run ./ngrok http 5000 to create a tunnel from ngrok to your http://localhost:5000. Copy the https Forwarding URL created by ngrok as you will need it later.
Creating and Configuring Your Okta Application
Now it’s time to create a new SCIM integration in Okta. If your SCIM app(s) are already set up on the Okta side, feel free to skip ahead to Test the SCIM Server. There are two options that will work with this server, and I will ALWAYS recommend the first, which is to use an Okta SCIM template application.
Option 1: SCIM Template App
- In your Okta dashboard, go to Applications -> Applications, then click the Browse App Catalogue button. Search for SCIM 2.0 Test App (Header Auth) and click the Add button once you have it pulled up.
- In the General Settings tab, click Next.
- We will set this up as a SWA application, so in the Sign-On Options tab, click Secure Web Authentication.
- Click Done.
- Tab over to Provisioning and click Configure API Integration.
- Check Enable API integration.
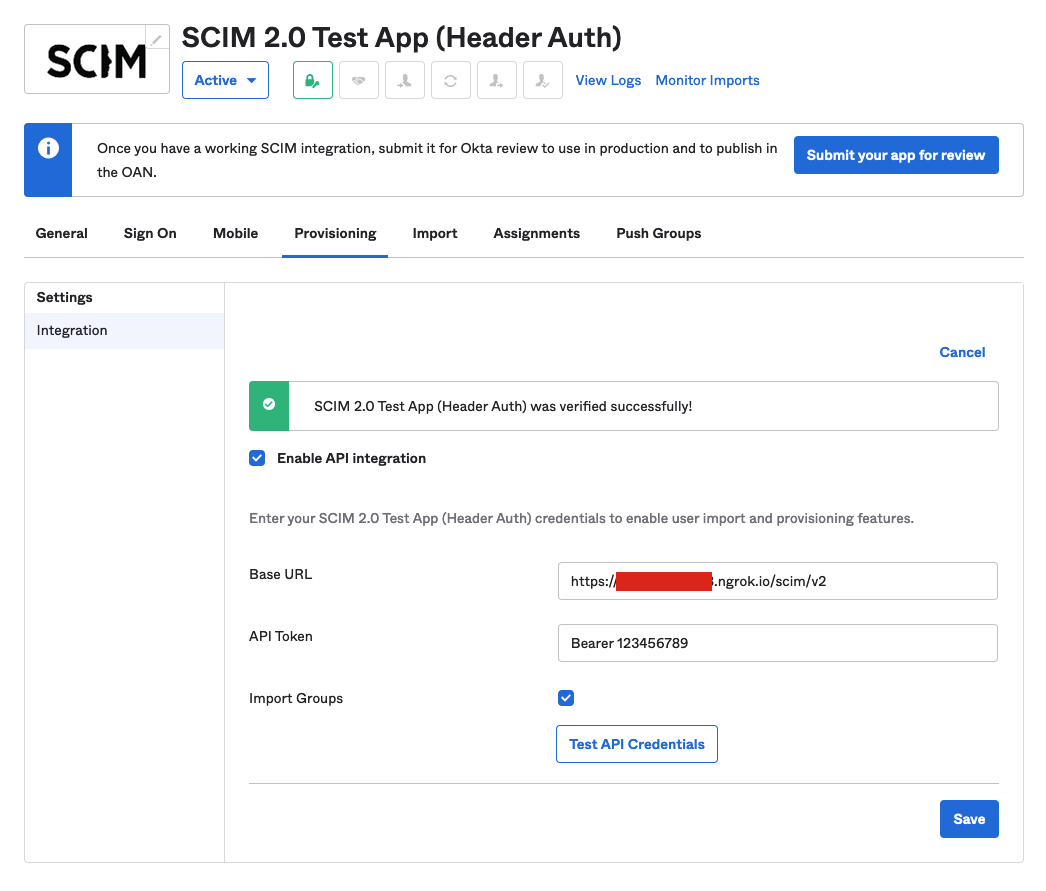
- In the Base URL field, paste in the ngrok url you generated above with /scim/v2 appended to the end. In the API Token field, type Bearer 123456789. (Later on we will go over how to customize this auth header, but out-of-the-box, the SCIM server expects this value.)
-
Click Test API Credentials and you should get a success message like the below:
You can check the ngrok logs by navigating to
http://localhost:4040to see the request from Okta as well as the response from the SCIM server.
-
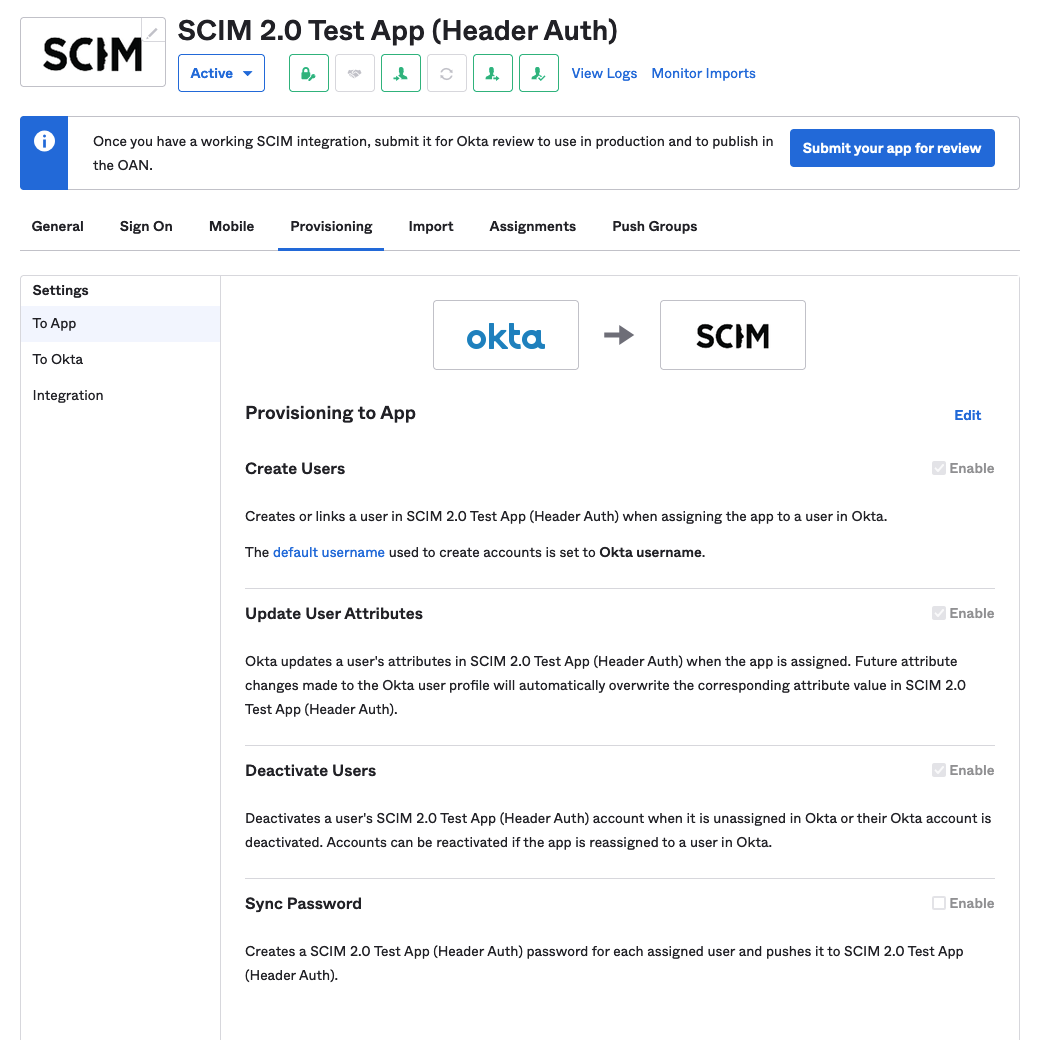
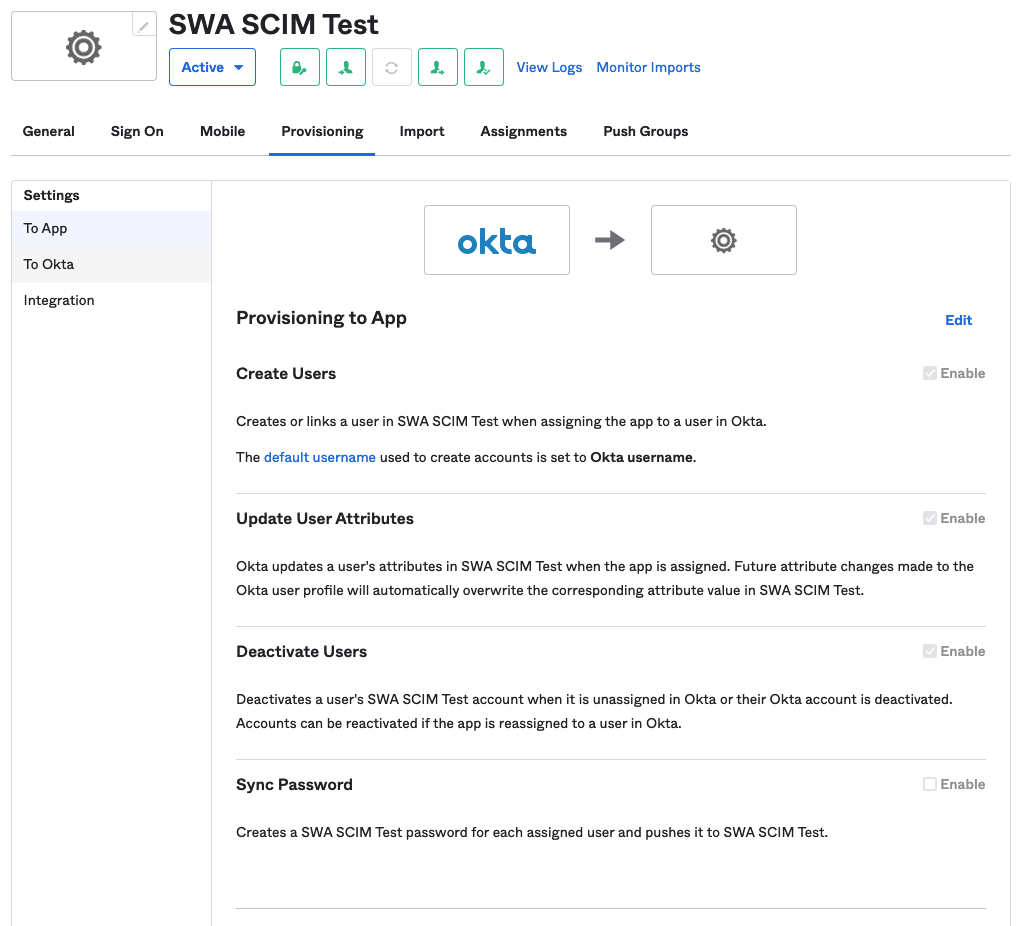
Click Save. Now your Provisoning tab will look a bit different.
- Click Edit next to Provisioning to App and check off:
- Create Users
- Update User Attributes
- Deactivate Users
And Save.
Option 2: Enable SCIM Provisioning for Existing App Integration Wizard (AIW) App
Feel free to skip over this section to Test the SCIM Server if you set up your SCIM integration above.
- In your Okta dashboard, go to Applications -> Applications, then click the Create App Integration button. For this setup we will select SWA - Secure Web Authentication. Click Next.
- You can put whatever you’d like for the App Name and App Login Page URL, as we will just be loking at the SCIM functionality and not the SWA aspect of this app. Click Finish.
- In the General tab of the app, click Edit and toggle Provisioning from None to SCIM. Click Save.
-
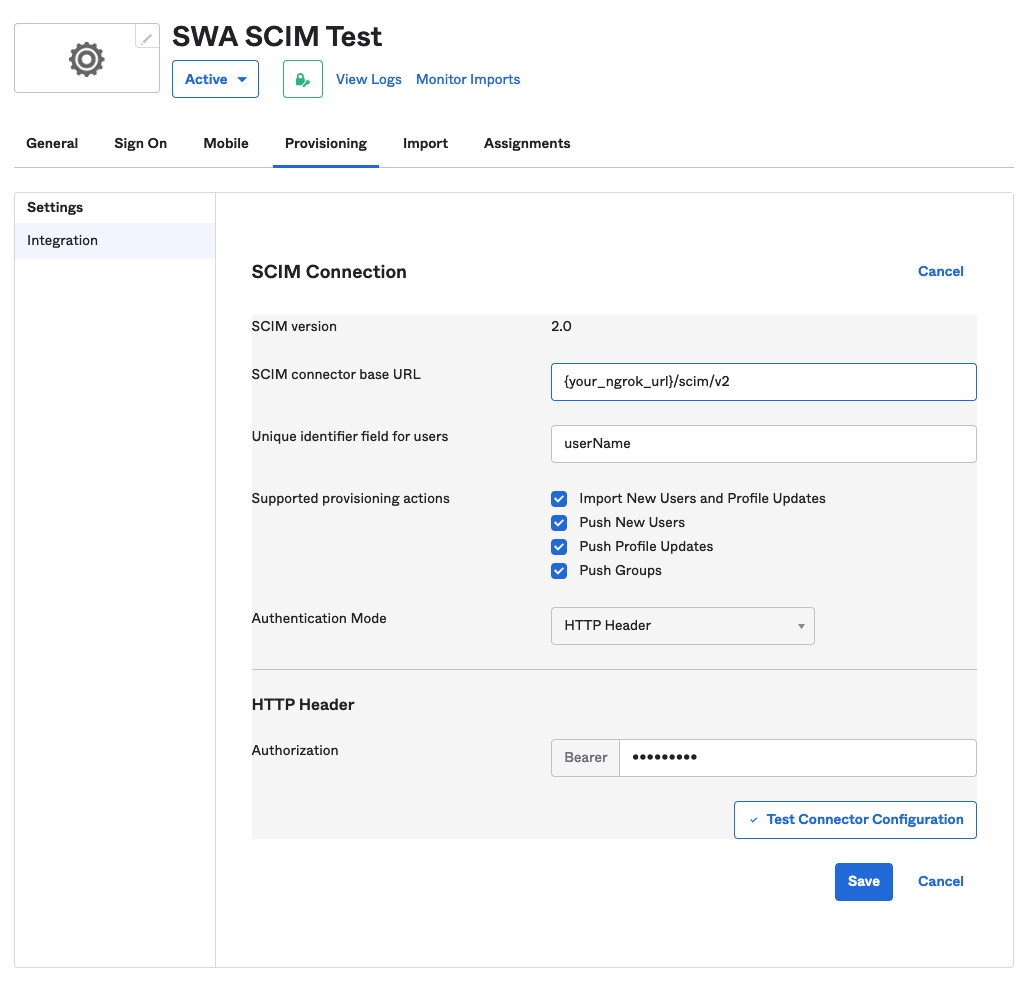
Your app should now have a Provisioning tab. Tab over to it and fill out the integration settings to match those in the image below. Make the Authorization header 123456789. You can change this later in the SCIM flask app.
-
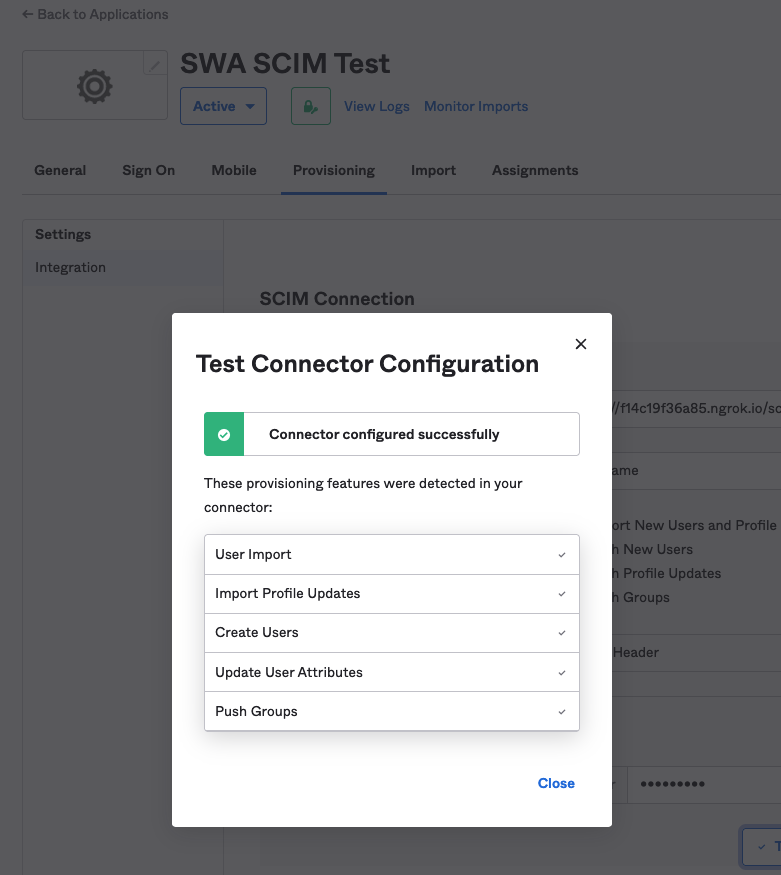
Click Test Connector Configuration and you should see the following success confirmation:
-
You can now click Save.
You can navigate to
http://localhost:4040to see the request from Okta on this request, as well as the response from the SCIM server.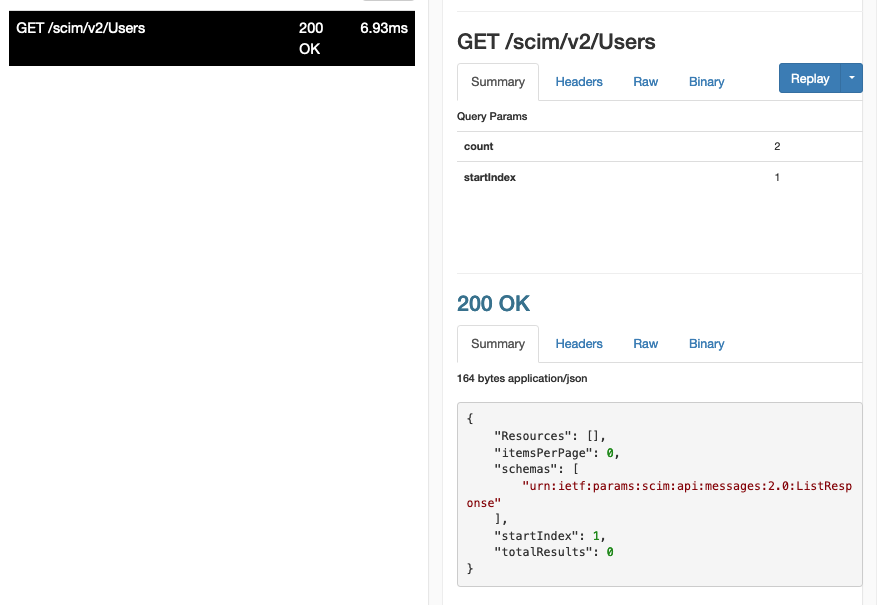
- Now your Provisoning tab will look a bit different. Click Edit next to Provisioning to App and check off:
- Create Users
- Update User Attributes
- Deactivate Users
And Save.
You should now be set on the Okta side to start testing the SCIM server.

What Did We Just Do?
Before we go ahead and test our SCIM server, let’s talk a bit about what we did in the setup steps above. Essentially we set up the following 3 components:
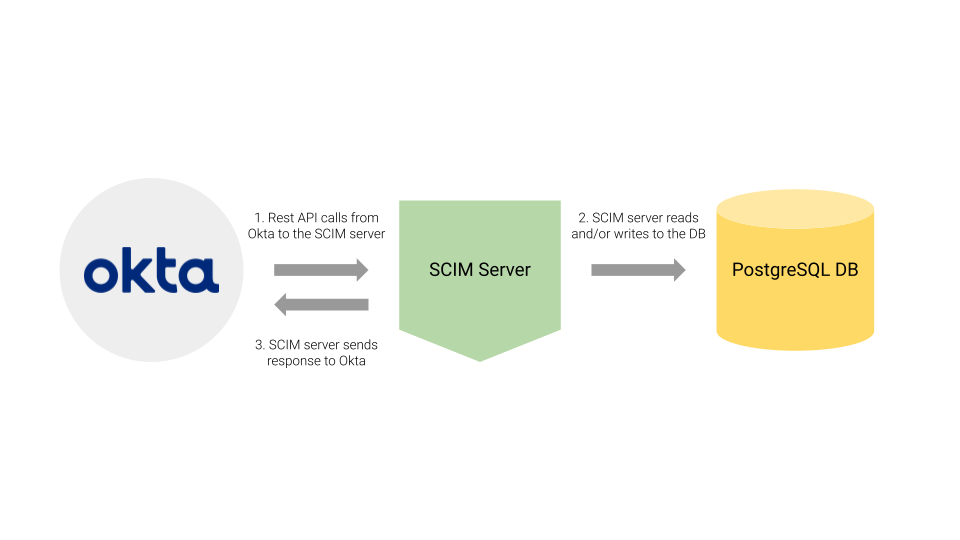
In this setup, Okta is the source of truth for user data. The SCIM server opens up four endpoints locally, which Okta is able to access thanks to the routing capabilities of ngrok. These endpoints are:
https://localhost:5000/scim/v2/Usershttps://localhost:5000/scim/v2/Users/{user_id}https://localhost:5000/scim/v2/Groupshttps://localhost:5000/scim/v2/Groups/{group_id}
These endpoints trigger CRUD operations based off the requests from Okta. Some examples of these calls:
CREATE
Okta Examples:
- When a user is assigned to the Okta app, Okta will make a
POSTto/scim/v2/Users - When a group is assigned to the Okta app, Okta will make iterative
POSTs to/scim/v2/Userswith each member of the group - When using Push Groups to add a new group to the Okta app, Okta sends a
POSTto/scim/v2/Groups
READ
Okta Examples:
- When importing users & groups from the external app Okta sends a
GETto/scim/v2/Usersand/orGETto/scim/v2/Groups - When getting all (or filtered) users from the external app, Okta sends a
GETto/scim/v2/Users - When getting a sole user from the external app, Okta sends a
GETto/scim/v2/Users/{user_id} - When getting all (or filtered) groups from the external app, Okta sends a
GETto/scim/v2/Groups - When getting a sole group from the external app, Okta sends a
GETto/scim/v2/Groups/{group_id}
With the exception of import, these actions are initiated by Okta prior to a CREATE, UPDATE or DELETE action. You can think of these calls as a sync verification step.
UPDATE
Okta Examples:
- When updating user attributes in Okta, Okta sends a
PUTorPATCHto/scim/v2/Users/{user_id} - When assigning or unassigning a user that already exists in external app DB, Okta sends a
PUTorPATCHto/scim/v2/Users/{user_id} - When changing membership of a pushed Okta group, Okta sends a
PUTorPATCHto/scim/v2/Groups/{group_id}
DELETE
Okta Examples:
- When selecting “Delete the group in target app” after selecting “Unlink pushed group” in the Push Groups tab, okta sends a
DELETEto/scim/v2/Groups/{group_id}
Let’s move on to testing the SCIM server to see some of these calls in action!
Test the SCIM Server
Note: I am using the SCIM template integration in the steps below. If you are using the AIW version, there may be subtle differences in some of the calls. More info here.
-
Navigate to
http://localhost:4040to see all the requests and responses taking place between Okta and the SCIM server. I will be truncating mine a bit in the examples below for brevity. -
From the section above, you saw that we set up our SCIM integration with Bearer 123456789 in the authorization header. You can change this header to whatever you’d like in the app.py file at the following line of function auth_required:
if request.headers['Authorization'].split('Bearer ')[1] == '123456789':
Replace 123456789 with whatever unique value you’d like and make sure to update this in the provisioning tab of your Okta integrations.
Note: This is just for convenience in testing - NEVER store sensitive credentials in source code. More info here.
Authentication exists to protect your endpoints from unwanted requests. In this guide we set up header authorization, but you can also use basic auth or OAuth. This tutorial doesn’t delve too deeply into this aspect of SCIM.
Assign a User
Under the Assignments tab, click Assign -> Assign to People. I assigned user obi-wan.kenobi@iamciam.dev. Here is a look at the requests and responses from Okta to my SCIM server:
- Okta Request:
GET /scim/v2/Users?filter=userName%20eq%20%22obi-wan.kenobi%40iamciam.dev%22&startIndex=1&count=100
Okta will first run a GET with a userName filter query parameter to see if the user already exists in the external app, since no external ID for the user yet exists to link them to the Okta user.
- SCIM Server Response:
200 OK
{
    "Resources": [],
    "itemsPerPage": 0,
    "schemas": [
        "urn:ietf:params:scim:api:messages:2.0:ListResponse"
    ],
    "startIndex": 1,
    "totalResults": 0
}
This response tells Okta that the user does not currently exist in the database and thus informs the next call - a
POSTto create the user.
- Okta Request:
POST /scim/v2/Users
{
    "schemas": [
        "urn:ietf:params:scim:schemas:core:2.0:User"
    ],
    "userName": "obi-wan.kenobi@iamciam.dev",
    "name": {
        "givenName": "Obi-Wan",
        "familyName": "Kenobi"
    },
    "emails": [
        {
            "primary": true,
            "value": "obi-wan.kenobi@iamciam.dev",
            "type": "work"
        }
    ],
    "displayName": "Obi-Wan Kenobi",
    "locale": "en-US",
    "externalId": "00use6vjvehodmsQb4x6",
    "groups": [],
    "password": "gl^m&qWZ",
    "active": true
}
Note: The above password value is randomly generated by Okta as many external apps require this value on user creation. As the app is federated, this password cannot be used to login.
- SCIM Server Response:
201 CREATED
{
    "active": true,
    "displayName": "Obi-Wan Kenobi",
    "emails": [
        {
            "primary": true,
            "type": "work",
            "value": "obi-wan.kenobi@iamciam.dev"
        }
    ],
    "externalId": "00use6vjvehodmsQb4x6",
    "groups": [],
    "id": "289383d9-ff3a-48bb-99ea-3048762267c7",
    "locale": "en-US",
    "meta": {
        "resourceType": "User"
    },
    "name": {
        "familyName": "Kenobi",
        "givenName": "Obi-Wan",
        "middleName": null
    },
    "schemas": [
        "urn:ietf:params:scim:schemas:core:2.0:User"
    ],
    "userName": "obi-wan.kenobi@iamciam.dev"
}
- Now If you navigate to your local scim database and run
select * from users;, you should see the assigned user in the database.

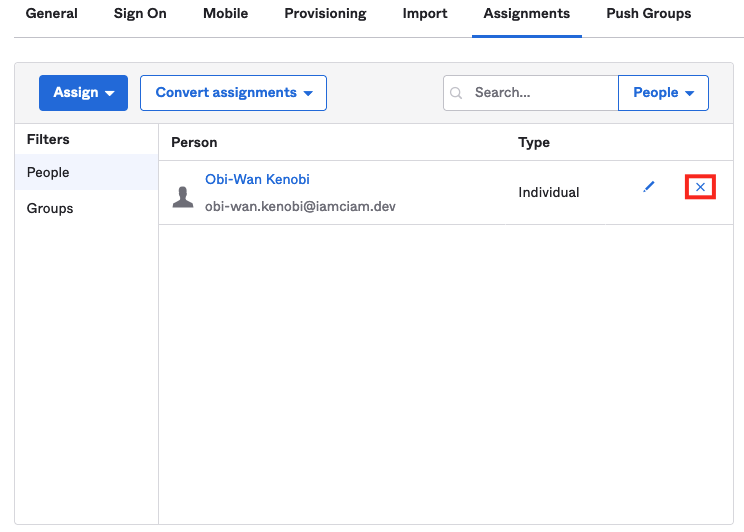
Unassign a User
Let’s go ahead and unassign the user we just assigned in Okta. Under Assignments, click the X next to the user we just assigned:
The request/response should look like this:
- Okta Request:
PATCH /scim/v2/Users/289383d9-ff3a-48bb-99ea-3048762267c7
{
    "schemas": [
        "urn:ietf:params:scim:api:messages:2.0:PatchOp"
    ],
    "Operations": [
        {
            "op": "replace",
            "value": {
                "active": false
            }
        }
    ]
}
Okta does not delete an unassigned user but rather updates their
activevalue tofalse.
- SCIM Server Response:
204 NO CONTENT
- And sure enough, if you run that same
select * from users;in the scim db, you will see the user is nowactive: false:

Assign a Group
Under the Assignments tab, click Assign -> Assign to Groups. I assigned group Droids. Note that this behavior is similar to the way individual users were assigned above. Okta will iterate through the group membership and create the users in the external SCIM server - but the Group itself won’t be made. That is done in Push Groups, which we will handle later. Here is a look at the requests and responses from Okta to the SCIM server:
- Okta Request:
GET /scim/v2/Users?filter=userName%20eq%20%22c-3po%40iamciam.dev%22&startIndex=1&count=100
- SCIM Server Response:
200 OK
{
    "Resources": [],
    "itemsPerPage": 0,
    "schemas": [
        "urn:ietf:params:scim:api:messages:2.0:ListResponse"
    ],
    "startIndex": 1,
    "totalResults": 0
}
- Okta Request:
POST /scim/v2/Users
{
    "schemas": [
        "urn:ietf:params:scim:schemas:core:2.0:User"
    ],
    "userName": "c-3po@iamciam.dev",
    "name": {
        "givenName": "C",
        "familyName": "3PO"
    },
    "emails": [
        {
            "primary": true,
            "value": "c-3po@iamciam.dev",
            "type": "work"
        }
    ],
    "displayName": "C 3PO",
    "locale": "en-US",
    "externalId": "00usemeo53HWWPYy14x6",
    "groups": [],
    "password": "wA&&cprB",
    "active": true
}
- SCIM Server Response:
201 CREATED
{
    "active": true,
    "displayName": "C 3PO",
    "emails": [
        {
            "primary": true,
            "type": "work",
            "value": "c-3po@iamciam.dev"
        }
    ],
    "externalId": "00usemeo53HWWPYy14x6",
    "groups": [],
    "id": "478c4cf4-1aa3-41a1-93da-4c154c5955e0",
    "locale": "en-US",
    "meta": {
        "resourceType": "User"
    },
    "name": {
        "familyName": "3PO",
        "givenName": "C",
        "middleName": null
    },
    "schemas": [
        "urn:ietf:params:scim:schemas:core:2.0:User"
    ],
    "userName": "c-3po@iamciam.dev"
}
- There are 3 members in my Droids group: C-3P0, R2-D2, and BB-8. The above req/resp chain repeats for the other 2 users. Now when I run
select * from users;in the scim database I can see the assigned users:

Push Groups
As mentioned above, assigning a group in Okta only adds the users to my SCIM server, not the Group itself. Push Groups is an Okta-specific functionality. It gives you the granularity to assign Okta group members to a SCIM application without automatically adding that group to the external app. More info can be found here In order to add a Group to our external app, tab over to Push Groups in your Okta app integration. Click Push Groups -> Find groups by name and select the group you assigned above. Make sure Push group memberships immediately is checked and click Save. Two calls should be made by Okta - one creating the group itself and another updating the group membership. Here are the requests and responses for my Droids group push:
- Okta Request:
POST /scim/v2/Groups
{
    "schemas": [
        "urn:ietf:params:scim:schemas:core:2.0:Group"
    ],
    "displayName": "Droids",
    "members": [
        {
            "value": "cc2573a1-e1c4-491d-a3db-ae4a2e078d61",
            "display": "bb-8@iamciam.dev"
        },
        {
            "value": "478c4cf4-1aa3-41a1-93da-4c154c5955e0",
            "display": "c-3po@iamciam.dev"
        },
        {
            "value": "34e14e58-f0fe-4e9d-aeb2-0da25fa6626d",
            "display": "r2-d2@iamciam.dev"
        }
    ]
 }

 - *SCIM Server Response:*

```http
201 CREATED
{
    "displayName": "Droids",
    "id": "b446521a-a65b-4c0b-a5ee-0a15e8e3e908",
    "members": [],
    "meta": {
        "resourceType": "Group"
    },
    "schemas": [
        "urn:ietf:params:scim:schemas:core:2.0:Group"
    ]
}
- Okta Request:
PATCH /scim/v2/Groups/b446521a-a65b-4c0b-a5ee-0a15e8e3e908
{
    "schemas": [
        "urn:ietf:params:scim:api:messages:2.0:PatchOp"
    ],
    "Operations": [
        {
            "op": "add",
            "path": "members",
            "value": [
                {
                    "value": "cc2573a1-e1c4-491d-a3db-ae4a2e078d61",
                    "display": "bb-8@iamciam.dev"
                },
                {
                    "value": "478c4cf4-1aa3-41a1-93da-4c154c5955e0",
                    "display": "c-3po@iamciam.dev"
                },
                {
                    "value": "34e14e58-f0fe-4e9d-aeb2-0da25fa6626d",
                    "display": "r2-d2@iamciam.dev"
                }
            ]
        }
    ]
}
- SCIM Server Response:
200 OK
 {
    "displayName": "Droids",
    "id": "b446521a-a65b-4c0b-a5ee-0a15e8e3e908",
    "members": [
        {
            "display": "c-3po@iamciam.dev",
            "value": "478c4cf4-1aa3-41a1-93da-4c154c5955e0"
        },
        {
            "display": "bb-8@iamciam.dev",
            "value": "cc2573a1-e1c4-491d-a3db-ae4a2e078d61"
        },
        {
            "display": "r2-d2@iamciam.dev",
            "value": "34e14e58-f0fe-4e9d-aeb2-0da25fa6626d"
        }
    ],
    "meta": {
        "resourceType": "Group"
    },
    "schemas": [
        "urn:ietf:params:scim:schemas:core:2.0:Group"
    ]
 }
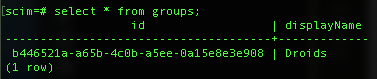
And with this, you should now see your group in the SCIM database after running select * from groups;:
And you can view the link table, which displays the many-to-many relationship between the users and groups. You can see this with select * from link;:

In Conclusion
This covers the basic functionality of SCIM integration from Okta. Other use cases haven’t been tested extensively and may need tweaking over time, but hopefully, this guide helps developers to better understand Okta’s SCIM functionality. Got questions? You can leave them in the comments below! Want to stay in touch? Follow our social channels: @oktadev on Twitter, Okta for Developers on LinkedIn, Twitch, and YouTube.
Okta Developer Blog Comment Policy
We welcome relevant and respectful comments. Off-topic comments may be removed.