Servlet Authentication with Java

It can be very satisfying to build an application “the hard way”, using few conveniences. This approach helps you understand core development principles and the inner workings of everyday abstractions. That’s why today, you’ll build an application from the ground up using Java Servlets with a login form.
There are more modern, technologically savvy ways to handle authentication within your application, namely OAuth 2.0 and OIDC, which I will touch upon later. However, this post is for those who want nothing handed to them! Well, except for some sample code.
The sample app you’ll build will make use of the Okta Authentication API for user authentication. A true old school approach would be to build an identity service all yourself, but that would transform this already long blog post into a massive novel. Using Okta gives you a simple, secure user store for your application.
To use the Okta API, you’ll make use of the Okta Java Authentication SDK. This is a simple client library for interacting with the Okta Authentication API.
Let’s get started!
NOTE: Throughout this post, I’ll use Eclipse, as it is my preferred IDE. However, you can use any IDE or editor you please.
Table of Contents
- Create an Unsecured JSP Application
- Create User Accounts in the Okta Admin Console
- Protect Your Application Using Servlet Login
- Specify the JSP Pages for Login and Profile
- Create the Login Form
- What About OAuth 2.0/OIDC?
- Further Reading
Note: In May 2025, the Okta Integrator Free Plan replaced Okta Developer Edition Accounts, and the Okta CLI was deprecated.
We preserved this post for reference, but the instructions no longer work exactly as written. Replace the Okta CLI commands by manually configuring Okta following the instructions in our Developer Documentation.
Create an Unsecured JSP Application
To get started, we’ll use a simple application I wrote that shares secret family recipes. The code that powers this app can be found on my GitHub.
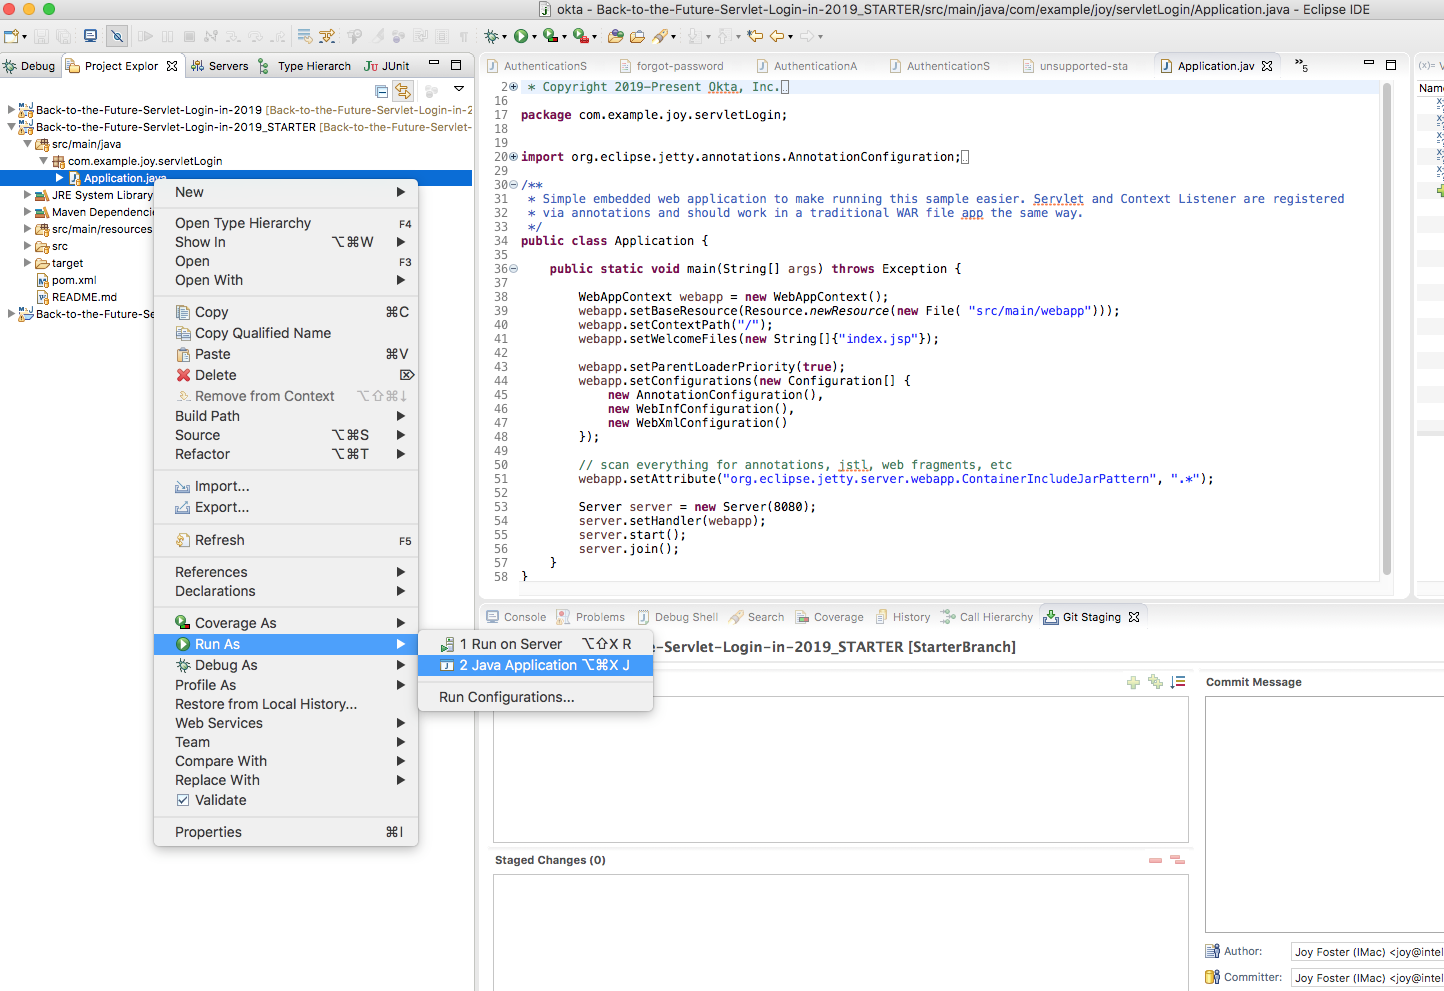
Because we’ll be modifying this application, you’ll want to clone or download this starter code. Once you have the code in your development environment, go ahead and run it via the Eclipse run menu, command line, or your preferred execution environment. The com.example.joy.servlet.login.Application class is the entry point for the application, as seen below:
Once you run it, you’ll be able to view the application at http://localhost:8080 and immediately view my secret family recipes! =)
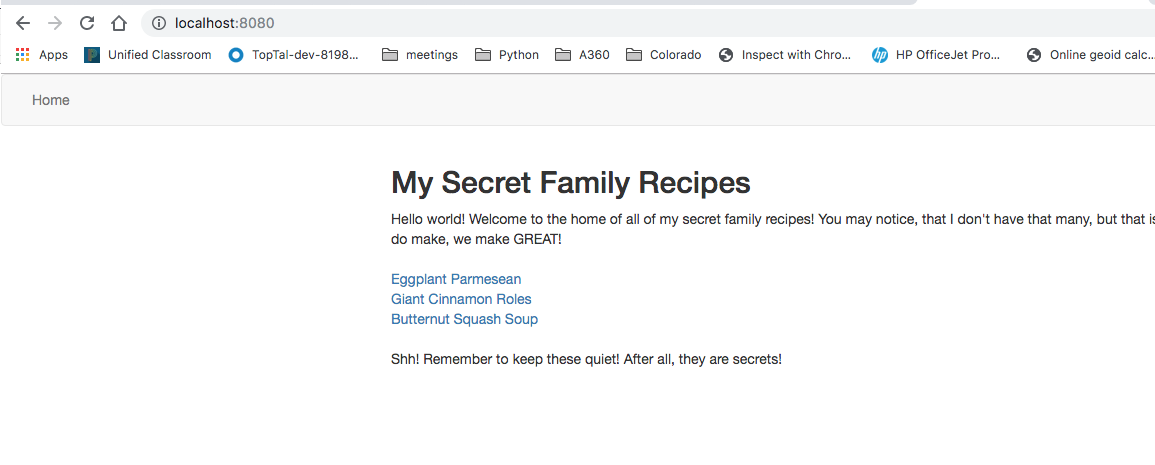
Uh oh, now anyone can view my top-secret Eggplant Parmesan recipe! What should we do now? Let’s secure the application!
Create User Accounts in the Okta Admin Console
Before we implement user authentication in this application, we need to create some users inside Okta that we can later use to log into the app.
If you haven’t already, head on over to developer.okta.com to create a free-forever developer account.
Once you have your developer account, log into the Okta Admin Console and click on Directory > People and then click Add Person. Fill out the form and fill in some basic information. These user accounts you’re creating will be used later on.
- First Name:
Marty - Last Name:
McFly - Username/Email:
MartyMcFly@gmail.com - Set password as an admin
I’ve chosen to create Marty McFly as a user. I figure if my secret recipes somehow become public, he can always go back to 1955 and tell my grandmother not to trust me with them!
NOTE: You can import multiple users from CSV files by selecting the More Actions menu button in the Directory > People section of the Okta Admin Console.
Protect Your Application Using Servlet Login
Now we are ready to actually add authentication into the app. I’m going to step you through all of the project code and explain everything, but if you want to cheat and just view the final application, you can find it here:
First add the appropriate dependencies to the pom.xml file. In <properties> section, add the following two properties:
<okta.sdk.version>1.5.2</okta.sdk.version>
<okta.auth.version>1.0.0</okta.auth.version>
Next, in the <dependencies> section, add the following dependencies:
<dependency>
    <groupId>com.okta.authn.sdk</groupId>
    <artifactId>okta-authn-sdk-api</artifactId>
    <version>${okta.auth.version}</version>
</dependency>
<dependency>
    <groupId>com.okta.authn.sdk</groupId>
    <artifactId>okta-authn-sdk-impl</artifactId>
    <version>${okta.auth.version}</version>
    <scope>runtime</scope>
</dependency>
<dependency>
    <groupId>com.okta.sdk</groupId>
    <artifactId>okta-sdk-httpclient</artifactId>
    <version>${okta.sdk.version}</version>
    <scope>runtime</scope>
</dependency>
Your final pom.xml file should look something like this:
<project xmlns="http://maven.apache.org/POM/4.0.0" xmlns:xsi="http://www.w3.org/2001/XMLSchema-instance"
  xsi:schemaLocation="http://maven.apache.org/POM/4.0.0 http://maven.apache.org/xsd/maven-4.0.0.xsd">
    <modelVersion>4.0.0</modelVersion>

    <groupId>com.example.joy</groupId>
    <artifactId>servletLogin</artifactId>
    <version>0.0.1-SNAPSHOT</version>
    <packaging>jar</packaging>
    <name>servletLogin</name>

    <properties>
        <project.build.sourceEncoding>UTF-8</project.build.sourceEncoding>
        <maven.compiler.target>8</maven.compiler.target>
        <maven.compiler.source>8</maven.compiler.source>
        <jetty.version>9.4.18.v20190429</jetty.version>
        <okta.sdk.version>1.5.2</okta.sdk.version>
        <okta.auth.version>1.0.0</okta.auth.version>
        <jstl.version>1.2</jstl.version>
    </properties>

     <dependencies>
        <dependency>
            <groupId>com.okta.authn.sdk</groupId>
            <artifactId>okta-authn-sdk-api</artifactId>
            <version>${okta.auth.version}</version>
        </dependency>
        <dependency>
            <groupId>com.okta.authn.sdk</groupId>
            <artifactId>okta-authn-sdk-impl</artifactId>
            <version>${okta.auth.version}</version>
            <scope>runtime</scope>
        </dependency>
        <dependency>
            <groupId>com.okta.sdk</groupId>
            <artifactId>okta-sdk-httpclient</artifactId>
            <version>${okta.sdk.version}</version>
            <scope>runtime</scope>
        </dependency>

        <!--Jetty dependencies start here -->
        <dependency>
            <groupId>org.eclipse.jetty</groupId>
            <artifactId>jetty-server</artifactId>
            <version>${jetty.version}</version>
        </dependency>
        <dependency>
            <groupId>org.eclipse.jetty</groupId>
            <artifactId>jetty-webapp</artifactId>
            <version>${jetty.version}</version>
        </dependency>
        <dependency>
            <groupId>org.eclipse.jetty</groupId>
            <artifactId>jetty-annotations</artifactId>
            <version>${jetty.version}</version>
        </dependency>
        <!-- Jetty Dependencies end here -->

        <!--Jetty Apache JSP dependency  -->
        <dependency>
            <groupId>org.eclipse.jetty</groupId>
            <artifactId>apache-jsp</artifactId>
            <version>${jetty.version}</version>
        </dependency>

        <!-- JSTL Dependency -->
        <dependency>
            <groupId>jstl</groupId>
            <artifactId>jstl</artifactId>
            <version>${jstl.version}</version>
        </dependency>

        <dependency>
            <groupId>ch.qos.logback</groupId>
            <artifactId>logback-classic</artifactId>
            <version>1.2.3</version>
            <scope>runtime</scope>
        </dependency>
    </dependencies>
</project>
Update the Servlet and Listener Config
Next, we’re going to make some config changes that do the following:
- Remove the generic JSP servlet
- Add a context parameter for the Okta domain, which is later used by the Context Listener
- Add in a
profileservlet which will handle viewing the user’s profile - Add in a listener for an authenticated servlet. This will allow us to set up the authentication context via the
AuthenticationServletContextListenerclass
Open the src/main/webapp/WEB-INF/web.xml file and remove the sections that look like this:
<servlet id="jsp">
    <servlet-name>jsp</servlet-name>
    <servlet-class>org.apache.jasper.servlet.JspServlet</servlet-class>
</servlet>
<servlet-mapping>
    <servlet-name>jsp</servlet-name>
    <url-pattern>*.jsp</url-pattern>
</servlet-mapping>
And replace it with this:
<context-param>
    <param-name>orgUrl</param-name>
    <param-value>https://{yourOktaDomain}</param-value>
</context-param>

<listener>
    <listener-class>
        com.example.joy.servlet.login.AuthenticationServletContextListener
    </listener-class>
</listener>
<servlet>
    <servlet-name>profile</servlet-name>
    <servlet-class>com.example.joy.servlet.login.UserProfileServlet</servlet-class>
</servlet>
<servlet-mapping>
    <servlet-name>profile</servlet-name>
    <url-pattern>/profile</url-pattern>
</servlet-mapping>
Replace {yourOktaDomain} with your own Okta organization URL (which can be found at the top-right hand side of your Okta Admin Console dashboard).
Create an OktaFilter Class to Confirm Authentication
At this point, if you tried to run the project, it would error out because the AuthenticationServletContext and UserProfileServlet classes haven’t been defined. So let’s define them and the classes that depend on them!
The OktaFilter class is a basic implementation of a Servlet Filter, code that is hit on every request within a servlet’s context. I will show you later how we apply this filter. This particular filter simply checks to see if the user is logged in, and if not, redirects them to the login page. It also allows a few pages (the login and forget password pages) to be shown if the user is not authenticated, as they need to be able to see those pages when not logged in.
Under the com.example.joy.servlet.login package, create the OktaFilter class:
package com.example.joy.servlet.login;

import com.okta.authn.sdk.resource.User;

import javax.servlet.Filter;
import javax.servlet.FilterChain;
import javax.servlet.FilterConfig;
import javax.servlet.ServletException;
import javax.servlet.ServletRequest;
import javax.servlet.ServletResponse;
import javax.servlet.http.HttpServletRequest;
import javax.servlet.http.HttpServletResponse;
import java.io.IOException;

public class OktaFilter implements Filter {

    static final String USER_SESSION_KEY = User.class.getName();

    public void init(FilterConfig filterConfig) {}

    public void doFilter(ServletRequest req, ServletResponse resp, FilterChain chain) throws IOException, ServletException {

        HttpServletRequest request = (HttpServletRequest) req;
        HttpServletResponse response = (HttpServletResponse) resp;
        String path = request.getServletPath();

        // allow anonymous access to static resources and anything under /authn/ and the root index.jsp
        if (isStaticAsset(request) || path.startsWith("/authn/") ) {
            chain.doFilter(request, response);
            return;
        }

        // check if we have a current user in the session
        if (isAuthenticated(request)) {
            chain.doFilter(request, response);
            return;
        }

        // no authenticated user found in session
        // redirect to /authn/login
        response.sendRedirect("/authn/login");
    }

    public void destroy() {}

    private boolean isAuthenticated(HttpServletRequest request) {
        return request.getSession(false) != null
            && request.getSession().getAttribute(USER_SESSION_KEY) != null;
    }

    private boolean isStaticAsset(HttpServletRequest request) {
        String path = request.getServletPath();
        return path.startsWith("/static/") || path.equals("/favicon.ico");
    }
}
Create A Simplified State Handler
Next, create the ExampleAuthenticationStateHandler class in the same package.
This class is a simplified version of a state handler that handles success states, unknown states, and redirects. These are essentially callback functions to be called by the Okta Authentication SDK after an action has been completed in order to continue work in the application. It handles things such as a password-expired, locked out, or multi-factor challenge required states.
The code should look like this:
package com.example.joy.servlet.login;

import com.okta.authn.sdk.AuthenticationStateHandlerAdapter;
import com.okta.authn.sdk.resource.AuthenticationResponse;

import javax.servlet.http.HttpServletRequest;
import javax.servlet.http.HttpServletResponse;
import java.io.IOException;

class ExampleAuthenticationStateHandler extends AuthenticationStateHandlerAdapter {

    static final String PREVIOUS_AUTHN_RESULT = AuthenticationResponse.class.getName();

    private final HttpServletRequest request;
    private final HttpServletResponse response;

    ExampleAuthenticationStateHandler(HttpServletRequest request, HttpServletResponse response) {
        this.request = request;
        this.response = response;
    }

    @Override
    public void handleSuccess(AuthenticationResponse successResponse) {
        // the last request was a success, but if we do not have a session token
        // we need to force the flow to start over
        if (successResponse.getSessionToken() != null) {
            // if we have a Session Token add the corresponding user to the Session
            request.getSession(true)
                .setAttribute(OktaFilter.USER_SESSION_KEY, successResponse.getUser());
        }

        String relayState = successResponse.getRelayState();
        String dest = relayState != null ? relayState : "/";
        redirect(dest, successResponse);
    }

    public void handleUnknown(AuthenticationResponse unknownResponse) {
        redirect("/authn/login?error=Unsupported State: "
            + unknownResponse.getStatus().name(), unknownResponse);
    }

    private void redirect(String location, AuthenticationResponse authenticationResponse) {
        try {
            setAuthNResult(authenticationResponse);
            response.sendRedirect(location);
        } catch (IOException e) {
            throw new IllegalStateException("failed to redirect.", e);
        }
    }

    private void setAuthNResult(AuthenticationResponse authenticationResponse) {
        request.getSession(true)
            .setAttribute(ExampleAuthenticationStateHandler.PREVIOUS_AUTHN_RESULT,
                          authenticationResponse);
    }
}
Create an AuthenticationActions Class
Next, create the AuthenticationActions class in the same package.
This class contains the logic needed to collect and display JSPs to advance a user through [Okta’s Authentication State Machine] (https://developer.okta.com/docs/api/resources/authn#transaction-state)
This class contains all the hooks that interact with Okta’s Authentication API. Those listed here are some of the most basic actions we can hook into our application (login and logout) but this class could contain more advanced actions such as account unlocking/recovery, multi-factor verification, forgot password, etc.
package com.example.joy.servlet.login;

import java.io.IOException;

import javax.servlet.ServletException;
import javax.servlet.http.HttpServletRequest;
import javax.servlet.http.HttpServletResponse;

import com.okta.authn.sdk.AuthenticationException;
import com.okta.authn.sdk.client.AuthenticationClient;

class AuthenticationActions {

    private final AuthenticationClient authenticationClient;

    AuthenticationActions(AuthenticationClient authenticationClient) {
        this.authenticationClient = authenticationClient;
    }

    void login(HttpServletRequest request, HttpServletResponse response)
        throws AuthenticationException {

        String username = request.getParameter("username");
        String password = request.getParameter("password");

        authenticationClient.authenticate(username,
            password.toCharArray(),
            "/",
            new ExampleAuthenticationStateHandler(request, response));
    }

    void logout(HttpServletRequest request, HttpServletResponse response) throws IOException {

        if (request.getSession(false) != null) {
            request.getSession().invalidate();
        }
        response.sendRedirect("/authn/login");
    }

    static void forward(String path, HttpServletRequest request, HttpServletResponse response) {
        try {
            request.getRequestDispatcher(path).forward(request, response);
        } catch (ServletException | IOException e) {
            throw new IllegalStateException("Unable to forward to path: "+ path, e);
        }
    }
}
Create a AuthenticationLambdaServlet Class
Next up is the AuthenticationLambdaServlet class. This code represents a servlet that is reused for several actions. When it is constructed, a user passes in functions for GET and POST handlers. I will discuss this a bit more when we go over the next class.
And, by now I assume you see the pattern, but in case not: you should also create this class in the same package. =)
package com.example.joy.servlet.login;

import com.okta.authn.sdk.AuthenticationException;
import com.okta.sdk.resource.ResourceException;

import javax.servlet.ServletException;
import javax.servlet.http.HttpServlet;
import javax.servlet.http.HttpServletRequest;
import javax.servlet.http.HttpServletResponse;
import java.io.IOException;

import static com.example.joy.servlet.login.AuthenticationActions.forward;

class AuthenticationLambdaServlet extends HttpServlet {
    private final AuthenticationServletHandler renderConsumer;
    private final AuthenticationServletHandler postConsumer;

    AuthenticationLambdaServlet(final String path, AuthenticationServletHandler postConsumer) {
        this((request, response) -> forward(path, request, response), postConsumer);
    }

    AuthenticationLambdaServlet(AuthenticationServletHandler renderConsumer,
            AuthenticationServletHandler postConsumer) {
        this.renderConsumer = renderConsumer;
        this.postConsumer = postConsumer;
    }

    @Override
    protected void doGet(HttpServletRequest req, HttpServletResponse resp) throws ServletException, IOException {

        if (renderConsumer == null) {
            super.doGet(req, resp);
            return;
        }

        try {
            renderConsumer.service(req, resp);
        } catch (AuthenticationException | ResourceException e) {
            req.setAttribute("error", e);
            forward("/WEB-INF/jsp/authn/login.jsp", req, resp);
        }
    }

    @Override
    protected void doPost(HttpServletRequest req, HttpServletResponse resp) throws ServletException, IOException {

        if (postConsumer == null) {
            super.doGet(req, resp);
            return;
        }

        try {
            postConsumer.service(req, resp);
        } catch (ResourceException | AuthenticationException  e) {

            // on error, set the error attribute then render the page again
            req.setAttribute("error", e);
            doGet(req, resp);
        }
    }

    @FunctionalInterface
    interface AuthenticationServletHandler {
        void service(HttpServletRequest req, HttpServletResponse resp)
                throws ServletException, IOException, AuthenticationException;
    }
}
Create the AuthenticationServletContextListener Class
Finally, we’ve reached the AuthenticationServletContextListener class, which ties everything together. If you remember from before, the AuthenticationServletContextListener class was specified in the web.xml file. That reference tells the system to execute the contextInitialized method of the AuthenticationServletContextListener class, which dynamically creates several servlets. It creates several servlets of type AuthenticationLambdaServlet. This is the file that links a URL, like /authn/login to the /WEB-INF/jsp/authn/login.jsp view, and the login action (from the AuthenticationActions class.
This class also registers the OktaFilter to be hit for any request in this servlet context.
package com.example.joy.servlet.login;

import javax.servlet.DispatcherType;
import javax.servlet.Filter;
import javax.servlet.ServletContext;
import javax.servlet.ServletContextEvent;
import javax.servlet.ServletContextListener;
import javax.servlet.annotation.WebListener;

import com.okta.authn.sdk.client.AuthenticationClient;
import com.okta.authn.sdk.client.AuthenticationClients;
import com.example.joy.servlet.login.AuthenticationLambdaServlet.AuthenticationServletHandler;

import java.util.EnumSet;

@WebListener
public class AuthenticationServletContextListener implements ServletContextListener {

    private AuthenticationActions actions;

    public void contextInitialized(ServletContextEvent sce) {

        // configuration can be pulled from various sources, see https://github.com/okta/okta-auth-java#configuration-reference
        AuthenticationClient authenticationClient = AuthenticationClients.builder()
            .setOrgUrl(sce.getServletContext().getInitParameter("orgUrl"))
            .build();

        actions = new AuthenticationActions(authenticationClient);

        ServletContext servletContext = sce.getServletContext();
        registerFilter(servletContext, "/*", new OktaFilter());

        registerAction(servletContext,
                       "/authn/login",
                       "/WEB-INF/jsp/authn/login.jsp",
                       (request,response) -> actions.login(request, response));
        registerAction(servletContext,
                       "/authn/logout",
                       null,
                       (request,response) -> actions.logout(request, response));
    }

    public void contextDestroyed(ServletContextEvent sce) {
        actions = null;
    }

    private void registerAction(ServletContext servletContext, String path,
                                String view, AuthenticationServletHandler postHandler) {
        servletContext.addServlet(path, new AuthenticationLambdaServlet(view, postHandler))
                      .addMapping(path);
    }

    private void registerFilter(ServletContext servletContext, String path, Filter filter) {
        servletContext.addFilter(filter.getClass().getName(), filter)
            .addMappingForUrlPatterns(EnumSet.of(DispatcherType.REQUEST), true, path);
    }
}
Create the UserProfileServlet Class
What’s left? Just one more Java class and a bit of UI work!
Let’s create the final Java class, UserProfileServlet. This is a simple servlet that displays the current user’s details. This servlet ensures the user’s info is part of the request so it can be used in the user profile jsp page, which you will see soon.
package com.example.joy.servlet.login;

import com.okta.authn.sdk.resource.User;

import javax.servlet.ServletException;
import javax.servlet.annotation.WebServlet;
import javax.servlet.http.HttpServlet;
import javax.servlet.http.HttpServletRequest;
import javax.servlet.http.HttpServletResponse;
import java.io.IOException;

@WebServlet(name = "UserProfile", urlPatterns = {"/profile"})
public class UserProfileServlet extends HttpServlet {

    @Override
    protected void doGet(HttpServletRequest request, HttpServletResponse response) throws ServletException, IOException {
        // get the currently logged in user
        User user = (User) request.getSession(true)
            .getAttribute(OktaFilter.USER_SESSION_KEY);

        // add the user to the request context and render the JSP
        request.setAttribute("user", user);
        // This has also been added the example JSPs directly using:
        // <c:set var="user" value="${sessionScope.get('com.okta.authn.sdk.resource.User')}"/>

        request.getRequestDispatcher("/WEB-INF/jsp/user-profile.jsp")
            .forward(request, response);
    }
}
Specify the JSP Pages for Login and Profile
All that’s left now is to create the JSP pages to handle the login/logout/profile/etc.
Create the following file src/main/webapp/WEB-INF/jsp/user-profile.jsp:
<jsp:include page="./includes/header.jsp" />
<%@ taglib prefix="c" uri="http://java.sun.com/jsp/jstl/core" %>
<body id="samples">
  <jsp:include page="./includes/menu.jsp" />
  <div id="content" class="container">
    <div>
      <h2>My Profile</h2>
    </div>
    <table class="table table-striped">
      <thead>
        <tr>
          <th>Key</th>
          <th>Value</th>
        </tr>
      </thead>
      <tbody>
        <c:forEach items="${user.profile}" var="item">
          <tr>
            <td>${item.key}</td>
            <td>${item.value}</td>
          </tr>
        </c:forEach>
      </tbody>
    </table>
  </div>
</body>

<jsp:include page="./includes/footer.jsp" />
As you may have guessed, this file displays the user’s profile information.
To change the top navbar to include the Logout and My Profile button, update the src/main/webapp/WEB-INF/jsp/includes/menu.jsp to the following content:
<%@ taglib prefix="c" uri="http://java.sun.com/jsp/jstl/core" %>
<c:set var = "user" value = "${sessionScope.get('com.okta.authn.sdk.resource.User')}"/>

<nav class="navbar navbar-default">
  <div class="container-fluid">
    <ul class="nav navbar-nav">
      <li><a href="<c:url value="/" />">Home</a></li>
      <c:if test="${not empty user}">
        <li><a id="profile-button" href="<c:url value="/profile" />">My Profile</a></li>
      </c:if>
    </ul>

    <c:if test="${not empty user}">
      <form method="post" action="<c:url value="/authn/logout"/>" class="navbar-form navbar-right">
        <button id="logout-button" type="submit" class="btn btn-danger">Logout</button>
      </form>
    </c:if>
  </div>
</nav>
Create the Login Form
Lastly, create this folder: src/main/webapp/WEB-INF/jsp/authn
In this directory, we will add a form. This form is the login.jsp form used to allow the user to login.
<jsp:include page="../includes/header.jsp" />
<%@ taglib prefix = "c" uri = "http://java.sun.com/jsp/jstl/core" %>
<body>
  <div class="container">
    <div class="row vertical-offset-100">
      <div class="col-md-4 col-md-offset-4">
        <div class="panel panel-default">
          <div class="panel-heading">
            <h3 class="panel-title">Please sign in</h3>
          </div>
          <div class="panel-body">

            <jsp:include page="../includes/form-errors.jsp" />

            <form method="POST" accept-charset="UTF-8" role="form">
              <fieldset>
                <div class="form-group">
                  <input class="form-control" placeholder="Email" name="username" type="text">
                </div>
                <div class="form-group">
                  <input class="form-control" placeholder="Password" name="password" type="password" value="">
                </div>
                <input class="btn btn-lg btn-success btn-block" type="submit" value="Login">
              </fieldset>
            </form>
          </div>
        </div>
      </div>
    </div>
  </div>
</body>

<jsp:include page="../includes/footer.jsp" />
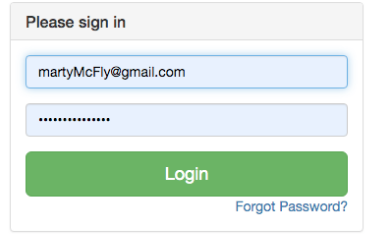
Now that the code is finished, let’s run the app! You should now see a login screen instead of the recipe list:
Victory is yours!
What About OAuth 2.0/OIDC?
In this post, I have shown you how to take an existing JSP application and add user authentication with Okta.
The Okta service stores your user accounts for you and the Okta Java Authentication SDK wraps the Okta Authentication APIs and makes it simple to authenticate users via username/password. Handling user authentication this way is quite a bit simpler than implementing everything needed to support user authentication on your own.
In comparison to what we implemented today, which required specific code to be written to authenticate users, OAuth and OIDC are protocols which standardize this functionality.
Most modern applications make use of OAuth and OpenID Connect (OIDC) to handle user authentication and authorization. They make it easy to log into a web application in a number of different environments.
Using OAuth and OIDC is the recommended approach because they provide lots of nice safeguards against implementing things incorrectly, and provide a standard implementation that can make accessing services simple.
To learn more about OAuth checkout our OAuth 2.0 and OpenID Connect (in plain English) talk.
So, now that we’ve talked a little about OAuth and OIDC, I’ll explain why I’m bringing them up!In reality, there are a lot of applications out there that just need to support simple user login. For these applications, if all you need to do is add basic user login to protect your site, then the simple approach described above should be sufficient.
However, if you are starting an application from scratch or need to build anything more complicated than simple user login, you should consider a framework like OIDC that allows you to more easily build user authentication and authorization into your app.
Further Reading
The full source code of the example application found in this post can be found on GitHub.
To learn more about the Okta Authentication SDK and Okta Authentication API, check out these links:
To learn more about OAuth 2.0 / OIDC, check out some of these in-depth posts:
- Authentication and Authorization: OpenID vs OAuth2 vs SAML
- Using a Servlet/Shiro based application via Spring Cloud Gateway
- Get Started with Spring Boot, OAuth 2.0, and Okta
- Nimbus OAuth 2.0 SDK with OpenID Connect extensions
- Simple Token Authentication for Java Apps
Finally, if you’re interested in more content like this, please be sure to follow us on Twitter and subscribe to your YouTube Channel.
Okta Developer Blog Comment Policy
We welcome relevant and respectful comments. Off-topic comments may be removed.