Build a CRUD App with Angular and Firebase

Storage as a Service (SaaS) is becoming ever more popular with many businesses. The advantages are clear. Instead of maintaining your own backend server you can outsource the service to a different provider. This can result in a significant increase in productivity, as well as a reduction in development and maintenance costs. In addition, the worry about server security is offloaded to the storage provider. SaaS is an option whenever the server part of your application can be reduced to storage of object data, optionally with access control. There are a number of different SaaS providers available. Arguably, one of the biggest players in the field is Google with the Firebase service.
In this tutorial, I will be showing you how to create your own Wiki using Angular for the frontend client and Firebase for storing the Wiki documents. You’ll see that it’s easy to create a complete application in minutes.
Note: In May 2025, the Okta Integrator Free Plan replaced Okta Developer Edition Accounts, and the Okta CLI was deprecated.
We preserved this post for reference, but the instructions no longer work exactly as written. Replace the Okta CLI commands by manually configuring Okta following the instructions in our Developer Documentation.
Set Up the Firebase Database
Firebase offers different methods for storing data. I will be using the new Firestore service instead of the more established Real-time Database. Firestore allows you to set up a more structured database together with a more powerful query API. To get started, open your browser and navigate to the Firebase console at https://console.firebase.google.com/. Log in using your Google account and accept all terms and conditions. In the Firebase console, you can see an overview of all your projects.
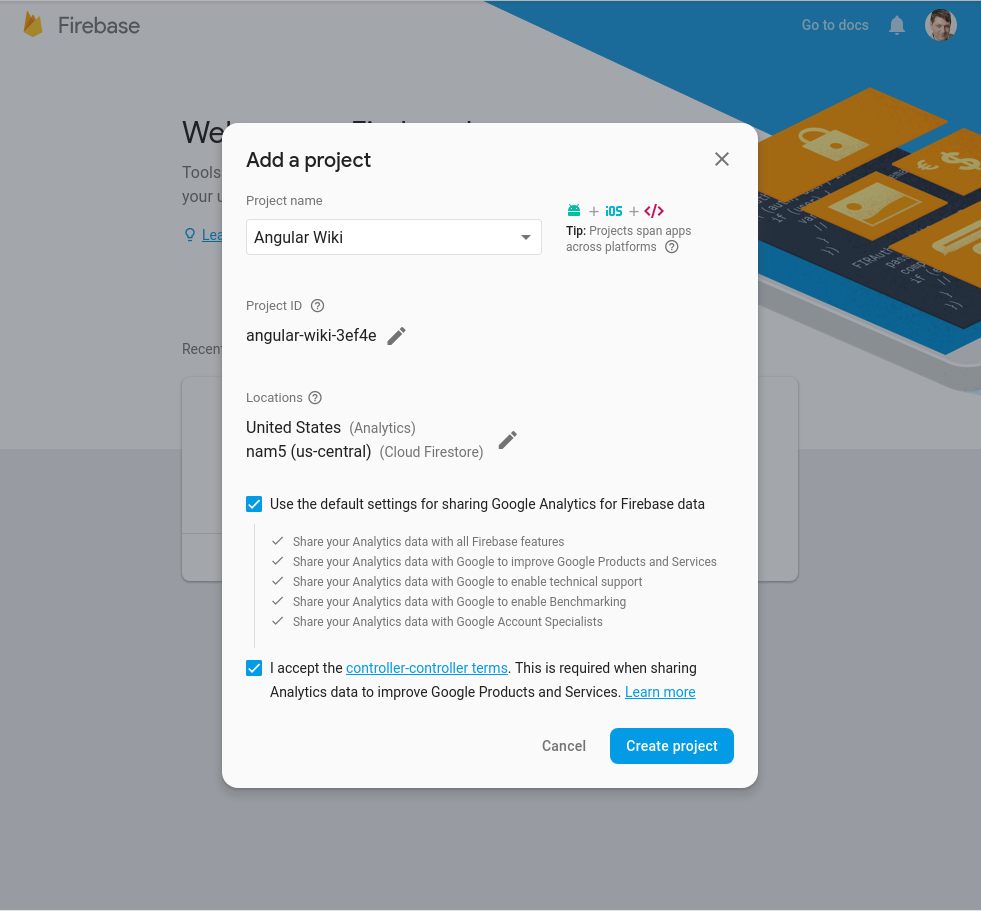
If you haven’t worked with Firebase before you’ll need to create your first Project. Click on the card with the plus sign that says Add project. In the pop-up that appears you can edit the project name and settings. Change the name to anything you like, accept the terms and conditions, and leave everything else at its default.
When you submit the form you are taken to the Project Overview page. Make a note of the Firebase project URL. You will need it, later on, to set up the client. The first thing that you will have to do here is to create a new database. Select Database in the left sidebar menu. You are given the choice between different technologies for storing your data. I will be using Firestore which allows you to store data in hierarchical format. At the time of writing, the Firestore database is advertised in the large banner at the top of the page. Click Create Database to create a Firestore database.
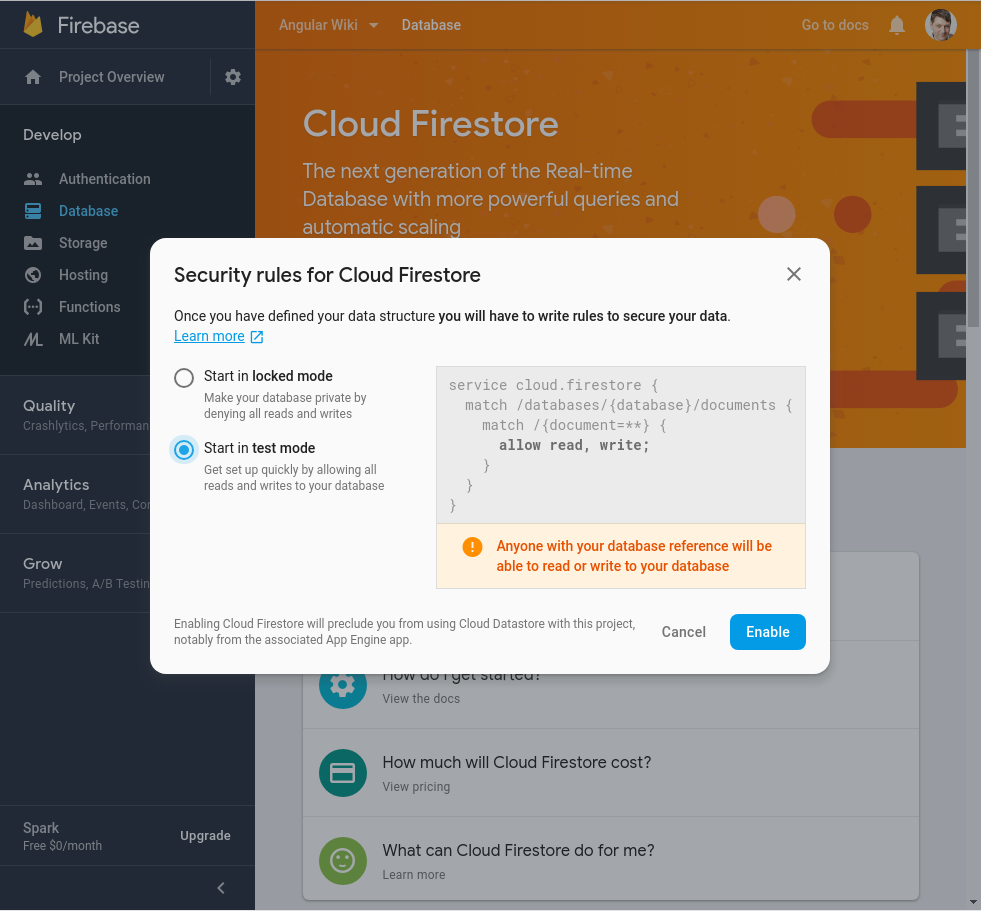
Another pop-up dialog appears that lets you change the settings of the database. Select Start in test mode to allows any developer to access the database. Click Enable and you will be taken to a dialog that allows you to manually add the first data record to the database. Firestore does not allow a completely empty database so you will have to add some data here.
First, create a new collection called pages. This collection will contain all the wiki pages of your app. Then add a new document consisting of the following fields.
| Field Name | Type |
|---|---|
content |
text |
created |
timestamp |
modified |
timestamp |
The first document that you create will be your wiki’s home page. Enter home for the document ID. This is the string that uniquely identifies your page. Then write any text into the content field. I will show you how to integrate markdown into your wiki, so you can enter any markdown string here. Next, enter the current date and time into the created and modified fields. Finally, click Save to save the document. You have now successfully set up your Firebase storage.
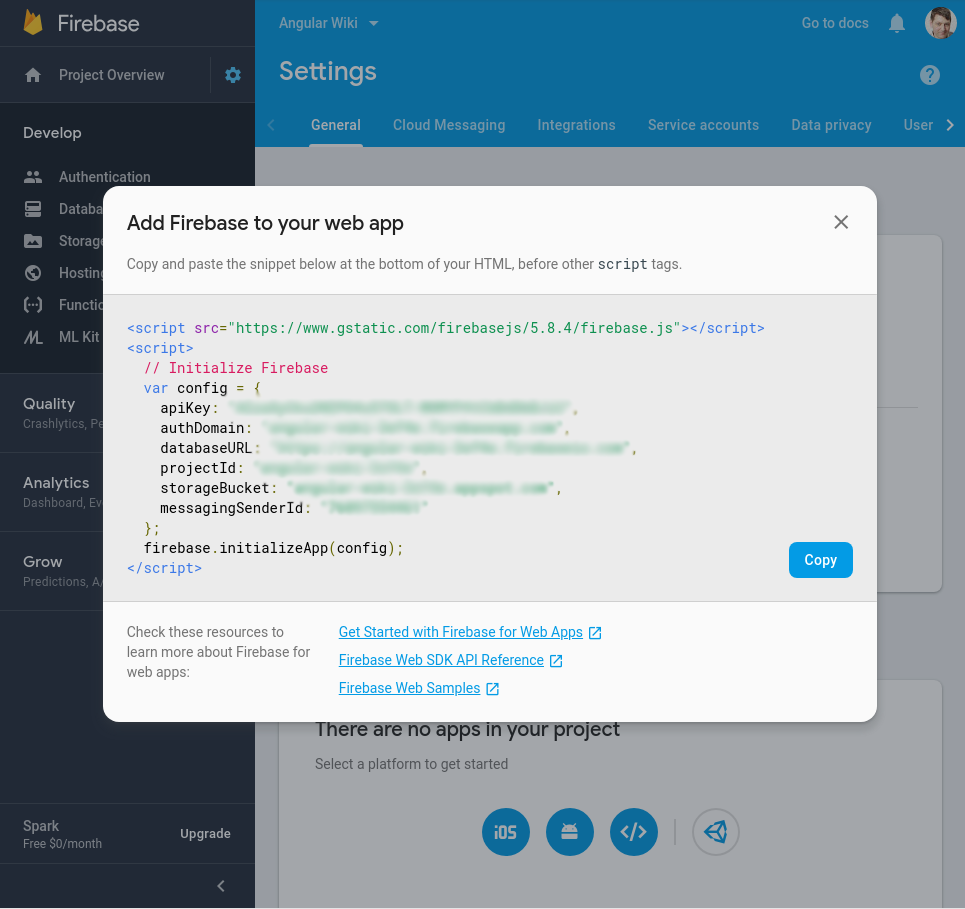
Next, you will need to obtain the information for using the service in your application. In the Firebase console click on the gear icon next to Project Overview to open the project settings. In the General tab scroll down to the bottom. You will see a notice telling you that there are no apps in your project. You will not be adding an app here but you can get the information by clicking on the web icon “</>”. A pop-up appears with your API key, database URL etc. Copy the information to a safe place, you will need it later.
Add User Authentication to Your Angular + Firebase App
The client will be implemented with user authentication from Okta.
Before you begin, you’ll need a free Okta developer account. Install the Okta CLI and run okta register to sign up for a new account. If you already have an account, run okta login.
Then, run okta apps create. Select the default app name, or change it as you see fit.
Choose Single-Page App and press Enter.
Use http://localhost:4200/callback for the Redirect URI and set the Logout Redirect URI to http://localhost:4200.
What does the Okta CLI do?
The Okta CLI will create an OIDC Single-Page App in your Okta Org. It will add the redirect URIs you specified and grant access to the Everyone group. It will also add a trusted origin for http://localhost:4200. You will see output like the following when it’s finished:
Okta application configuration:
Issuer:    https://dev-133337.okta.com/oauth2/default
Client ID: 0oab8eb55Kb9jdMIr5d6
NOTE: You can also use the Okta Admin Console to create your app. See Create an Angular App for more information.
Set Up Your Angular Client
The client will be implemented using Angular which is based Node. I will assume that you have installed Node and the npm command on your system. Angular uses a command line client, called ng, to automate many development tasks. If you haven’t done so already, open a terminal and install it globally using npm.
npm install -g @angular/cli@7.3.3
If you are on a system that doesn’t let you modify system files as a normal user, you will have to run this command using sudo. You are now ready to create your application. In the terminal, navigate to a directory of your choice and create the wiki client.
ng new WikiClient --routing --style=css
This will create a directory with the name WikiClient, add some barebones application code in it, and install all necessary packages. Before you make any changes to your code, you can use the Angular schematic provided by Okta to set up authentication. Navigate into the WikiClient directory and run the following command.
ng add @oktadev/schematics
You will be asked about the issuer URL and the client ID of your application. To set them, simply copy and paste the values obtained from the Okta CLI. The command will add the latest Okta packages for Angular and set up the basic configuration to use Okta authentication in your application.
Add Visual Design to Your Angular + Firebase Application
When implementing responsive front end user interfaces, I really enjoy working with the Zurb Foundation framework. It is a comprehensive set of CSS classes and JavaScript tools that has a huge amount of settings and can be styled according to your needs. For this tutorial, you’ll only be using the CSS part of the framework which can be imported from the CDN. Add the following line into the <head> tag of src/index.html.
<link rel="stylesheet" href="https://cdn.jsdelivr.net/npm/foundation-sites@6.5.3/dist/css/foundation.min.css" integrity="sha256-xpOKVlYXzQ3P03j397+jWFZLMBXLES3IiryeClgU5og= sha384-gP4DhqyoT9b1vaikoHi9XQ8If7UNLO73JFOOlQV1RATrA7D0O7TjJZifac6NwPps sha512-AKwIib1E+xDeXe0tCgbc9uSvPwVYl6Awj7xl0FoaPFostZHOuDQ1abnDNCYtxL/HWEnVOMrFyf91TDgLPi9pNg==" crossorigin="anonymous">
Next, open up src/styles.css and replace the contents with some basic styling.
body {
  margin: 0;
  font-family: sans-serif;
}

h1, h2 {
  text-align: center;
}
You will need to import some modules which you will be using later on and make them available for your application. Open up src/app/app.module.ts and add the following imports to the top of the file.
import { FormsModule, ReactiveFormsModule } from '@angular/forms';
Then add them to the list of imports further down in the same file.
imports: [
  FormsModule,
  ReactiveFormsModule,
  ... ]
The main application design is placed into src/app/app.component.html. Copy the following code into the file.
<div class="top-bar">
  <div class="top-bar-left">
    <button routerLink="/">{{title}}</button>
  </div>
  <div class="top-bar-right">
    <button class="button" *ngIf="!isAuthenticated" (click)="oktaAuth.loginRedirect()"> Login </button>
    <button class="button" *ngIf="isAuthenticated" (click)="oktaAuth.logout()"> Logout </button>
  </div>
</div>
<router-outlet></router-outlet>
The <div class="top-bar"> element defines the application’s toolbar at the top of the page. It contains a link to the wiki’s home page and a button that lets the user log in or out. You will notice the use of the isAuthenticated flag and the oktaAuth property. These have been made available through the application component in src/app/app.component.ts by the Okta schematic that you applied to the client in the previous step. The <router-outlet> is the container in which the router will render its content.
Implement Your Angular + Firebase Wiki
The wiki client will need to connect to the Firebase server. Google provides Node and Angular libraries to interface with the database. As usual, they can be installed with npm.
npm install --save @angular/fire@5.1.1 firebase@5.8.4
The modules have to be made available to the app. Open src/app/app.module.ts again and add the following imports and configuration.
import { AngularFireModule } from '@angular/fire';
import { AngularFirestoreModule } from '@angular/fire/firestore';

const firebaseConfig = {
  apiKey: "<Firebase API key>",
  authDomain: "<Firebase auth domain>",
  databaseURL: "<Firebase database URL>",
  projectId: "<Firebase project ID>",
  storageBucket: "<Firebase storage bucket>",
  messagingSenderId: "<Firebase messaging sender ID>",
};
You can simply paste the information you obtained from the Firebase console into the configuration object. Further down in the same file, add both modules to the imports.
AngularFireModule.initializeApp(firebaseConfig),
AngularFirestoreModule,
You will load the page content into the home page. Open src/app/home/home.component.ts and replace the current content with the following content.
import { Component, OnInit } from '@angular/core';
import { OktaAuthService } from '@okta/okta-angular';
import { ActivatedRoute } from '@angular/router';
import { AngularFirestore } from '@angular/fire/firestore';
import { Subscription } from 'rxjs';
import { DocumentSnapshot } from '@firebase/firestore-types';

@Component({
  selector: 'app-home',
  templateUrl: './home.component.html',
  styleUrls: ['./home.component.css']
})
export class HomeComponent implements OnInit {
  isAuthenticated: boolean;
  slug: string;
  content: string;
  created: number;
  modified: number;

  subs: Subscription;

  constructor(private oktaAuth: OktaAuthService,
              private db: AngularFirestore,
              private route: ActivatedRoute) {
  }

  async ngOnInit() {
    this.route.paramMap.subscribe(params => {
      this.loadPage(params.get('slug') || 'home');
    });

    this.isAuthenticated = await this.oktaAuth.isAuthenticated();
    this.oktaAuth.$authenticationState.subscribe(
      (isAuthenticated: boolean)  => this.isAuthenticated = isAuthenticated
    );
  }

  loadPage(slug) {
    if (this.subs) {
      this.subs.unsubscribe();
    }

    const doc = this.db.collection('pages').doc(slug).get();
    this.subs = doc.subscribe((snapshot) => {
      const page = snapshot.data();
      if (!page) {
        this.content = '### This page does not exist';
        this.slug = undefined;
      } else {
        this.slug = slug;
        this.content = page.content;
        this.created = page.created;
        this.modified = page.modified;
        console.log(page);
      }
    });
  }
}
The HomeComponent loads the page depending on the slug parameter that is passed in through the route. The Firestore API is available through the AngularFirestore injectable. Once loaded, the content, slug and timestamp properties are set from the data obtained. In the home component’s template in src/app/home/home.component.html, then replace the content with the code below.
<div class="grid-container wiki">
  <div class="grid-x">
    <div class="small-12 cell">
      <div class="manage-post" *ngIf="isAuthenticated">
        <button class="button" [routerLink]="['/edit', slug]">Edit</button>
        <button class="button" routerLink="/edit">Create</button>
      </div>
      {{content}}
    </div>
  </div>
</div>
If the user is authenticated, the page also contains a bar with buttons to manage the page. These buttons link to the edit page which you will implement later on in this tutorial. Give this toolbar some style by editing src/app/home/home.component.css.
.manage-post {
  display: flex;
  justify-content: space-between;
  padding: 0.5rem 1rem;
  background-color: #fafafa;
}
The router settings for the home route have to be modified from their default to account for the slug parameter. Open src/app/app-routing.module.ts and modify the routes array.
const routes: Routes = [
  {path: '', redirectTo: '/home/', pathMatch: 'full'},
  {
    path: 'home/:slug',
    component: HomeComponent
  },
  {
    path: 'home',
    component: HomeComponent
  },
  {
    path: 'callback',
    component: OktaCallbackComponent
  }
];
The application is now ready to show wiki pages from the Firebase server. In the terminal, run ng serve. Then open your browser and navigate to http://localhost:4200. You will see the content of the home page that you entered into the database. However, at this point, the markdown is not rendered correctly. This is quickly remedied. Open the terminal again and install the ngx-markdown package.
npm install --save ngx-markdown@7.1.3
Again, import the modules at the top of src/app/app.module.ts.
import { MarkdownModule } from 'ngx-markdown';
Then add the MarkdownModule.forRoot() to the imports array of AppModule. Next, make a minor change to src/app/home/home.component.html by changing {{content}} to the following.
<markdown [data]="content"></markdown>
Now, when you look at the wiki’s home page you can see that the markdown is rendered properly.
Edit Pages in Your Angular + Firebase App
Showing wiki pages is not enough for a wiki app. Of course, you will want to create new pages or edit existing ones. Create a new component using the command line tool in the terminal.
ng generate component edit
This will create a number of files in the src/app/edit directory. Open src/app/edit/edit.component.ts and replace its contents with the code below.
import { Component, OnInit } from '@angular/core';
import { ActivatedRoute, Router } from '@angular/router';
import { AngularFirestore } from '@angular/fire/firestore';
import { FormGroup, FormBuilder, Validators } from '@angular/forms';

@Component({
  selector: 'app-edit',
  templateUrl: './edit.component.html',
  styleUrls: ['./edit.component.css']
})
export class EditComponent implements OnInit {
  editPageForm: FormGroup;
  newPage: boolean = true;
  pending: boolean = true;
  slug: string;

  constructor(private formBuilder: FormBuilder,
              private db: AngularFirestore,
              private route: ActivatedRoute,
              private router: Router) { }

  ngOnInit() {
        this.route.paramMap.subscribe(params => {
      const slug = params.get('slug');
      if (!slug) {
        this.initNewPage();
      } else {
        this.initEditPage(slug);
      }
    });
  }

  initNewPage() {
    this.newPage = true;
    this.pending = false;
    this.editPageForm = this.formBuilder.group({
      slug: ['', Validators.required],
      content: ['', Validators.required]
    });
  }

  initEditPage(slug) {
    const doc = this.db.collection('pages').doc(slug).get();
    const subs = doc.subscribe((snapshot) => {
      const page = snapshot.data();
      if (!page) {
        this.initNewPage();
      } else {
        this.editPageForm = this.formBuilder.group({
          content: [page.content, Validators.required]
        });
        this.newPage = false;
        this.pending = false;
        this.slug = slug;
      }
      subs.unsubscribe();
    });
  }

  savePage() {
    if (!this.editPageForm.valid) return;
    const now = Date.now();
    let slug, document;
    if (this.newPage) {
      slug = this.editPageForm.get('slug').value;
      document = {
        content: this.editPageForm.get('content').value,
        modified: now,
        created: now
      }
    } else {
      slug = this.slug;
      document = {
        content: this.editPageForm.get('content').value,
        modified: now
      }
    }
    this.db.collection('pages').doc(slug).set(document, {merge: true}).then(() => {
      this.router.navigate(['/home', slug]);
    });
  }
}
This component is used to process adding new pages and editing existing ones. Using the Firebase API both operations are performed using the set operation. The {merge: true} option tells Firebase not to delete properties of a document if they are not supplied in the update call. The template for the edit component, in src/app/edit/edit.component.html contains a simple form.
<div class="grid-container wiki">
  <div class="grid-x">
    <div class="small-12 cell">
      <form [formGroup]="editPageForm" (ngSubmit)="savePage()" *ngIf="!pending">
        <label *ngIf="newPage">Slug
          <input type="text" placeholder="Slug" formControlName="slug">
        </label>
        <label>
          Page Content
          <textarea placeholder="Page Content" formControlName="content"></textarea>
        </label>
        <button class="button">Save</button>
      </form>
    </div>
  </div>
</div>
Add a tiny bit of styling in src/app/edit/edit.component.css.
input {
  width: 100%;
}

textarea {
  height: 80vh;
}
To make the edit component available through the router, open src/app/app-routing.module.ts and first, modify the import from okta-angular to include the OktaAuthGuard.
import { OktaCallbackComponent, OktaAuthGuard } from '@okta/okta-angular';
Next, add the import of the EditComponent.
import { EditComponent } from './edit/edit.component';
Then add the following entries to the routes array.
{
  path: 'edit/:slug',
  component: EditComponent,
  canActivate: [OktaAuthGuard]
},
{
  path: 'edit',
  component: EditComponent,
  canActivate: [OktaAuthGuard]
}
Note the canActivate property on these routes. They prevent any user that is not logged in from accessing the page editor. Now you are ready to test your wiki. Open the terminal and run start the Angular test server.
ng serve
Now, open your browser and navigate to http://localhost:4200. If you are not logged into your application, click on the Login link and proceed to enter your username and password. Once logged in, you should see the buttons to add a new page or edit the current one. The data is stored in your Firebase database. This means that you can run your app from anywhere and always access the same pages.

Did you know that it was this easy to create your own Wiki?
Learn More About Angular and Secure User Authentication
I hope you enjoyed this tutorial on integrating Angular with Firebase. I think it shows nicely how useful Storage as a Service can be. If you want to learn more about Angular and JavaScript in general, why not check out the following links.
- Angular 7: What’s New and Noteworthy + OIDC Goodness
- Build a Basic CRUD App with Angular and Node
- The Basics of JavaScript Generators
The code for this tutorial is available at https://github.com/oktadeveloper/angular-firebase-wiki-example.
If you found this tutorial useful, we’d love to have you follow us @oktadev on Twitter to find out when we publish more. We also publish screencasts on our YouTube Channel.
Okta Developer Blog Comment Policy
We welcome relevant and respectful comments. Off-topic comments may be removed.