Spread Serverless Holiday Cheer with Lambda and API Gateway
It’s that time of year again: Christmas music on the radio, festive decorations in the workplace, and a chill in the air. Except in the Southern Hemisphere, where it’s warm and balmy. And on the International Space Station, where the temperature is strictly regulated. But I digress.
It’s a season for reconnecting with loved ones, exchanging gifts, and eating delicious food. And, if you’re like me, a little downtime to work on fun projects.
Looking for something to work on for a few minutes? Why not build an API to spread some holiday cheer? Even if you’re an API or coding newbie, you can follow along with this simple project.
Cheer as a Service
The API will be simple: it will have one route called /cheer.
GET /cheer
200 OK
{
  "holidaySeason": true,
  "greeting": "Happy holidays!"
}
The API will determine whether it’s currently the holiday season using the precise, ultra-scientific method that supermarkets in the USA use to decide whether to start playing Christmas music: is today’s date after Thanksgiving, but before the end of the year?
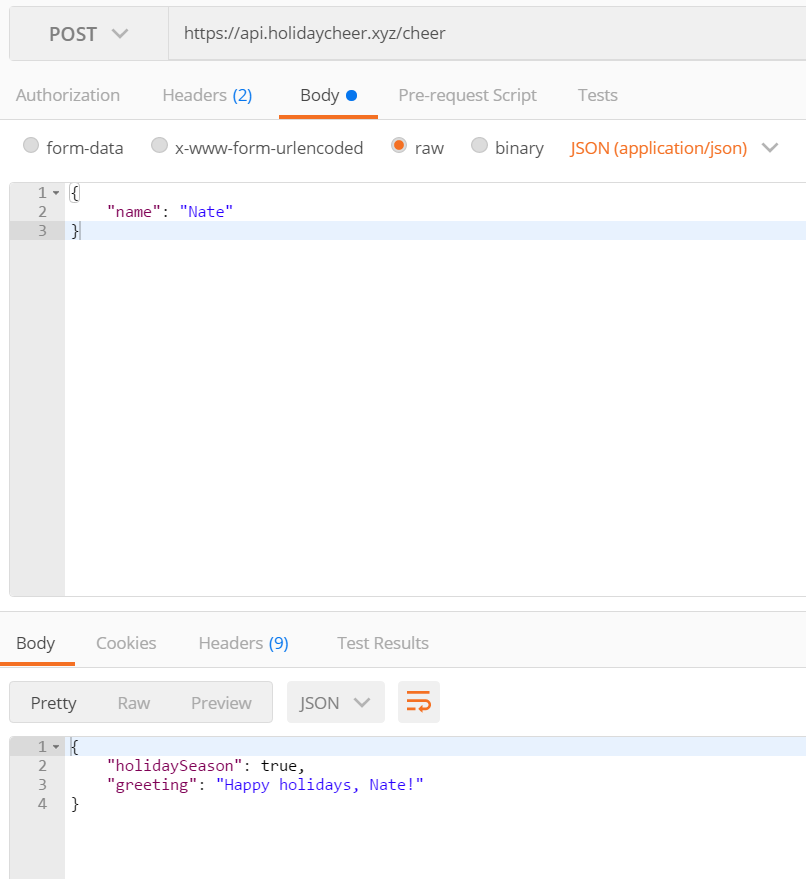
If it’s the holidays, the API will return an randomly-selected greeting. If you want to personalize it, you can POST your name:
POST /cheer
{
  "name": "Nate"
}
200 OK
{
  "holidaySeason": true,
  "greeting": "Merry Christmas, Nate!"
}
Use it in your IFTTT recipes, mail merges, and Twitter bots. Cheer-as-a-service is limited only by your imagination!
Create a Lambda Function
For such a simple API, there’s no need to use a web framework, or even set up a server. The whole API can be written in a few lines of JavaScript code and hosted on AWS Lambda for cheap.
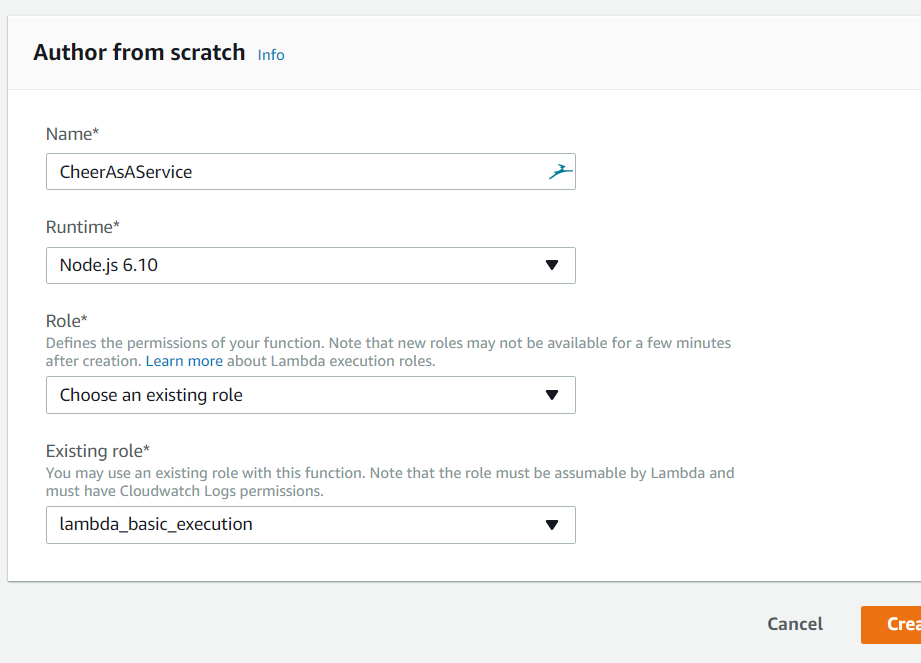
If you don’t have an AWS account, go sign up for free. Then, open the Lambda console and create a new function from scratch.
Name the new function CheerAsAService and pick Node 6.10 (or higher) as the runtime. If you’ve never created a Lambda function before, pick Custom role from the Role dropdown and create an IAM Role called lambda_basic_execution (the default) in the popup window. The role controls what permissions your API code has, and this code just needs the basics (permission to execute and create log messages). Click Create function.
Time to write some code! Use the browser code editor to add code above the exports.handler line:
function isHolidaySeason() {
  let now = new Date();
  let dayOfThanksgiving = 22 + (11 - new Date(now.getFullYear(), 10, 1).getDay()) % 7;

  let isAfterThanksgiving = now.getMonth() > 10 ||
    (now.getMonth() === 10 && now.getDay() > dayOfThanksgiving);

  return isAfterThanksgiving;
}
The isHolidaySeason() function uses some date math to find Thanksgiving Day (in the USA, the fourth Thursday in November) and compares that to today’s date. (If the months look off, remember that JavaScript counts from January at 0.)
Next, add some more code above exports.handler:
const phrases = [
  'Happy holidays',
  'Merry Christmas',
  'Ho ho ho',
  'Feliz Navidad',
  'Happy Hanukkah',
  'Season\'s greetings'
];

function createCheerfulResponse(name) {
  let response = {
    holidaySeason: isHolidaySeason()
  };

  if (!response.holidaySeason) {
    return response;
  }

  let randomPick = Math.floor(Math.random() * phrases.length);
  let phrase = phrases[randomPick];

  if (name) {
    phrase += ', ' + name;
  }

  phrase += '!';

  response.greeting = phrase;
  return response;
}
This function generates the JSON response that will be returned to the client. If a name is supplied, it’s used to personalize the response. Feel free to add your own greetings and phrases to the list!
With these functions in place, you can update the main handler at the bottom. This code runs when Lambda executes your function, so you’ll want to check for a name parameter (if it’s a POST), and return the API response:
exports.handler = (event, context, callback) => {
  let name = '';

  if (event.httpMethod === 'POST') {
    try {
      let body = JSON.parse(event.body);
      name = body.name || '';
    }
    catch (err) {
      // Leave name blank
    }
  }

  let responseBody = createCheerfulResponse(name);

  let response = {
    statusCode: 200,
    body: JSON.stringify(responseBody)
  };

  callback(null, response);
};
That’s all the code you need! Make sure you click Save at the top-right of the Lambda console.
You can test the function by creating a test event. Click Test and use this JSON as the test event data:
{
  "body": "{\"name\":\"Frosty the Snowman\"}",
  "requestContext": {
    "httpMethod": "POST",
    "stage": "prod"
  },
  "httpMethod": "POST"
}
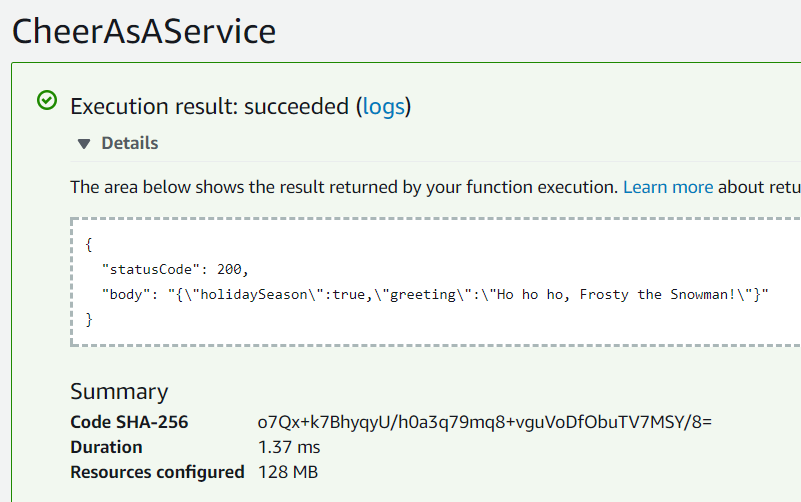
The function returns the correct response, but it’s not accessible on the public internet yet. To share it with the world, you’ll need to publish it (freeze the code), and then use API Gateway to map the function to a public URL.
To publish the function, choose Publish new version from the Actions button. The title of the function will update to CheerAsAService:1. You’ll need this name in a minute, when you link this function to the API Gateway rule you’ll create.
Create the API in API Gateway
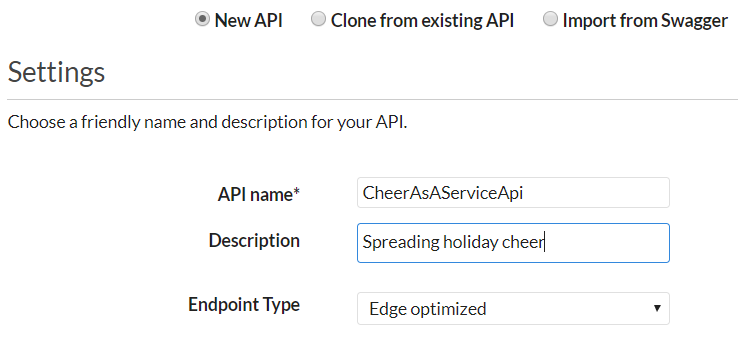
Switch over to the API Gateway console and create a new API called CheerAsAServiceApi.
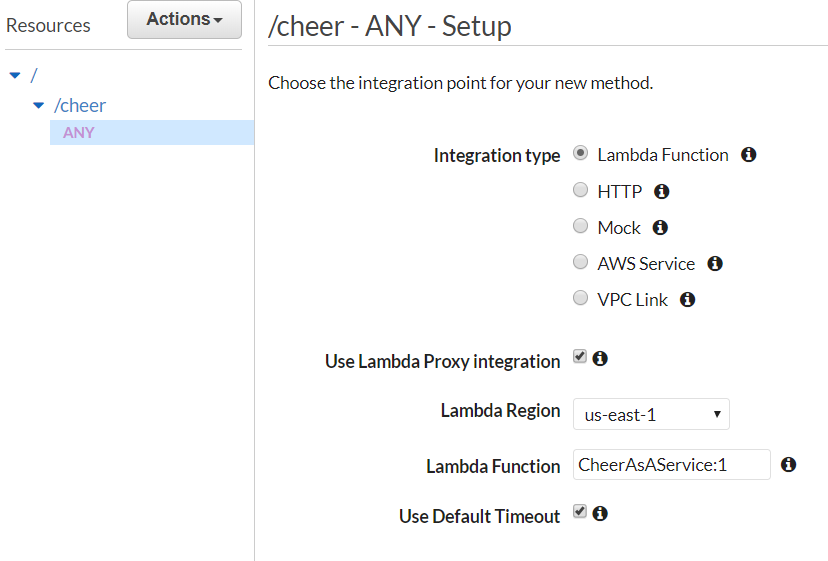
The API will have one path (or “resource”), called /cheer. From the Actions button, click Create Resource. Enter Cheer as the Resource Name, and the path will be automatically filled in.
Both the GET and POST methods will be supported. Instead of defining these separately, you can add a single rule that handles any method. With the /cheer resource selected, choose Create Method from the Actions button. Pick ANY and click the checkmark to add the method.
Choose Lambda Function as the integration type, and check Use Lambda Proxy Integration. Choose the region you created your Lambda function in (us-east-1, unless you changed the default), and enter the Lambda function name plus version: CheerAsAService:1
Click Save to create the method definition. On the Method Execution screen, click Test and pick a method (GET or POST) to send to your function. If everything is configured correctly, you’ll see the JSON response on the right.
You’re almost there! From the Actions button, choose Deploy API. Create a new stage called production and click Deploy. When the API is deployed, you’ll get an Invoke URL like:
https://blah.execute-api.us-east-1.amazonaws.com/production
You can see your live API in action by adding /cheer to that URL and requesting it in your browser. Sweet!
Add a Domain Name
Right now, your API URL is long and a little boring. Before you share it with the world, you can add a custom domain name to make it more exciting (bonus points for using a trendy TLD like .xyz or .io). I registered holidaycheer.xyz with my favorite domain registrar so I could use api.holidaycheer.xyz as my API URL.
To map a custom domain name to your API in API Gateway, you’ll need to get an SSL/TLS certificate for your domain using AWS Certificate Manager (ACM). No API is too simple for HTTPS!
Using ACM to get a certificate is easy. Simply click Request a certificate, enter the domain name (I used a wildcard: *.holidaycheer.xyz) and verify that you are the owner of the domain.
Then, in the API Gateway console, click on Custom Domain Names and create a new custom name. Pick the certificate you just created, and map the path / to your API’s production stage.
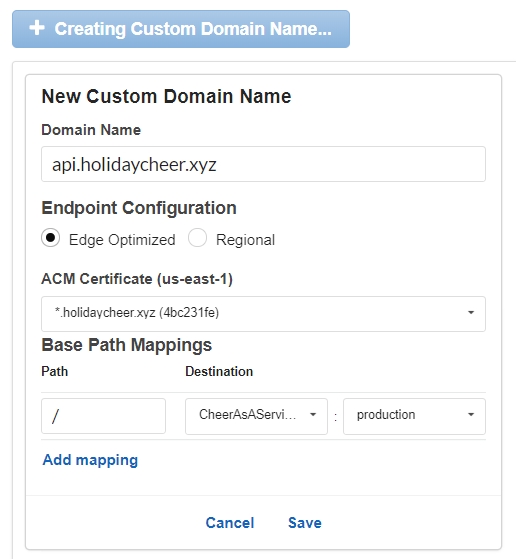
When you click Save, AWS will start setting up a CloudFront distribution for your API. You can see the CloudFront domain name immediately (like dz123.cloudfront.net). You’ll need to log into your domain registrar and update the DNS settings for your domain name. I added a CNAME record from api.holidaycheer.xyz to the domain generated by CloudFront.

Go grab a cup of coffee (or eggnog), because you’ll be waiting a while. Deploying the CloudFront distribution (and propagating the DNS record changes) can take half an hour or more. Come back when you’ve had enough to drink!
When everything is deployed, you’ll be able to use a tool like Postman (or any browser) to make requests to your public API:
Eat, Drink, and Code Merrily
That’s it! You’ve built a real, working API with a few lines of code and some useful AWS services. The full source code (all 63 lines) is available on GitHub.
You can try the API out live: api.holidaycheer.xyz/cheer
When you find yourself working on more complicated projects, check out Okta’s APIs. We make it easy to add user identity and authorization to your apps and APIs without a ton of code. How’s that for cheerful?
From everyone here at Okta, may you and your loved ones have a wonderful (and nerdy) holiday season.
Stay warm! <3
Okta Developer Blog Comment Policy
We welcome relevant and respectful comments. Off-topic comments may be removed.