On this page
Set up OAuth 2.0 On-Behalf-Of Token Exchange
This guide discusses how to retain user context in requests to downstream services using On-Behalf-Of Token Exchange. You can use On-Behalf-Of Token Exchange with a single custom authorization server. You can also use it between other custom authorization servers under the same Okta tenant.
Learning outcomes
Understand the purpose of OAuth 2.0 On-Behalf-Of Token Exchange.
What you need
- Okta Integrator Free Plan org (opens new window)
- Two custom authorization servers. See Create an authorization server if you need to add them for use with this guide.
Note: If you have a new Integrator Free Plan org and plan to use the
defaultcustom authorization server, check that it has an access policy. Add an access policy if it's not there. See Create access policies (opens new window).
Overview
OAuth 2.0 solves the problem of delegated access to resources across services mediated by an authorization server. For example, a user delegates permission to a social networking mobile app to manage their profile and run background processes on behalf of the user, like reminding the user about upcoming events.
Machine-to-machine requests
However, with the adoption of microservices, a resource server must sometimes access resources hosted by other downstream services on behalf of the user to satisfy a client request. Traditionally these API calls are made as machine-to-machine requests that use an access token obtained using the Client Credentials grant type. But, the user context is lost while making these machine-to-machine requests.
OAuth On-Behalf-Of Token Exchange (opens new window) helps retain the user context in requests to downstream services. It provides a protocol approach to support scenarios where a client can exchange an access token received from an upstream client for a new token by interacting with the authorization server.
Token Exchange flow
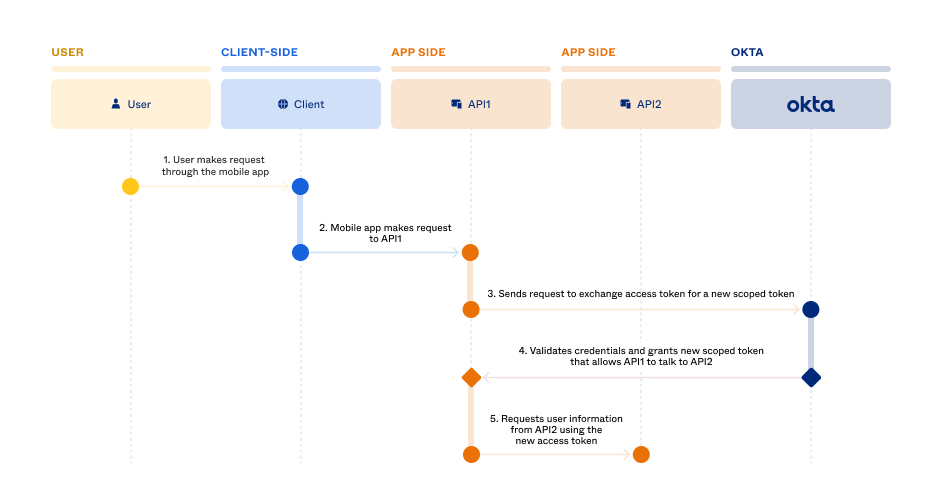
Note: This flow assumes that user authentication and authorization are complete and the authorization server issued an access token and ID token.
- The user is successfully signed in to a mobile app and makes a request.
- The mobile app makes a request to the API1 service and includes the user’s valid access token.
- API1 needs to communicate with API2 to further process the user request. The API1 service makes a request to the Okta authorization server to exchange the user’s access token for a new token.
- The authorization server validates the user’s access token, and then grants a new access token to API1 with scopes that allow API1 to make requests to API2. The new access token retains the user context so the API2 service knows on whose behalf the request is made.
- The API1 service makes a request to the API2 service and includes the new access token.
Note: You can determine which API service made API calls on behalf of which user by analyzing the token grant events in the Okta System Log (opens new window).
Set up token exchange
The following sections explain the setup for an example token exchange flow using a single custom authorization server. For an example token exchange flow using more than one authorization server within an Okta tenant, see the Trusted servers section.
Create a native app integration
- Go to Applications > Applications in the Admin Console.
- Click Create App Integration.
- Select OIDC - OpenID Connect, and then Native Application.
- Name your app, and then select Allow everyone in your organization to access.
- Click Save, and then click Back to Applications.
Note: Okta recommends that native apps use the Authorization Code with Proof Key for Code Exchange (PKCE) authentication flow. See Implement authorization by grant type for more information on creating PKCE for your native app.
Create a service app
In token exchange use cases, an API microservice can act both as a resource server and a client. For this example, the native app gets an access token to make API requests to API1. API1 acts as the resource server. When API1 needs to talk to API2 on behalf of the user, API1 becomes the OAuth client. Create a service app that represents API1.
- Click Create App Integration on the Applications page.
- Select API Services, and then click Next.
- Name your app. For this example, enter API1, and then click Save.
- Click Edit in the General Settings section of the General tab.
- Click Advanced in the Grant type section, select Token Exchange, and click Save.
Note: If you're using Classic Engine, select Token Exchange in the Grant type section.
- Copy the client ID in the Client Credentials section, and then copy the client secret in the CLIENT SECRETS section.
- Base64-encode the client ID and client secret for use in the token exchange request from API1 to API2.
Update the authorization servers
The following sections explain how to update the authorization servers for this example.
Create custom scopes
Add some custom scopes to both authorization servers to request during the token exchange calls.
Note: You can't include the
offline_accessscope or any of the OpenID Connect scopes when using a service app. This means that you can't request refresh tokens or ID tokens in a service app-initiated token exchange flow.
- Go to Security > API in the Admin Console, and then select one of the authorization servers that you want to use.
- Select the Scopes tab, and then click Add Scope.
- Enter the scope name (api:access:read) in the dialog that appears.
- Click Create.
- Repeat steps 1 through 4 and create a second custom scope called api:access:write.
- Repeat steps 1 through 5 for the second authorization server.
Create access policies and rules
An access policy helps you secure your APIs by defining different access token lifetimes for a given combination of grant type, user, and scope. Create policy rules to determine if an app is permitted to access specific information from your protected APIs and for how long.
Access policies are specific to an authorization server. They’re also specific to client apps that you designate for the policy and the API resource that you want to mint tokens for.
From the API page, click edit for the authorization server that you want to use for the initial authentication.
Select the Access Policies tab, and then click Add New Access Policy to add a policy that allows the native app to access API1.
In the Add Policy dialog that appears, enter the following:
- Name: Enter Access API1.
- Description: Enter a description.
- Assign to: Select The following clients, start typing the name of the native app that you created earlier, and select it from the list that appears.
Click Create Policy.
Click Add Rule and in the dialog that appears, enter the following:
- Name: Enter Mobile app to API1.
- AND Scopes requested: Select The following scopes and enter openid.
Click Create rule.
Repeat steps 1 through 6 to create a policy and a rule that allows the service app that represents API1 to talk to API2. Use the following values for the policy:
- Name: Enter Access API2.
- Assign to: Select The following clients, start typing API1 (the service app that you created earlier) and select it from the list that appears.
Use the following values for the rule:
- Name: Enter API1 to API2.
- AND Scopes requested: Select The following scopes, start typing api:access:read, and select it from the list that appears. Repeat for api:access:write and select it from the list.
Flow specifics
Authorization Code with PKCE request
Use the Authorization Code with PKCE flow to obtain an authorization code for the client. In this case, the mobile app requests tokens so that it can talk to API1.
Request an authorization code
Go to the /authorize endpoint using a request URL with the appropriate parameters:
https://{yourOktaDomain}/oauth2/default/v1/authorize?client_id={nativeAppClientId}&response_type=code&scope=openid&redirect_uri={configuredRedirectUri}&state=teststate&code_challenge_method=S256&code_challenge={code_challenge}
Note the parameters that are being passed:
client_id: Matches the client ID of your app that you created in the Create a native app integration section.response_typeiscode: Indicates that you’re using the Authorization Code grant type.scopeisopenid: Means that the/tokenendpoint returns an ID token. See the Create Scopes section of the Create an authorization server guide.redirect_uri: The callback location where the user agent is directed to along with the code. This must match one of the Sign-in redirect URIs that you specified when you created your native app.state: An arbitrary alphanumeric string that the authorization server reproduces when redirecting the user agent back to the client. This is used to help prevent cross-site request forgery.code_challenge_method: The hash method used to generate the challenge, which is alwaysS256.code_challenge: The code challenge used for PKCE.
Note: See the OAuth 2.0 API reference (opens new window) for more information on these parameters.
If the user doesn't have an existing session, this request opens the Okta sign-in page. If they have an existing session, or after they authenticate, the user arrives at the specified redirect_uri along with an authorization code:
Response
https://{configuredRedirectUri}/?code=FQGFlDO-J1jXl....7-cfYJ0KtKB8&state=testState
Exchange code for tokens request
Use the following example to build the request to exchange the authorization code for tokens.
  curl --location --request POST \
    --url 'https://{yourOktaDomain}/oauth2/default/v1/token' \
    --header 'Accept: application/json' \
    --header 'Content-Type: application/x-www-form-urlencoded' \
    --data-urlencode 'grant_type=authorization_code' \
    --data-urlencode 'redirect_uri={configuredRedirectUri}' \
    --data-urlencode 'code=FQGFlDO-J1j.....QvabuZ7-cfYJ0KtKB8' \
    --data-urlencode 'code_verifier=xO5wgOEH5UA2XUdVQ88pM.....Rtc5ERKq1MeonMo8QLCSRYlDk' \
    --data-urlencode 'client_id={nativeAppClientId}'
Response
  {
    "token_type": "Bearer",
    "expires_in": 3600,
    "access_token": "eyJraWQiOiJ6………X1Z4QA",
    "scope": "openid",
    "id_token": "eyJraWQiOiJRVXlG.....-NAtVFdwD1bg2JprEJQ"
  }
Token exchange request from service app to API
Note: Include the Base64-encoded client ID and secret within the authorization header. See the following example for the format.
curl --location --request POST \
  --url 'https://{yourOktaDomain}/oauth2/default/v1/token' \
  --header 'Accept: application/json' \
  --header 'Authorization: Basic {Base64-encoded service app client ID and client secret}' \
  --header 'Content-Type: application/x-www-form-urlencoded' \
  --data-urlencode 'grant_type=urn:ietf:params:oauth:grant-type:token-exchange' \
  --data-urlencode 'subject_token_type=urn:ietf:params:oauth:token-type:access_token' \
  --data-urlencode 'subject_token={access token from the Authorization Code with PKCE flow}' \
  --data-urlencode 'scope=api:access:read api:access:write' \
  --data-urlencode 'audience=com.api.atko' \
Properties sent in the request body:
grant_type: urn:ietf:params:oauth:grant-type:token-exchangesubject_token_type: urn:ietf:params:oauth:token-type:access_tokensubject_token: the access token from the Authorization Code with PKCE flowscope: the scopes required for API1 to talk to API2.audience: audience of the authorization server
Response
{
    {
    "token_type": "Bearer",
    "expires_in": 3600,
    "access_token": "eyJraWQiOiJBVj.....bsW6C8Qg",
    "scope": "api:access:read api:access:write",
    "issued_token_type": "urn:ietf:params:oauth:token-type:access_token"
     }
}
Access token decoded
To check the returned access token payload, you can copy the value and paste it into any JWT decoder (for example: https://jwt.io/). Then, verify that the scope claim (scp) and the audience claim (aud) are correct. The audience should match the custom authorization server audience.
{
  "ver": 1,
  "jti": "AT.nmEEZjEgPk62Us10J5aG4kUfg7DWoLIExSotYJA-rJ4",
  "iss": "https://{yourOktaDomain}/oauth2/default",
  "aud": "com.api.atko",
  "iat": 1675220791,
  "exp": 1675224391,
  "cid": "0oa9aw62CPUnXomeU9c5",
  "uid": "00u930ooYXgBltqbs9c5",
  "scp": [
    "api:access:read",
    "api:access:write"
  ],
  "auth_time": 1675220791,
  "sub": "user@example.com"
}
Trusted servers
You can perform token exchange within a single authorization server or between other authorization servers under the same Okta tenant. The previous example discussed a token exchange within a single custom authorization server. To perform token exchange between authorization servers within the same tenant, make the authorization server that issued the subject token trusted under the authorization server against which the token exchange request is made.
A trusted server handles authenticated requests after the app obtains an access token. The incoming subject token (access token) is used to evaluate a subject.
The following sections explain how to set up a trusted server, access policy, and rule. Then, you can make the token exchange request with the trusted server.
Add a trusted server
Add the authorization server that you used in the previous flow as a trusted server of the authorization server that handles the token exchange in this flow.
- In the Admin Console, go to Security > API.
- Select edit on the right of the authorization server that you plan to use in the token exchange flow.
- In the Trusted servers section, click Add Server.
- In the Search box, enter the name of the authorization server that you used in the previous token exchange flow. Matching results appear in a list. If more than 20 results appear, you can click Show more.
- Click Add beside the authorization server, and then click Done. The authorization server appears in the Trusted servers section.
Create an access policy and rule
Create an access policy and rule so that the service app can access API2 using a different authorization server than the one that granted the original access token for the user.
Select the Access Policies tab, and then click Add New Access Policy to add a policy that allows the service app to access API2.
In the Add Policy dialog, do the following:
- Name: Enter Access API2.
- Description: Enter a description.
- Assign to: Select The following clients, start typing API1, and then select it from the list that appears.
Click Create Policy.
Click Add Rule and in the dialog, do the following:
- Name: Enter API1 to API2.
- AND Scopes requested: Select The following scopes, start typing api:access:read, and select it from the list that appears. Repeat for api:access:write and select it from the list.
Click Create rule.
Flow specifics with a trusted server
Perform the requests in the previous Flow specifics section. When you reach the token exchange request from the service app request, it should look like the following:
Note: Include the Base64-encoded client ID and secret within the authorization header. See the following example for the format.
curl --location --request POST \
  --url 'https://{yourOktaDomain}/oauth2/{trustedAuthServerId}/v1/token' \
  --header 'Accept: application/json' \
  --header 'Authorization: Basic {Base64-encoded service app client ID and client secret}' \
  --header 'Content-Type: application/x-www-form-urlencoded' \
  --data-urlencode 'grant_type=urn:ietf:params:oauth:grant-type:token-exchange' \
  --data-urlencode 'subject_token_type=urn:ietf:params:oauth:token-type:access_token' \
  --data-urlencode 'subject_token={access token from the Authorization Code with PKCE flow}' \
  --data-urlencode 'scope=api:access:read api:access:write' \
  --data-urlencode 'audience=com.api.atko' \
This request is sent to the authorization server with the trusted server that you configured in the Add a trusted server section.
Properties sent in the request body:
grant_type: urn:ietf:params:oauth:grant-type:token-exchangesubject_token_type: urn:ietf:params:oauth:token-type:access_tokensubject_token: access token from the Authorization Code with PKCE flowscope: the scopes required for API1 to talk to API2audience: the audience of the authorization server that trusts the other authorization server
Response
{
    "token_type": "Bearer",
    "expires_in": 3600,
    "access_token": "eyJraWQiOiJR.....ajXZIk3GryDPC8OIhLsQ",
    "scope": "api:access:read api:access:write",
    "issued_token_type": "urn:ietf:params:oauth:token-type:access_token"
}
Access token decoded
The decoded access token shows the audience of the authorization server, the requested scopes, and the original user as the value of the sub parameter.
{
  "ver": 1,
  "jti": "AT.cW5tnqgEKrm2Us9t2W3YXWOz1HYc3JOmA4aPYkthJJM",
  "iss": "https://{yourOktaDomain}/oauth2/aus9awb5qgcRPB2Ey9c5",
  "aud": "com.api.atko",
  "iat": 1675287544,
  "exp": 1675291144,
  "cid": "0oa9aw62CPUnXomeU9c5",
  "uid": "00u930ooYXgBltqbs9c5",
  "scp": [
    "api:access:read",
    "api:access:write"
  ],
  "auth_time": 1675287544,
  "sub": "user@example.com"
}