On this page
Secure API connections between orgs with OAuth 2.0
This guide explains how to securely configure Okta hub-and-spoke orgs to synchronize users and groups using OAuth 2.0 in a multi-tenant solution with Okta APIs.
Learning outcomes
Use the Okta APIs to set up Okta hub-and-spoke org provisioning connections.
What you need
- Multiple Okta orgs for your multi-tenant solution
- A tool to make secure REST API calls (for example, Postman)
Note: The Okta Org2Org app integration isn't available in Okta Integrator Free Plan orgs. If you need to test this feature in your Integrator Free Plan org, contact your Okta account team.
OAuth 2.0 for secure API connections in multi-tenant solutions
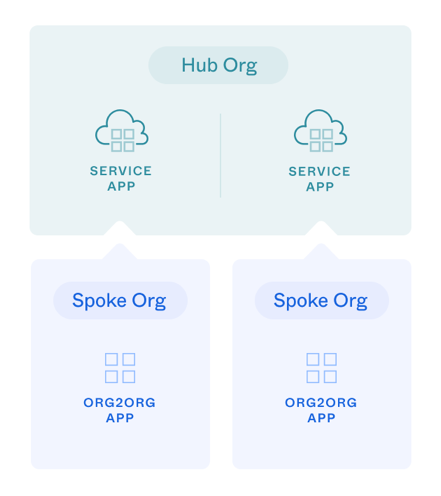
To secure API connections between orgs in a hub-and-spoke multi-tenant solution model, use the Okta Org2Org integration as an OAuth 2.0 client. In this model, the source org is referred to as the spoke org and the target org is the hub org. The provisioning connection between the orgs is configured as an Org2Org app integration with the OAuth 2.0 authentication scheme.
Previously, the Org2Org integration only supported token-based access to Okta APIs for provisioning requests in the hub org. You can now configure the Org2Org integration to access Okta APIs using the OAuth 2.0 Client Credentials flow. The OAuth 2.0 API access enables you to increase security by limiting the scope of resource access and providing automatic credential rotation.
Note: You can perform the same configuration task in the Admin Console. See Use OAuth 2.0 for provisioning (opens new window) in the product documentation.
In this configuration:
The hub org acts as the resource server and the authorization server.
Each spoke org represents a service app in the hub org for the OAuth 2.0 Client Credentials flow. See Implement OAuth for Okta with a service app.
At the spoke org level, an Org2Org app represents the OAuth 2.0 client
To limit access to the OAuth 2.0 clients, the hub-org service app needs to be granted with allowed OAuth 2.0 scopes (opens new window).
After you configure the OAuth 2.0 connection, test your connection: push user data from the spoke orgs to the hub org.
Note: In this Org2Org configuration, you create a service app in the hub org for each spoke org. For each service app you create, you need to assign admin roles to constrain the permissions and resources of that app for least privilege access. See Assign admin roles to the OAuth 2.0 service app.
Hub and spoke connection configuration with OAuth 2.0
You can set up federation and push user and group information from a spoke org to a centralized hub org with OAuth 2.0 by performing the following tasks:
- In the hub org, create an IdP to configure federation between orgs. This configuration enables your spoke users to access resources on the hub. You can set up an OIDC IdP (Okta IdP) or a SAML 2.0 IdP.
- In each spoke org, add an instance of the Org2Org app integration.
- In the hub org, create an OAuth 2.0 service app for each spoke org with the corresponding Org2Org app JWKS public key URL. For each hub-org service app (the OAuth 2.0 client), assign admin roles and grant allowed scopes.
- For each hub-org service app (the OAuth 2.0 client), enable demonstrating proof-of-possession (DPoP) for the OAuth 2.0 client. See also Configure OAuth 2.0 Demonstrating Proof-of-Possession.
- In each spoke org, set and activate provisioning in the Org2Org app from the Okta API.
- In each spoke org, assign users and groups in the spoke Org2Org app to synchronize with the hub org.
Make secure API requests with OAuth 2.0
To make secure Okta API requests to configure your Okta orgs, obtain OAuth 2.0 access tokens for the Authorization header in requests. The Okta setup to obtain access tokens depends on whether you want the token to have a user-based or a service-based context:
- User-based access: The access token is tied to a specific admin user. For this access, you need to provide an Okta admin username and credentials. See User-based API access setup. Grant the appropriate scopes for your endpoint and use case. Use this access type for simple testing of the APIs.
- Service-based access: If you have a service app or script that makes API requests to Okta without user context, see Service-based API access setup. Grant the appropriate scopes for your endpoint and use case.
Grant the following scopes during the OIDC app or service app setup: okta.apps.manage, okta.clients.manage, okta.clients.register, okta.roles.manage, okta.users.manage, okta.appGrants.manage, and okta.groups.manage.
You need an access token for API requests to each Okta org. After you have API access to your orgs, execute the steps in the following sections for the Hub and spoke connection configuration with OAuth 2.0.
Create an IdP in the hub org
In the hub org, create an IdP to configure federation between your spoke and hub orgs. Add an OIDC IdP integration by using the Create an IdP (opens new window) request with the following body parameters.
From the response of the POST request, use the id property of the IdP instance in the next step for your idpId.
You can also use the OpenID Connect IdP for an OIDC integration, see Enterprise identity provider. If you want to use a SAML 2.0 IdP for federation, see Integrate Okta Org2Org (opens new window).
Create an OIDC Okta Integration IdP
Use the following request body parameters to define your OIDC Okta Integration IdP in the hub org. See also Create an IdP (opens new window).
| Parameter | Description/Value |
|---|---|
type | OKTA_INTEGRATION |
name | Specify a name for this Okta Integration IdP |
protocol.oktaIdpOrgUrl | Your spoke org domain name |
protocol.credentials.client.token_endpoint_auth_method | private_key_jwt |
protocol.credentials.client.client_id | Add a placeholder value for the Org2Org ID, which you create in the next step. Update this value using the procedure Update the IdP in the hub org. |
Note: OIDC federation has a known limitation in Classic Okta orgs when using Org2Org apps. When a user signs in to a service provider (SP) app or the End-User Dashboard through an OIDC-based Org2Org app from the identity provider (IdP) org, the MFA challenge configured in the SP org isn’t enforced.
Request example
curl -v -X POST \
-H "Accept: application/json" \
-H "Content-Type: application/json" \
-H "Authorization: Bearer {yourHubAccessToken}" \
-d '{
    "type": "OKTA_INTEGRATION",
    "name": "Example API Okta Integration IdP",
    "protocol": {
        "type": "OIDC",
        "credentials": {
            "client": {
                "token_endpoint_auth_method": "private_key_jwt",
                "client_id": "Edit this"
            }
        },
        "oktaIdpOrgUrl": "https://{your-spoke-org}.com"
    },
    "policy": {
        "accountLink": {
            "action": "DISABLED",
            "filter": null
        },
        "provisioning": {
            "action": "AUTO",
            "conditions": {
                "userOffboarding": {
                    "action": "NONE"
                },
                "deprovisioned": {
                    "action": "NONE"
                },
                "suspended": {
                    "action": "NONE"
                }
            },
            "groups": {
                "action": "NONE"
            }
        },
        "maxClockSkew": 120000,
        "subject": {
            "userNameTemplate": {
                "template": "idpuser.email"
            },
            "matchType": "USERNAME",
            "matchAttribute": "",
            "filter": ""
        }
    }
}' "https://{yourHubOktaDomain}/api/v1/idps"
Add an Org2Org app integration in a spoke org
You use the spoke org to push users and groups to the central hub org. In the spoke org, add an instance of the Org2Org app integration by using the Create an app (opens new window) request with the Org2Org request parameters (opens new window).
Note: You can't use an Integrator Free Plan org as a spoke org since the Okta Org2Org app integration isn't available. If you need to test this feature in your Integrator Free Plan org, contact your Okta account team.
Make a POST /api/v1/apps request to the spoke org with Okta Org2Org request parameters (opens new window):
| Parameter | Description/Value |
|---|---|
name | The key name for the OIN app definition: okta_org2org |
label | Specify a user-defined name for this Org2Org app integration |
baseUrl | Specify the base URL of your hub org |
idpId | Specify the IdP ID of your hub org from the previous procedure |
signOnMode | You can set this parameter to any valid value. In this example, set signOnMode to OPENID_CONNECT |
Request example
curl -v -X POST \
-H "Accept: application/json" \
-H "Content-Type: application/json" \
-H "Authorization: Bearer {yourSpokeAccessToken}" \
-d '{
  "name": "okta_org2org",
  "label": "{spokeOrg2OrgAppName}",
  "signOnMode": "OPENID_CONNECT",
  "settings": {
    "app": {
        "baseUrl": "https://{yourHubOktaDomain}",
        "idPId": {yourOktaIdPID}
    }
  }
}' "https://{yourSpokeOktaDomain}/api/v1/apps"
From the response of the POST request, use the id property of the Org2Org app instance in the following steps for your {yourOrg2OrgAppId}.
Update the IdP in the hub org
In the hub org, update your IdP with the response values from the Create an Org2Org app request from the previous procedure. Use the Replace an IdP (opens new window) request with the following updated parameter:
| Parameter | Description/Value |
|---|---|
protocol.credentials.client.client_id | The client_id of the Org2Org app |
Use the id property from the IdP instance that you created previously for the {idpId} in the endpoint.
Request example
curl -v -X PUT \
-H "Accept: application/json" \
-H "Content-Type: application/json" \
-H "Authorization: Bearer {yourHubAccessToken}" \
-d '{
  "type": "OKTA_INTEGRATION",
  "name": "Example API Okta Integration IdP",
  "protocol": {
    "oktaIdpOrgUrl": "https://{your-spoke-org}.com/",
    "type": "OIDC",
    "credentials": {
        "client": {
          "client_id": "{yourOrg2OrgAppId}",
          "token_endpoint_auth_method": "private_key_jwt"
        },
        "signing": {
            "algorithm": "RS256"
        }
    },
    "scopes": [
      "openid",
      "profile",
      "email"
    ]
  }
}' "https://{yourHubOktaDomain}/api/v1/idps/{idpId}"
Create an OAuth 2.0 service app in the hub org
In the hub org, create an OAuth 2.0 service app for each spoke org by using the Register a client app (opens new window) API. Use the id property and your spoke org domain to build the jwks_uri parameter. Make a POST /oauth2/v1/clients request to the hub org with the following required parameters from your spoke Org2Org app:
| Parameter | Description/Value |
|---|---|
client_name | Specify a label for this service app to represent the spoke org OAuth 2.0 client |
grant_types | client_credentials |
response_types | token |
token_endpoint_auth_method | private_key_jwt |
application_type | service |
jwks_uri | https://{yourSpokeOktaDomain}/api/v1/apps/{yourOrg2OrgAppId}/connections/default/jwks |
Request example
curl -X POST \
  -H 'Accept: application/json' \
  -H "Authorization: Bearer {yourHubAccessToken}" \
  -H 'Content-Type: application/json' \
  -d '{
    "client_name": "{hubServiceClientLabel}",
    "response_types": [
      "token"
    ],
    "grant_types": [
      "client_credentials"
    ],
    "token_endpoint_auth_method": "private_key_jwt",
    "application_type": "service",
    "jwks_uri": "https://{yourSpokeOktaDomain}/api/v1/apps/{yourOrg2OrgAppId}/connections/default/jwks"
 }' "https://{yourHubOktaDomain}/oauth2/v1/clients"
Note: Using a JWKS URL in the service app allows Okta to manage key rotation.
Assign admin roles to the OAuth 2.0 service app
Assign admin roles for every OAuth 2.0 service app that you create in the hub org. Service apps with assigned admin roles are constrained to the permissions and resources that are included in the role. This improves security for an org since it ensures that service apps only have access to the resources that are needed to perform their tasks.
You can assign a standard admin role (opens new window) or a custom admin role (opens new window) with permissions to specific resource sets.
For the basic OAuth 2.0 Org2Org provisioning connection, you can assign the following standard admin roles (opens new window) to manage user provisioning:
USER_ADMIN(Group administrator)GROUP_MEMBERSHIP_ADMIN(Group membership administrator)
Or you can create a custom role to manage provisioning. For example, to create a custom role:
- Create a resource set that includes the users and groups resources. See Create a resource set (opens new window).
- Create the custom role including the appropriate permissions (for example, Manage users and Manage groups). See Create a role (opens new window).
See also Roles in Okta (opens new window).
Note: If you want Org2Org to manage Group Push to the target org, ensure that your standard or custom role can create groups.
You can use the Admin Console to assign an admin role to your service app. See Assign admin roles to apps (opens new window) and go to the Admin roles tab from your app integration details. Alternatively, you can assign the admin role to your service app with the Assign a client role (opens new window) API:
Make a POST /oauth2/v1/clients/{yourServiceAppId}/roles request to the hub org with the following required parameters to assign an admin role:
| Parameter | Description/Value |
|---|---|
yourServiceAppId | Specify the client_id value from the previous response when the service app was created. In the following role assignment example, the {yourServiceAppId} variable name is used for the client_id. |
type | Specify the admin role to assign to the service app. Use the recommended standard admin roles (USER_ADMIN, GROUP_MEMBERSHIP_ADMIN) |
Note: Only Okta super admins (opens new window) can assign roles.
Request example
curl -X POST \
-H "Accept: application/json" \
-H "Content-Type: application/json" \
-H "Authorization: Bearer {yourHubAccessToken}" \
-d '{
   "type": "USER_ADMIN"
 }' "https://{yourHubOrgDomain}/oauth2/v1/clients/{yourServiceAppId}/roles"
Note: The admin roles determine which resources the admin can perform actions on (such as a specific group of users or a specific set of apps). Scopes determine the action that the admin can perform (such as manage users, read apps). Therefore, the admin roles need to have enough permissions for the scopes provided.
Grant allowed scopes to the OAuth 2.0 client
From the response of the previous POST request (opens new window), use the client_id property of the hub service-app instance to grant the allowed scopes with the Grant consent to scope (opens new window) API request (POST /api/v1/apps/{client_id}/grants). In the following example, the {yourServiceAppId} variable name is used instead of client_id.
Note: Currently, both
okta.users.manageandokta.groups.managescopes are required for the service app configuration.
Request examples
curl -X POST \
  -H 'Accept: application/json' \
  -H "Authorization: Bearer {yourHubAccessToken}" \
  -H 'Content-Type: application/json' \
  -d ' {
    "scopeId": "okta.users.manage",
    "issuer": "https://{yourHubOrgDomain}"
}' "https://{yourHubOrgDomain}/api/v1/apps/{yourServiceAppId}/grants"
curl -X POST \
  -H 'Accept: application/json' \
  -H "Authorization: Bearer {yourHubAccessToken}" \
  -H 'Content-Type: application/json' \
  -d ' {
    "scopeId": "okta.groups.manage",
    "issuer": "https://{yourHubOrgDomain}"
}' "https://{yourHubOrgDomain}/api/v1/apps/{yourServiceAppId}/grants"
Enable demonstrating proof-of-possession (DPoP) for the OAuth 2.0 client
Enable demonstrating proof-of-possession for the hub org OAuth 2.0 client. Make a GET request to retrieve the hub org app parameters and use the response body for the following PUT call. All system-assigned properties are ignored in the PUT call.
Using the body from the previous GET call, make a PUT request (opens new window) to the hub org setting the dpop_bound_access_token parameter to true.
Request example
curl -X PUT \
  -H 'Accept: application/json' \
  -H "Authorization: Bearer {yourHubAccessToken}" \
  -H 'Content-Type: application/json' \
  -d '{
    "id": "0oal6zm117PYBG4Ya1d7",
    "name": "{hubServiceClientName}",
    "label": "{hubServiceClientLabel}",
    ...
    "settings":
        ...
        "oauthClient": {
             ...
            "dpop_bound_access_tokens": true
        }
    }
 }' "https://{yourHubOktaDomain}/api/v1/apps/{yourServiceAppId}"
Enable provisioning in the Org2Org app
In each spoke org, set and activate provisioning for the Org2Org app integration by using the Update the default provisioning connection (opens new window) API request with the OAuth 2.0-based connection request parameters.
Make a POST /api/v1/apps/{Org2OrgAppId}/connections/default?activate=TRUE (opens new window) request to set provisioning for the spoke org using the following profile parameters:
| Parameter | Description/Value |
|---|---|
authScheme | OAUTH2 |
clientId | Specify the corresponding service app client ID in your hub org |
signing.rotationMode | Specify AUTO for automatic key rotation. If signing.rotationMode isn't specified, then rotationMode is set to MANUAL and key rotation isn't automatic for the Org2Org provisioning connection. |
Request example
curl -X POST \
  -H 'Accept: application/json' \
  -H "Authorization: Bearer {yourSpokeAccessToken}" \
  -H 'Content-Type: application/json' \
  -d ' {
    "profile": {
      "authScheme": "OAUTH2",
      "clientId": "{yourHubOrgServiceAppId}",
      "signing": {
        "rotationMode": "AUTO"
      }
    }
}' "https://{yourSpokeOrgDomain}/api/v1/apps/{yourOrg2OrgAppId}/connections/default?activate=TRUE"
Note: After you enable provisioning, if you want to enable app features or edit Org2Org attribute mappings, use the App features operation (opens new window) or the Profile Mappings API (opens new window). Alternatively, go to the Org2Org app Provisioning > To App settings from the Admin Console and edit the Provisioning To App or the Okta Org2Org Attribute Mappings sections.
Assign users and groups in the Org2Org app
In each spoke (source) org, assign the users and groups to the Org2Org app integration by using the Okta Application Users API (opens new window):
POST /api/v1/apps/{yourOrg2OrgAppId}/users(Assign an application user) (opens new window)POST /api/v1/apps/{yourOrg2OrgAppId}/groups/{groupId}(Assign an application group) (opens new window)
Alternatively, you can assign users and groups for provisioning using the Okta Admin Console. See Assign an app to a user (opens new window) and Assign an app integration to a group (opens new window).
After you've assigned your users or groups in the spoke org, validate that the same users or groups appear in your hub org.
Migrate from API token to OAuth 2.0 provisioning
Migrate your existing Org2Org integrations that use the API Token authentication scheme to use OAuth 2.0 provisioning by performing the following configurations:
- Review your existing Org2Org connection
- Create a new OAuth 2.0 service app in your hub org
- Update your Org2Org app connection
Review connection details
Make a call to the Retrieve the default provisioning connection (opens new window) endpoint to review the authentication scheme of your existing Org2Org app connection.
Request example
curl -X GET \
  -H 'Accept: application/json' \
  -H "Authorization: Bearer {yourSpokeAccessToken}" \
  -H 'Content-Type: application/json' \
  "https://{yourSpokeOrgDomain}/api/v1/apps/{yourOrg2OrgAppId}/connections/default
Response example
The following response indicates an API Token authentication scheme configuration.
{
    "authScheme": "TOKEN",
    "status": "ENABLED",
    "baseUrl": "https://{yourHubOrgDomain}",
    "profile": {
        "authScheme": "TOKEN"
    },
    "_links": {
        "self": {
            "href": "https://{yourSpokeOrgDomain}/api/v1/apps/0oalbhb6d3u6Y1hSq1d7/connections/default",
            "hints": {
                "allow": [
                    "POST",
                    "GET"
                ]
            }
        },
        "deactivate": {
            "href": "https://{yourSpokeOrgDomain}/api/v1/apps/0oalbhb6d3u6Y1hSq1d7/connections/default/lifecycle/deactivate",
            "hints": {
                "allow": [
                    "POST"
                ]
            }
        }
    }
}
Create a new OAuth 2.0 service app in the hub org
Create a new OAuth 2.0 service app in the hub org following the same steps in Create an OAuth 2.0 service app. Ensure you assign the appropriate roles, grant scopes, and enable DPoP.
Update the Org2Org app to use OAuth 2.0 provisioning
Make a call to the Update the default provisioning connection (opens new window) endpoint with a request body that includes the OAuth 2.0 scheme, as in enable provisioning in the Org2Org app.
Request example
curl -X POST \
  -H 'Accept: application/json' \
  -H "Authorization: Bearer {yourSpokeAccessToken}" \
  -H 'Content-Type: application/json' \
  -d ' {
    "profile": {
      "authScheme": "OAUTH2",
      "clientId": "{yourHubOrgServiceAppId}",
      "signing": {
        "rotationMode": "AUTO"
      }
    }
}' "https://{yourSpokeOrgDomain}/api/v1/apps/{yourOrg2OrgAppId}/connections/default?activate=TRUE"
Response example
{
    "authScheme": "OAUTH2",
    "status": "ENABLED",
    "profile": {
        "clientId": "0oalbl08v41uIujGz1d7",
        "signing": {
            "rotationMode": "AUTO"
        },
        "authScheme": "OAUTH2"
    },
    "clientId": "0oalbl08v41uIujGz1d7",
    "_links": {
        "self": {
            "href": "https://{yourSpokeOrgDomain}/api/v1/apps/0oalbhb6d3u6Y1hSq1d7/connections/default",
            "hints": {
                "allow": [
                    "POST",
                    "GET"
                ]
            }
        },
        "deactivate": {
            "href": "https://{yourSpokeOrgDomain}/api/v1/apps/0oalbhb6d3u6Y1hSq1d7/connections/default/lifecycle/deactivate",
            "hints": {
                "allow": [
                    "POST"
                ]
            }
        }
    }
}
Key rotation
OAuth 2.0 connections support automatic key rotation to adhere to cryptographic best practices. Use the steps in the following section if you're using manual key rotation.
Manual key rotation
To rotate keys manually for a specific OAuth 2.0 connection, follow these API steps:
- Generate a new key for the Org2Org app.
- Register the new key with the corresponding service app.
- Update the current credentials for the Org2Org app.
Note: If you want to minimize downtime during key rotation, you can update the service app (step two) with both the old and new keys, since
jwks.keysis an array that can handle differentkididentifiers. You can remove the old key after you verify that provisioning works with the new key.
Generate a new key for the Org2Org app
From your spoke org, make a request to generate a new app key credential (opens new window) as an Okta admin.
Request example
curl -X POST \
  -H 'Accept: application/json' \
  -H "Authorization: Bearer {yourSpokeAccessToken}" \
  -H 'Content-Type: application/json' \
  "https://{yourSpokeOrgDomain}/api/v1/apps/{yourOrg2OrgAppId}/credentials/keys/generate?validityYears={validYears}"
Response example
{
    "kty": "RSA",
    "created": "2022-01-20T19:50:14.000Z",
    "lastUpdated": "2022-01-20T19:50:14.000Z",
    "expiresAt": "2024-01-20T19:50:13.000Z",
    "kid": "sf-jWwRKMUU5588aokhj-xu_mGucHLxIh_-fYLAofB8",
    "use": "sig",
    "x5c": [
        "MIIDqDCCApCgAwIBAgIGAX55C ... Iuo9j3wpemDSgGapXQ=="
    ],
    "x5t#S256": "v-v2V8soFmXuhCAhta8wycA9lXKnrJ4ho-N3P8aASFc",
    "e": "AQAB",
    "n": "gIxwqCNkdAb1ioyNBY2boqUCrMj_NS ... FiAYF7p_k3XMXOh-hsL_D8FDQ"
}
Note: The keys are truncated for brevity.
Save the generated credentials to update the keys in your Org2Org and service apps.
Register the new Org2Org app key with the corresponding service app
On your hub org, register the key generated from the previous POST request to your corresponding service app by using the Dynamic Client Registration API (opens new window).
Request example
curl -X PUT \
  -H 'Accept: application/json' \
  -H "Authorization: Bearer {yourHubAccessToken}" \
  -H 'Content-Type: application/json' \
  -d ' {
    "client_id": "'{yourServiceAppId}'",
    "client_name": "{hubServiceClientLabel}",
    "response_types": [
      "token"
    ],
    "grant_types": [
      "client_credentials"
    ],
    "token_endpoint_auth_method": "private_key_jwt",
    "application_type": "service",
    "jwks": {
                "keys": [
                  {
                    "kty": "RSA",
                    "kid": "sf-jWwRKMUU5588aokhj-xu_mGucHLxIh_-fYLAofB8",
                    "use": "sig",
                    "x5c": [
                        "MIIDqDCCApCgAwIBAgIGAX55C ... Iuo9j3wpemDSgGapXQ=="
                    ],
                    "x5t#S256": "v-v2V8soFmXuhCAhta8wycA9lXKnrJ4ho-N3P8aASFc",
                    "e": "AQAB",
                    "n": "gIxwqCNkdAb1ioyNBY2boqUCrMj_NS ... FiAYF7p_k3XMXOh-hsL_D8FDQ"
                  }
                ]
            }
 }' "https://{yourHubOrgDomain}/oauth2/v1/clients/{yourServiceAppId}"
Note: Specify all the required parameters when you update a client app. Partial updates aren't supported. If any mandatory parameters are missing when you update a client app, the update fails. When you update the keys in the service app
jwksparameter, all the old keys are overwritten. To add a key and keep the old key, you need to specify both old and new keys in thejwks.keysarray.
Update the current credentials for the Org2Org app
From the response of the previous generate key POST request, copy the kid property and activate the new key by updating the Org2Org app (opens new window).
Request example
curl -X PUT \
  -H 'Accept: application/json' \
  -H "Authorization: Bearer {yourSpokeAccessToken}" \
  -H 'Content-Type: application/json' \
  -d ' {
    "name": "okta_org2org",
    "label": "{spokeOrg2OrgClientLabel}",
    "credentials": {
        "signing": {
            "kid": "sf-jWwRKMUU5588aokhj-xu_mGucHLxIh_-fYLAofB8"
        }
    }
}' "https://{yourSpokeOrgDomain}/api/v1/apps/{yourOrg2OrgAppId}"
Note: Specify
nameandlabelparameters when you update an Org2Org app.