Identity Engine
This guide describes how to run the embedded Identity Engine SDK or Sign-In Widget sample app. Make sure to successfully create and set up your Okta org first. You also need to download and set up the SDK .
Learning outcomes Run the embedded Identity Engine SDK or Sign-In Widget sample app.
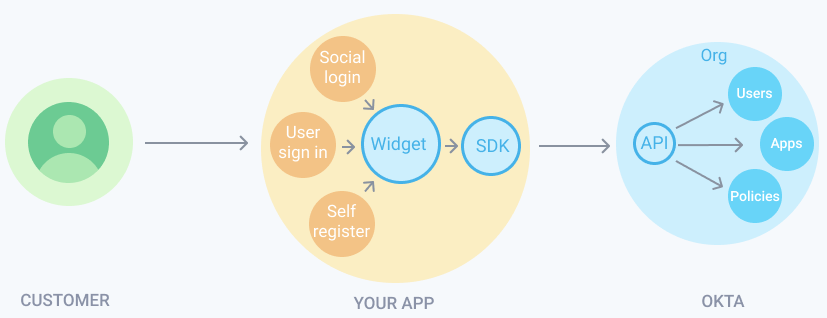
What you need Sample code In tandem with the embedded SDK, the widget integrates into your app by using a native language interface and communicates directly with the Okta APIs. The following diagram summarizes the flow.
The sample app is located here: okta-auth-js/samples/generated/express-embedded-sign-in-widget
If you haven't already done so, set up your Okta org . If you haven't already done so, download and set up the sample app . Locate the sample app in the following directory:
okta-auth-js/samples/generated/express-embedded-sign-in-widget, and ensure that the module dependencies are installed. See Install module dependencies . Open the embedded app directory of the widget sample using Visual Studio Code or your preferred IDE. Add a testenv configuration file. See Option 1: Create a configuration file for further information. From the terminal, go to the express-embedded-sign-in-widget sample directory and run the app: npm run start. This process sets the environment variables and starts the web server. Check the console to see that the environment variables are set. Open a browser window and go to the app's home page at http://localhost:8080. After the app loads, click Sign In on the home page. On the sign-in page, enter the username (email) and password you used in Create your Okta account . If you've successfully signed in, the app redirects you to the user profile page that displays basic user profile and security token information. Troubleshoot If the widget doesn't load, verify that you have properly set up your local configurations. Follow the steps in Set the configuration values .
If the "There was an unexpected internal error. Please try again." message appears instead of the Sign-In Widget, then verify that CORS is enabled. Follow the steps in Add a trusted origin and enable CORS to enable CORS.
Start your work with the use cases After you successfully run the sample app, the next step is to build your integration. Use the sample app as your guide. See Load the widget to start using the widget and explore the available use cases.
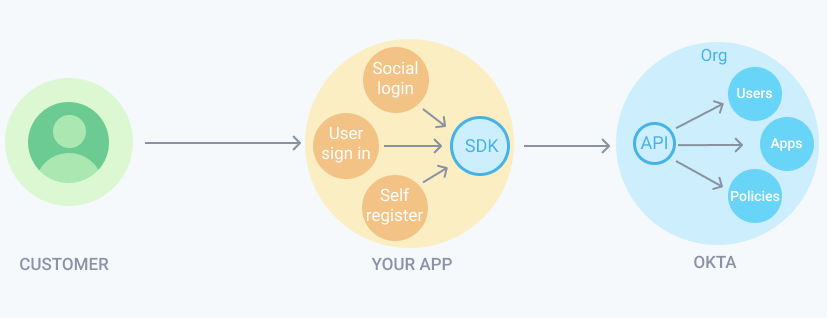
The embedded SDK flow The SDK integrates into your app by using a native language interface and communicates directly with the Okta APIs by using a REST interface. The following diagram illustrates the SDK flow.
Run the embedded SDK sample app If you haven't already done so, set up your Okta org . If you haven't already done so, download and set up the sample app . Locate the sample app in the following directory:
okta-auth.js/samples/generated/express-embedded-auth-with-sdk, and ensure that the module dependencies are installed. See Install the module dependencies . Open the embedded SDK sample app directory using Visual Studio Code or your preferred IDE. Add a testenv configuration file. See Option 1: Create a configuration file for further information. From the terminal, go to the express-embedded-sign-in-widget sample directory and run the app: npm run start. This process sets the environment variables and starts the web server. Verify on the console that the environment variables are set. Open a browser window and go to the app's home page: http://localhost:8080. After the app loads, click Sign In on the home page. On the sign-in page, enter the username (email) and password you used in Create your Okta account . Click Sign In . If you've successfully signed in, the app redirects you to the user profile page that displays basic user profile and security token information. Troubleshoot If the widget doesn't load, verify that you have properly set up your local configurations. Follow the steps in Set the configuration values .
If the "There was an unexpected internal error. Please try again." message appears instead of the Sign-In Widget, then verify that CORS is enabled. Follow the steps in Add a trusted origin and enable CORS to enable CORS.
Work with the use cases After you successfully run the sample app, you can build your own integration. Use the sample app as your guide. Explore the use cases that are available with the SDK, starting with the Basic sign-in flow using the password factor use case.