Instructions for

On this page

Set up your Okta org

Identity Engine

This guide covers how to create and set up your Okta org. Then, you can run the Identity Engine sample apps or integrate the SDK or Widget into your own app.


Learning outcomes

Get a new org set up and ready for various use cases.

What you need

Okta Developer Edition organization


Overview of the embedded identity solutions

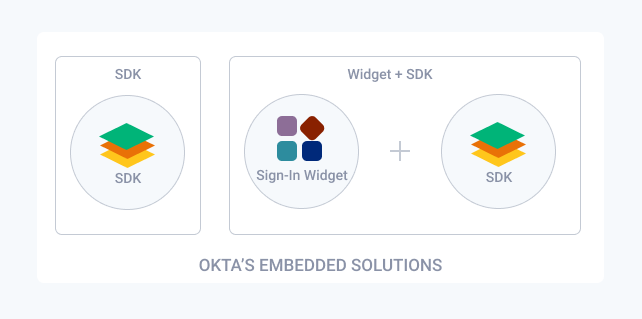
Okta provides two embedded identity solutions:

  • Embedded SDK only: A highly customizable solution that provides native language support for various identity use cases.
  • Embedded Widget + SDK: A quick and easy to set up solution that moves most of the heavy lifting to Okta. The amount of code that you need to write is small. However, many of the most advanced identity use cases (for example, social sign in, multifactor authentication) are supported out of the box.

Displays Okta embedded solution components: (SDK) and (Sign-In Widget + SDK)

This guide shows you how to set up your Okta org to support the embedded SDK or the embedded widget with SDK solutions. Ensure that you get set up with Okta and set up your Okta org for your use case before you

.

Note: You can use direct authentication with your apps in Identity Engine rather than an embedded SDK. This enables you to directly authenticate users rather than delegating authentication to Okta Identity Providers and authorization servers through an HTTP redirect in a browser. Direct authentication is beneficial in scenarios where there's a high degree of trust between the user and the app. It's also beneficial where browser-based flows aren't feasible, like with mobile apps. See the /challenge endpoint (opens new window), the /oob-authenticate endpoint (opens new window), and the new grant_types for the /token endpoint (opens new window) to help tailor authentication to your specific use cases. Also, for information on how to set up each new grant type, see Implement by grant type.

Get set up

Sample apps are provided for each solution to show you exactly how to integrate the SDK and the widget into your own app. Before you can run the sample apps or integrate embedded authentication into your own app, you need to do the following:

  1. Create your Okta account.
  2. Verify that the Interaction Code grant type is enabled.
  3. Update the default custom authorization server.
  4. Create an application.

After you've created your app, you need to set up your Okta org for your use case.

Create your Okta account

If you don't have an Okta Identity Engine org, you need to sign up for an Okta account and an Identity Engine org.

  1. Sign up (opens new window) for an Okta account.

    After you sign up, Okta sends a verification email to the email address that you provide.

  2. Using the activate link in Okta's email, activate your account and provide a new password. Okta redirects you to the Admin Console of your new Identity Engine org.

Update the default custom authorization server

Configure your default custom authorization server to enable the Interaction Code flow.

  1. Go to Security > API from your Okta org's Admin Console.

  2. Select the pencil icon for the default custom authorization server.

  3. Select the Access Policies tab.

  4. Select the pencil icon from the Actions column for the Default Policy Rule to access the Edit Rule dialog.

  5. Click Advanced in the IF Grant type is section, and then select the Interaction Code checkbox.

    Note: If the Interaction Code checkbox doesn’t appear, the Interaction Code grant type isn’t enabled for your org. To enable it, go to Settings > Account > Embedded widget sign-in support. See Verify that the Interaction Code grant type is enabled.

  6. Click Update Rule.

Create an application

Create an app integration that represents the application you want to add authentication to with Okta:

  1. Go to Applications > Applications in the Admin Console.

  2. Click Create App Integration.

  3. Select OIDC - OpenID Connect as the Sign-in method.

    • Enter an application name.

    • Select the Refresh Token checkbox.

    • Click Advanced in the Grant type section and ensure that the Interaction Code checkbox is selected.

      Note: If the Interaction Code checkbox doesn’t appear, the Interaction Code grant type isn’t enabled for your org. To enable it, go to Settings > Account > Embedded widget sign-in support. See Verify that the Interaction Code grant type is enabled.

    • Set Sign-in redirect URIs to

    • Set Controlled Access to Allow everyone in your organization to access.

  4. Click Save.

  5. Note the Client ID value (and if applicable, the Client secret value) on the General tab. You need it later in your embedded solution.

Note: New apps are automatically assigned the default authentication policy, which requires a user to verify their identity with two factors. To view or change this policy, select the Sign On tab, and then locate the User Authentication section.

Set up your Okta org for your use case

After you create your app integration in your Okta org, configure your app and org to support the use cases that you're implementing:

Set up your Okta org for a password factor only use case

This section shows you how to set up your Okta org and app to support password factor-only use cases. These use cases are intended to use the password factor without any additional factors (such as email or phone SMS). In the Create an application section, the app is assigned Any two factors. This is the default policy for new apps that requires a user to verify their identity with any two enabled authentication factors.

First, assign the Password only policy to your app:

  1. Got to Applications > Applications in the Admin Console, and then select your app.
  2. Select the Sign On tab.
  3. Click Edit in the User Authentication section.
  4. Select Password only for the Authentication policy, and then click Save.

Next, check that the password authenticator doesn't require any additional verification:

  1. Go to Security > Authenticators.
  2. Select Edit from the Actions menu on the Password authenticator row.
  3. Scroll down on the Password policy page to the rules section.
  4. Click the pencil icon next to the Default Rule to access the Edit Rule dialog.
  5. Select Not required in the AND Additional verification is section.
  6. Click Update rule.

Set up your Okta org for a password-optional use case

For password-optional authentication, you first need to:

  1. Set up the email authenticator for authentication and recovery.
  2. Create a separate group for password-optional users.

To ensure that only specific app integrations can let users sign up without a password, do the following:

  1. Create a profile enrollment policy for password-optional users that adds them to the new group and assign your app to it.
  2. Place this group at the lowest priority (just above the default policy) in the authenticator enrollment policy.

To ensure that only password-optional users can sign in without a password and everybody else is appropriately prompted for it, do the following:

  1. Create a new password-optional authenticator enrollment policy for the group.
  2. Add a global session policy for the group.
  3. Add an authentication policy for the group.
  4. Ensure that password-optional users never fall through to the default policy. The default policy should always have a password as a required authenticator.
  5. Explicitly exclude your main admin account from any further password-optional policies that you create.

Note: See also Set up password-optional sign-in experience (opens new window).

Common password-optional setup tasks

Set up the email authenticator
  1. Open the Admin Console for your org.
  2. Choose Security > Authenticators to show the available authenticators.
  3. Locate the Email authenticator on the Setup tab, and then select Actions > Edit.
  4. Set This authenticator can be used for to Authentication and recovery.
  5. Click Save.
Create a group for password-optional users
  1. Choose Directory > Groups.
  2. Click Add Group.
  3. Give the group a name, for example, "Password-optional Users."
  4. Click Save.

Enable password-optional user sign-up flow

To ensure that only specific app integrations can let users sign up without a password, do the following:

Create a profile enrollment policy for password-optional users

A profile enrollment policy determines the minimum information required from a user to create an account. The policy also determines how the user should verify their identity before creating their account.

  1. Go to Security > Profile Enrollment and click Add Profile Enrollment Policy.
  2. Locate the Profile Enrollment section of the policy and click Edit.
  3. Set Self-service registration to Allowed.
  4. Verify that Required before access is granted is selected for Email Verification.
  5. Set Add the user to group to the group that you made for password-optional users, and then click Save.
  6. Click Manage apps, and then click Add an App to This Policy.
  7. Locate your app integration, click Apply, and verify that the app is in the Apps list using the new Profile Enrollment Policy.

Enable password-optional user sign-in flow

To ensure that only password-optional users can sign in without a password and everybody else is appropriately prompted for it, do the following:

Create a password-optional authenticator enrollment policy

An authenticator enrollment policy determines which authenticators must challenge a user before they’re successfully signed in. In this case, email is set to Required, while all the other authenticators are set to Optional.

  1. Go to Security > Authenticators.

  2. Select the Enrollment tab, and then click Add A Policy.

  3. Give the new policy a name, for example, "Password-optional Sign-In Policy."

  4. Set Assign to groups to the group you just made for password-optional users.

  5. Do the following in the Eligible Authenticators section:

    • Set Email to Required.
    • Set Password to Optional.
    • Verify that the remaining authenticators are set to Optional.
  6. Click Create Policy.

Create a rule for the policy
  1. Give the rule a name, for example, "Password-optional Sign-In Rule."
  2. Set Exclude Users to the names of your main admin accounts.
  3. Leave the other settings at their defaults, and then click Create Rule.
  4. Move the new policy immediately above the Default Policy in the list of policies.
Add a global session policy for password-optional users

A global session policy determines user session length and basic authentication rules for groups of users. In this case, the policy turns off MFA for all users in the password-optional user group. Therefore, they only need email authentication to sign in.

  1. Go to Security > Global Session Policy, and click Add policy.
  2. Give the policy a name, for example, "Global Password Optional Policy."
  3. Set Assign to groups to the group you just made for password-optional users.
  4. Click Create Policy and Add Rule, and give the rule a name. Example: "Global Password Optional Rule."
  5. Verify that Establish the user session with is set to Any factor used to meet the Authentication Policy requirements.
  6. Set Multifactor authentication (MFA) is to Not required.
  7. Leave the other settings at their defaults, and then click Create Rule.
Add an authentication policy for password-optional users
  1. Go to Security > Authentication Policies, and click Add a policy.

  2. Give the policy a name, such as "Authenticate with Email Only", and then click Save.

  3. Locate the Catch-all Rule of the new policy and select Actions > Edit.

  4. Set User must authenticate with to Any 1 factor type, and in the Possession factor constraints are section:

    • Verify that no options are selected.
    • Verify that Email is listed in the box under 1 factor type.
  5. Click Save, select the Applications tab for your newly created policy, and then click Add app.

  6. Find your app in the list and click Add next to it.

  7. Click Close, and then verify that the app is now listed in the Applications tab of the new policy.

Set up your Okta org for a multifactor use case

This section shows you how to set up your Okta org and app to support the multifactor use cases available in this embedded authentication guide. In addition to the password factor, the multifactor use cases presented in this guide use the email and phone factors. Perform the following configuration after you create an app to set up the email and phone factors in your Okta org:

  1. Set up the email authenticator for authentication and recovery
  2. Add the phone authenticator for authentication and recovery
  3. Update your authentication policy with multifactor authentication

Note: The multifactor use cases in this guide implement the password, email, and phone factors. However, there are more supported factors that you can use in your embedded authentication app. See Multifactor Authentication (opens new window).

Set up the email authenticator for authentication and recovery

  1. Go to Security > Authenticators in the Admin Console.
  2. Select Edit from the Actions dropdown menu on the Email authenticator row to access the Email dialog.
  3. Select Authentication and recovery in the Used for section, and click Save.

Add the phone authenticator for authentication and recovery

Note: If your org already has the phone authenticator, ensure that Authentication and recovery appears in the Used for column on the Setup tab.

  1. Go to Security > Authenticators in the Admin Console to add the phone authenticator.

  2. Click Add Authenticator, and then click Add on the Phone authenticator tile.

  3. Select SMS for the User can verify with field.

    Note: Some SDKs support only SMS with a phone authenticator.

  4. Select Authentication and recovery for This authenticator can be used for.

  5. Click Add.

Update your authentication policy with multifactor authentication

  1. Go to Security > Authentication Policies in the Admin Console.

  2. Select Default Policy as this is the policy that the app you created is assigned to.

  3. Select Edit from the Actions menu for the Catch-all Rule to access the Edit Rule dialog.

  4. Scroll down to the AND User must authenticate with dropdown menu and select Password + Another Factor.

  5. Ensure that no options are selected for the AND Possession factor constraints are field.

  6. Click Save.

    Note: Because the default authentication policy is a shared policy, changes you make apply to both new and existing apps that are assigned to it.

Set up your Okta org for a social IdP use case

Use this section to set up your Okta org and app to support Facebook IdP use cases that are available in this embedded authentication guide. If you want to implement a use case with another social IdP, see Add an external Identity Provider for the list of Okta-supported social IdPs and instructions on how to configure them for social login with Okta.

Perform the following configurations after you create an app to set up the Facebook IdP and your Okta org:

  1. Create a Facebook app in Facebook
  2. Set up the Facebook test user
  3. (Optional) Switch your Facebook app to Live mode—this step isn't required if you want to remain in Facebook Development mode
  4. Create the Facebook Identity Provider in Okta
  5. Add an Identity Provider routing rule in Okta

Create a Facebook app in Facebook

  1. Go to Facebook for Developers (opens new window) and click the Login link. If you don't have an account, create one.
  2. Use these Facebook instructions (opens new window) as a guide to create a Facebook app. When you create the Facebook app, ensure that you select None as the app type.
  3. Select the app that you created from the Facebook Apps (opens new window) page.
  4. Scroll to the Add a product section on the App Dashboard page and click the Set up link in the Facebook Login tile.
  5. Select Web as the platform type on the first set up page.
  6. Set the value for Site URL to https://${yourOktaDomain}/oauth2/v1/authorize/callback (for example: https://dev-12345678.okta.com/oauth2/v1/authorize/callback).
  7. Click Save, Continue, and then click Next until you finish.
Configure Facebook settings
  1. Click Facebook Login (under products) in the left navigation menu, and then click Settings.
  2. Locate Client OAuth Settings on the Settings page and add the following URLs for the Valid OAuth Redirect URIs field: https://${yourOktaDomain}/oauth2/v1/authorize/callback (for example, https://dev-12345678.okta.com/oauth2/v1/authorize/callback).
  3. Click Save Changes at the bottom of the page.
  4. Expand Settings on the left side of the page, and then click Basic.
  5. Save the App ID and the App Secret values so you can add them to your Okta org's Identity Provider settings.

Set up the Facebook test user

A test account is required to test Facebook sign-in in Development mode. Facebook automatically creates one test user for you. Perform the following steps to find, set the password, and save this user's information.

  1. From the Facebook App Dashboard page, click Roles and then click Test Users.
  2. Click Edit for the test user and select Change the name or password for this test user.
  3. In the Edit Test User dialog box, set a password in the New Password and Confirm New Password fields.
  4. Click Save.
  5. Save the test user's email and password for testing social IdP sign-in use cases with Okta and Facebook.

Switch your Facebook app to Live mode

Note: This section is optional.

By default, your Facebook app is in Development mode and can only be used by the test user and the user that you used to sign in and create the Facebook app. As a result, you can only use these users when you test your Facebook sign-in use cases.

If you would like to sign in any public Facebook user, you need to set the Facebook app to Live mode. To switch your Facebook app to Live mode, perform the following steps:

  1. From the Facebook App Dashboard page, click Settings and then click Basic.
  2. Specify a value in the Privacy Policy URL field for your app. If you don't have a privacy URL, you can temporarily use: https://www.okta.com/privacy-policy/.
  3. Click Save Changes at the bottom of the page.
  4. At the top of the App Dashboard page, use the App Mode toggle to switch the app from In development to Live mode.
  5. In the Switch to Live Mode dialog box, click Switch Mode.

Create the Facebook Identity Provider in Okta

To connect your org to Facebook, you need to add and configure the Facebook IdP in Okta. The following steps assume that you have already created and configured your Facebook app and that you have the Facebook App ID and App Secret values available.

  1. In the Admin Console, go to Security > Identity Providers.
  2. Click Add Identity Provider, and then select Add Facebook.
  3. Enter a name (for example, Facebook IdP) on the Add Identity Provider - Facebook page.
  4. Keep the default SSO Only option for the Idp Usage field.
  5. Specify the Facebook App ID as the Client ID, and the Facebook App Secret as the Client Secret.
  6. Keep the default values for public_profile and email in the Scopes field, and click Add Identity Provider.

Add an Identity Provider routing rule in Okta

The final step is to add the created Facebook IdP to the routing rule.

  1. Go to Security > Identity Providers in the Admin Console.

  2. Click the Routing Rules tab on the Identity Providers page, and then click Add Routing Rule.

  3. Specify the Rule Name (for example: Facebook and Okta Rule).

  4. Select the Facebook Identity Provider that you just created from the THEN Use this identity provider dropdown list. Since Okta is the default IdP, the two values should be:

    • Okta
    • Facebook Identity Provider (IdP)
  5. Click Create Rule.

  6. Click Activate at the prompt. Your new rule appears above the Default Rule in the routing rule list. This top position signifies that the setting in your new rule overrides the Default Rule.