On this page
Configure Native to Web SSO
Learn what Native to Web SSO is, why it matters, and how it actually connects your OpenID Connect (OIDC) apps to your web-based services.
Learning outcomes
- Understand the native to web SSO flow.
- Set up your allowlist for token exchange.
- Manage your allowlist.
What you need
- Okta Integrator Free Plan org (opens new window)
- An OIDC app that you want to use as the origin app. Okta supports web, SPA, and native OIDC apps.
- An OIDC or SAML app that you want to use as the target web app
Overview
Native to Web SSO creates a seamless, unified authentication experience when a user transitions from an OIDC origin app (like a native app) to a web app (either OIDC or SAML). It’s a one-way trust from the origin app to the target.
Native to Web SSO achieves this by exchanging a token with the interclient_access scope for a one-time token. This token is used to bootstrap an authentication into the target OIDC or SAML app using authentication information such as previous factor verifications from a session created when obtaining the original token. This eliminates repeated sign-in prompts and simplifies development by reducing authentication complexity.
Handle different assurance levels and remediation
Sometimes the target web app has stricter security needs than the requesting app. For instance, the original app may have only required a username and password, but the target web app requires a second factor, like a one-time passcode (OTP).
Okta handles that during the transition by prompting the user to satisfy the missing requirement. The user sees a single prompt for the complimentary factor (OTP), not a full authentication restart.
Common use cases
- Incorporating SaaS: You have an app, and you want to seamlessly incorporate a third-party SaaS app into it.
- The application dashboard: Your app acts as an "application dashboard" with links to multiple web apps.
- Modernization: You’re going through a large modernization project. This pattern lets your legacy apps continue to operate unmodified while you update the new parts of the system. This is especially helpful when you want to move towards a modern native app and incorporate the legacy web (hybrid native/web) app.
- Integration limitations: It’s critical when you can’t modify the target app integration to accommodate a special connection. The target source code isn’t accessible, but it already supports federation.
In all these cases, the Identity and Access Management (IAM) platform becomes the secure fabric that seamlessly weaves all of your apps together into one low-friction experience.
Native to Web SSO flow
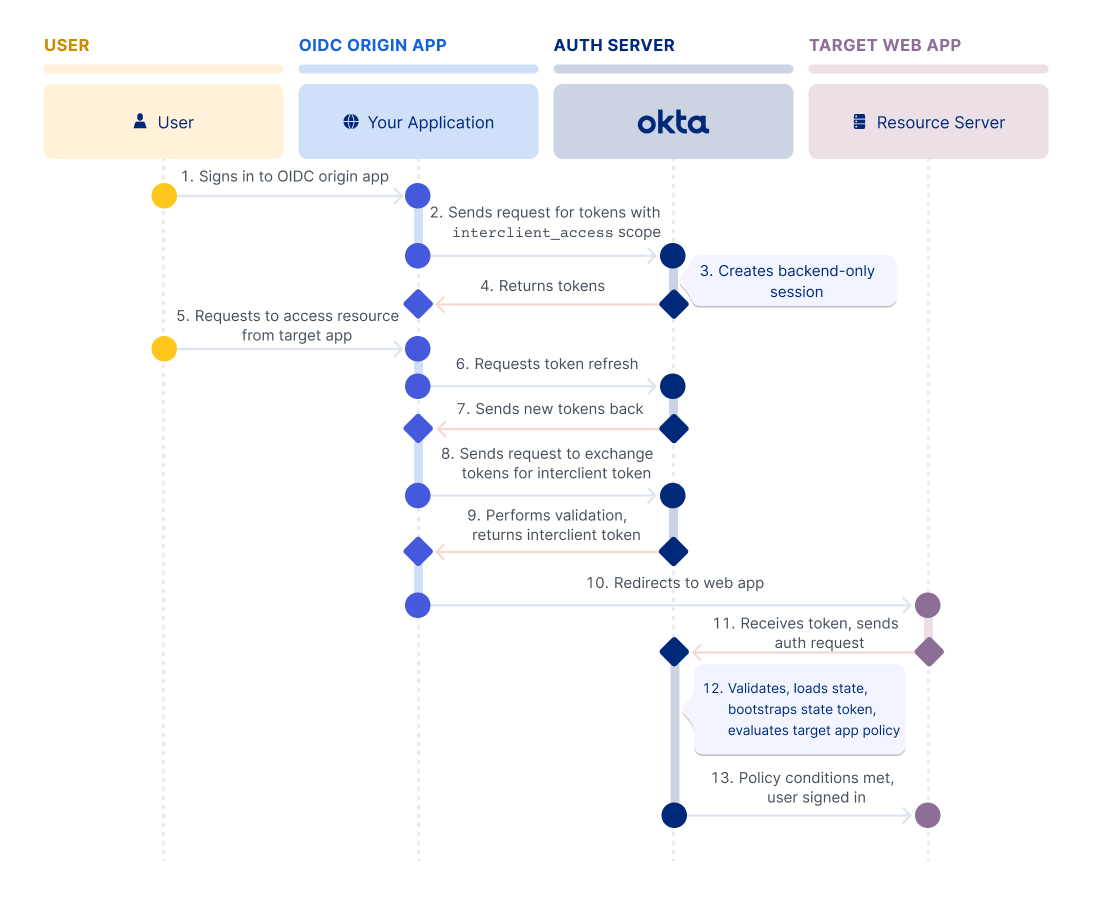
The flow steps:
The user signs in to an OpenID Connect (OIDC) origin app.
The app obtains tokens through a request to the
/tokenendpoint. The request includes theinterclient_accessandoffline_access(optional) scopes.Okta checks that the app is an admin-configured trusted app that’s allowed to use this flow. Then, it creates a special backend-only session. This session tracks the user’s authentication level and security assurances, such as, "This user verified their identity with a strong factor on a trusted device."
Okta sends back the access token, the session-bound ID token, and a refresh token if
offline_accesswas requested.The user requests access to a resource from the target web app (client app).
The OIDC origin app now needs to launch the other app. It makes a request to refresh the access token, if necessary.
Okta sends back the new tokens, and the refresh token (if requested).
The app then makes a request to the
/tokenendpoint to exchange the access and ID tokens for a single-useinterclient_token. This token is requested using therequested_token_type(urn:okta:params:oauth:token-type:interclient_token) and the Token Exchange grant type (urn:ietf:params:oauth:grant-type:token-exchange).Okta validates the trust relationship and user assignment of the target web app, and returns the single-use
interclient_tokenthat’s bound to the assurance of theid_tokenand target app. This single-use token is the user’s ticket to the target web app.The OIDC app launches the authorization server URI with intent for the target web app, securely passing the
interclient_tokento it.The web app receives the token and sends it to Okta in an authorize request (
/authorizeor/sso/saml).Okta validates the
interclient_token,audience, target app ID, issuer, and so on.- Look up context: Okta looks up the associated backend session.
- Loads the state: Okta then reconstructs the user’s state. This tells Okta who the user is and what security assurances (MFA, Device Trust, and so on) were already satisfied when they signed in to the OIDC origin app.
- Bootstraps the state token to the flow: Rather than making the user start from a blank sign-in page, Okta uses this loaded context to bootstrap a new state token for the web app's policy evaluation.
Okta checks if the user has satisfied all of the target web app’s policy requirements. If all checks pass, the user is immediately signed in, otherwise the user is prompted to satisfy all policy requirements.
Note: The user isn’t allowed to cancel and switch users.
Configure the app
The OIDC origin app exchanges access and ID tokens for a single-use interclient token from Okta. To do this, use the Token Exchange grant type in the exchange request.
To enable the Token Exchange grant type in your app, follow these steps:
- Go to Applications > Applications in the Admin Console.
- Locate your app and select it.
- Click Edit in the General Settings section.
- In the Grant type section, expand Advanced.
- Select the Token Exchange checkbox and click Save.
Note: To update the OIDC origin app using the Okta APIs, use the Replace an app (opens new window) method. In the
oauthClientobject of your PUT request, add theurn:ietf:params:oauth:grant-type:token-exchangevalue to thegrant_typesarray.
Configure the trust map
Define a list of apps that are allowed to request the single-use interclient token on the target web app. This allowlist is a trust map between the origin app and the target web app. It ensures that the SSO flow only happens between apps that you explicitly trust. You can define up to five trusted apps per target web app.
Okta checks this trusted relationship at two critical points in the flow:
During authentication: The OIDC origin app can only request the special
interclient_accessscope if it has a trust relationship set up.During token exchange: When the OIDC origin app asks for the
interclient_token, Okta explicitly checks to ensure that the app is on the target app's allowed list. If it's not there, the token exchange is denied.
Use the Admin Console (opens new window) steps to configure the trust mapping.
Note: To create an allowlist of apps using the Okta APIs, use the Create an allowed app mapping for a target app (opens new window) method (
POST /api/v1/apps/{appId}/interclient-allowed-apps). TheappIDis the target app’s ID. In the body of the request, include the app ID (opens new window) of the app that you want to add to the allowlist.
Application Interclient Trust Mappings API
See the following new Application Interclient Trust Mappings API (opens new window) endpoints to perform other Native to Web SSO tasks:
To get a list of allowed apps for a target app, use the List all allowed apps for a target app (opens new window) method (
GET https://{yourOktaDomain}/api/v1/apps/{appId}/interclient-allowed-apps). TheappIdis the ID of the target web app (the one allowing the SSO).To get a list of target apps that allow an app to SSO, use the List all target apps for an allowed app (opens new window) method (
GET https://{yourOktaDomain}/api/v1/apps/{appId}/interclient-target-apps). TheappIdis the ID of the requesting OIDC origin app (the one allowed to request the SSO).To delete a trust mapping, use the Delete an interclient trust mapping (opens new window) method.
Scopes
There are two new OAuth 2.0 scopes available for the interclient endpoints:
okta.apps.interclientTrust.manage: Use to create a resource, manage a resource, or delete a resourceokta.apps.interclientTrust.read: Use to read information about a resource
Flow specifics
The following section outlines the requests required to perform Native to Web SSO. These example requests use a native app as the origin app. You can obtain a token with the interclient_access scope using your preferred authentication method. The example below uses Resource Owner Password as the authentication flow for simplicity.
Request for initial tokens
Before you can begin this flow, collect the required credentials from the user in a manner of your choosing. Then, make a single API call to the Okta authorization server /token endpoint. Your request should look something like the following example:
curl --request POST \
    --url https://{yourOktaDomain}/oauth2/v1/token \
    --header 'accept: application/json' \
    --header 'authorization: Basic MG9hYn...' \
    --header 'content-type: application/x-www-form-urlencoded' \
    --data 'grant_type=password
  &client_id={client_id}
  &username=testuser1%40example.com
  &password=%7CmCovrlnU9oZU4qWGrhQSM%3Dyd
  &scope=openid%20offline_access%20interclient_access'
Note the parameters that are passed:
client_id: Matches the client ID of the OIDC origin app. You can find it at the top of your app's General tabscope: Must beopenid,interclient_access, and optionallyoffline_accessgrant_type:password, which indicates that you're using the Resource Owner Password grant type.username: The username of a user registered with Okta.password: The password of a user registered with Okta.
Note: For more information on these parameters, see the
/tokenendpoint (opens new window).
Response example
If the credentials are valid, Okta responds with the required tokens. This example response is truncated for brevity.
{
    "token_type": "Bearer",
    "expires_in": 3600,
    "access_token": "eyJraWQiOiItbkk . . . aIRQ",
    "scope": "openid offline_access interclient_access",
    "refresh_token": "DnZ77s5coFFJsj7CBO5NJU_wlZs0SZ0euCeiKXrN8T4",
    "id_token": "eyJraWQi . . . AHlwNmdw"
}
Request to initialize Native to Web SSO
When the user requests access to a resource from the target web app, the native app needs to launch a trusted target web app. It makes a request to refresh the access token, if necessary, and gets back refreshed tokens from Okta. Then, the OIDC origin app needs to exchange the tokens for a single-use interclient token from an Okta authorization server. The Okta org authorization server is used in this example. Your request should look something like this example. The tokens are truncated for brevity.
Request example
curl --request POST
    --url https://{yourOktaDomain}/oauth2/v1/token \
    --header 'content-type: application/x-www-form-urlencoded' \
    --header 'accept: application/json' \
    --data 'grant_type=urn:ietf:params:oauth:grant-type:token-exchange
  &client_id={client_id}
  &actor_token=eyJra. . . tSXL-HCA
  &actor_token_type=urn:ietf:params:oauth:token-type:access_token
  &subject_token=eyJr. . .cbYGw
  &subject_token_type=urn:ietf:params:oauth:token-type:id_token
  &requested_token_type=urn:okta:params:oauth:token-type:interclient_token
  &audience=urn:okta:apps:0oa8vcy7h1eyj7wLL0g7'
Note the parameters that are passed:
client_id: Matches the client ID of the OIDC origin app. You can find it at the top of your app's General tabactor_token: The value of the access token that you obtained in the last requestactor_token_type:urn:ietf:params:oauth:token-type:access_tokensubject_token: A security token that represents the identity of the party on behalf of whom the request is being made, which is the value of the ID token that you obtained in the last request.subject_token_type:urn:ietf:params:oauth:token-type:id_tokenrequested_token_type: The type of token that you’re requesting in exchange for theactor_tokenandsubject_token. (urn:okta:params:oauth:token-type:interclient_token)audience: The target audience for the requested token bound to the target app using the IdP/Okta application/client ID (urn:okta:apps:{target web app client_id})grant_type:urn:ietf:params:oauth:grant-type:token-exchange
Response example
This example response is truncated for brevity.
{
    "token_type": "N_A",
    "expires_in": 300,
    "access_token": "eyJraWQiOiJNTG. . .GubhhEsg",
    "issued_token_type": "urn:okta:params:oauth:token-type:interclient_token"
}
Authorize request by target app
The OIDC app launches the authorization server URI with intent for the target web app, securely passing the interclient_token to it. The web app receives the token and sends it to Okta in an authorize request (/authorize or /sso/saml). The OIDC request looks something like the following example. The example is truncated for brevity.
curl --request POST
    --url http://{yourOktaDomain}/oauth2/v1/authorize \
    --header 'content-type: application/x-www-form-urlencoded' \
    --header 'accept: application/json' \
    --data 'client_id={client_id}
  &response_type=code
  &scope=openid
  &redirect_uri=http://localhost:8080/authorization-code/callback
  &state=1234
  &interclient_token=eyJraWQiOiJNTG. . .GubhhEsg
Note the parameters that are being passed:
client_id: The client ID of the app integration that you created earlier. Find it in the Admin Console on your app integration's General tab.response_type: The value iscode, which indicates that the target app is configured for the Authorization Code grant type. Okta returns the authorization code, which is then used by the app in the request to the/tokenendpoint. See Implement authorization by grant type (opens new window) for specifics on the authorization code flow.scope: The value isopenid, which means that the/tokenendpoint returns an ID token. Note: Theinterclient_accessscope isn't allowed in the request when theinterclient_tokenparameter is used.redirect_uri: The callback location where the user agent is directed to along with thecode. This URI must match one of the Sign-in redirect URIs in the target app.state: An arbitrary alphanumeric string that the authorization server reproduces when redirecting the user agent back to the client. This is used to help prevent cross-site request forgery.interclient_token: The token that bootstraps an authentication into the target app using authentication information such as previous factor verifications from a session created when obtaining the original token.
Note: A SAML request would look similar to the following request:
http://{yourOktaDomain}/app/{instanceName}/{externalKey}/sso/saml?interclient_token=eyJraWQi. . .w2H0OYlw
Final checks by Okta
Okta validates the interclient_token, audience, target app ID, issuer, and so on. Okta then checks if the user has satisfied all of the target web app’s policy requirements. If all checks pass, the user is immediately signed in, otherwise the user is prompted to satisfy all policy requirements.