On this page
Configure Device Authorization Grant Flow
This guide describes the Device Authorization feature, which allows users to sign in to input-constrained devices and devices without a browser.
Learning outcomes
- Create and configure a native OpenID Connect application to support Device Authorization.
- Enable Device Authorization at the policy rule level.
- Request the device verification code.
- Retrieve tokens for the user.
- Revoke the tokens.
What you need
Okta Integrator Free Plan org (opens new window)
Overview
The Device Authorization feature is an OAuth 2.0 grant type. It allows users to sign in to input-constrained devices, such as smart TVs, digital picture frames, and printers, and devices with no browser. Device Authorization enables you to use a secondary device, such as a laptop or mobile phone, to complete the sign-in flow to apps that run on such devices.
Configure an application to use the Device Authorization Grant
Create a Native OpenID Connect application and then configure it to support Device Authorization:
- Open the Admin Console for your org.
- Go to Applications > Applications to view the current app integrations.
- Click Create App Integration.
- Select OIDC - OpenID Connect as the Sign-in method, and then Native Application as the Application type.
- Click Next and specify the App integration name.
- Select Device Authorization and Refresh Token as the grant types.
- Select Allow everyone in your organization to access in the Assignments section, and then click Save.
Note: Device Authorization is only supported for use with a native application.
Configure the authorization server policy rule for Device Authorization
Both org and custom authorization servers support Device Authorization. Ensure that Device Authorization is enabled at the policy rule level if you're planning to use a custom authorization server. If you're planning to use the org authorization server, you can skip this step. Examples in this guide use the "default" custom authorization server.
To check that Device Authorization is enabled:
- In Admin Console, go to Security > API and select the "default" custom authorization server.
- On the Access Policies tab, select the access policy that you want to configure Device Authorization for.
- Click the pencil icon for the Default Policy Rule.
- In the Edit Rule dialog, select Device Authorization for the grant type and click Update Rule.
Configure the smart device
Request the device verification code
The smart device first needs to call the /device/authorize endpoint to obtain the unique verification code.
Example request
curl --request POST \
  --url https://{yourOktaDomain}/oauth2/default/v1/device/authorize \
  --header 'Accept: application/json' \
  --header 'Content-Type: application/x-www-form-urlencoded' \
  --data-urlencode 'client_id={clientId}' \
  --data-urlencode 'scope=openid profile offline_access'
The device authorization request passes the following parameters:
client_id: Matches the Client ID of the OAuth 2.0 app that you created.scope: Specifies which access privileges are being requested for the access token. See Scopes (opens new window) for a list of supported scopes.
Example response
{
    "device_code": "4ebdb4de-1f8b-4497-be01-ddfaf83c4e9c",
    "user_code": "MHXTFRPK",
    "verification_uri": "https://{yourOktaDomain}/activate",
    "verification_uri_complete": "https://{yourOktaDomain}/activate?user_code=MHXTFRPK",
    "expires_in": 600,
    "interval": 5
}
The properties in the response are:
device_code: The long string that the device uses to exchange for an access token.user_code: The text that you enter at the URL that's listed as the value forverification_uri.verification_uri: The URL that the user needs to access from their device to start the sign-in process.verification_uri_complete: The URL that the client uses to generate the QR Code for the user to scan.expires_in: The number of seconds that this set of values is valid. After the device code and user code expire, the user has to start the device verification process over.interval: The number of seconds that the device should wait between polling to see if the user has finished signing in.
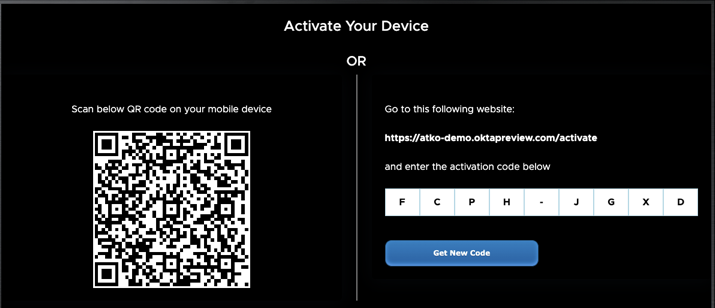
The user_code and verification_uri must appear on the smart device for the user. To display the QR Code, the client generates the code by using the verification_uri_complete value that was returned in the response and displays it on the device for the user to scan.
Example of the display on a smart device
Request access, ID, and refresh tokens
To retrieve tokens for the user, the smart device needs to make a request to the /token endpoint.
Request example
curl --request POST \
  --url https://{yourOktaDomain}/oauth2/default/v1/token \
  --header 'Accept: application/json' \
  --header 'Content-Type: application/x-www-form-urlencoded' \
  --data-urlencode 'client_id={clientId}' \
  --data-urlencode 'grant_type=urn:ietf:params:oauth:grant-type:device_code' \
  --data-urlencode 'device_code={deviceCode}'
Note the parameters that are being passed:
grant_type: Identifies the mechanism that Okta uses to retrieve the tokens. Value:urn:ietf:params:oauth:grant-type:device_codedevice_code: The string that the device uses to exchange for an access token. Use thedevice_codevalue from the device verification response.
Example response
Okta returns a pending response if the user doesn't complete the authentication.
{
  "error": "authorization_pending",
  "error_description": "The device authorization is pending. Please try again later."
}
After the user visits the /activate URL, follows the instructions on their device to input the activation code, and completes the authentication and authorization, the tokens are returned in the response from the /token endpoint.
{
  "token_type": "Bearer",
  "expires_in": 3600,
  "access_token": "eyJraWQ...JQuDJh8g",
  "scope": "openid profile offline_access",
  "refresh_token": "zcLdr1FBXwtI9ej98VVVwtjDd-SmaoL06qr_UcY2tNA",
  "id_token": "eyJraWQ...WI6KR0aQ"
}
If you need a refresh token, ensure that you've initially requested the offline_access scope through the /device/authorize endpoint. To renew access tokens in the future, you can use the refresh token.
Note: The unique user code is valid for 10 minutes. The user needs to use this code and complete the authentication process within that time. If not, the unique user code expires and the device can request a new user code by using the
/device/authorizeendpoint.
Revoke the token
To revoke the tokens, the smart device must make a request to the /revoke endpoint.
curl --request POST \
  --url https://{yourOktaDomain}/oauth2/default/v1/revoke \
  --header 'Accept: application/json' \
  --header 'Content-Type: application/x-www-form-urlencoded' \
  --data-urlencode 'token={refreshToken}' \
  --data-urlencode 'token_type_hint=refresh_token' \
  --data-urlencode 'client_id={clientId}'
Example response
HTTP/1.1 200 OK