On this page
Transactional verification using CIBA
This guide explains how to build transactional verification using a Client-Initiated Backchannel Authentication (CIBA) grant and a custom-branded authenticator.
Learning outcomes
- Understand the OpenID Connect (OIDC) CIBA flow.
- Set up your OIDC client and an Okta authorization server to use the CIBA grant type.
- Implement the CIBA grant flow in Okta using an Okta Custom Authenticator.
What you need
- Okta Integrator Free Plan org (opens new window)
- A configured mobile app that verifies user identities for an Okta Custom Authenticator and responds to CIBA authorization challenges (opens new window) sent by Okta in a backchannel request.
- A test user in your org that you can use for testing the CIBA flow with a Custom Authenticator.
Note: See the Okta Devices Swift SDK (opens new window) for iOS and the Okta Mobile Kotlin SDK (opens new window) for Android for more information on the Okta Devices SDK. This guide uses the Okta Devices Swift SDK (opens new window).
Sample code
This guide uses the Okta Authenticator Sample App (opens new window) for iOS to configure the Okta Custom Authenticator to work with CIBA.
About Client-Initiated Backchannel Authentication (CIBA)
Organizations are constantly looking for ways to strike a balance between offering a frictionless user experience without compromising security. It becomes even more challenging when the users try to perform sensitive transactions. Okta uses CIBA to provide customers with a simple and secure transaction verification solution.
CIBA extends OIDC to define a decoupled flow where the authentication or transaction flow is initiated on one device and verified on another. The device that the OIDC app initiates the transaction on is called the consumption device. The device where the user verifies the transaction is called the authentication device.
CIBA grant-type flow
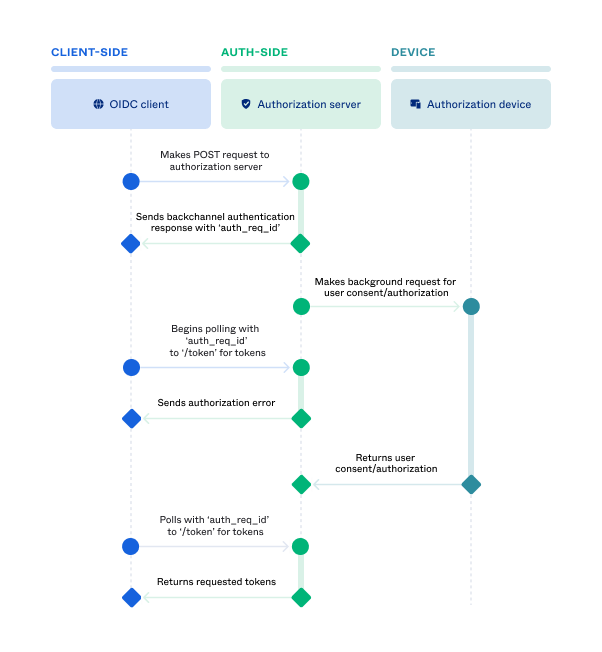
The OIDC app on the consumption device triggers the CIBA authentication flow by sending a POST request to the authorization server’s backchannel authentication endpoint (
/oauth2/v1/bc/authorize).To identify the user that more authentication is being requested for, the request must include either a previously issued ID token (obtained during the user’s initial authorization) as an
id_token_hintor the user’s username (email address) as alogin_hint.Note: The
id_token_hintis used in cases where the user is signed in to the app running on the consumption device, and the same authorization server authenticates the user. The user is also in control of both the consumption and authentication devices.The authorization server validates the authentication request and the user identification, and then sends the backchannel authentication response with the authentication request ID (
auth_req_id) to the client.Okta sends a backchannel request for user approval to a branded authenticator on the user’s device (authentication device). That request contains all the information needed to authenticate the user without asking them for their credentials.
The client (consumption device) begins to poll the
/tokenendpoint including theauth_req_idin the request.An authorization error is sent to the client if the authorization server hasn’t received user approval yet.
The user sees the custom-branded push notification on their device and approves it.
The client (consumption device) polls the authorization server again.
Okta sends back the tokens.
Configure CIBA for your org
There are a few steps required to configure CIBA for your org:
Note: Ensure that you complete the What you need section at the beginning of this guide before proceeding.
- Create an OIDC client integration and enable the CIBA grant type.
- Configure an authorization server access policy to use CIBA.
Create an OIDC client integration and enable CIBA
Create an Okta OIDC client app integration to represent the consumption device. Then, enable CIBA as a grant type and associate the client app with the Custom Authenticator that you previously configured using the Devices SDK (opens new window).
Note: Web apps are currently the only app supported with the CIBA flow.
In the Admin Console, go to Applications > Applications, and then click Create App Integration.
Select OIDC - OpenID Connect as the Sign-in method and choose the type of app that you want to integrate with Okta. In this example, select Web Application.
Click Next, and then enter a name for your app integration.
In the Grant type section, click Advanced and select Client-initiated backchannel authentication flow (CIBA) in the Other grants section.
Select the Custom Authenticator that you previously configured using the Mobile SDK (opens new window) from the Preferred authenticator for CIBA dropdown list.
In the Sign-in redirect URIs box, specify the callback location where Okta returns the tokens after the user finishes authenticating. You can use the default URI for this exercise.
Note: You can leave the rest of the default values as they work with this guide for testing purposes.
In the Assignments section, select Allow everyone in your organization to access.
Click Save. The settings page for the app integration appears, showing the General tab.
Make note of the Client ID in the Client Credentials section and the client secret in the CLIENT SECRETS section. You need this information for the Test the CIBA flow section.
Use the API
You can also use the Apps API (opens new window) to create the OAuth 2.0 client app with the CIBA grant type. Use the following parameters in the request:
Supported parameters
| Parameter | Value |
|---|---|
grant_types | urn:openid:params:grant-type:ciba |
backchannel_authentication_request_signing_alg | (Optional) The signing algorithm for CIBA-signed requests using JWT. If this value isn't set and a JWT-signed request is sent, the request fails. |
backchannel_custom_authenticator_id | The ID of the Custom Authenticator that authenticates the user |
backchannel_token_delivery_mode | (Optional) How CIBA is delivered. Supported value: poll. Since poll is the only value supported, this parameter is optional. |
Note: The parameters
backchannel_token_delivery_mode,backchannel_authentication_request_signing_alg, andbackchannel_custom_authenticator_idare only available if the client hasurn:openid:params:grant-type:cibadefined as one of its allowedgrant_types. See the Settings (opens new window) table on the Apps API reference page for more information on these new parameters.
Example request
{
    "name": "oidc_client",
    "label": "CIBA Client",
    "signOnMode": "OPENID_CONNECT",
    "credentials": {
      "oauthClient": {
        "token_endpoint_auth_method": "client_secret_post"
      }
    },
    "settings": {
      "oauthClient": {
        "client_uri": "http://localhost:8080",
        "logo_uri": null,
        "redirect_uris": [
          "https://example.com/oauth2/callback",
          "myapp://callback"
        ],
        "response_types": [
          "token",
          "id_token",
          "code"
        ],
        "grant_types": [
          "implicit",
          "authorization_code",
          "urn:openid:params:grant-type:ciba"
        ],
        "application_type": "web",
        "backchannel_custom_authenticator_id" : "aut5ur07m58W2sQD01d7"
      }
    }
}
Note: You can also use the Apps API to update an OAuth 2.0 client app to use CIBA (opens new window). See the Supported parameters table for the parameters to use.
Configure an authorization server access policy to use CIBA
You can use either the org authorization server or a custom authorization server with CIBA. In this example, use the default custom authorization server.
- In the Admin Console, go to Security > API.
- On the Authorization Servers tab, select the authorization server that you want to use and click the edit icon. In this example, use the
defaultcustom authorization server. - Select Access Policies.
- Select the edit icon for the Default Policy Rule.
- Click Advanced in the IF Grant type is section, and then select Client-initiated backchannel authentication (CIBA) in the Other grants section.
- Click Update rule.
Enroll a Custom Authenticator to use CIBA
Use the Devices SDK and your app to enroll a Custom Authenticator for the test user. In this example, use the Okta Authenticator Sample App and the Xcode simulator to enroll the authenticator. See the What you need section if you haven’t set up the sample app.
- In the PushSampleApp directory of the Okta Devices SDK, run the Okta Authenticator Sample App and then open the mobile app in the simulator.
- Click Sign In, enter the test user’s credentials, and click Sign In.
- Complete any additional two-factor authentication required and click Verify.
- On the Sign in securely using push notifications screen, click Set up.
- On the Security Settings screen, slide to enable Sign in with push notifications.
- Click Ok at the confirmation dialog. More security setting options then appear, including Enable CIBA transactions.
- Slide to select Enable CIBA transactions.
The sample app is set up to include the Enable CIBA transactions option by default for the user to enable CIBA themselves in the mobile app. However, you can implement CIBA in your app any way that you want, for example, create an enrollment flow that turns CIBA on by default, making it transparent to users. - Click Ok at the success dialog and close the Security Settings screen.
- Leave your test user signed in to the authentication device (the Magenta Bank app on the Xcode simulator).
Test the CIBA flow
This section walks you through how to test the CIBA authentication flow using the Okta Authenticator Sample App and the Custom Authenticator that you previously set up.
Base64-encode the client ID and secret
The call to the /bc/authorize endpoint and to the /token endpoint requires authentication. In this case, it’s a Basic Auth digest of the client ID and secret of the OIDC client that you created in an earlier section of the guide. You can find them on the client’s General tab in the Client Credentials section.
To use a Basic Authorization header in both the /bc/authorize and /token requests, Base64-encode the string and set it in the Authorization header:
Authorization: Basic {Base64({clientId}:{clientSecret})}
Initiate the flow
The OIDC client sends the CIBA challenge request to an Okta authorization server. This request can include the following parameters:
Supported parameters
| Parameter | Value |
|---|---|
binding_message | (Optional) A human-readable message that appears on the authentication device to identify the transaction |
id_token_hint | An ID token that was issued during initial user authentication. The token is passed back as a hint to identify the user for whom more authentication is being requested. You can specify either login_hint or id_token_hint in the authentication request, not both. This parameter isn’t used in this example. |
login_hint | Information that identifies the user for whom authentication is being requested. This is typically the user’s email address. You can specify either login_hint or id_token_hint in the authentication request, not both. |
request | If you're using private_key_jwt as the token endpoint authentication method (opens new window), this is the JWT created by the client that enables you to pass requests as a single, self-contained parameter. See Parameter details (opens new window). |
request_expiry | (Optional) A positive integer that allows the client to request how long (in seconds) the authentication request is valid. This value is returned in the response from the authorization server as the expires_in parameter. If your request doesn’t contain this parameter, the default time that the request is valid is 300 seconds. |
scope | The openid scope is required for authentication requests. You can also include other scopes (opens new window). |
Note: For more request examples using different parameters and a public key/private key client authentication (opens new window) example, see CIBA request examples (opens new window).
Example request
curl --request POST \
  --url https://{yourOktaDomain}/oauth2/default/v1/bc/authorize \
  --header 'Accept: application/json' \
  --header 'authorization: Basic MG9hY...' \
  --header 'Content-Type: application/x-www-form-urlencoded' \
  --data 'scope=openid email'
  --data 'binding_message=Test Binding Message'
  --data 'login_hint=test.user@email.com'
Example response
{
  "auth_req_id": "ftJwF5ZwW2SGPPoTQEKtAr_U8_Ek3RvWyR",
  "expires_in": 300,
  "interval": 5
}
Note the response parameters that are passed:
auth_req_idis a unique identifier that identifies the authentication request made by the client. The client must use this parameter in the request to the token endpoint.expires_inis the expiration time of theauth_req_idin seconds. 300 seconds is the default.intervalis the minimum amount of time (in seconds) that the client should wait between polling requests to the token endpoint. The default is five minutes.
Send a request to the token endpoint
The next step in the CIBA authentication flow is to send a request for tokens to the /token endpoint.
Note: Currently
pollis the only supported backchannel token delivery method (opens new window).
CIBA request parameters
| Parameter | Value |
|---|---|
grant_type | urn:openid:params:grant-type:ciba |
auth_req_id | Required if the grant_type is urn:openid:params:grant-type:ciba |
scope | This is a list of scopes that the client wants in the access token. |
request | If you're using private_key_jwt as the client authentication method (opens new window), this is the JWT created by the client that enables you to pass requests as a single, self-contained parameter. See the parameter details (opens new window). |
Send a request for tokens to the
/tokenendpoint:Example request
  curl --request POST \
  --url https://{yourOktaDomain}/oauth2/default/v1/token \
  --header 'Accept: application/json' \
  --header 'authorization: Basic MG9hY...' \
  --header 'Content-Type: application/x-www-form-urlencoded' \
  --data 'grant_type=urn:openid:params:grant-type:ciba&scope=openid email&auth_req_id=ftuPCF1eZ0ujBBC3RlRPwTXucFfFQ1M3bh&login_hint=test.user@email.com'
Note: For more request examples using different parameters and a public key/private key client authentication (opens new window) example, see CIBA request examples (opens new window).
An authorization error response is sent to the client when the authorization server hasn’t received the user consent yet:
Example error response
{
    "error": "authorization_pending",
    "error_description": "The authorization request is still pending as the user hasn't yet been authenticated."
}
On the mobile app in the simulator, click the house icon in the top bar to refresh the screen. The consent page appears.
Click Yes, it’s me.
Click Ok in the confirmation dialog.
Send the request for tokens again and the authorization server responds with the requested tokens.
Example response (truncated for brevity)
{
    "token_type": "Bearer",
    "expires_in": 3600,
    "access_token": "eyJraWQiOiJlX1duS. . . . .josV5OPNwka0DG2qy0Yg",
    "scope": "openid email",
    "id_token": "eyJraWQiO . . . . RQbdJ4i0Nk4w"
}