Build a Node.js API with TypeScript

JavaScript has been turning into more and more of a robust language and is no longer just seen in browsers. Server-side JavaScript has become quite relevant. However, one major thing that JavaScript is not, is a strongly typed language. Being explicit with what types to expect from function parameters or object and class properties can help prevent bugs from creeping into the code. It can also help make the code easier to understand if you know exactly what types of values you need to pass into an API call, for example.
If you’re both a fan of JavaScript and strongly typed languages, then you’re in luck. TypeScript is a superset of JavaScript that provides some extra syntax for defining types. Today I’ll show you how to write a simple API for a real-time chat app using TypeScript. The catch will be messages will expire after a short amount of time and get deleted from both the server and the client, so you have to pay attention if you want to keep up on the conversation. I’ll also show you how to create a simple frontend using React to interface with the API. You’ll also be using Okta to add user authentication so that you don’t just have a bunch of anonymous messages.
Note: In May 2025, the Okta Integrator Free Plan replaced Okta Developer Edition Accounts, and the Okta CLI was deprecated.
We preserved this post for reference, but the instructions no longer work exactly as written. Replace the Okta CLI commands by manually configuring Okta following the instructions in our Developer Documentation.
Set Up Your TypeScript + Node.js Server
If you don’t have Node installed yet, you’ll need to do that first. That’s the only real prerequisite for this tutorial. To see if you have it installed, try typing node --version in a terminal. You’ll want to get a response back with something like v8 or higher. If you get an error, you may need to install it. I recommend installing via nvm. The install should look something like this:
curl -o- https://raw.githubusercontent.com/nvm-sh/nvm/v0.35.3/install.sh | bash
But if that doesn’t work, head to the docs to see how to get it up and running for your system.
Once you have Node running, create a new directory for your chat server, then use npm to create a package.json file for you:
mkdir real-time-chat
cd real-time-chat
npm init -y
Edit the package.json file so the "main" entry says "dist/index.js". Then edit the "scripts" entry to have the following scripts:
"scripts": {
  "prebuild": "tslint -c tslint.json -p tsconfig.json --fix",
  "build": "tsc",
  "prestart": "npm run build",
  "start": "node .",
  "dev": "ts-node-dev src/index.ts",
  "test": "echo \"Error: no test specified\" && exit 1"
}
You’ll also need to install some dependencies:
npm install express@4.17.1
npm install --save-dev typescript@3.9.3 ts-node-dev@1.0.0-pre.44 tslint@6.1.2 @types/node@14.0.5 @types/express@4.17.6
You’ll need to create some configuration files for TypeScript. Create a tslint.json file:
{
  "defaultSeverity": "error",
  "extends": [
    "tslint:recommended"
  ]
}
And a tsconfig.json file:
{
  "compilerOptions": {
    "module": "commonjs",
    "esModuleInterop": true,
    "allowSyntheticDefaultImports": true,
    "target": "es6",
    "noImplicitAny": true,
    "moduleResolution": "node",
    "sourceMap": true,
    "outDir": "dist",
    "baseUrl": ".",
    "paths": {
      "*": [
        "node_modules/*"
      ]
    }
  },
  "include": [
    "src/**/*"
  ],
  "exclude": [
    "src/client"
  ]
}
Now that the TypeScript configuration is ready, create a new folder src and create a new file src/index.ts:
import express from "express";

const app = express();
const port = 8080 || process.env.PORT;

app.get("/", (req, res) => {
  res.send("Hi!");
});

app.listen(port, () => {
  // tslint:disable-next-line:no-console
  console.log(`server started at http://localhost:${port}`);
});
If you run the code now with npm run dev you should get a website up and running at http://localhost:8080 that just says Hi!. Nothing fancy yet.
Set Up a React Frontend for Your Node.js + TypeScript API
Another neat developer tool is Parcel. It provides a really simple way to bundle JavaScript or TypeScript code for the frontend, so you can use the familiar import syntax and install packages using npm, but at the end of the day your client just gets a single bundle pared down to the code they need.
To set this up with React, add the following dependencies:
npm install react@16.13.1 react-dom@16.13.1
npm install --save-dev parcel-bundler@1.12.4 @types/parcel-bundler@1.12.1 @types/react@16.9.35 @types/react@16.9.35 @babel/core@7.10.2 @babel/preset-env@7.10.2
Create a new folder for your client-side code in src/client:
mkdir src/client
You’ll need a second configuration file for TypeScript to know that the client should be packaged for the web rather than for Node. Create a new file src/client/tsconfig.json
{
  "compilerOptions": {
    "lib": [
      "es6",
      "dom"
    ],
    "allowSyntheticDefaultImports": true,
    "jsx": "react",
    "module": "es6",
    "target": "es6",
    "moduleResolution": "node",
    "sourceMap": true,
    "outDir": "../../dist",
    "baseUrl": ".",
    "paths": {
      "*": [
        "../../node_modules/*"
      ]
    }
  },
  "include": [
    "./**/*"
  ]
}
Then create a new file src/client/index.html:
<!doctype html>
<html>
  <head>
    <title>Real-Time Chat</title>
  </head>
  <body>
    <main id="root"></main>
    <script src="./index.tsx"></script>
  </body>
</html>
You’ll then need to create the src/client/index.tsx file mentioned.
import React from "react";
import ReactDOM from "react-dom";

import App from "./App";

ReactDOM.render(
  <App />,
  document.getElementById("root"),
);
As well as src/client/App.tsx:
import React from "react";

export default () => <div>Hello world</div>;
Now that you have your client set up, you need to tell Express how to serve the content using Parcel. Edit your src/index.ts file:
// These should be at the top of the file
import Bundler from "parcel-bundler";
import path from "path";

// replace the call to app.get with:
const bundler = new Bundler(path.join(__dirname, "../src/client/index.html"));
app.use(bundler.middleware());
With those changes, your src/index.ts should now look like this:
import express from "express";
import Bundler from "parcel-bundler";
import path from "path";

const app = express();
const port = 8080 || process.env.PORT;

const bundler = new Bundler(path.join(__dirname, "../src/client/index.html"));
app.use(bundler.middleware());

app.listen(port, () => {
  // tslint:disable-next-line:no-console
  console.log(`server started at http://localhost:${port}`);
});
Send and Receive Messages with Socket.IO
For real-time applications, Socket.IO makes it easy to send messages back and forth between the server and any connected clients. It uses WebSockets to keep a connection open so messages are instant, but it does fall back to polling in cases where WebSockets aren’t available. You’ll need to add a few new dependencies for this:
npm install immutable@4.0.0-rc.12 socket.io@2.3.0 socket.io-client@2.3.0 uuid@8.1.0
npm install --save-dev @types/socket.io@2.1.8 @types/uuid@8.0.0 sass@1.26.7
Set Up the Backend
To set up the backend, create a new file src/socket.ts:
import { Server, Socket } from "socket.io";
import { v4 as uuidv4 } from "uuid";

const messageExpirationTimeMS = 10 * 1000;

export interface IUser {
  id: string;
  name: string;
}

const defaultUser: IUser = {
  id: "anon",
  name: "Anonymous",
};

export interface IMessage {
  user: IUser;
  id: string;
  time: Date;
  value: string;
}

const sendMessage = (socket: Socket | Server) =>
  (message: IMessage) => socket.emit("message", message);

export default (io: Server) => {
  const messages: Set<IMessage> = new Set();

  io.on("connection", (socket) => {
    socket.on("getMessages", () => {
      messages.forEach(sendMessage(socket));
    });

    socket.on("message", (value: string) => {
      const message: IMessage = {
        id: uuidv4(),
        time: new Date(),
        user: defaultUser,
        value,
      };

      messages.add(message);

      sendMessage(io)(message);

      setTimeout(
        () => {
          messages.delete(message);
          io.emit("deleteMessage", message.id);
        },
        messageExpirationTimeMS,
      );
    });
  });
};
That might be a lot to grok, so I’ll break down the individual pieces.
Here you’re defining types, known as interfaces in TypeScript. You’re also creating a default user for when you don’t have user information (you’ll be adding that later with authentication).
export interface IUser {
  id: string;
  name: string;
}

const defaultUser: IUser = {
  id: "anon",
  name: "Anonymous",
};

export interface IMessage {
  user: IUser;
  id: string;
  time: Date;
  value: string;
}
This next function actually returns another function. This pattern is common in functional programming. It’s not strictly necessary to do it this way, but makes some things a little (subjectively) cleaner later on.
const sendMessage = (socket: Socket | Server) =>
  (message: IMessage) => socket.emit("message", message);
Here you’re exporting a function that takes in a Socket.IO server and adds some listeners. This uses an es6 Set to keep track of the messages. This will make it easy to remove them later without having to search through an array.
When a client connects to the server, it triggers a callback anywhere you’ve added a listener, like in the following with io.on("connection", listener). When the server receives a getMessages signal, it will send all of the current messages to the client. The client will need to send that message after it finishes connecting.
When the client sends a message, that message gets added to the Set of messages with a unique ID, the current timestamp, and for now just the default anonymous user. It then sends that message to all connected clients.
In order to delete the message after a set period of time, a timeout set to 10 seconds (you can tweak this number by editing messageExpirationTimeMS) will remove the message from the Set of messages, and sends a message to all clients to delete the message by ID. It will be up to the client to actually remove the message, but since it’s removed from the Set no new clients will get that message.
export default (io: Server) => {
  const messages: Set<IMessage> = new Set();

  io.on("connection", (socket) => {
    socket.on("getMessages", () => {
      messages.forEach(sendMessage(socket));
    });

    socket.on("message", (value: string) => {
      const message: IMessage = {
        id: uuid(),
        time: new Date(),
        user: defaultUser,
        value,
      };

      messages.add(message);

      sendMessage(io)(message);

      setTimeout(
        () => {
          messages.delete(message);
          io.emit("deleteMessage", message.id);
        },
        messageExpirationTimeMS,
      );
    });
  });
};
You’ll now need to initialize the socket in src/index.ts. Add the following imports:
import http from "http";
import SocketIOServer from "socket.io";

import initializeSocketIO from "./socket";
After creating the app variable, add the following:
const server = new http.Server(app);
const io = SocketIOServer(server);

initializeSocketIO(io);
Then change app.listen to server.listen.
// this was `app.listen`
server.listen(port, () => {
  // tslint:disable-next-line:no-console
  console.log(`server started at http://localhost:${port}`);
});
Your full src/index.ts file should now look something like this:
import express from "express";
import http from "http";
import Bundler from "parcel-bundler";
import path from "path";
import SocketIOServer from "socket.io";

import initializeSocketIO from "./socket";

const app = express();
const server = new http.Server(app);
const io = SocketIOServer(server);
const port = 8080 || process.env.PORT;

const bundler = new Bundler(path.join(__dirname, "../src/client/index.html"));

initializeSocketIO(io);
app.use(bundler.middleware());

server.listen(port, () => {
  // tslint:disable-next-line:no-console
  console.log(`server started at http://localhost:${port}`);
});
Set Up the Frontend
Your server is all ready to go now. Next, you’ll need to create a couple of new components for the client to interface with the socket.
Create a src/client/NewMessage.tsx component that will allow you to send a new message to the server:
import React, { SyntheticEvent, useState } from "react";
import { Socket } from "socket.io";

interface IProps {
  socket: Socket;
}

const NewMessage = ({ socket }: IProps) => {
  const [value, setValue] = useState("");
  const submitForm = (e: SyntheticEvent) => {
    e.preventDefault();
    setValue("");

    socket.emit("message", value);
  };

  return (
    <form onSubmit={submitForm}>
      <input
        autoFocus
        value={value}
        onChange={(e: SyntheticEvent<HTMLInputElement>) => {
          setValue(e.currentTarget.value);
        }}
      />
    </form>
  );
};

export default NewMessage;
This sets up a simple form so that when you hit Enter that will trigger the form submission. You can then hijack that, preventDefault to keep the form from refreshing the page, send the value to the server, and reset the input to an empty string. Some TypeScript types are peppered throughout to make sure you’re getting what you expect.
You’ll also need a way to display the messages. Create a new src/client/MessageList.tsx component:
import { Map } from "immutable";
import React, { SyntheticEvent, useEffect, useState } from "react";

import "./MessageList.scss";

import { IMessage } from "../socket";

const MessageList = ({ socket }) => {
  const [messages, setMessages] = useState(Map());

  useEffect(() => {
    const messageListener = (message: IMessage) => {
      setMessages((prevMessages) => prevMessages.set(message.id, message));
    };

    const deleteMessageListener = (messageID: string) => {
      setMessages((prevMessages) => prevMessages.delete(messageID));
    };

    socket.on("message", messageListener);
    socket.on("deleteMessage", deleteMessageListener);
    socket.emit("getMessages");

    return () => {
      socket.off("message", messageListener);
      socket.off("deleteMessage", deleteMessageListener);
    };
  }, [socket]);

  return (
    <div className="message-list">
      {messages
        .toSet()
        .sortBy((message: IMessage) => message.time)
        .map((message: IMessage) => (
          <div
            key={message.id}
            className="message-list--message-container"
            title={`Sent at ${new Date(message.time).toLocaleTimeString()}`}
          >
            <span className="message-list--message">{message.value}</span>
            <span className="message-list--user">{message.user.name}</span>
          </div>
        )).toArray()
      }
    </div>
  );
};

export default MessageList;
The above component is using the Map from Immutable to make sure that a new Map is returned when setting a value on it. This will make React detect that there was a change in the state so that it renders the new data. It’s important to use the functional version of setMessages in order to get prevMessages. Otherwise, you’re using messages as a closure and it will keep trying to set the value to the original Map, which means you’ll only ever see a single message.
When using useEffect, you can return a function that will get run during cleanup. This removes the listeners from the socket, so those functions don’t get called even after the component is unmounted. It’s also important to notice the [socket] passed in as the second param to useEffect (useEffect(addListeners, [socket])). This tells it to only update when one of the values in the array changes, meaning it will only run when a new socket is passed in. If you didn’t have that, you would be removing the listeners and reading them on every render, then send a message to get new messages, and you’d get stuck in a never-ending loop.
I’ve also added some basic styles to make it looks a little easier to read. You’ll need to create a new file src/client/MessageList.scss with the following (but feel free to tweak it to your heart’s desire…it’s nothing fancy at the moment):
.message-list {
  max-width: 500px;
  width: 100%;

  .message-list--message-container {
    display: flex;
    font-size: 14px;
    justify-content: space-between;
    align-items: center;

    .message-list--user {
      font-size: 1.1em;
      font-weight: bold;
      justify-content: flex-end;
    }

    .message-list--message {
      flex: 1;
      display: flex;
      justify-content: flex-start;
      padding-right: 10px;
    }
  }
}
Now to add those to your app, edit src/client/App.tsx to look like this:
import React from "react";
import io from "socket.io-client";

import MessageList from "./MessageList";
import NewMessage from "./NewMessage";

const socket = io(location.origin);

export default () => (
  <div>
    <MessageList socket={socket} />
    <NewMessage socket={socket} />
  </div>
);
Add User Authentication to Your Node.js + TypeScript API
You should now be able to connect to your server and send messages that get posted in real time. You can have multiple people connected and they should all get all the messages as they come, and they should get removed after 10 seconds for all clients.
The big missing piece though is all users are just “Anonymous”. You could let users simply add their name, but that wouldn’t guarantee they are who they say they are. Instead, you can add user authentication with Okta to make it easy to manage users and verify them.
Okta is a cloud service that allows developers to create, edit, and securely store user accounts and user account data, and connect them with one or multiple applications.
If you don’t already have one, sign up for a forever-free developer account. Log in to your developer console, navigate to Applications, then click Add Application. Select Single-Page App, then click Next. Change the name of your app to something meaningful and the Login redirect URI to be http://localhost:8080/callback. The settings should look something like this:
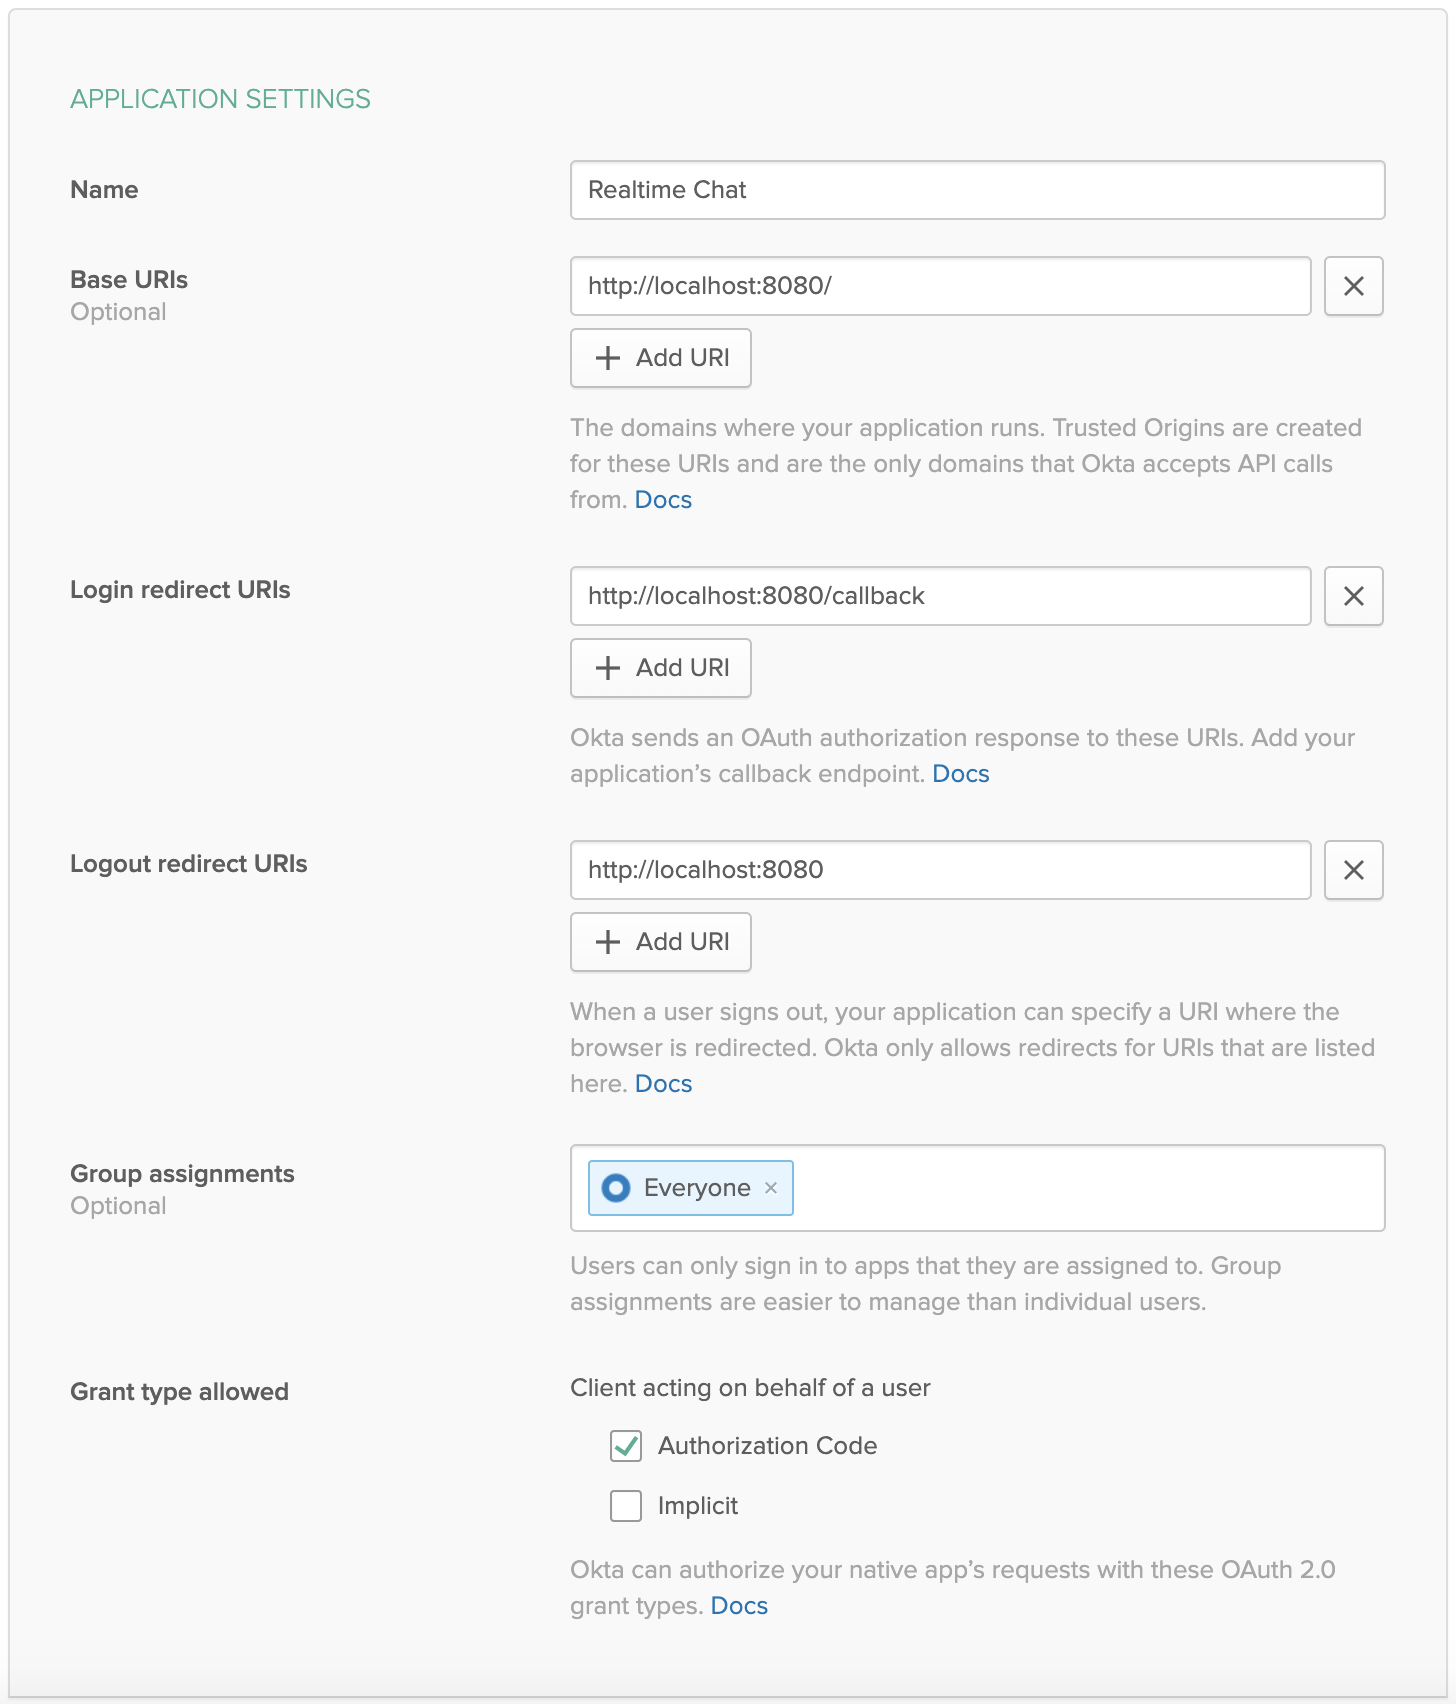
Click Done to save your app, then copy your Client ID and paste it as a variable into a file called .env in the root of your project. This will allow you to access the file in your code without needing to store credentials in source control. You’ll also need to add your organization URL (without the -admin suffix). The file should end up looking like this:
OKTA_ORG_URL=https://{yourOktaDomain}
OKTA_CLIENT_ID={yourClientId}
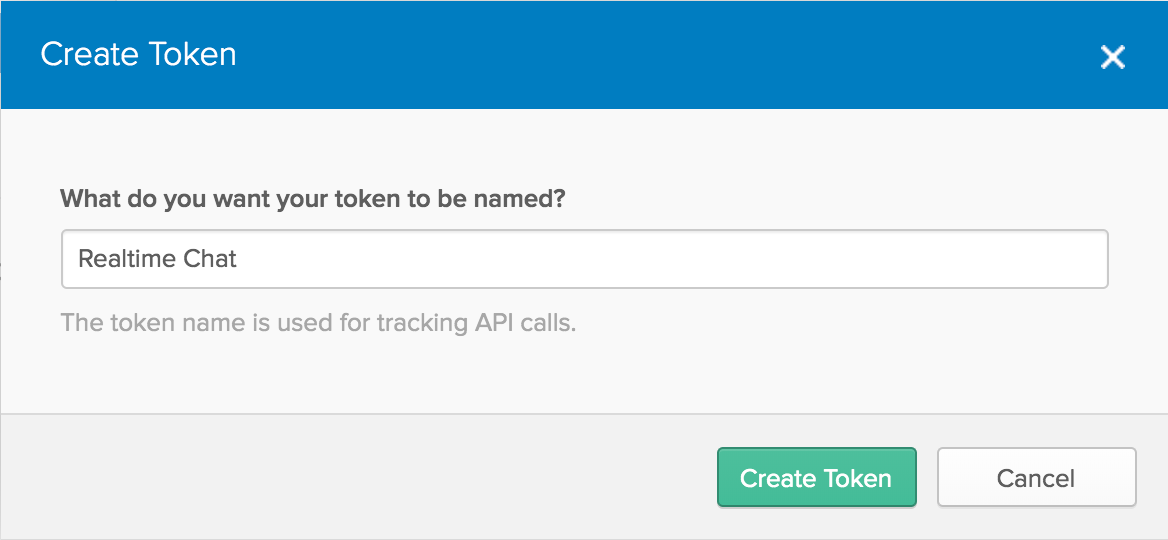
Okta provides an API that allows you to look up user information, among many other things. Okta also has a Node library to make it really simple. For your app to authenticate with Okta so you can look up user information, such as their name, you need an API token. From your dashboard, select Tokens from the API dropdown in the header. Click Create Token and give it a meaningful name. It will then give you a token this one time - if you lose it you’ll need to create another one.
Go ahead and add this to your .env file as OKTA_TOKEN, so that it now looks like this:
OKTA_ORG_URL=https://{yourOktaOrgUrl}
OKTA_CLIENT_ID={yourClientId}
OKTA_TOKEN={yourToken}
Add Server-Side Authentication
In order for your server to read the environment variables, you’ll need to use dotenv. You’ll also need to install the Okta SDK and a JWT Verifier to ensure that the tokens users are sending are valid. Install these dependencies:
npm install dotenv@8.2.0 @okta/jwt-verifier@1.0.0 @okta/okta-sdk-nodejs@3.3.1
You’ll first need to set up dotenv. At the very top of your src/index.ts file, add the following. It should be the first thing in your code to make sure the rest of your code has access to your environment variables from .env:
import dotenv from "dotenv";
dotenv.config();
At the time of this writing, Okta doesn’t provide any types for their modules, so TypeScript will complain when you try to use them. You’ll need to simply create a new file and declare the modules. Create a new file src/global.d.ts with the following:
declare module "@okta/jwt-verifier";
declare module "@okta/okta-sdk-nodejs";
In src/socket.ts you’ll need to import a couple new packages:
import OktaJwtVerifier from "@okta/jwt-verifier";
import okta from "@okta/okta-sdk-nodejs";
Then you’ll need to configure them. It’s best to do this in the default export so everything is initialized in one place.
export default (io: Server) => {
  const messages: Set<IMessage> = new Set();
  const users: Map<Socket, IUser> = new Map();

  const jwtVerifier = new OktaJwtVerifier({
    clientId: process.env.OKTA_CLIENT_ID,
    issuer: `${process.env.OKTA_ORG_URL}/oauth2/default`,
  });

  const oktaClient = new okta.Client({
    orgUrl: process.env.OKTA_ORG_URL,
    token: process.env.OKTA_TOKEN,
  });

  ...
}
Now inside your export default function, before the call to io.on("connection", connectionHandler), add the following middleware:
const users: Map<Socket, IUser> = new Map();

io.use(async (socket, next) => {
  const { token = null } = socket.handshake.query || {};
  if (token) {
    try {
      const [authType, tokenValue] = token.trim().split(" ");
      if (authType !== "Bearer") {
        throw new Error("Expected a Bearer token");
      }

      const { claims: { sub } } = await jwtVerifier.verifyAccessToken(tokenValue, "api://default");
      const user = await oktaClient.getUser(sub);

      users.set(socket, {
        id: user.id,
        name: [user.profile.firstName, user.profile.lastName].filter(Boolean).join(" "),
      });
    } catch (error) {
      // tslint:disable-next-line:no-console
      console.log(error);
    }
  }

  next();
});
This will check the socket handshake to see if there’s a token attached or not. If there is, it’ll use the jwtVerifier to make sure it’s a valid token. If it is, then it’ll fetch information about the user so that it can get their name. Finally, it adds the user to an es6 Map so that it can look up the user by the socket later.
Now, where we were setting user: defaultUser, you can enter the actual user:
const message: IMessage = {
  // ...
  user: users.get(socket) || defaultUser,
};
You’ll also want to add a listener when the socket disconnects to clean up the users Map. At the end of your connection handler, add the following:
socket.on("disconnect", () => {
  users.delete(socket);
});
Add Client-Side Authentication
You’ll need some more packages in order to set up authentication on the client. Add the following:
npm install @okta/okta-react@3.0.1 react-router@5.2.0 react-router-dom@5.2.0
Okta uses React Router to handle routes and keep things secure. You’ll need to wrap the App component in Router and Security wrappers, then render it as a Route. You’ll need to add an LoginCallback route as well so that Okta knows what to do after you’ve authenticated in the browser. Edit your src/client/index.tsx file to look like this:
import React from "react";
import ReactDOM from "react-dom";
import { BrowserRouter as Router, Route } from "react-router-dom";
import { LoginCallback, Security } from "@okta/okta-react";

import App from "./App";

ReactDOM.render(
  <Router>
    <Security
      issuer={`${process.env.OKTA_ORG_URL}/oauth2/default`}
      client_id={process.env.OKTA_CLIENT_ID}
      redirect_uri={`${window.location.origin}/callback`}
    >
      <Route path="/" exact component={App} />
      <Route path="/callback" component={LoginCallback} />
    </Security>
  </Router>,
  document.getElementById("root"),
);
You can create a new React hook to help with authentication as well. You can use the Okta React SDK’s useOktaAuth() hook to get the authState to determine whether or not a user is authenticated and get the access token. You can also get the authService to get the user’s information. These are then passed back into your React component for later use. Create a new file src/client/auth.ts:
import { useEffect, useState } from "react";
import { useOktaAuth } from "@okta/okta-react";

export const useAuth = () => {
  const { authService, authState } = useOktaAuth();
  const [user, setUser] = useState(null);
  const [token, setToken] = useState(null);

  useEffect(() => {
    if (authState.isAuthenticated) {
      if (!user) {
        authService.getUser().then(setUser);
      }
      setToken(`Bearer ${authState.accessToken}`);
    } else {
      setUser(null);
      setToken(null);
    }
  });

  return [user, token];
};
In your src/client/App.tsx file, you’ll need to use the useAuth hook to get info about the user, including the token. Then whenever the token changes, you’ll need to reconnect to the backend with a new socket. You’ll also need to import the authService so you can create buttons to sign the user in or out. Edit your src/client/App.tsx file to look like this:
import React, { useEffect, useState } from "react";
import io from "socket.io-client";
import { useOktaAuth } from '@okta/okta-react';
import { useAuth } from "./auth";
import MessageList from "./MessageList";
import NewMessage from "./NewMessage";

export default () => {
  const { authService } = useOktaAuth();
  const [user, token] = useAuth();
  const [socket, setSocket] = useState(null);

  useEffect(() => {
    const newSocket = io(location.origin, token && { query: { token } });
    setSocket(newSocket);
    return () => newSocket.close();
  }, [token]);

  return socket && (
    <div>
      {user ? (
        <div>
          Signed in as {user.name}
          <button onClick={() => authService.logout()}>Sign out</button>
        </div>
      ) : (
        <div>
          Not signed in
          <button onClick={() => authService.login()}>Sign in</button>
        </div>
      )}
      <MessageList socket={socket} />
      <NewMessage socket={socket} />
    </div>
  );
};
You should now be able to run npm run dev again and send messages in real-time and see the user who sent the message!
Learn More about Node.js, TypeScript, and Secure Authentication
I hope you now have the building blocks you need to use TypeScript for your next project, big or small. It’s just a little more setup but gives you much stronger code. If you want to see the final code sample for reference, you can find it on GitHub.
For more examples using Okta with Node, TypeScript, or React, check out some of these other posts, or browse the Okta Developer Blog.
- Use TypeScript to Build a Node API with Express
- If It Ain’t TypeScript It Ain’t Sexy
- Build and Test a React Native App with TypeScript and OAuth 2.0
- Build a Basic CRUD App with Angular and Node
- Build a Simple REST API with Node and OAuth 2.0
If you have any questions about this post, please add a comment below. For more awesome content, follow @oktadev on Twitter, or subscribe to our YouTube channel.
Changelog:
- Jun 5, 2020: Updated to use the latest versions of all dependencies. You can see the example app changes in okta-node-express-typescript-react-example#7; changes to this post can be viewed in okta-blog#315.
Okta Developer Blog Comment Policy
We welcome relevant and respectful comments. Off-topic comments may be removed.