Using Okta Advanced Server Access & Terraform to Automate Identity & Infrastructure as Code
Many Okta customers who leverage Advanced Server Access to secure and automate identity across their dynamic infrastructure fleets use HashiCorp Terraform to declare and provision resources across AWS, GCP, and Azure. One customer built their own Terraform Provider as a wrapper to the Advanced Server Access API, which we recently had certified by the team at HashiCorp. You can read more about the announcement on the Okta blog.
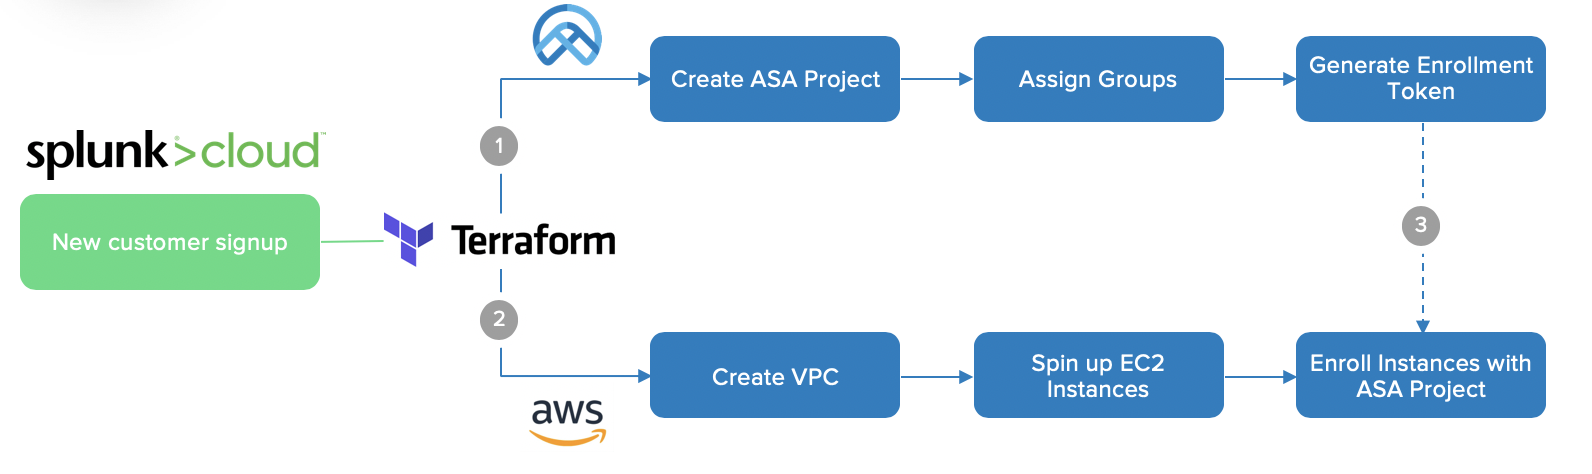
In this example, we’re going to showcase the full power of Okta and Terraform to automate and secure AWS environments. To proceed with this example, you must be an Okta Advanced Server Access administrator, and have administrative access to an AWS account. The steps to perform here are similar across GCP and Azure as well, using their respective Providers to provision the respective infrastructure resources.
NOTE: If you don’t have an Okta ASA account yet, you can go create one here.
Create an Okta Advanced Server Access API User
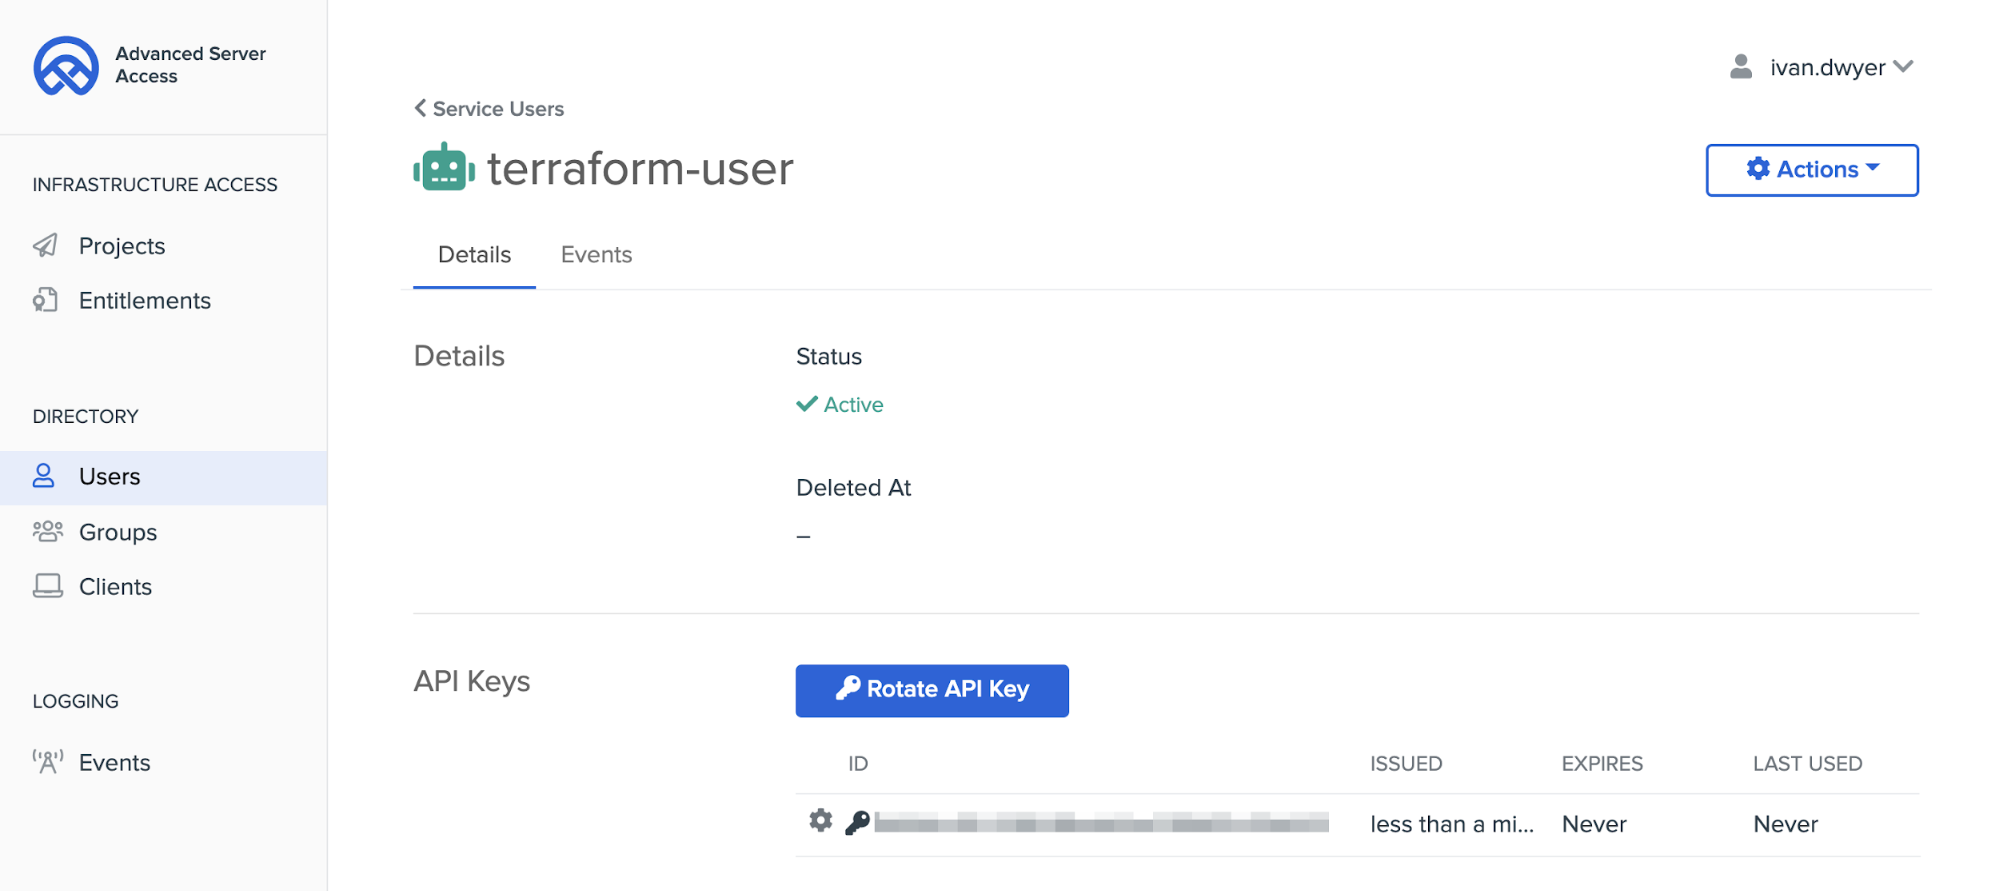
In order to leverage the Okta ASA Terraform Provider, you’ll need a Service User to authenticate with the API. Within your ASA Team, follow the documentation to create a Service User, create an API key, and copy the values for the Key ID and Key Secret.
Create an AWS IAM User
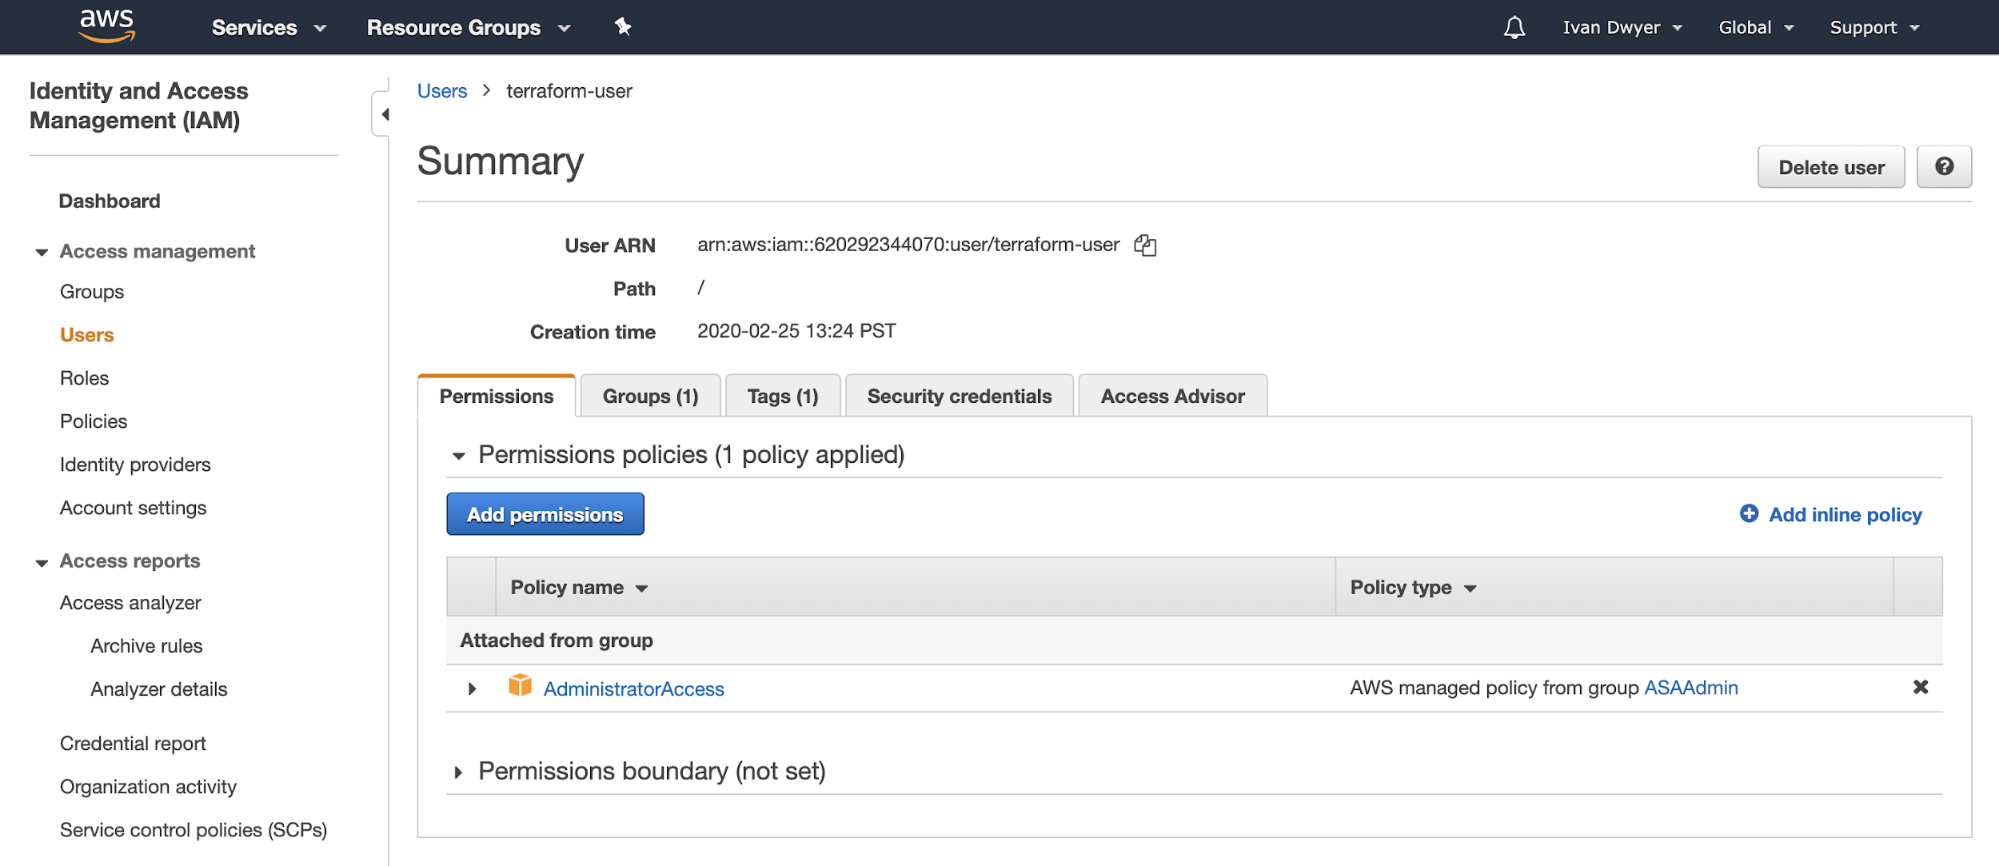
In order to leverage the AWS Terraform Provider, you’ll need an AWS IAM user with enough permissions to create the infrastructure resources we plan to create in this example. Within your AWS account, follow the documentation to create an IAM user. Copy the values for the IAM user’s Access Key and Secret.
NOTE: AWS IAM policies are a complex topic. Before proceeding in a production environment, ensure that you are only granting the least privileged access. The following article provides an example of restricting permissions to within a specified VPC: https://aws.amazon.com/premiumsupport/knowledge-center/iam-policy-permission-ec2-tags-vpc/
Create a New Terraform Project
If you do not already have Terraform installed on your machine, follow the instructions to do so. The following example uses Terraform v0.12+.
In your directory of choice, create the following empty files: input.tf and main.tf. You may skip ahead to the completed code in this GitHub repository: https://github.com/fortyfivan/asa-terraform-demo
Setting Secrets as Environment Variables
There are a number of credentials that will be needed to interface with Okta ASA and AWS. These are sensitive pieces of data that should be handled with care. Terraform supports a number of options–we are going to declare our secrets as Environment Variables. Alternatively, you can store these secrets in a variables.tfvars file, however you must be certain not to publish that file to a public repository, as anyone could then gain access to your Okta ASA and AWS accounts.
Refer back to the values you copied, and set the following from your command line:
export AWS_ACCESS_KEY_ID     = "<AWS IAM User Access Key>"
export AWS_SECRET_ACCESS_KEY = "<AWS IAM User Secret Key>"

export OKTAASA_KEY_SECRET = "<ASA Service User Key Secret>"
export OKTAASA_KEY        = "<ASA Service User Key ID>"
export OKTAASA_TEAM       = "<ASA Team Name>"
To help you better secure and manage your secrets, HashiCorp offers a hosted solution–Terraform Cloud, which runs in a consistent and reliable environment, and includes easy access to shared state and secret data, access controls for approving changes to infrastructure, a private registry for sharing Terraform modules, detailed policy controls for governing the contents of Terraform configurations, and more. To learn more about the various offerings from HashiCorp, visit: https://www.hashicorp.com/products/terraform/pricing/.
Declare Terraform Variables in input.tf
Additional variables that are used within the Terraform code are placed in the input.tf file. Copy the following code to declare the AWS variables.
variable "region" {
  description = "Region to deploy the VPC"
  default     = "us-west-1"
}

variable "availability_zone" {
  description = "Availability Zone to deploy the VPC"
  default     = "us-west-1b"
}

variable "cidr_vpc" {
  description = "CIDR block for the VPC"
  default     = "10.1.0.0/16"
}
variable "cidr_subnet" {
  description = "CIDR block for the subnet"
  default     = "10.1.0.0/24"
}

variable "instance_ami" {
  description = "AMI for aws EC2 instance"
  default     = "ami-759bc50a"
}

variable "instance_type" {
  description = "type for aws EC2 instance"
  default     = "t2.micro"
}

variable "environment_tag" {
  description = "AWS tag to attach to resources"
  default = "ASATerraformDemo"
}
Next, we’ll add the necessary ASA variables in the same file.
variable "oktaasa_project" {
  description = "Name of the ASA Project to create"
  default     = "asa-terraform-demo"
}

variable "oktaasa_group" {
  description = "Name of the ASA Group to create and assign"
  default     = "ops-team"
}

variable "sftd_version" {
  type    = string
  default = "1.40.1"
}
With our variables, let’s now add the AWS and Okta ASA Providers. Add the following code to the same file. Both Providers reference the set Environment Variables for the respective credentials, so if you run into any authorization errors, double check that those are set.
provider "aws" {
  region = var.region
}

provider "oktaasa" {
}
Initialize the Terraform Project
Now would be a good time to initialize the Terraform project, which will import the AWS and Okta ASA Providers, ensuring all dependencies are met. From your terminal, within the project directory, run the following command:
$ terraform init
If there are no errors, at this point, you can move on to writing the Terraform code. If there are errors, pay close attention to the responses. A very common Terraform issue is with versioning–the code from this example was built for v0.12+.
Create Terraform Resources in main.tf
Next, we’re going to declare the resources to create across Okta ASA and AWS. First, we’ll create and configure the Okta ASA Project, and create and assign an Okta Group to the Project. Copy the following code to main.tf. You may optionally skip the Create Group step and assign an existing Group if you want to test with existing users.
resource "oktaasa_project" "asa_project" {
  project_name = var.oktaasa_project
}

resource "oktaasa_enrollment_token" "enrollment_token" {
  project_name = oktaasa_project.asa_project.project_name
  description  = "ASA enrollment token for project"
}

resource "oktaasa_create_group" "group_name" {
  name = "ops-team"
}

resource "oktaasa_assign_group" "group-assignment" {f
  project_name  = oktaasa_project.asa_project.project_name
  group_name    = oktaasa_create_group.group_name.name
  server_access = true
  server_admin  = true
}
Next, we’ll create a VPC in AWS. This includes a number of resources, including a Subnet, Internet Gateway, Route Table, and Route Table Association. Copy the following code to main.tf.
resource "aws_vpc" "vpc" {
  cidr_block           = var.cidr_vpc
  enable_dns_support   = true
  enable_dns_hostnames = true
  tags = {
    Environment = var.environment_tag
  }
}

resource "aws_internet_gateway" "igw" {
  vpc_id = aws_vpc.vpc.id
  tags = {
    Environment = var.environment_tag
  }
}

resource "aws_subnet" "subnet" {
  vpc_id                       = aws_vpc.vpc.id
  cidr_block                   = var.cidr_subnet
  map_public_ip_on_launch      = "true"
  availability_zone            = var.availability_zone
  tags = {
    Environment = var.environment_tag
  }
}

resource "aws_route_table" "route_table" {
  vpc_id = aws_vpc.vpc.id
  route {
      cidr_block   = "0.0.0.0/0"
      gateway_id   = aws_internet_gateway.igw.id
  }
  tags = {
    Environment = var.environment_tag
  }
}

resource "aws_route_table_association" "route_table_subnet" {
  subnet_id        = aws_subnet.subnet.id
  route_table_id   = aws_route_table.route_table.id
}
Next, we’ll create a Security Group to only allow inbound access to EC2 instances on port 22–for SSH access only. Copy the following code to main.tf.
resource "aws_security_group" "security_group" {
  name = "sg_ssh"
  vpc_id = aws_vpc.vpc.id
  ingress {
      from_port   = 22
      to_port     = 22
      protocol    = "tcp"
      cidr_blocks = ["0.0.0.0/0"]
  }
  egress {
    from_port   = 0
    to_port     = 0
    protocol    = "-1"
    cidr_blocks = ["0.0.0.0/0"]
  }
  tags = {
    Environment = var.environment_tag
  }
}
Write an Okta User Data Shell Script
Before we spin up an EC2 instance within this newly spawned VPC, we need to create the Okta ASA installation script to be run as user data on startup. Create a new file in your project directory named: sftd-userdata.sh. This file performs a few key configuration functions, and then installs the Okta ASA Server Agent. We’ll walk through the code in this file piece by piece. Note that we’ll cover the included variables afterwards when we return back to main.tf.
First, we’ll create the local configuration file, sftd.yaml. Here you can enter a number of configuration options – the full list can be found in the documentation. For this example, we are going to give this EC2 instance an easy to remember canonical name value.
#!/bin/bash

echo "Add a basic sftd configuration"
sudo mkdir -p /etc/sft/
sftcfg=$(cat <<EOF
---
# CanonicalName: Specifies the name clients should use/see when connecting to this host.
CanonicalName: "asa-terraform-demo"
EOF
)

echo -e "$sftcfg" | sudo tee /etc/sft/sftd.yaml
The next piece of code will create a new directory for writing the enrollment token file. An enrollment token is a mechanism for attributing a server to an Okta ASA Project. Recall earlier, we created an enrollment token resource, which is referenced as a variable here. When the Okta ASA Server Agent first starts up, it checks the contents of the enrollment token file as it communicates with the backend API to enroll with the right Project.
echo "Add an enrollment token"
sudo mkdir -p /var/lib/sftd
echo "${enrollment_token}" | sudo tee /var/lib/sftd/enrollment.token
The remaining code in this shell script installs the Okta ASA Server Agent. For this example, we are using a Debian based instance, so apt-get is used. A similar script can be run for distributions that use yum as the package manager.
export DEBIAN_FRONTEND=noninteractive

echo "Retrieve information about new packages"
sudo apt-get update

sudo apt-get install -y curl

echo "Add the ScaleFT testing apt repo to your /etc/apt/sources.list system config file"
echo "deb http://pkg.scaleft.com/deb/ linux main" | sudo tee -a /etc/apt/sources.list

echo "Trust the repository signing key"
curl -C - https://dist.scaleft.com/pki/scaleft_deb_key.asc | sudo apt-key add -

echo "Retrieve information about new packages"
sudo apt-get update

echo "Install sftd"
sudo apt-get install scaleft-server-tools=${sftd_version}
This script is executed when the EC2 instance is instantiated, and once the Okta ASA Server Agent is installed and started, it performs the enrollment mechanism, and then queries for the users, groups, and entitlements that have been assigned to the Project. The Server Agent then creates the user and group accounts locally via /etc/passwd, and writes the sudo entitlements via /etc/sudoers. The Server Agent then periodically calls back out to the Okta ASA API for any changes in user status, group membership, or sudo entitlements, and updates accordingly. This illustrates the core value of the end-to-end lifecycle management that Okta ASA delivers, and how seamless it is to inject identity & access controls into your infrastructure automation code.
One additional function the Okta ASA Server Agent performs on startup is to configure the local OpenSSH to trust client certificates signed by Okta as a valid authentication mechanism. This is key to the underlying Zero Trust architecture, where every login request to this EC2 instance is independently authenticated and authorized, and minted a short-lived, tightly scoped credential.
Spin Up EC2 Instances Using Terraform in main.tf
Let’s return back to our main.tf file to create the EC2 instance resource with the respective shell script executed as user data on startup. Copy the following code to the end of main.tf.
resource "aws_instance" "ec2_instance" {
  ami                    = var.instance_ami
  instance_type          = var.instance_type
  subnet_id              = aws_subnet.subnet.id
  vpc_security_group_ids = [aws_security_group.security_group.id]
  user_data              = templatefile("sftd-userdata.sh", { sftd_version = var.sftd_version, enrollment_token = oktaasa_enrollment_token.enrollment_token.token_value})
  tags = {
    Environment = var.environment_tag
  }
}
Enabling Velocity at Scale
This example demonstrates how seamless it is to inject Okta Identity & Access Management functions directly within your Terraform Infrastructure as Code. The real value shows when you think about this at scale. Imagine spinning up thousands of instances on demand–how would you enable your team secure access? Better question–what would happen if one of your server administrators left the organization? These are hard questions to answer, which only come from fully embracing the cloud operating model of automation.
To learn more about Okta Advanced Server Access, and start a free 30-day trial, visit: https://www.okta.com/products/advanced-server-access/.
About HashiCorp
HashiCorp is the leader in multi-cloud infrastructure automation software. The HashiCorp software suite enables organizations to adopt consistent workflows to provision, secure, connect, and run any infrastructure for any application. HashiCorp’s open source tools Vagrant™, Packer™, Terraform, Vault, Consul, and Nomad are downloaded tens of millions of times each year and are broadly adopted by the Global 2000. Enterprise versions of these products enhance the open source tools with features that promote collaboration, operations, governance, and multi-data center functionality. For more information, visit https://www.hashicorp.com or [follow @HashiCorp on Twitter](https://twitter.com/HashiCorp].
If you’d like to see more information like this, consider following us on Twitter, subscribing to our YouTube channel, or reading through some of our other DevOps articles!
Okta Developer Blog Comment Policy
We welcome relevant and respectful comments. Off-topic comments may be removed.