How to Build an Express Application Using Prisma

Prisma is an ORM (object–relational mapping) tool for Node.js using TypeScript. The software integrates with many of the most popular databases today, including MySQL, SQL Server, SQLite, and MongoDB, and emphasizes a human-readable schema with a type-safe database client. Prisma also includes other features such as migrations, seed data, and a virtual database browser.
In this project, you will use Prisma to connect your Express application to a database server. You will build a schema to model a workout tracker application. Then you’ll create some seed data and use Prisma to run migrations and seed your database. Finally, you’ll create the web application using Pug and Tailwind CSS to build the application frontend.
Table of Contents
- Create your OAuth2 authorization server
- Create your Express application
- Use Prisma to create your database
- Add OIDC authentication
- Add views to your Express application
- Create the CSS file using Tailwind CSS
- Test your application
- What you learned in this article
- Learn more about Node, authentication, and Okta
Prerequisites
This tutorial uses the following technologies but doesn’t require any prior experience:
- An IDE for JavaScript. I will use Visual Studio Code but you can use Webstorm, or any other IDE you prefer.
- Node.js
- A database, such as PostgreSQL, MySQL, SQLite, SQL Server, or MongoDB. In this tutorial we’ll use SQLite.
- Okta CLI
If you’d like to skip the tutorial and check out the fully built project, you can go view it on GitHub.
Note: In May 2025, the Okta Integrator Free Plan replaced Okta Developer Edition Accounts, and the Okta CLI was deprecated.
We preserved this post for reference, but the instructions no longer work exactly as written. Replace the Okta CLI commands by manually configuring Okta following the instructions in our Developer Documentation.
Create your OAuth2 authorization server
Create a new directory for your application. Use the cd command to navigate to that folder.
Before you begin, you’ll need a free Okta developer account. Install the Okta CLI and run okta register to sign up for a new account. If you already have an account, run okta login.
Then, run okta apps create. Select the default app name, or change it as you see fit.
Choose Web and press Enter.
Select Other.
Then, change the Redirect URI to http://localhost:3000/authorization-code/callback and use http://localhost:3000/ for the Logout Redirect URI.
What does the Okta CLI do?
The Okta CLI will create an OIDC Web App in your Okta Org. It will add the redirect URIs you specified and grant access to the Everyone group. You will see output like the following when it’s finished:
Okta application configuration has been written to: /path/to/app/.okta.env
Run cat .okta.env (or type .okta.env on Windows) to see the issuer and credentials for your app.
export OKTA_OAUTH2_ISSUER="https://dev-133337.okta.com/oauth2/default"
export OKTA_OAUTH2_CLIENT_ID="0oab8eb55Kb9jdMIr5d6"
export OKTA_OAUTH2_CLIENT_SECRET="NEVER-SHOW-SECRETS"
Your Okta domain is the first part of your issuer, before /oauth2/default.
NOTE: You can also use the Okta Admin Console to create your app. See Create a Web App for more information.
Create your Express application
Next, you will use the express-generator application generator tool to quickly scaffold your application. Run the following command.
npx express-generator@4.16 --view=pug
Now you can install your packages.
npm i @prisma/client@3.13.0
npm i dotenv@16.0.0
npm i passport@0.5.2
npm i passport-openidconnect@0.1.1
npm i express-session@1.17
npm i -D tailwindcss@3.0.24
npm i -D prisma@3.13.0
@prisma/clientis used to access the database from your server code.dotenvreads configuration settings from.envfiles like the one produced by the Okta CLI.passportis a middleware for Node.js that is flexible enough to handle most authentication scenarios, including Okta.passport-openidconnectis a module for passport that lets you authenticate with OpenID Connect.express-sessionis required for passport. Express apps use this package for session support. Your application must intiialize session support to use passport.Tailwind CSSis the CSS framework you will use. If you’ve never used Tailwind before, you may wonder why it’s a development dependency. This is because Tailwind will dynamically build your CSS files from your views and configuration. More on that later.prismais the ORM you are using. This is a dev dependency because the Prisma library handles the migrations, seed data, etc., while the@prisma/clientpackage is used in your application at runtime.
At this point, you will initialize Tailwind CSS and Prisma. You will configure them for usage later on.
Start with Prisma and run the following command.
npx prisma init
This command will add a new folder named prisma to your application. It also adds a file called .env to your project with some default configuration. Replace the contents of that file with the code below.
# Environment variables declared in this file are automatically made available to Prisma.
# See the documentation for more detail: https://pris.ly/d/prisma-schema#accessing-environment-variables-from-the-schema

# Prisma supports the native connection string format for PostgreSQL, MySQL, SQLite, SQL Server, MongoDB, and CockroachDB (Preview).
# See the documentation for all the connection string options: https://pris.ly/d/connection-strings

DATABASE_URL="file:./dev.db"
SEED_USER_NAME={yourOktaUserName}
In this example, I used SQLite because it’s easy and compact. But one of the cool things about Prisma and most ORMs is that they can support many databases. The boilerplate code includes comments about configuring your application for other database servers. Feel free to use what you feel most comfortable with and use the appropriate connection string.
Your seed data will use the SEED_USER_NAME setting. You want to ensure that it’s the same as the Okta username with which you sign in. This will allow the application to associate your logged-in user with the data you will seed into your database.
Next, update your package.json file with the following code.
{
  "name": "workout-app",
  "version": "0.0.0",
  "private": true,
  "prisma": {
    "seed": "node prisma/seed.js"
  },
  "scripts": {
    "start": "node ./bin/www"
  },
  "dependencies": {
    "@prisma/client": "^3.13.0",
    "cookie-parser": "~1.4.4",
    "debug": "~2.6.9",
    "dotenv": "^16.0.0",
    "express": "~4.16.1",
    "http-errors": "~1.6.3",
    "morgan": "~1.9.1",
    "passport": "^0.5.2",
    "passport-openidconnect": "^0.1.1",
    "pug": "2.0.0-beta11"
  },
  "devDependencies": {
    "prisma": "^3.13.0",
    "tailwindcss": "^3.0.24"
  }
}
This will add the prisma seed command you need later.
Now you can initialize Tailwind CSS.
npx tailwindcss init
You’ve now added a new file called tailwind.config.js to the root of your application. Replace the contents of that file with the code below.
module.exports = {
  content: ["./views/**/*.pug"],
  theme: {
    extend: {},
  },
  plugins: [],
}
In this step, you tell Tailwind CSS where to find the classes you used in your application. You want Tailwind to look in the .pug files in your views directory. Tailwind CSS is highly extensible, as seen by the configuration object’s theme and plugins settings. A deep dive into this is out of the scope of this article, but I encourage you to look into Tailwind CSS’s site for more information.
Use Prisma to create your database
The next task is to create the database for your application. Steps will involve writing the schema, writing some seed data, creating the migration, and applying the migration, which will also seed your data.
The prisma init task from above should have added a file called schema.prisma to your prisma directory. Replace the code there with the code below.
generator client {
  provider = "prisma-client-js"
}

datasource db {
  provider = "{yourDatabaseProvider}"
  url      = env("DATABASE_URL")
}

model WorkoutLog {
  id        Int      @id @default(autoincrement())
  userId    Int
  exercise  String
  amount    Decimal
  units     String
  date      DateTime
  minutes   Int
  calories  Int
  user      User     @relation(fields: [userId], references: [id])
}

model User {
  id          Int          @id @default(autoincrement())
  username    String       @unique
  workoutLogs WorkoutLog[]
}
Make sure you replace {yourDatabaseProvider} with the provider you are using. As you can see, this file defines the User and WorkoutLog objects that you will store in the database. The WorkoutLog has basic information about the user’s workout on a specific day and then associates that record with the User object. You can also define keys, constraints, and indices from this file. Note the user property on the WorkoutLog has a relation defined by the userId to the id of the User table.
Add a file to the prisma directory named seed.js and add the following code to it.
const { PrismaClient } = require("@prisma/client");
const prisma = new PrismaClient();

require("dotenv").config();

async function main() {
  const user = await prisma.user.upsert({
    where: { username: process.env.SEED_USER_NAME },
    update: {},
    create: {
      username: process.env.SEED_USER_NAME,
      workoutLogs: {
        create: [
          {
            exercise: "Running",
            amount: 1,
            units: "Miles",
            date: new Date(2022, 1, 1),
            minutes: 8,
            calories: 100
          },
          {
            exercise: "Running",
            amount: 1.2,
            units: "Miles",
            date: new Date(2022, 1, 3),
            minutes: 10,
            calories: 120
          },
          {
            exercise: "Running",
            amount: 1.5,
            units: "Miles",
            date: new Date(2022, 1, 5),
            minutes: 12,
            calories: 150
          },
          {
            exercise: "Heavy Bag",
            amount: 4,
            units: "Rounds",
            date: new Date(2022, 1, 1),
            minutes: 15,
            calories: 100
          },
          {
            exercise: "Heavy Bag",
            amount: 6,
            units: "Rounds",
            date: new Date(2022, 1, 3),
            minutes: 22,
            calories: 150
          },
          {
            exercise: "Heavy Bag",
            amount: 4,
            units: "Rounds",
            date: new Date(2022, 1, 5),
            minutes: 15,
            calories: 100
          },
          {
            exercise: "Situps",
            amount: 50,
            units: "Reps",
            date: new Date(2022, 1, 2),
            minutes: 5,
            calories: 50
          },
          {
            exercise: "Pushups",
            amount: 100,
            units: "Reps",
            date: new Date(2022, 1, 2),
            minutes: 10,
            calories: 100
          },
          {
            exercise: "Situps",
            amount: 50,
            units: "Reps",
            date: new Date(2022, 1, 4),
            minutes: 5,
            calories: 50
          },
          {
            exercise: "Pushups",
            amount: 100,
            units: "Reps",
            date: new Date(2022, 1, 4),
            minutes: 10,
            calories: 100
          },
        ],
      },
    },
  });
}

main()
  .catch((e) => {
    console.error(e);
    process.exit(1);
  })
  .finally(async () => {
    await prisma.$disconnect();
  });
Prisma knows to use the seed.js file from the command you added to package.json. This file will insert the data when you run that command.
You can now add and apply the migration using the Prisma CLI. From the root of your application directory, run the following command.
npx prisma migrate dev --name init
The CLI has several ways to add and apply migrations. I suggest you understand the best way to manage migrations for your environment. The method above is the easiest and fastest way to prepare your database. As part of the migration process, this command will look for the seed command from your package.json and run that as well. Once complete, your database should be ready with a database full of seed data to work with.
Add OIDC authentication
Now that your database is ready, you can turn your attention to the core of your application.
First, add a new file in the root of your application called ensureLoggedIn.js and add the following code to it.
function ensureLoggedIn(req, res, next) {
    if (req.isAuthenticated()) {
        return next();
    }
    res.redirect('/login')
}

module.exports = ensureLoggedIn;
This little piece of middleware will make sure the user is authenticated. If they aren’t, you will redirect them to the login route, which you will configure to use Okta. Otherwise, you will allow the user to reach the next screen.
Next, you can update your routes in the routes directory. First, remove users.js as you won’t be using that. Replace the code in index.js with the following.
var express = require('express');
var router = express.Router();

/* GET home page. */
router.get('/', function(req, res, next) {
  res.render('index', { title: 'The Workout Tracker - Home', isAuthenticated: req.isAuthenticated() });
});

module.exports = router;
Here you will pass a property for isAuthenticated so your layout page can properly display a login or logout button.
Next, add a file in the routes directory for dashboard.js with the following code.
var express = require("express");
var router = express.Router();

const { PrismaClient } = require("@prisma/client");
const prisma = new PrismaClient();

const ensureLoggedIn = require("../ensureLoggedIn");

/* GET home page. */
router.get("/", ensureLoggedIn, async function (req, res) {
  const username = req.user.username;

  const dbUser = await prisma.user.findUnique({
    where: {
      username: username,
    },
    include: {
      workoutLogs: true,
    },
  });

  res.render("dashboard", {
    title: "The Workout Tracker - Dashboard",
    isAuthenticated: req.isAuthenticated(),
    user: dbUser
  });
});

module.exports = router;
There’s a lot of magic in this route. First, you are using the ensureLoggedIn middleware to protect the route. Then you can extract the username from the request and look up the user in the database using the Prisma client. Since the user has a property for its workout logs, you can pass the user as the model and parse the logs on the pug view you will create. This will give view access to the user’s name as well. Of course, you could query the workoutLogs table directly and include features such as pagination and search if this approach better fits your workflow.
Now, replace the code in app.js with the following.
var createError = require('http-errors');
var express = require('express');
var path = require('path');
var cookieParser = require('cookie-parser');
var logger = require('morgan');

var indexRouter = require('./routes/index');
var dashboardRouter = require('./routes/dashboard');

const session = require('express-session');
const passport = require('passport');
const { Strategy } = require('passport-openidconnect');

var app = express();

const { PrismaClient } = require('@prisma/client')

const prisma = new PrismaClient();

require('dotenv').config({path:'./.okta.env'});

// view engine setup
app.set('views', path.join(__dirname, 'views'));
app.set('view engine', 'pug');

app.use(session({
  secret: 'CanYouLookTheOtherWay',
  resave: false,
  saveUninitialized: true
}));

app.use(passport.initialize());
app.use(passport.session());


const {OKTA_OAUTH2_CLIENT_ID, OKTA_OAUTH2_CLIENT_SECRET, OKTA_OAUTH2_ISSUER} = process.env;

// set up passport
passport.use('oidc', new Strategy({
  issuer: OKTA_OAUTH2_ISSUER,
  authorizationURL: `${OKTA_OAUTH2_ISSUER}/v1/authorize`,
  tokenURL: `${OKTA_OAUTH2_ISSUER}/v1/token`,
  userInfoURL: `${OKTA_OAUTH2_ISSUER}/v1/userinfo`,
  clientID: OKTA_OAUTH2_CLIENT_ID,
  clientSecret: OKTA_OAUTH2_CLIENT_SECRET,
  callbackURL: 'http://localhost:3000/authorization-code/callback',
  scope: 'openid profile'
}, (issuer, profile, done) => {
  return done(null, profile);
}));

passport.serializeUser((user, next) => {
  next(null, user);
});

passport.deserializeUser((obj, next) => {
  next(null, obj);
});

app.use(logger('dev'));
app.use(express.json());
app.use(express.urlencoded({ extended: false }));
app.use(cookieParser());
app.use(express.static(path.join(__dirname, 'public')));

app.use('/login', passport.authenticate('oidc'));

app.use('/authorization-code/callback',
  passport.authenticate('oidc', { failureRedirect: '/error' }),
  (req, res, next) => {
    res.redirect('/dashboard');
  }
);

app.post('/logout', (req, res) => {
  req.logout();
  req.session.destroy();
  res.redirect('/');
});

app.use('/', indexRouter);
app.use('/dashboard', dashboardRouter);

// catch 404 and forward to error handler
app.use(function(req, res, next) {
  next(createError(404));
});

// error handler
app.use(function(err, req, res, next) {
  // set locals, only providing error in development
  res.locals.message = err.message;
  res.locals.error = req.app.get('env') === 'development' ? err : {};

  // render the error page
  res.status(err.status || 500);
  res.render('error');
});

module.exports = app;
You updated your routes to properly use the dashboard routes as well as any login or logout routes that Okta will use. You also set up passport to use Okta using the values the Okta CLI produced in the .okta.env file.
Add views to your Express application
By default, express-generator will add a few views for you. You will need to edit them and add a new one of your own. Start by opening the layout.pug file in the views directory and replacing the code there with the following.
doctype html
html
  head
    title= title
    link(rel='stylesheet', href='/stylesheets/output.css')
  body
    nav.flex.items-center.justify-between.flex-wrap.bg-teal-500.p-6.flex.items-center.flex-shrink-0.text-white.mr-6
      span.font-semibold.text-xl.tracking-tight.pr-2 The Workout Tracker
      .w-full.block.flex-grow(class='lg:flex lg:items-center lg:w-auto')
        .text-sm(class='lg:flex-grow')
        div
          if(isAuthenticated)
            form(action="logout" method="POST")
              button(type="submit").inline-block.text-sm.px-4.py-2.leading-none.border.rounded.text-white.border-white.mt-4 Logout
          else
            a.inline-block.text-sm.px-4.py-2.leading-none.border.rounded.text-white.border-white.mt-4(href='Login' class='hover:border-transparent hover:text-teal-500 hover:bg-white lg:mt-0') Login

    block content
You’ll notice a couple of things about this file. First, the classes are very specific and plentiful. This is typical of Tailwind CSS. Rather than defining how a specific element looks, Tailwind CSS strives to define how a particular style looks, then you can add and remove styles from elements to fit the desired look.
The other thing you’ll see is the Login/Logout button that will change based on the isAuthenticated property.
Next, your can update index.pug with the following.
extends layout

block content
  .py-12.bg-white
    .max-w-7xl.mx-auto.px-4(class='sm:px-6 lg:px-8')
      div.c(class='lg:text-center')
        p.mt-2.text-3xl.leading-8.font-extrabold.tracking-tight.text-gray-900(class='sm:text-4xl') The Workout Tracker
        p.mt-4.max-w-2xl.text-xl.text-gray-500(class='lg:mx-auto')
          | A small demo built with
          a(href="https://expressjs.com/") Express on
          a(href="https://nodejs.org/en/") Node.JS
          | Secured with
          a(href="https://developer.okta.com/signup") Okta.
          br
          | This app uses
          a(href="https://tailwindcss.com/") Tailwind CSS
          | for its CSS framework and
          a(href="https://www.prisma.io/") Prisma.JS
          | for its ORM.
There’s not much to talk about here. Just a splash page with some more Tailwind CSS and some links to the technologies used.
Finally, add a file for dashboard.pug with the following code.
extends layout

block content
    .flex.flex-wrap
        .w-full.p-6(class='md:w-1/2 xl:w-1/3')
            .bg-gradient-to-b.from-green-200.to-green-100.border-b-4.border-green-600.rounded-lg.shadow-xl.p-5
                .flex.flex-row.items-center
                    .flex-shrink.pr-4
                        .rounded-full.p-5.bg-green-600
                            i.fa.fa-wallet.fa-2x.fa-inverse
                    .flex-1.text-right(class='md:text-center')
                        h2.font-bold.uppercase.text-gray-600 Total Minutes Worked
                        p.font-bold.text-3xl
                            span= user.workoutLogs.reduce(function(total, item) { return total + item.minutes }, 0)
                            span.text-green-500
                                i.fas.fa-caret-up
        .w-full.p-6(class='md:w-1/2 xl:w-1/3')
            .bg-gradient-to-b.from-pink-200.to-pink-100.border-b-4.border-pink-500.rounded-lg.shadow-xl.p-5
                .flex.flex-row.items-center
                    .flex-shrink.pr-4
                        .rounded-full.p-5.bg-pink-600
                            i.fas.fa-users.fa-2x.fa-inverse
                    .flex-1.text-right(class='md:text-center')
                        h2.font-bold.uppercase.text-gray-600 Total Calories Burned
                        p.font-bold.text-3xl
                            span= user.workoutLogs.reduce(function(total, item) { return total + item.calories }, 0)
                            span.text-pink-500
                                i.fas.fa-exchange-alt
        .w-full.p-6(class='md:w-1/2 xl:w-1/3')
            .bg-gradient-to-b.from-yellow-200.to-yellow-100.border-b-4.border-yellow-600.rounded-lg.shadow-xl.p-5
                .flex.flex-row.items-center
                    .flex-shrink.pr-4
                        .rounded-full.p-5.bg-yellow-600
                            i.fas.fa-user-plus.fa-2x.fa-inverse
                    .flex-1.text-right(class='md:text-center')
                        h2.font-bold.uppercase.text-gray-600 Total Days Worked
                        p.font-bold.text-3xl
                            span= user.workoutLogs.map(r => r.date).filter((date, i, self) => self.findIndex(d => d.getTime() === date.getTime()) === i).length
                            span.text-yellow-600
                                i.fas.fa-caret-up
    .w-full.p-6
        .bg-white.border-transparent.rounded-lg.shadow-xl
            .bg-gradient-to-b.from-gray-300.to-gray-100.uppercase.text-gray-800.border-b-2.border-gray-300.rounded-tl-lg.rounded-tr-lg.p-2
                h2.font-bold.uppercase.text-gray-600 Workout Log
            .p-5
                table.w-full.p-5.text-gray-700
                    thead
                        tr
                            th.text-left.text-blue-900 Date
                            th.text-left.text-blue-900 Execise
                            th.text-left.text-blue-900 Amount
                            th.text-left.text-blue-900 Time
                            th.text-left.text-blue-900 Calories Burned
                    tbody
                        each log in user.workoutLogs.sort((a,b) => a.date - b.date)
                            tr
                                td=log.date.toLocaleDateString()
                                td=log.exercise
                                td=log.amount + ' ' + log.units
                                td=log.minutes + ' Minutes'
                                td=log.calories
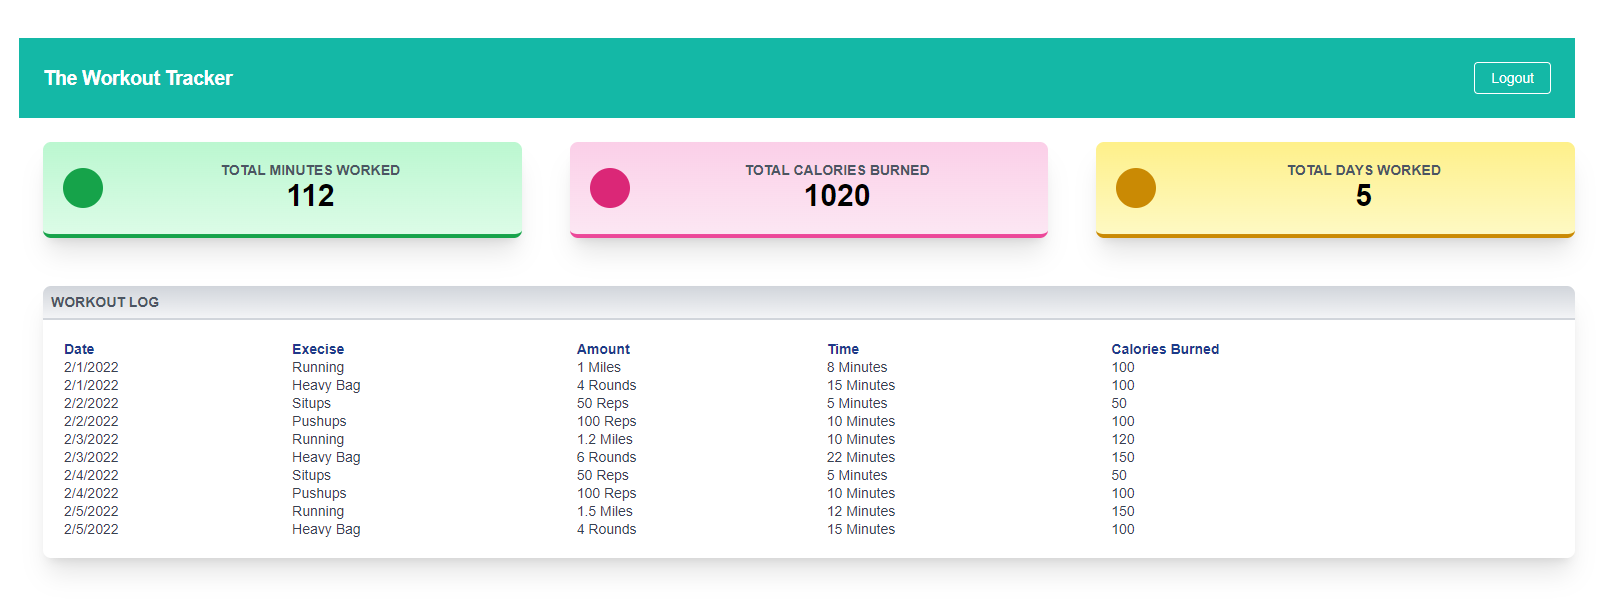
As you saw before, this page is protected. Therefore, it requires that you have a user to access this page. The application will pull the user details and workout logs and form them into a summary at the top of the page with a couple of tables of the logs based on the exercises the user has performed.
Create the CSS file using Tailwind CSS
The last part of this process is to create the actual CSS file that your application will use. In your public/stylesheets directory, you’ll see a file called style.css. Replace the code in that file with the code below.
@tailwind base;
@tailwind components;
@tailwind utilities;

body {
  padding: 50px;
  font: 14px "Lucida Grande", Helvetica, Arial, sans-serif;
}

a {
  color: #00B7FF;
}
This is largely the same. However, you are importing the directives for each of Tailwind’s layers.
Next, you can compile the classes you used in your pug files and the style sheet you just modified to create a new CSS file. Run the following command.
npx tailwindcss -i ./public/stylesheets/style.css -o ./public/stylesheets/output.css --watch
Now you can open the output.css file and see the complete Tailwind CSS code. The --watch parameter here is helpful for local development. This will rebuild the output.css file each time you change one of your layouts. You can disregard that parameter if you do not want to make any changes.
Test your application
You’re now ready to start your application. Run the following command.
npm run start
Once your application is started you should be able to navigate to http://localhost:3000/ and see your home page.

Use the login button at the top of the screen and navigate out to the Okta login page. Once you’ve logged in you will be redirected back to your website where you will be able to see your dashboard page.
What you learned in this article
In this article, you learned how to use Prisma to define a schema for your database. You then learned how to create a migration from that schema and seed your database. You saw that Prisma could be used with the most popular database options, including SQL Server, MySql, MongoDB, and more.
You also learned how to build a CSS file with Tailwind CSS. We walked through a simple tailwind configuration and how the Tailwind CLI uses your code to build its CSS file.
Finally, you learned how to secure your express application using passport.
Learn more about Node, authentication, and Okta
Can’t get enough of Node? Check out our quickstarts for Node and other excellent posts from the Okta Developer blog:
- Build and Deploy a Node.js App to Heroku
- Node.js Login with Express and OIDC
- Build a Node.js API with TypeScript
Make sure you follow us on Twitter and subscribe to our YouTube channel. Please comment below if you have any questions or want to share what tutorial you’d like to see next.
Okta Developer Blog Comment Policy
We welcome relevant and respectful comments. Off-topic comments may be removed.