Get to Know Entity Framework and PostgreSQL

Entity Framework is one of the most pervasive Object-Relational Mappers (ORMs) for ASP.NET. An ORM maps an application’s object entities to relational entities in a database, and allows developers to build and edit the database schema from the code. Furthermore, Entity Framework’s design makes it particularly friendly for PostgreSQL developers.
Entity Framework (EFCore) Core is a lighter weight and more flexible version that specifically enables .NET objects. It reduces the amount of data access code developers need to write, and offers higher-performance APIs.
To show how Entity Framework uses the domain model to interact with databases directly from data model objects, we will use Entity Framework Core to build a Family Tree app and create a person table in PostgreSQL. EntityFramework Core will scaffold the model and data access code, while Visual Studio will add the basic CRUD functionality. We will then tailor the app to the specific requirements of a family tree builder.
This post will use:
- Visual Studio 2019 Community Edition
- ASP.NET Core 2.2 MVC
- Free managed PostgreSQL from elephantsql.com
- EntityFramework Core
- Free Okta Developer Account
Let’s get started!
Note: In May 2025, the Okta Integrator Free Plan replaced Okta Developer Edition Accounts, and the Okta CLI was deprecated.
We preserved this post for reference, but the instructions no longer work exactly as written. Replace the Okta CLI commands by manually configuring Okta following the instructions in our Developer Documentation.
Create a PostgreSQL Instance
[Elephantsql.com] offers free managed PostgreSQL for up to 5 concurrent connections and 20 Mb data, so it’s perfect for this sample app. You can also easily download and install PostgreSQL locally on your computer. Visit the PostgreSQL site for Windows, Linux, Max and other operating system installers .
For our purposes, visit elephantsql.com, select Get a managed database today, and then select Try now for FREE. Sign up for a new account at the bottom of the screen and find the confirmation email in your inbox to set a password and complete registration.
Next, click Create New Instance to create a new database instance. Enter FamilyTreeBuilder for Name, and leave the free option as the selected plan. Click Select Region to continue. Select a data center location near you, or simply leave it at the default option. Click Review, and then Create instance.
Create the Table in PostgreSQL
Click on the link FamilyTreeBuilder, and then select Browser in the menu on the left to open a page where you can run SQL queries. Copy the SQL below to the SQL Query text box, and click Execute to create the person table:
CREATE TABLE person(
  id serial PRIMARY KEY,
  first_name VARCHAR,
  last_name VARCHAR,
  birth_date DATE,
  death_date DATE,
  father INTEGER,
  mother INTEGER,
  data_owner_id INTEGER,
  CONSTRAINT person_father_fkey FOREIGN KEY (father)
    REFERENCES person (id) MATCH SIMPLE
    ON UPDATE NO ACTION ON DELETE NO ACTION,
  CONSTRAINT person_mother_fkey FOREIGN KEY (mother)
    REFERENCES person (id) MATCH SIMPLE
    ON UPDATE NO ACTION ON DELETE NO ACTION
);
Now, you have made the database table. It has an integer field id, which populates automatically from the database when a new row is inserted. first name and last name are text fields, while the birth date and death date are dates.
The fields father and mother refer to the id of another row in the table. You won’t actually use data_owner_id in this tutorial, but at the end of this post, an explanation of how to maintain separate data for each user will use this field.
Now, let’s start with some data. Run these SQL statements in the SQL Query text box:
insert into person (first_name, last_name, birth_date)
values ('Homer', 'Simpson', '1956-05-12');
insert into person (first_name, last_name, birth_date)
values ('Marge', 'Simpson', '1956-03-19');
insert into person (first_name, last_name, birth_date)
values ('Bart', 'Simpson', '1980-04-01');
insert into person (first_name, last_name, birth_date)
values ('Lisa', 'Simpson', '1981-05-09');
insert into person (first_name, last_name, birth_date)
values ('Maggie', 'Simpson', '1987-01-12');
To check it worked, click Table queries, select person, and then click Execute. It should look something like this:
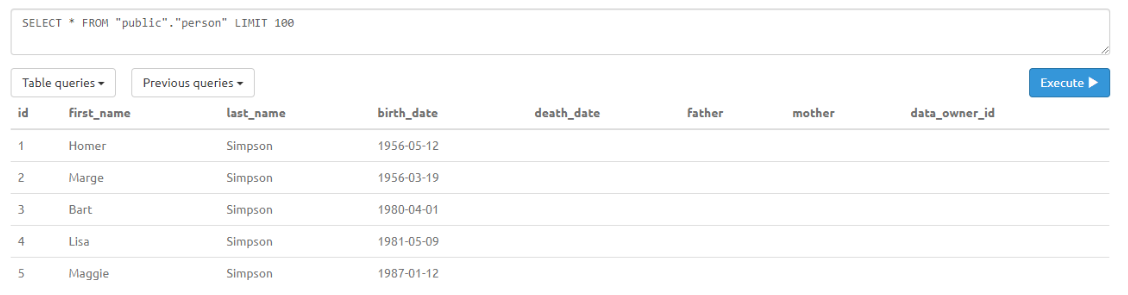
Homer and Marge are the parents of Bart, Lisa, and Maggie, but this is not yet in the table. To add it, run the SQL below. If Homer didn’t get id 1 and Marge id 2 in your database, change 1 and 2 in the update statement before you run it.
update person
set father = 1, mother = 2
where birth_date > '1980-01-01'
Create an ASP.NET MVC Core Entity Framework Application
Next, you will create an ASP.NET MVC Core application to interact with the database table you just made.
Download Visual Studio 2019 Community Edition if you don’t have it already. Make sure to check the workload “ASP.NET and web development”:
Start Visual Studio, select Create a new project, select the template ASP.NET Core Web Application, and click Next.
Enter FamilyTreeBuilder for Project name and click Next. Select Web Application (Model-View-Controller), and click Create.
In the Package Manager Console, you will install some NuGet Packages, and also run the scaffolding function of EntityFramework Core to generate most of the code to access the database. Select Tools from the top menu, then NuGet Package Manager, and then Package Manager Console. Run each of these lines of code in the Package Manager Console one-by-one:
Install-Package Microsoft.EntityFrameworkCore -Version 2.2.6
Install-Package Microsoft.EntityFrameworkCore.Tools -Version 2.2.6
Install-Package Npgsql.EntityFrameworkCore.PostgreSQL -Version 2.2.4
Configure Entity Framework Classes with Postgres Fields
Finally, to generate C# classes for database access, you need to make a connection string with the hostname, user id, password, port number, and database name in the URL of your ElephantSQL database. To do this, go back to the ElephantSQL web dashboard, select FamilyTreeBuilder, and then select Details from the menu on the left, if it is not already shown. Copy the value of URL. It should look something like this:
postgres://bob:abcd1234@balarama.db.elephantsql.com:5432/abcdef
This corresponds to:
- User id is
bob - Password is
abcd1234 - Host is
balarama.db.elephantsql.com - Port number is
5432 - Database name is
abcdef
Use this to create your own connection string. The values above give this connection string:
"Server=balarama.db.elephantsql.com;Database=abcdef;User Id=bob;Password=abcd1234;Port=5432"
Next, run this command in the Package Manager Console, but replace the connection string with your own:
Scaffold-DbContext "Server=balarama.db.elephantsql.com;Database=abcdef;User Id=bob;Password=abcd1234;Port=5432"
 Npgsql.EntityFrameworkCore.PostgreSQL -OutputDir ModelsGenerated -Force -Context FamilyTreeContext
This command creates a model class for a person and a database context class in a folder called ModelsGenerated. You will find it in the Solution Explorer.
Go to Startup.cs and add using FamilyTreeBuilder.ModelsGenerated; to the top and the code below to the end of ConfigureServices(). This adds the context to the database setup allowing it to be used by the application.
services.AddEntityFrameworkNpgsql()
  .AddDbContext<FamilyTreeContext>()
  .BuildServiceProvider();
In the Solution Explorer, right-click the Controllers folder, select Add and then Controller. Select MVC Controller with views, using Entity Framework, and click Add.
Select Person in the drop-down for Model class and FamilyTreeContext for Data context class. Keep the rest as it is, and click Add.
Visual Studio will now create a PeopleController and the following views:
Createto create a new personDeleteto delete a personDetailsto view a single personEditto edit a single personIndexto list all the people
Now, add a menu item for the family tree page. Expand the folder Views, and then Shared, and open the file _Layout.cshtml. Add an <li> tag around the new menu item. It should look like this:
<div class="navbar-collapse collapse d-sm-inline-flex flex-sm-row-reverse">
  <ul class="navbar-nav flex-grow-1">
    <li class="nav-item">
      <a class="nav-link text-dark" asp-area="" asp-controller="Home" asp-action="Index">Home</a>
    </li>
    <li class="nav-item">
      <a class="nav-link text-dark" asp-area="" asp-controller="Home" asp-action="Privacy">Privacy</a>
    </li>
    <li class="nav-item">
      <a class="nav-link text-dark" asp-area="" asp-controller="People" asp-action="Index">Family tree</a>
    </li>
  </ul>
</div>
Now, you are ready to run the first version of the application by pressing F5.
Improve the Entity Framework Data Views
Most of the pages are complete, but the page to view a person is missing some critical information. Let’s add data about, and navigation links to, parents and children via a new class in the PersonViewModel (find it in the Models folder). For best practice, separate code you edit yourself from generated code, so when you rerun the scaffolding, it will only change files within the folder ModelsGenerated, but not in the Models folder. Here is the code for PersonViewModel.cs:
using System.Collections.Generic;
using FamilyTreeBuilder.ModelsGenerated;

namespace FamilyTreeBuilder.Models
{
  public class PersonViewModel
  {
    public Person Person { get; set; }
    public IEnumerable<Person> Children { get; set; }
  }
}
To fill this view model with data, change the method Details() in PeopleController. Replace the last line from return View(person); to this:
var children = _context.Person.Where(p => p.Mother == id || p.Father == id).ToList();
var viewModel = new PersonViewModel { Person = person, Children = children };

return View(viewModel);
The first line finds all the children of the person the user is about to view. The second line wraps a list of the children together with the Person object in our new view model. To make this work, also add using FamilyTreeBuilder.Models; to the top of the PeopleController.cs file.
Change the first line of Details.cshtml to @model FamilyTreeBuilder.Models.PersonViewModel. It will replace the original view model of the page to the one you created. Delete everything after <h1>Details</h1>, and insert the following:
@if (Model.Person.MotherNavigation == null && Model.Person.FatherNavigation == null)
{
  <b>No information about parents available</b><br />
}
@if (Model.Person.FatherNavigation != null)
{
  <b>Father: </b>@(Model.Person.FatherNavigation.FirstName + " " + Model.Person.FatherNavigation.LastName)
  <a asp-action="Details" asp-route-id="@Model.Person.FatherNavigation.Id">Details</a>
  <br />
}
@if (Model.Person.MotherNavigation != null)
{
  <b>Mother: </b>@(Model.Person.MotherNavigation.FirstName + " " + Model.Person.MotherNavigation.LastName)
  <a asp-action="Details" asp-route-id="@Model.Person.MotherNavigation.Id">Details</a>
  <br />
}

<h2>@Model.Person.FirstName @Model.Person.LastName</h2>

<table>
    <tr>
        @if (Model.Person.BirthDate != null)
        {
            <td>Birthdate</td>
            <td>@Model.Person.BirthDate</td>
        }
    </tr>
    <tr>
        @if (Model.Person.DeathDate != null)
        {
            <td>Birthdate</td>
            <td>@Model.Person.DeathDate</td>
        }
    </tr>
</table>
<div>
    <a asp-action="Edit" asp-route-id="@Model.Person.Id">Edit</a> |
    <a asp-action="Index">Back to List</a>
</div>
@if (!Model.Children.Any())
{
    <h3>No children</h3>
}
else
{
  <h4>Children</h4>
  <table class="table">
    <thead>
      <tr>
        <th>First name</th>
        <th>Last name</th>
        <th>Birth date</th>
        <th>Death date</th>
        <th></th>
      </tr>
    </thead>
    <tbody>
      @foreach (var item in Model.Children)
      {
        <tr>
          <td>@item.FirstName</td>
          <td>@item.LastName</td>
          <td>@item.BirthDate</td>
          <td>@item.DeathDate</td>
          <td>
            <a asp-action="Edit" asp-route-id="@item.Id">Edit</a> |
            <a asp-action="Details" asp-route-id="@item.Id">Details</a> |
            <a asp-action="Delete" asp-route-id="@item.Id">Delete</a>
          </td>
        </tr>
      }
    </tbody>
  </table>
}
Important: this code adds a table for the children, and populates it with a foreach-loop.
The views generated by Visual Studio are not optimal for the fields Father and Mother if you want to create or edit people, so let’s change them to drop-down boxes. Add this method to PeopleController:
private void SavePotentialParentsInViewData(Person person = null)
{
  object mapPerson(Person p)
  {
    var name = p.FirstName ?? string.Empty;
    if (p.LastName != null) name += " " + p.LastName;
    if (p.BirthDate != null) name += " (born " + p.BirthDate.Value.ToShortDateString() + ")";
    return new
    {
        Id = p.Id,
        Name = name
    };
  }

  var potentialFathers = _context.Person.Select(mapPerson).ToList();
  var potentialMothers = _context.Person.Select(mapPerson).ToList();
  potentialMothers.Insert(0, new { Id = (int?)null, Name = string.Empty });
  potentialFathers.Insert(0, new { Id = (int?)null, Name = string.Empty });
  ViewData["Father"] = new SelectList(potentialFathers, "Id", "Name", person?.Father);
  ViewData["Mother"] = new SelectList(potentialMothers, "Id", "Name", person?.Mother);
}
The code will store options for parents in ViewData.
PeopleController contains two methods to create and two to edit people. In all four methods, you must replace the two lines below with a call to SavePotentialParentsInViewData();:
ViewData["Father"] = new SelectList(_context.Person, "Id", "Id");
ViewData["Mother"] = new SelectList(_context.Person, "Id", "Id");
Two of the calls need an argument, and two of them don’t. Make the call with an argument(SavePotentialParentsInViewData(person);) in Create([Bind("Id,FirstName,...)] Person person) and Edit(int? id).
In both the Create and Edit views, find the controls for Father and Mother, and swap them with this code:
<div class="form-group">
  <label asp-for="Father" class="control-label"></label>
  <select asp-for="Father" class="form-control" asp-items="ViewBag.Father"></select>
</div>
<div class="form-group">
  <label asp-for="Mother" class="control-label"></label>
  <select asp-for="Mother" class="form-control" asp-items="ViewBag.Mother"></select>
</div>
Because the users of this application won’t care about database ids, delete the control for DataOwnerId in all the views that display it.
Add type="date" to the <input> tags for BirthDate and DeathDate to ensure the date popup won’t include time.
From the index view, simply remove the columns for the fields DataOwnerId, FatherNavigation, and MotherNavigation - both from the headers and the data rows.
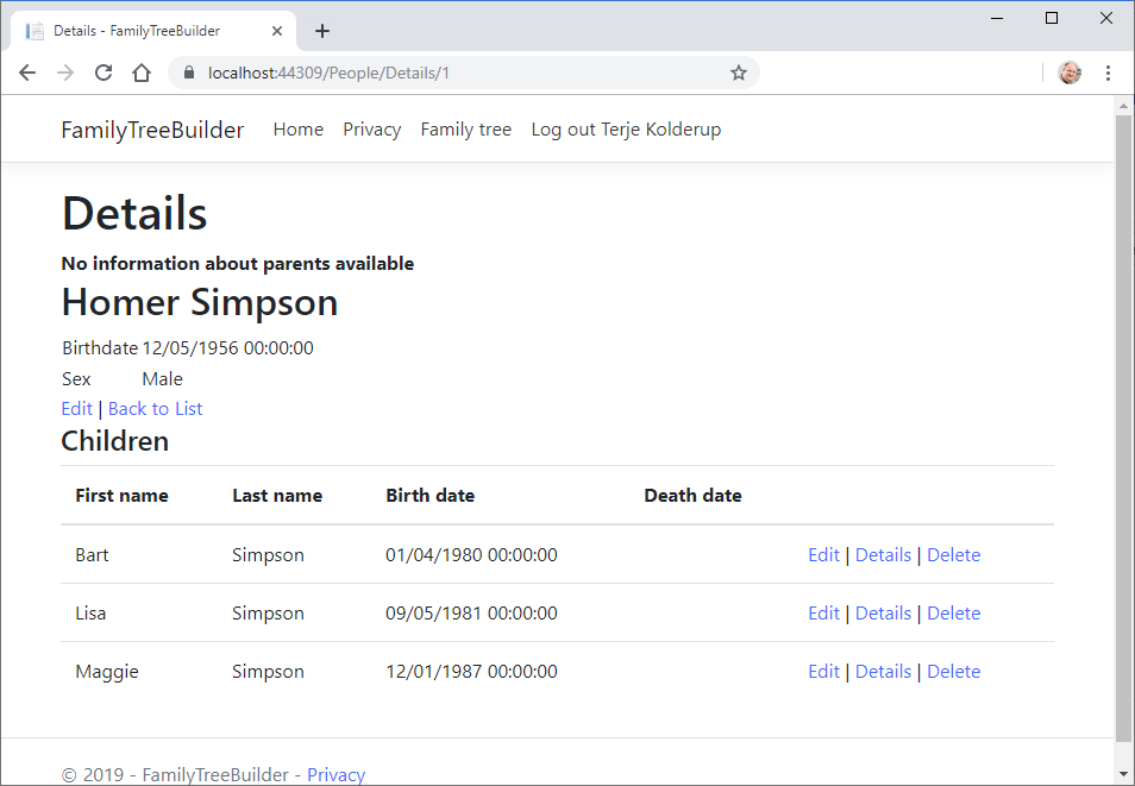
The main screen of the family tree builder is the Details view, and here is how it should look in the end:
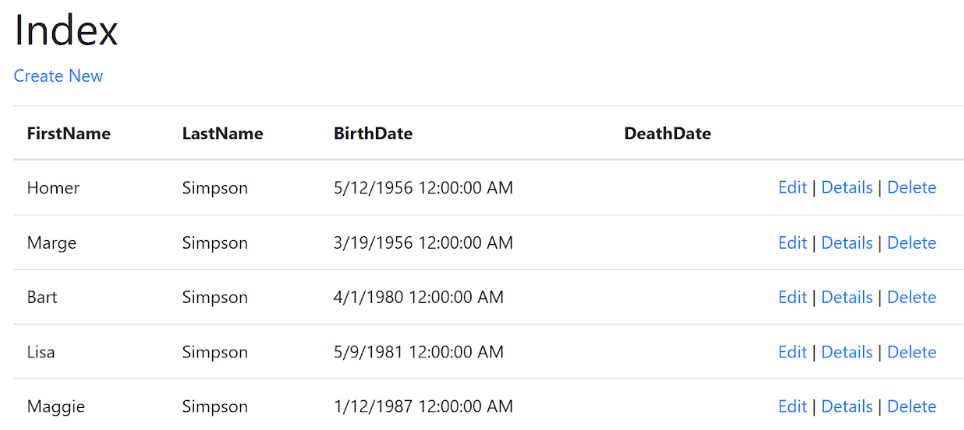
The index view should look something like this:
Add Authentication to Your ASP.NET Entity Framework Core and PostgreSQL Application
It would be nice if users had to log into the application to see their data. There is no reason to write authentication or authorization yourself. You can easily integrate Okta to handle many user management functions for you:
- Authenticate and authorize your users
- Store data about your users
- Perform password-based, passwordless and social login
- Secure your application with multi-factor authentication And much more! Check out our product documentation
Sign up for a forever-free developer account (or login if you already have one). Once you have signed up and logged in, you’ll be taken to your dashboard. Make note of your Org URL in the top right corner. It looks something like this: Org URL: https://dev-######.okta.com.
You must also register your application in the Okta dashboard.
- Select Applications at the top
- Click the green button, Add Application
- Select Web and click Next.
Enter “Family Tree Builder” for Name, and click Done. Then click Edit to end on the form, so you can enter the appropriate port value. To find it, go back to Visual Studio. Right-click the solution FamilyTreeBuilder and select Properties. Then go to the tab, Debug to find the port number used by Enable SSL. It is usually around 44300. Change the value in App URL to use the same port number, and change http to https.
Back in the Okta Dashboard, change Login redirect URIs to use https and the same port number as above. Do the same for Initiate login URI, and add a Logout redirect URIs with a value like https://localhost:443XX/signout/callback, but with the port number you have already used. Click Save.
Configure Your ASP.NET Entity Framework Core Application for Authentication
To use Okta for authentication, use the easy Okta ASP.NET SDK. Install it from the Package Manager Console with the following command:
Install-Package Okta.AspNetCore -Version 1.2.0
Add some configuration values to your appsettings.json file so the final file looks like this:
{
  "Logging": {
    "LogLevel": {
      "Default": "Warning"
    }
  },
  "AllowedHosts": "*",
  "Okta": {
    "ClientId": "{yourClientId}",
    "ClientSecret": "{yourClientSecret}",
    "OktaDomain": "{yourOktaDomain}",
    "PostLogoutRedirectUri": "https://localhost:44309/"
  }
}
Go to the Okta dashboard to copy the values for ClientId, ClientSecret and OktaDomain. The Okta domain is at the top right of your Okta dashboard. To find the others, go to Applications in the top menu, then select Family Tree Builder, and then select General.
After logging out, Okta will redirect back to the URL in the field PostLogoutRedirectUri.
Back in the Startup.cs file, add the following using statements:
using Okta.AspNetCore;
using Microsoft.AspNetCore.Authentication.Cookies;
using System.Collections.Generic;
Then at the very beginning of the ConfigureServices() method add:
var oktaMvcOptions = new OktaMvcOptions();
Configuration.GetSection("Okta").Bind(oktaMvcOptions);
oktaMvcOptions.Scope = new List<string> { "openid", "profile", "email" };
oktaMvcOptions.GetClaimsFromUserInfoEndpoint = true;

services.AddAuthentication(options =>
{
  options.DefaultAuthenticateScheme = CookieAuthenticationDefaults.AuthenticationScheme;
  options.DefaultSignInScheme = CookieAuthenticationDefaults.AuthenticationScheme;
  options.DefaultChallengeScheme = OktaDefaults.MvcAuthenticationScheme;
})
.AddCookie()
.AddOktaMvc(oktaMvcOptions);
This sets up the authentication scheme and gets all the values you just added to application,json so that the application can use those values when making the calls to your Okta authorization server.
Also, you need to tell the Configure() method to use the service you just configured. Right before the app.UseMvc(...) line, add:
app.UseAuthentication();
Okta is now configured in your application! You still need to set up your application to challenge the user (send them to Okta to authenticate).
Create a new empty controller in the Controllers folder called AccountController:
using Microsoft.AspNetCore.Authentication.Cookies;
using Microsoft.AspNetCore.Mvc;
using Okta.AspNetCore;

namespace FamilyTreeBuilder.Controllers
{
  public class AccountController : Controller
  {
    public IActionResult Login()
    {
      if (!HttpContext.User.Identity.IsAuthenticated)
      {
        return Challenge(OktaDefaults.MvcAuthenticationScheme);
      }
      return RedirectToAction("Index", "People");
    }

    public IActionResult Logout()
    {
      return new SignOutResult(new[]
      {
        OktaDefaults.MvcAuthenticationScheme,
        CookieAuthenticationDefaults.AuthenticationScheme
      });
    }
  }
}
To restrict all views with URLs starting with /People, go to PeopleController, and add the statement from below. Also the attribute [Authorize] just before the line that defines the class:
using Microsoft.AspNetCore.Authorization;

namespace FamilyTreeBuilder.Controllers
{
  [Authorize]
  public class PeopleController : Controller
The only thing missing are menu options for login and logout. Go to _Layout.cshtml and add the code below immediately after the menu option you added for Family Tree.
@if (User.Identity.IsAuthenticated)
{
  <a class="nav-link text-dark" asp-controller="Account" asp-action="Logout">Log out  @User.Identity.Name </a>
}
else
{
  <a class="nav-link text-dark" asp-controller="Account" asp-action="Login">Log in</a>
}
Now, run the application to seeyou have to authenticate to access the family tree pages.
Learn More About ASP.NET Core, Entity Framework Core and PostgreSQL
To learn more about ASP.NET Core or PostgreSQL, check out any of these great resources:
- Build a REST API with Node and Postgres
- Build a CRUD App with ASP.NET Core and SQL Server
- Build a CRUD App with ASP.NET Core 2.2 and Entity Framework
- Add Login to Your ASP.NET Core MVC App
As always, if you have any questions please comment below. Never miss out on any of our awesome content by following us on Twitter and liking us on Facebook!
Okta Developer Blog Comment Policy
We welcome relevant and respectful comments. Off-topic comments may be removed.