On this page
Upgrade SAML apps to SHA256
Upgrade Okta SAML apps from using SHA1 certificates to more secure SHA256 certificates.
Learning outcomes
- Upgrade a SAML 2.0 app integration with a new SHA256 certificate
- Roll a SAML 2.0 app integration back to its original SHA1 certificate
What you need
A SAML app to upgrade. See Building a SAML SSO integration.
Okta recommends that you upgrade SAML 2.0 app integrations that use SHA1 certificates to use SHA256 certificates instead. SHA256 is a more secure cryptographic hash function that superseded SHA1 in 2002. If your ISV doesn't accept certificates with an SHA256 signature, you can continue to use the previous SHA1 certificate. This guide also covers how to revert your app integration back to its original SHA1 certificate if there’s an issue.
You can upgrade and revert certificates in the Admin Console, and also programmatically using the Apps API (opens new window). This guide covers both options.
Note: New SAML 2.0 app integrations automatically use SHA256 certificates. Those created with this guide are self-signed.
Upgrade and revert apps with the Admin Console
After you've created your SAML 2.0 app integration, you can use the Admin Console to check the type of certificate it currently uses.
Open the Admin Console for your org.
Go to Applications > Applications to view the current app integrations.
Select your app integration.
Go to the SAML Signing Certificates section of the Sign On tab.
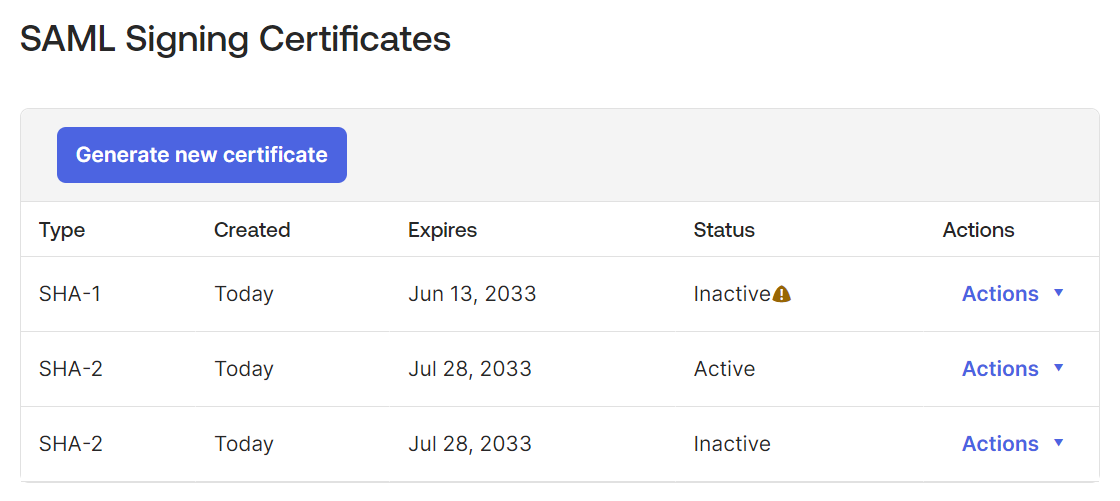
If a certificate of Type SHA-2 is active, you don’t need to upgrade the certificate.
If a certificate of Type SHA-1 is active, you need to create a SHA2 certificate and make it active.
- Click Generate new certificate.
- Go to the entry for the new certificate and select Actions > Activate.
After you activate the new certificate, your users can't access the app until you upload the new certificate to your ISV.
- Click View SAML Setup Instructions.
- Download the new certificate and optionally the IdP metadata to provide to your ISV.
Note: To revert your app integration back to an SHA1 certificate, use these steps to mark the SHA1 certificate active and upload it to your ISV.
Upgrade apps programmatically with the Applications API
Existing SAML 2.0 app integrations must be updated with an SHA256 certificate manually.
First, check if the app's certificate is SHA1 or SHA256:
- Get the app's ID, name, label, and current certificate
- Save your certificate as a PEM file
- Check if the certificate is SHA1 or SHA256
Then, if the certificate is SHA1, update the app:
- Generate a new app key credential.
- Update the key credential for the app with the new signing key id.
- Upload the new certificate to the ISV (this step can't be automated.)
Get the app's ID, name, label, and current certificate
Return a list of all the apps (opens new window) in your org. Find your app in the list, and note its id, name, and label elements. You see them referred to as {appId}, {appName}, and {appLabel} later on.
curl -v -X GET \
-H "Accept: application/json" \
-H "Content-Type: application/json" \
-H "Authorization: SSWS {api_token}" \
"https://{yourOktaDomain}/api/v1/apps"
Truncated response:
{
   "id": "0000000000aaaaaBBBBBo",
   "name": "appname",
   "label": "Application Name",
   "status": "ACTIVE",
    ... ,
    "signOnMode": "SAML_2_0",
    ... ,
    "settings": {
      ...
   }
}
Check if the certificate is SHA1 or SHA256
To check if your app's certificate was hashed with the SHA1 or SHA256 algorithm, you need to:
- Save it as a PEM file.
- Use
opensslor an online certificate decoder service to determine its signature algorithm.
Save your certificate as a PEM file
A PEM file contains a Base64-encoded version of the certificate text and a plain-text header and footer marking the beginning and end of the certificate. You can obtain the PEM file for a current certificate for an app from the following URL:
https://{yourOktaSubdomain}-admin.okta.com/admin/org/security/{appId}/cert
Where:
{yourOktaSubdomain}is your org's subdomain.{appId}is your app's ID.
Alternatively, you can create the file manually:
- Open a new file in a plain text editor like Notepad or TextEdit.
- Add the
-----BEGIN CERTIFICATE-----header. - Copy the certificate text to the next line.
- Add the
-----END CERTIFICATE-----footer to the next line. - Save as a
.pemor.cerfile
Note: Leaving trailing whitespace characters, such as spaces or carriage returns, at the end of the file make the certificate invalid.
Determine the certificate's signature algorithm
After you have a PEM file for your certificate, you can determine if the certificate was hashed with SHA1 or SHA256 in one of two ways:
- If you have
opensslinstalled, runopenssl x509 -text -noout -in <pemfile>from a terminal. - Upload the contents of the PEM file to an online Certificate (CSR) Decoder service. These tools are readily found through a web search. Be sure to note the certificate format that the decoder service requires.
If the "Signature Algorithm" is sha256WithRSAEncryption, your app's certificate is up to date. If it’s sha1WithRSAEncryption, you should upgrade it to a new SHA256 certificate.
Generate a new application key credential
Generate a new X.509 certificate for an application key credential (opens new window) and make a note of the key ID kid value that's returned.
curl -v -X POST \
-H "Accept: application/json" \
-H "Content-Type: application/json" \
-H "Authorization: SSWS {api_token}" \
-d '{
}' "https://{yourOktaDomain}/api/v1/apps/{appId}/credentials/keys/generate?validityYears={years}"
Where:
{yourOktaDomain}is your org's domain.{appId}is your app's ID.{years}is the number of years before the credential expires. If you have no company policy for credential expiration, use10years.
Response:
{
  "created": "2016-09-30T20:36:15.000Z",
  "lastUpdated": "2016-09-30T20:36:15.000Z",
  "expiresAt": "2018-09-30T20:36:14.000Z",
  "x5c": [
    "MIIDojCCAoqgAwIBAgIGAVd8z8kEMA0GCSqGSIb3DQEBBQUAMIGRMQswCQYDVQQGEwJVUz
     ...
     /bIs7EizkKT1ew0SRDI+Ws9roUKsquCWJWiAGxVEqheQvf4dauAOtqGQ=="
  ],
  "e": "AQAB",
  "n": "gmwxfer8gyoVM9-EYkcguBEYeuu9idnMvayca8LgKyyoELUDPo8gAT5G07W9P7q_WxF6
        ...
        MjROXFXr-LnQrnqjRgZYid7Uhh19rO4rS1dMTyTCy9cRnS0NGr-NWEGmgC19DyEovFUFhQ",
  "kid": "w__Yr9AElCftDtLP5CmjzZFMKXndqHtx7B3QPkg9jrI",
  "kty": "RSA",
  "use": "sig",
  "x5t#S256": "ypBvmMYkQGPqxKL4SMdH9B7IXrtGADrvgEc-GKGQ7XY"
}
Update the key credential for the app with the new signing key ID
After you create a new key credential for the app, you must update the app to use it.
Note: To update an app with the newly generated key credential, use the Replace an Application (opens new window) request with the new credentials.signing.kid (opens new window) value in the request body. You can provide just the signing credential object (opens new window) instead of the entire application credential object (opens new window).
The following is an example request to update the key credential for the app (opens new window):
curl -v -X PUT \
-H "Accept: application/json" \
-H "Content-Type: application/json" \
-H "Authorization: SSWS {api_token}" \
-d '{
  "name": "{appName}",
  "label": "{appLabel}",
  "signOnMode": "SAML_2_0",
  "credentials": {
    "signing": {
      "kid": "{keyId}"
    }
  }
}' "https://{yourOktaDomain}/api/v1/apps/{appId}"
Request parameters:
{yourOktaDomain}: Your org's domain{appId}: The app's ID{appName}: The app's name{appLabel]: The app's label{keyId]: The key ID that you generated in the previous step
Upload the new certificate to the ISV
After you update the key credential, your users can't access the application until you upload the new certificate to your ISV.
- Open the Admin Console for your org.
- Go to Applications > Applications to view the current app integrations.
- Select your app integration.
- Click View SAML Setup Instructions.
- Download the new certificate and optionally the IdP metadata to provide to your ISV.
Revert to an SHA1 certificate programmatically
If your ISV doesn't accept certificates with an SHA256 signature, you can revert the settings to use the previous SHA1 certificate. The certificate will still be in the list of key credentials associated with the app:
- Get the app's ID, name, label, and current certificate.
- Locate the SHA1 certificate associated with the app.
- Update the key credential for the app with the new signing key id.
- Upload the old certificate to the ISV (this step can't be automated.)
Steps 1, 2, and 4 are the same as for upgrading a certificate to SHA256.
Locate the SHA1 certificate associated with the app
- List all the credentials for the app (opens new window).
- For each certificate returned in an
x5celement, check if the certificate is SHA1 or SHA256 until you find the SHA1 certificate. - Note the signing key id,
kid, for the SHA1 certificate.
In the following example, there are two certificates to check to find the SHA1 certificate.
curl -v -X GET \
-H "Accept: application/json" \
-H "Content-Type: application/json" \
-H "Authorization: SSWS {api_token}" \
"https://{yourOktaDomain}/api/v1/apps/{appId}/credentials/keys"
Request parameters:
{yourOktaDomain}: Your org's domain{appId}: The app's ID
Response:
{
    "created": "2016-09-27T21:49:49.000Z",
    "lastUpdated": "2016-09-27T21:49:49.000Z",
    "expiresAt": "2026-09-27T21:49:48.000Z",
    "x5c": [
      "MxxDnDCCAoSgAwIBAgIGAVdtoBFfMA0GCSqGSIb3DQEBCwUAMIGOMQswCQYDVQQGEwJVUz
      ...
      0WTUyT7KojW8MJua0Gd5cxHvw+dbNwb6VukvUqOTWz+sBIxg0lBmKudROol57mhB73v0iFaPf5X/w4aS7GmqIohtkHcEA=="
    ],
    "e": "AQAB",
    "n": "muSDYzs_qsfTIlkhhSNxfRF1OLfoi0Xz3d0tmg1eKCDabBvWQizRekeY3xtLoQdYz8XcyiKIwOHQO
    ...
    N-APKy51iWnSzCySIcl82ne4BlK0WoXCNWTEv_X8I5Rz4MguR_Q",
    "kid": "X_dQOF8ON5WTRxWrNygEHi18sJe8CKhMOKur6j4pvYg",
    "kty": "RSA",
    "use": "sig",
    "x5t#S256": "QqqxuINGQFdJ_ObbeBJtUWhngXISll5DHT5Qfzf-JFM"
  },
  {
    "created": "2016-09-27T21:49:19.000Z",
    "lastUpdated": "2016-09-27T21:49:19.000Z",
    "expiresAt": "2043-08-23T20:29:25.000Z",
    "x5c": [
      "MIIClzCCAEFKAwIBAgIGAUCs3gRDMA0GCSqGSIb3DQEBBQUAMIGOMQswCQYDVQQGEwJVUz
      ...
      oYvfDnPFBf/zw08CPIgA+bI0JOFB6ul+w5u1EvaksDeIfLxJkCSurYrK2nOPGplF/vVew=="
    ],
    "e": "AQAB",
    "n": "3XZGz0vu2tcT_oLax_9HF8bZJ0h1hd_B4GjYbzCSCCI0YuGN9SVic76PlOOtoByehzf7eD2bmsOTeIhiD
    ...
    AumVDdkyg7dIwp4JnJBro0RkWaIX_gTidncA5x6_3MlwjSfzb-kT5fcxr75ZQVjAytP9i3x6cnEybBETivyvlBkElM",
    "kid": "ZcLGUslsdTn3996YYel6KPvOxZOhNWfly5-q36CByH4o",
    "kty": "RSA",
    "use": "sig",
    "x5t#S256": "_DXULzisdoprgJ8OhiSN_KUD2rScRDd7pY2HE1ZI_bs"
  }