On this page
Test your private SCIM integration
This guide teaches you how to test your System for Cross-domain Identity Management (SCIM) app. This includes an automated Runscope test suite for create, read, update, and delete (CRUD) operations, and a manual Okta Integration Network (OIN) quality assurance (QA) test suite. You need to create a private SCIM integration instance in your org before you run these tests.
Scope of tests
This second suite of Runscope (opens new window) tests checks that your SCIM app can handle actual requests to create, read, update, and delete (CRUD) user profile information.
Note: Okta doesn't delete user profiles in your app, but instead marks the user record with
active=falseto deactivate them. For a detailed explanation on deleting user profiles, see Delete (Deprovision).
Profile Sourcing activation
Okta developer support must activate the Profile Sourcing capability (formerly known as Profile Mastering) for developer orgs. To temporarily activate this feature for your org, contact developers@okta.com with the name of your app integration and your org ID. Developer support automatically removes the access after two weeks. If you need a longer period to test your integration, include your time requirements in your email.
Note: If you decide to submit your integration to the OIN, contact oin@okta.com to enable profile sourcing in your integration. This can only be done after Okta developer support activates your org with this capability. See Submit an SCIM integration with the OIN Wizard.
Runscope tests for CRUD
If you're not familiar with Runscope, follow the detailed instructions in the Test your SCIM API topic to get started.
This suite runs the following tests:
- Check that the integration exists in your Okta org.
- Add a new random user in Okta.
- Assign that user to the integration in Okta.
- Verify that the user was created on your SCIM server.
- Update the user
firstNameattribute in Okta. - Verify that the user attribute was updated on your SCIM server.
- Deactivate the user in Okta.
- Verify that the user was deactivated on your SCIM server.
- Reactivate the user in Okta.
- Reassign your integration to the user in Okta.
- Verify that the user was reactivated and assigned on your SCIM server.
- Remove your integration from the user in Okta.
- Verify that the user is deactivated on your SCIM server.
Configure and run tests
To configure and run the SCIM CRUD tests:
Download the Okta SCIM CRUD test file.
- If you're using SCIM 2.0, download: Okta SCIM 2.0 CRUD test file
- If you're using SCIM 1.1, download: Okta SCIM 1.1 CRUD test file
Click Import Test in Runscope.
Select API Monitoring Tests as the import format.
Click Choose File and select the Okta SCIM 2.0 CRUD JSON test file.
Click Import API Test. In this new test bucket, click Editor from the left-navigation menu.
Click Test Settings and then click Initial Variables.
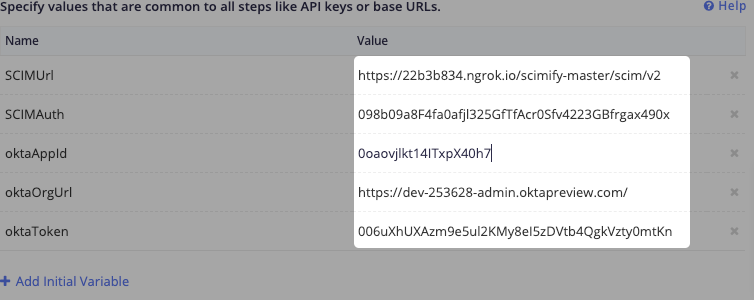
Add the following variables with values that match your SCIM integration:
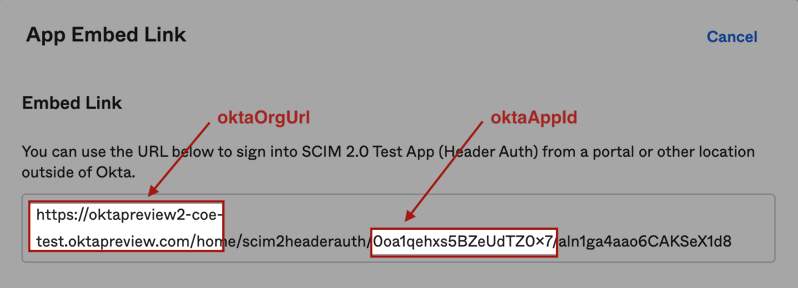
oktaAppId: The unique identifier that's randomly assigned to your Okta integration. You can see this value in the App Embed Link panel under the General tab for your Okta integration.oktaOrgUrl: The base URL for your Okta org. Include thehttps://prefix.
oktaToken: The security token used to connect to your API. You can generate a token for your integration inside your Okta org:- Click Security > API.
- Click Tokens and Create Token.
- Provide the token name and click Create Token.
- Copy the resulting token value over to this Runscope variable.
SCIMUrl: The base URL of the SCIM implementation on your server. For example:https://example.com/scim/v2SCIMAuth: The Basic or OAuth authorization token used to access your SCIM API.
The final Runscope values should look similar to the following:

Click Test Settings and then click Initial Script.
Copy the contents of the Okta CRUD Initial Script text file and paste into this Runscope console.
Click Save & Run.
Review test results
On the left of your Runscope page, the test appears in the Recent Test Runs section.
- Click View Progress inside the Recent Test Runs section. As the test suite runs, Runscope displays live updates of the test in progress. After the test suite completes execution, the main panel displays the results of your test.
- Click the name of each particular test case to see the test details. The details show you the Request, Response, and Connection information for each test.
Run through OIN QA tests
If you plan to publish your SCIM integration in the OIN catalog, run the test cases in the OIN test plan. See Okta SCIM Test Plan. Your integration has to pass the test cases in the OIN test plan, in addition to the Runscope test cases.
Next steps
This completes the Build a SCIM provisioning integration series. You now have a private SCIM integration that's successfully built and tested for your org users.
If you want to expose your SCIM integration to your customers who also use Okta, submit it to the Okta Integration Network (OIN). Integrations listed in the OIN catalog (opens new window) are available to all Okta customers to use.
- See Publish an OIN integration to understand the process for submitting and publishing an integration.
- Review the OIN submission requirements before starting the submission process.
- Use the OIN Wizard: Submit an integration guide to connect, test, and submit your Okta SCIM integration to the OIN.