On this page
New user activation
Note: In proxy model architectures, where a server-side app using the embedded SDK is used as a proxy between client apps and Okta servers, a request context for the client apps is required. The expectation is that security enforcement is based on the client request context's IP address and user agent. However, since these values are currently derived from the server app rather than the client, this enforcement isn't available. As a result, network zones or behaviors that drive their conditions based on these request context values (geolocation, IP Address, or user agent) don't work until a solution to the issue is found.
Learn how to use the embedded SDK to integrate user activation with self-service registration.
Learning outcomes
- Integrate user activations using Okta email
- Integrate user activations using your infrastructure
What you need
Sample code
Overview
User activation is the final step in self-service registration, where a user proves ownership of the email they've used during registration. After the email is verified, their account status changes to active and they're allowed to sign in to your app. How you integrate user activation depends on how you've implemented self-service registration. With the embedded SDK, Okta supports two main self-service registration architectures: registration with the embedded SDK or with the Okta API and embedded SDK. Each architecture supports a unique way to integrate a user activation.
Architecture 1: Registration with the Embedded SDK
This architecture uses the embedded SDK to create and activate users during self-service registration. The user uses
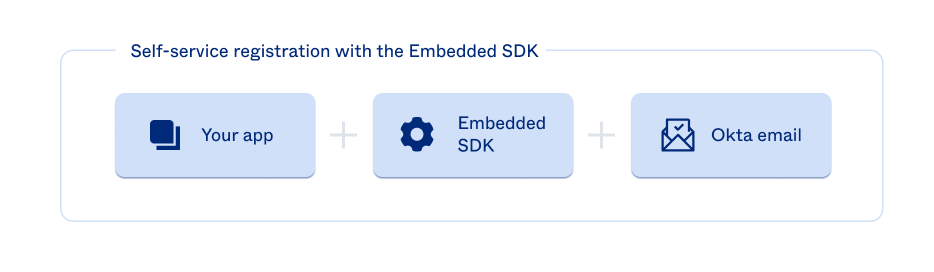
See Integrate user activations using Okta email to get started integrating this activation solution into your app.
Architecture 2: Registration with the Okta API and Embedded SDK
In this architecture, your system makes direct calls to the Okta API to create users and initiate activations. You send activation emails with your infrastructure and call the embedded SDK to complete the registration steps and activate the user.
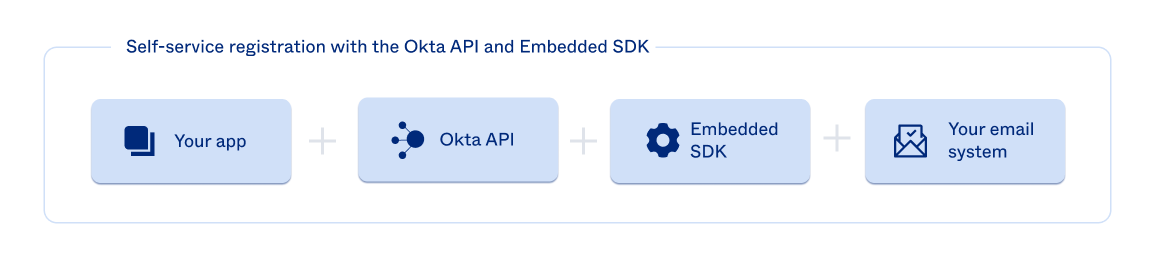
See Integrate user activations using your own infrastructure to get started integrating this activation solution into your app.
Integrate user activations using Okta email
When your app uses the embedded SDK's
Org settings that control the email template
Okta emails are based on templates, and the type of template used to enable activations depends on how you've configured your org. Your app can integrate with two different email templates during user activation. The following matrix lists the org setting values needed to enable each email template.
| Email template | Email verification required before access | Enrollment policy for email authenticator | Self-service recovery with email | Supported methods |
|---|---|---|---|---|
| Email Factor Verification | Yes / No | Optional or Disabled | Yes | OTP |
| Email Factor Verification | Yes / No | Required or Optional and the user chooses to enroll an email authenticator | No | OTP |
| Registration - Activation | Yes | Disabled or Optional and the user doesn't choose to enroll an email authenticator | No | Link |
See Setting location in the Admin Console to locate each setting in the Admin Console. The following step-by-step instructions detail how to integrate each template into your app.
Setting location in the Admin Console
Learn how to find each setting in the Admin Console.
Email verification required before access
- Select Security > Profile Enrollment, in the Admin Console.
- Edit the Default Policy by clicking the pencil icon in the Profile Enrollment page.
- In the Default Policy page under Enrollment Settings, select Edit under the Actions menu.
- In the Edit Rule popup, find the Email Verification field.
- Click the Required before access is granted option to enable and disable the field.
- Set the desired value.
- Click Save to save your changes.
Enrollment policy for email authenticator
- Select Security > Authenticators.
- Click the Enrollment tab on the Authenticators page.
- Under the Enrollment tab, scroll down to the Default Policy and click Edit.
- Toggle the values for Email under Eligible Authenticators. Possible values are Optional, Required, Disabled.
- Set the desired value.
- Click Update Policy to save your changes.
Self-service recovery with email
- Select Security > Authenticators.
- In the Authenticators page, find Password and select Edit under the Actions menu.
- In the Edit Rule popup, find the Users can initiate recovery with field under Recovery authenticators.
- Click the field's Email option to toggle its value.
- Click Update Rule to save changes.
Integrate the Email Factor Verification template
In this configuration, the user enrolls in the email authenticator while registering a new account in your app. During enrollment Okta sends an email based on the Email Factor Verification template to the entered email address. After the user verifies the email with the OTP and completes any additional registration steps, their account is activated. See the
Update configurations
To enable the Email Factor Verification template for user activations, set your org's settings to the following values:
- Email verification required before access: Yes
- Enrollment policy for email authenticator: Optional or Disabled
- Self-service recovery with email: Yes, email selected
Update Email Factor Verification template
Since the Email Factor Verification currently supports OTP only, remove the magic link from the email template to keep the user experience in your app. To find the template in the Admin Console, perform the following steps:
- Select Customizations > Emails.
- In the Emails page, click Email Factor Verification under Other.
- On the Email Verification page, click Edit to view and modify the template.
To learn more about this template and how to remove the magic link, see the
Integration steps
Integrate the Email Factor Verification template into your app with the following steps.
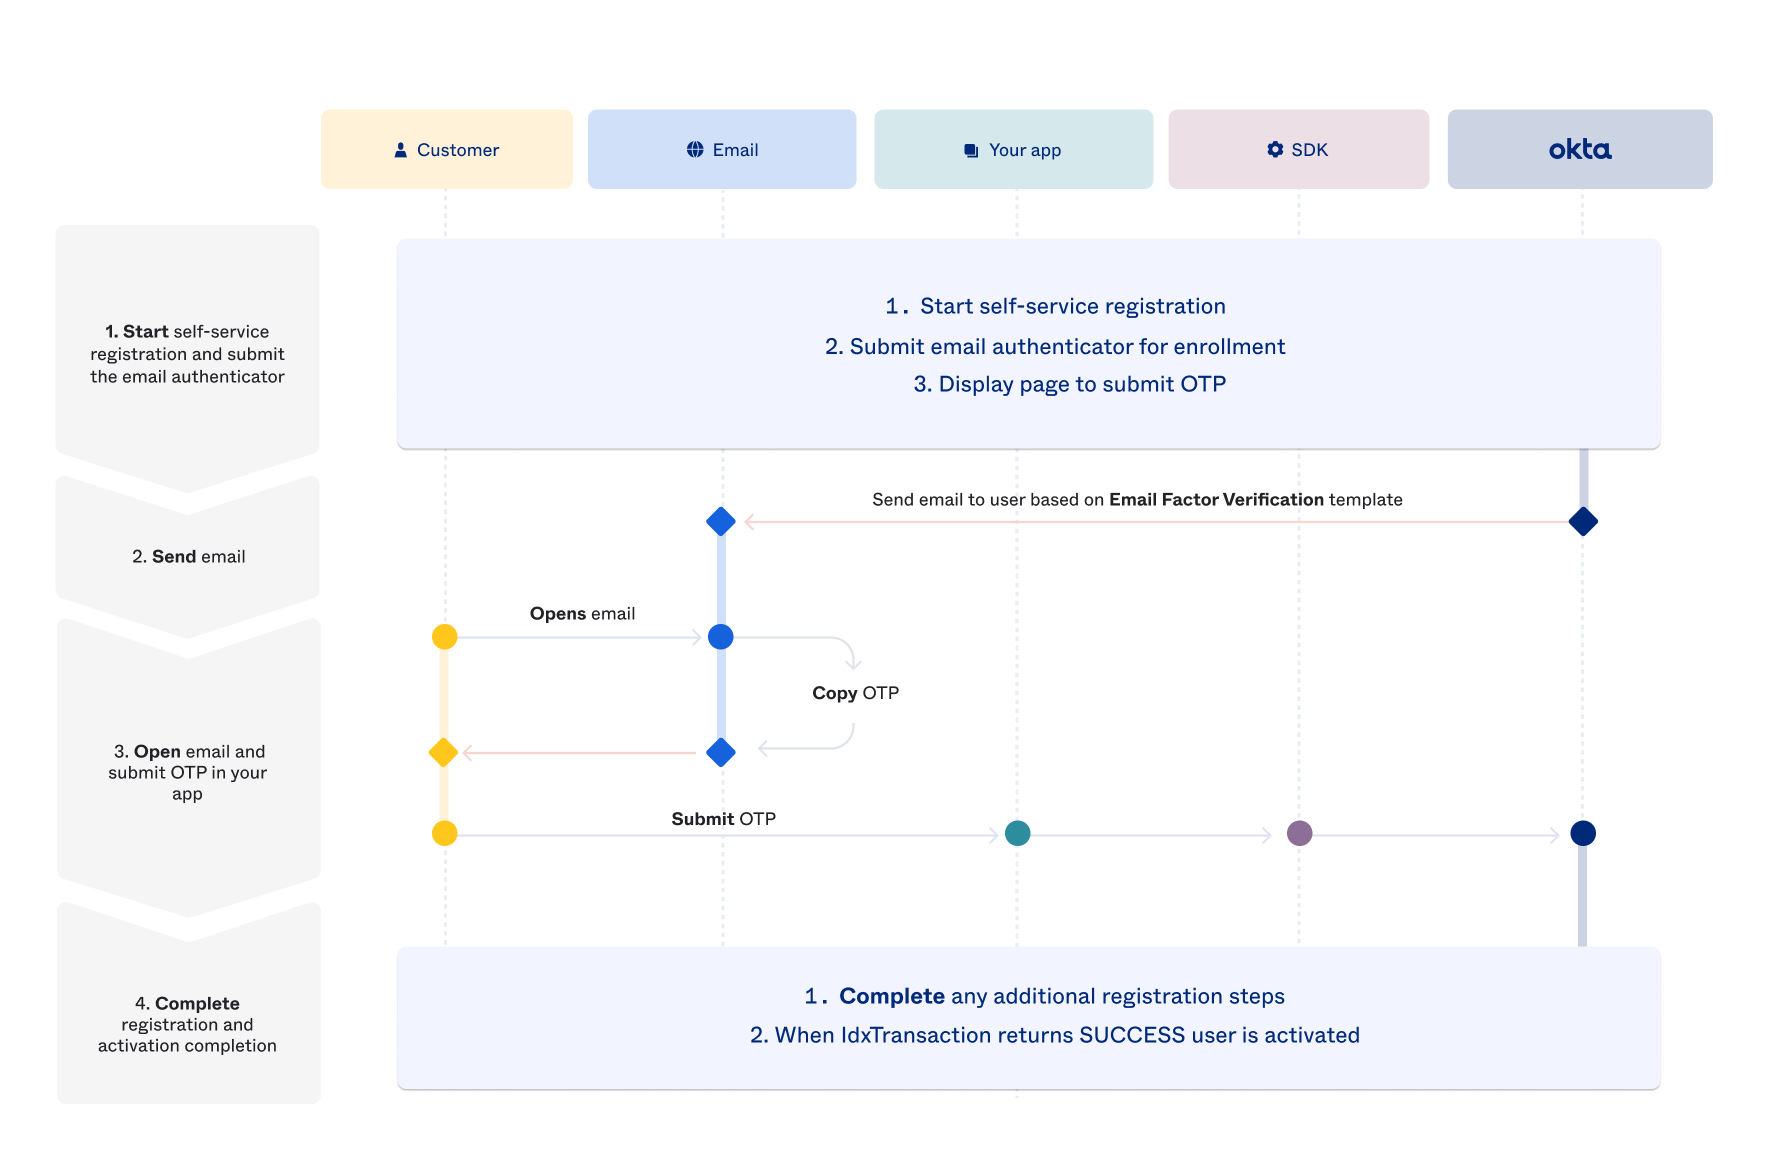
Start self-service registration and submit the email authenticator
First, the user starts a new account registration using your app and is required to enroll in the email authenticator. After they submit an email for enrollment, your app displays an OTP page. See the following guides to learn more about this flow.
Learn more:
- To learn about integrating self-service registration, see the guide.
- To learn about integrating the email enrollment, see under the Okta email guide.
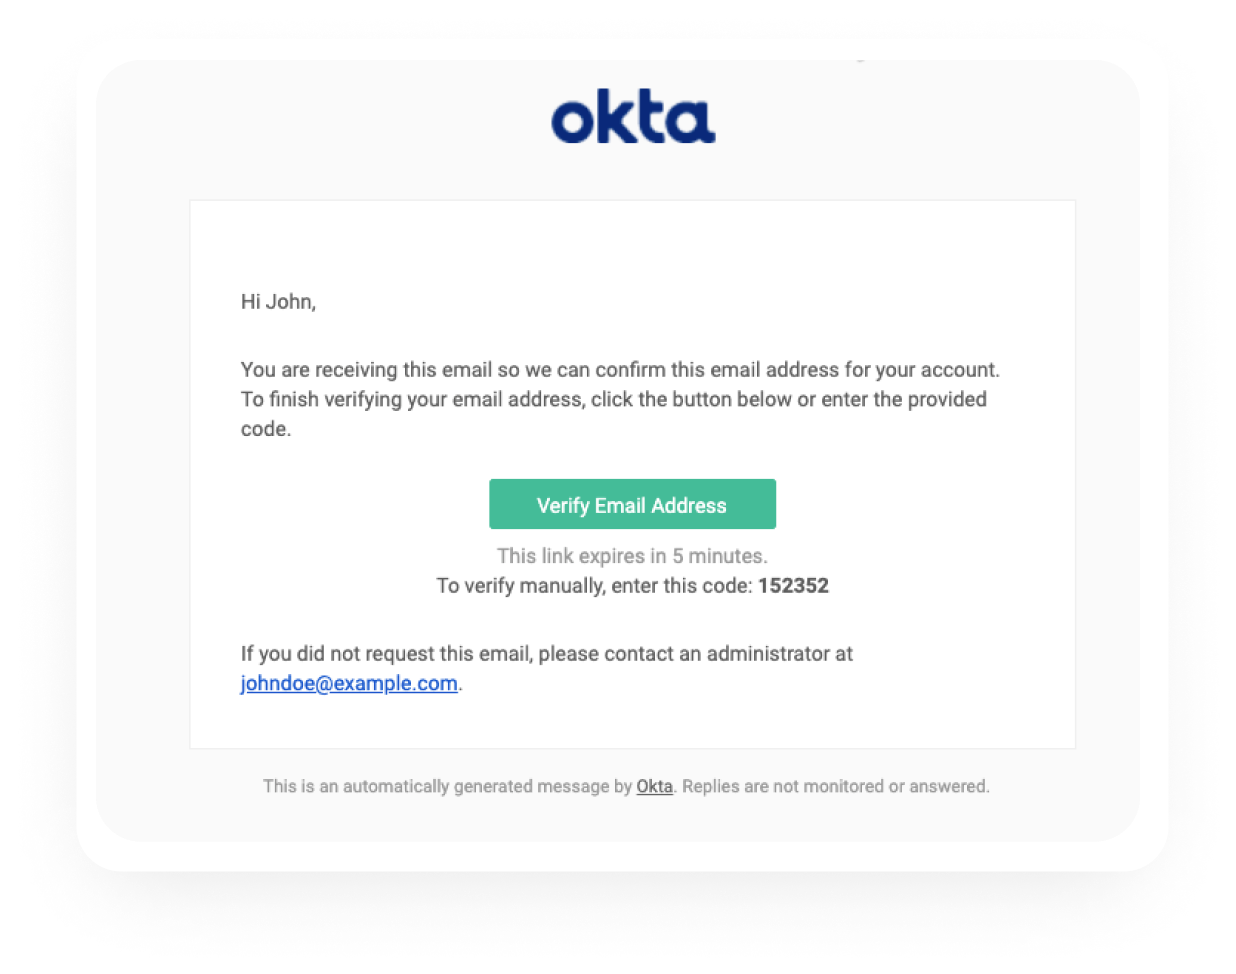
Send email
After the user submits the email authenticator for enrollment, Okta sends an email to the user based on the Email Factor Verification Template. See the following image for an example of the email.
Open email and submit OTP in your app
Next, the user copies the OTP from their email and submits it in your app. Depending on your org's configuration, they may be required to complete more steps (including enrolling in any additional authenticators) before completing the registration. This flow is described in detail in
Complete registration and activation completion
Integrate the Registration - Activation template
In this configuration, the user initiates a new account registration and completes all registration steps, including enrolling in optional and required authenticators. The email authenticator is excluded from the list of available authenticators. After the user completes the registration in your app, Okta sends an email to the user based on the Registration - Activation template. The user opens their email and clicks the Activate account link to complete the activation.
Update configurations
To enable the Registration - Activation template for user activations, set your org's settings to the following values:
- Email verification required before access: Yes
- Enrollment policy for email authenticator: Optional or Disabled
- Self-service recovery with email: No, email not selected
Find the Registration - Activation template
If you want to view or modify the Registration - Activation template, go into the Admin Console and perform the following steps.
- Select Customizations > Emails.
- In the Emails page, click Registration - Activation under Activation.
- On the Email Verification page, click Edit to view and modify the template.
Initiate login URI
When the user clicks the email's Activate Account link, Okta activates their account and redirects the request to the URL defined in Initiate login URI. To update this value, perform the following steps in the Admin Console.
- Select Applications > Applications.
- Select your app in the Applications page.
- On your app page, click Edit in General Settings.
- Under Login, update Initiate login URI to a URL used by your app. The sample app uses
- Click Save to save the changes.
Integration steps
Integrate the Registration - Activation template into your app with the following steps.
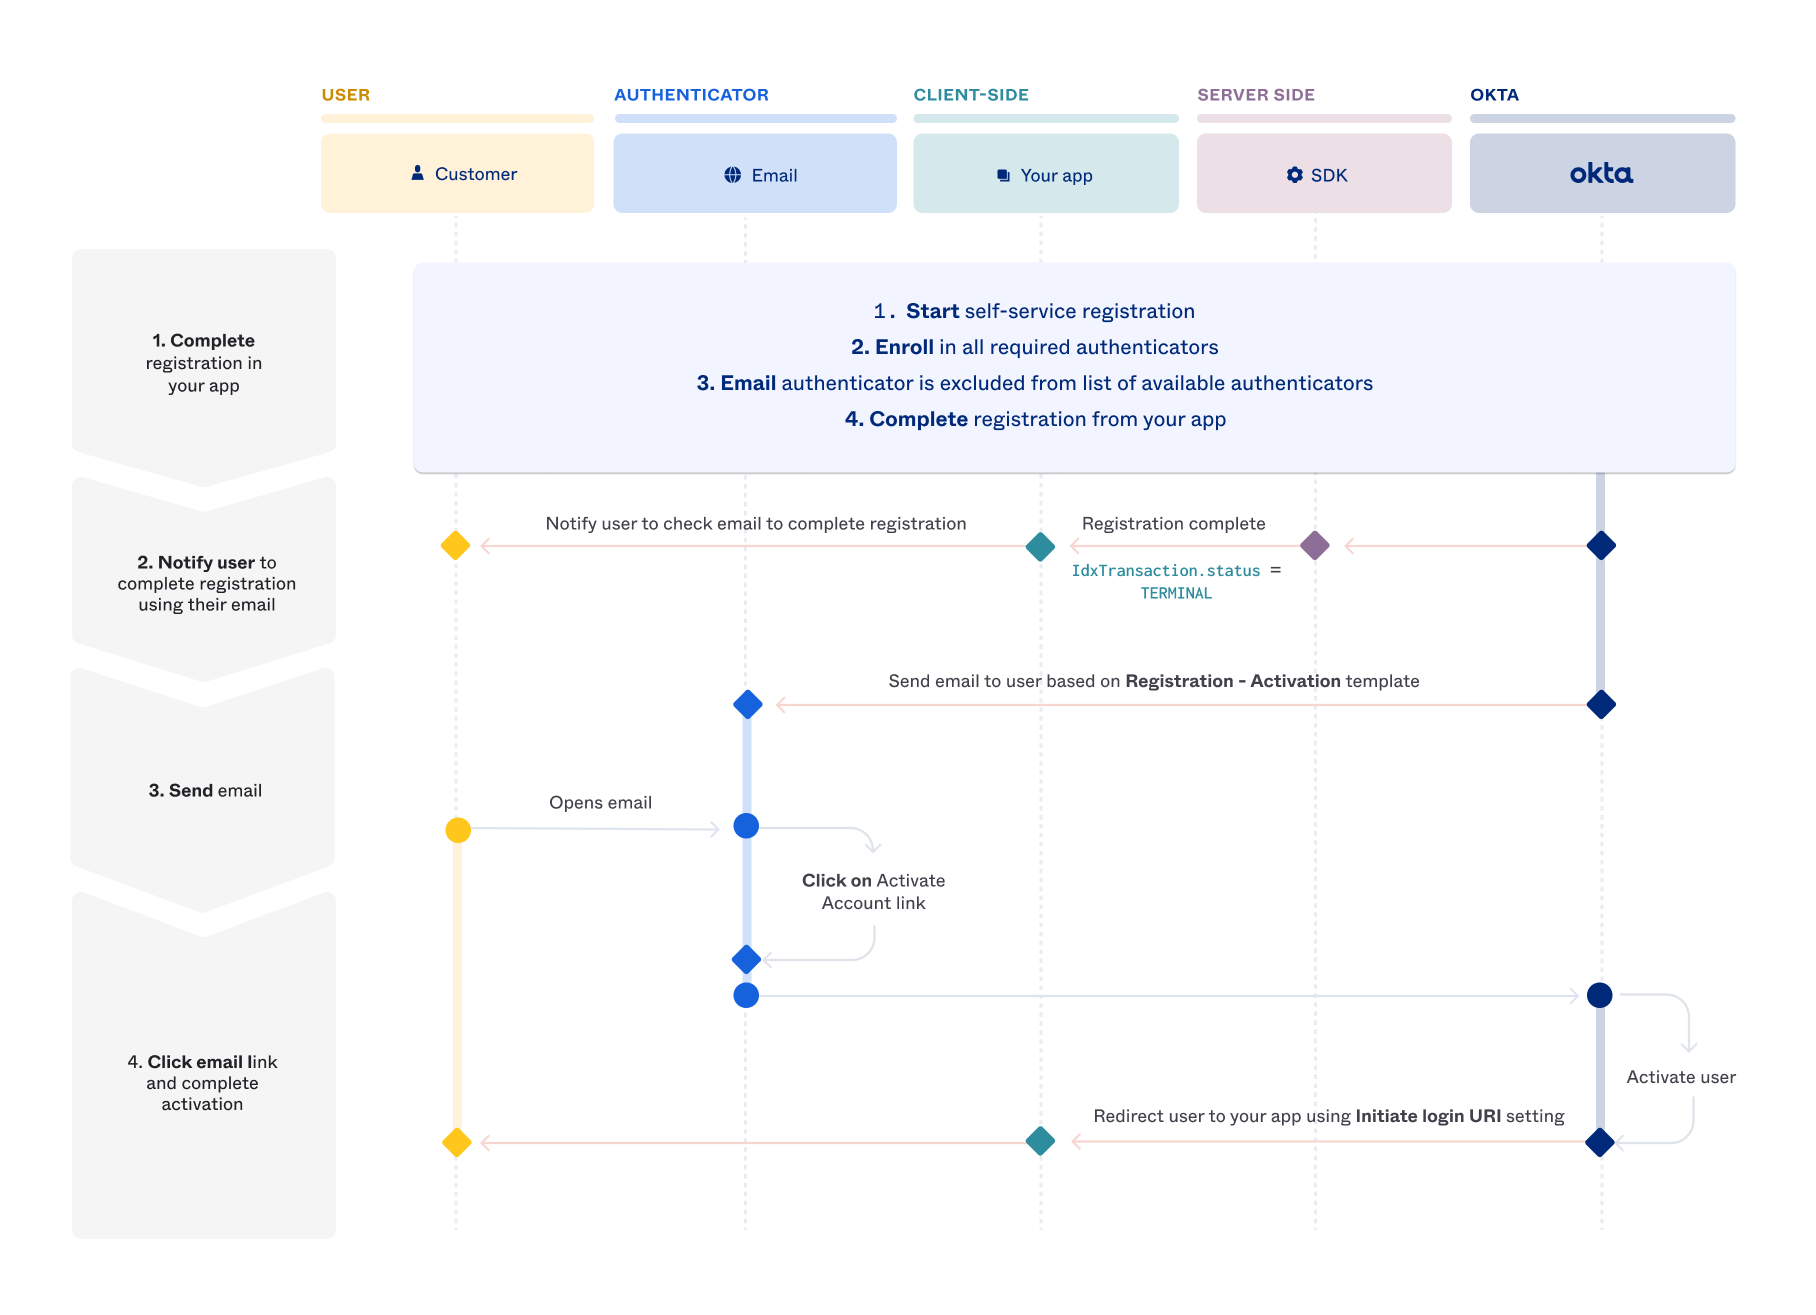
Complete registration in your app
First, the user registers a new account using your app. This registration includes setting the username, optional password, and enrolling in any required authenticators. The email authenticator is excluded from the list of available authenticators, or it's present and the user doesn't choose to enroll in it.
Learn more:
- To learn more about integrating self-service registration, see the guide.
Notify user to complete registration with their email
Send email
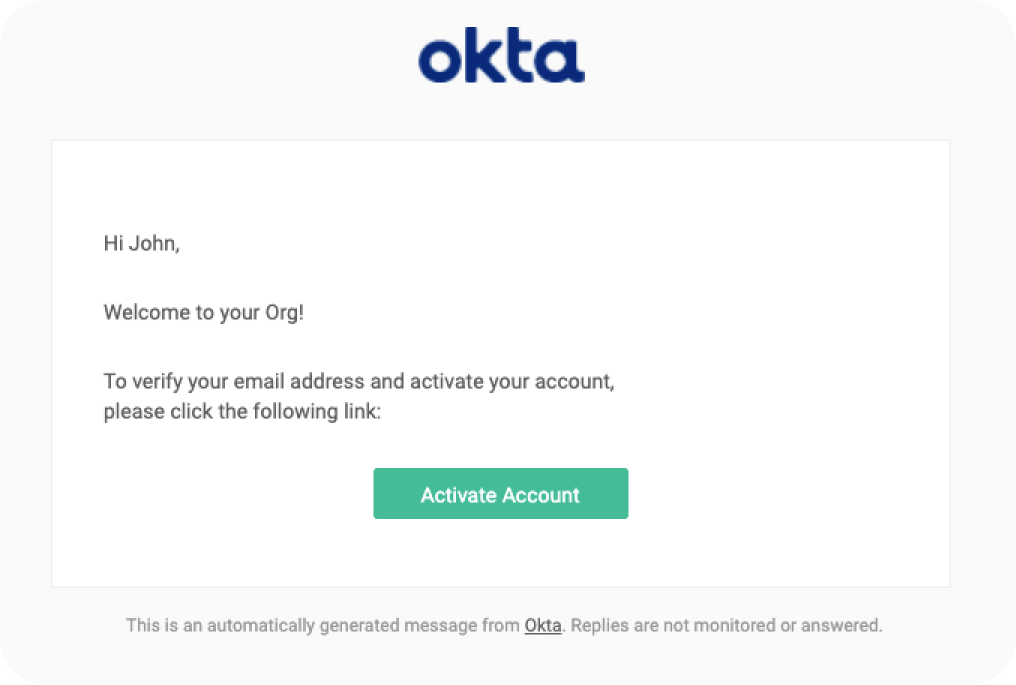
After the user completes the account registration, Okta sends an email to the user based on the Registration - Activation template. See the following image for an example of the email.
Click the email link and complete the activation
When the user clicks the email link, the request is sent to Okta and the user is activated. After activation, the user is redirected to your app (defined in Initiate login URI) where they can sign in.
Integrate user activations with your infrastructure
In this architecture, you take more control over the account creation by calling Okta APIs directly to create the account and initiate the activation during self-service registration. It is your responsibility to send the email to the user to prove ownership. Once verified, redirect the user to your app to complete the activation with the embedded SDK. This architecture is also called the "proxy model" because your infrastructure serves as a relay between user requests and Okta.
Integration steps
Integrate user activations in this proxy model with the following steps.
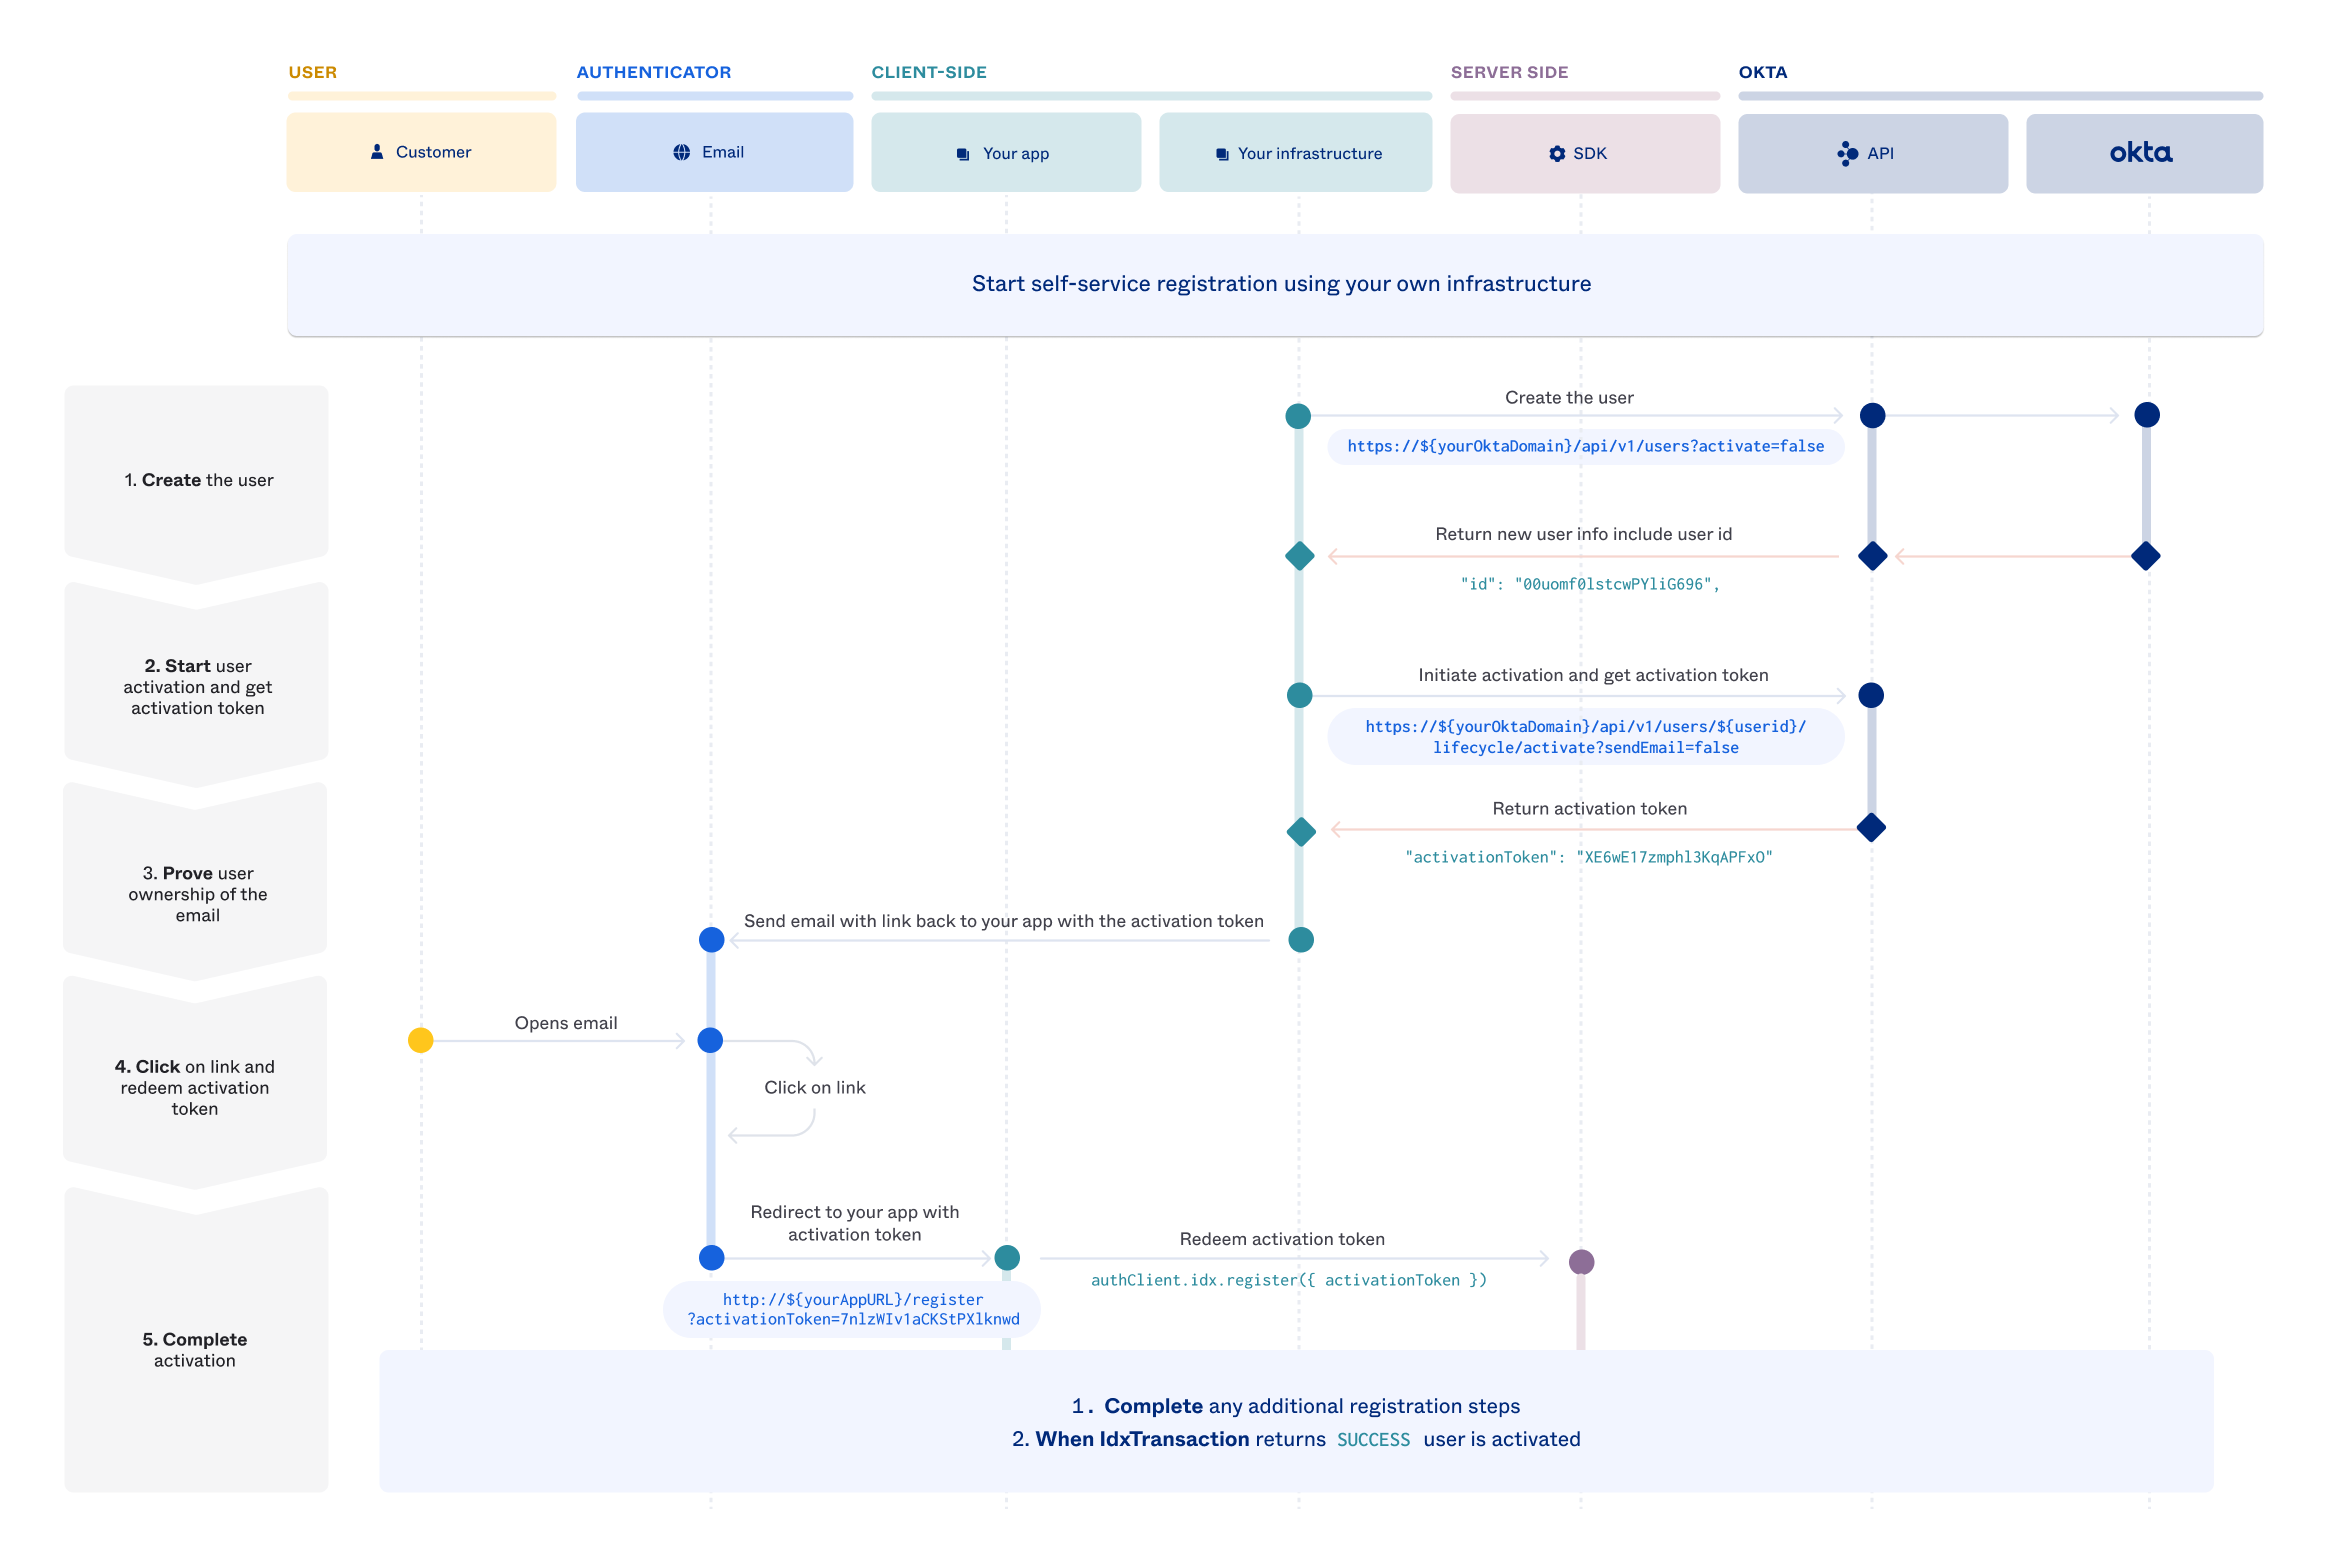
Create the user
The first step is to create a user using the Create a user (opens new window) operation on the Users API. The URL format of the endpoint call is https://{yourOktaDomain}/api/v1/users?activate=false. The following example creates a user without credentials. Ensure the activate query parameter is set to false.
Request
curl -v -X POST \
-H "Accept: application/json" \
-H "Content-Type: application/json" \
-H "User-Agent: Mozilla/5.0 ({systemInformation}) {platform} ({platformDetails}) {extensions}" \
-H "Authorization: SSWS {api_token}" \
-d '{
  "profile": {
    "firstName": "Isaac",
    "lastName": "Brock",
    "email": "john.doe@example.com",
    "login": "john.doe@example.com",
    "mobilePhone": "555-415-1337"
  }
}' "https://{yourOktaDomain}/api/v1/users?activate=false"
Response
{
    "id": "00uomf0lstcwPYliG696",
    "status": "STAGED",
    "created": "2022-03-26T15:32:09.000Z",
    "profile": {
        "firstName": "John",
        "lastName": "Doe",
        "mobilePhone": null,
        "secondEmail": null,
        "login": "john.doe@example.com",
        "email": "john.doe@example.com"
    },
    ...
}
Note: The
idproperty is the user ID of the newly created user. See the Create user without credentials section in the Users API documentation (opens new window) for more details on the response.
Start user activation and get activation token
After user creation, obtain the activation token. Use the Activate User (opens new window) operation in the User Lifecycle API to generate the activation token. The URL format of the endpoint call is https://{yourOktaDomain}/api/v1/users/{userid}/lifecycle/activate?sendEmail=false. The endpoint requires the user ID, which is found in theid property shown in the previous step. In addition, set the sendEmail query parameter to false to include the activation token in the response. See the following examples for more details:
Request
curl -v -X POST \
-H "Accept: application/json" \
-H "Content-Type: application/json" \
-H "User-Agent: Mozilla/5.0 ({systemInformation}) {platform} ({platformDetails}) {extensions}" \
-H "Authorization: SSWS {api_token}" \
"https://{yourOktaDomain}/api/v1/users/00ub0oNGTSWTBKOLGLNR/lifecycle/activate?sendEmail=false"
Response
{
  "activationUrl": "https://{yourOktaDomain}/tokens/XE6wE17zmphl3KqAPFxO/verify",
  "activationToken": "XE6wE17zmphl3KqAPFxO"
}
The activation token is returned in the activationToken property.
Note: The
activationUrlvaries depending on if you are on a Classic or Identity Engine org.
- For Identity Engine orgs, the activation link is in this format:
https://{yourOktaDomain}/tokens/{activationToken}/verify- For Classic orgs, the activation link is in this format:
https://{yourOktaDomain}/welcome/{activationToken}
Prove user ownership of the mail
Next, using your infrastructure and email service, send the user an email with a link including the activation token as a query parameter. For example, the link used by the sample app,
Click the link and redeem the activation token
Complete activation
See also
The