On this page
Event hooks with ngrok
This guide provides a functional example of an Okta event hook that uses the ngrok utility.
Learning outcomes
- Understand the Okta event hook calls and responses.
- Implement Okta event hooks using a local app and the ngrok utility.
- Preview and test an Okta event hook and review the call details with ngrok.
What you need
- Okta Integrator Free Plan org (opens new window)
- A local app. See Create a local app in this guide for a simple example.
- ngrok
Sample code
- See Create a local app for this project's sample code.
About event hooks with ngrok
Event hooks are outbound calls from Okta that can notify your software systems of events that occurred in your Okta org. The ngrok utility exposes local apps to the internet and receives and responds to event hook calls. This setup enables the development and testing of event hooks locally, rather than using an external test or production environment. The ngrok utility also provides a replay function to assist you in testing and developing your external service code.
To use this guide:
- Create a local app or use an existing app.
- Run the ngrok utility with your local app.
- Create an event hook.
- Preview and test the event hook.
Create a local app
Install ngrok
If you already have ngrok installed, move on to Run ngrok. If not, follow the installation instructions at https://ngrok.com/download (opens new window) to install in your sample app folder (or the location of your choice).
Installation notes:
A free ngrok account isn't required, but can provide more features including Basic authentication.
You can install ngrok in the system path directory or the project directory. Alternatively, you can install the executable in another local directory, as long as you reference the directory path when using the tool.
Run ngrok
After installing ngrok, ensure that it's running by creating a "tunnel" into a local port (8082 in this example). If you installed directly into your project directory (for example, sample-app), run the following command in your terminal:
sample-app > ./ngrok http 8082
If you see the following content in your terminal, ngrok is running successfully:
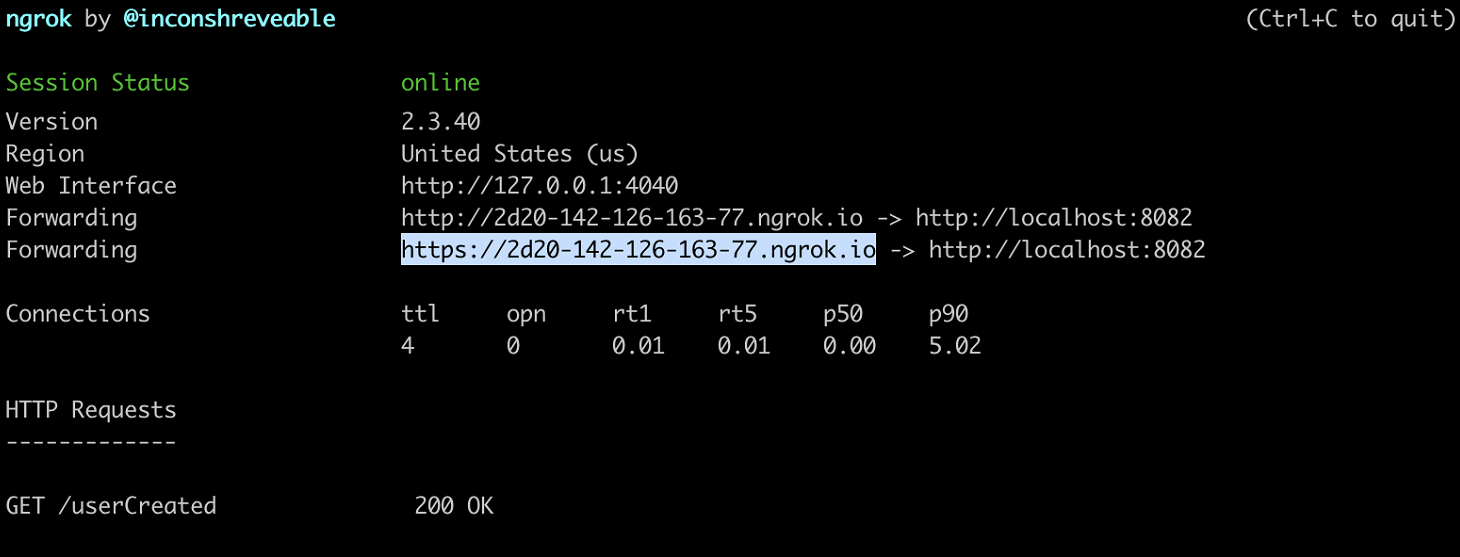
Note: Copy the forwarding URL that’s available from the ngrok terminal session. For example:
https://2d20-142-126-163-77.ngrok.io. Use this URL when setting up your Okta event hook.
See ngrok (opens new window) or their documentation (opens new window) for further information.
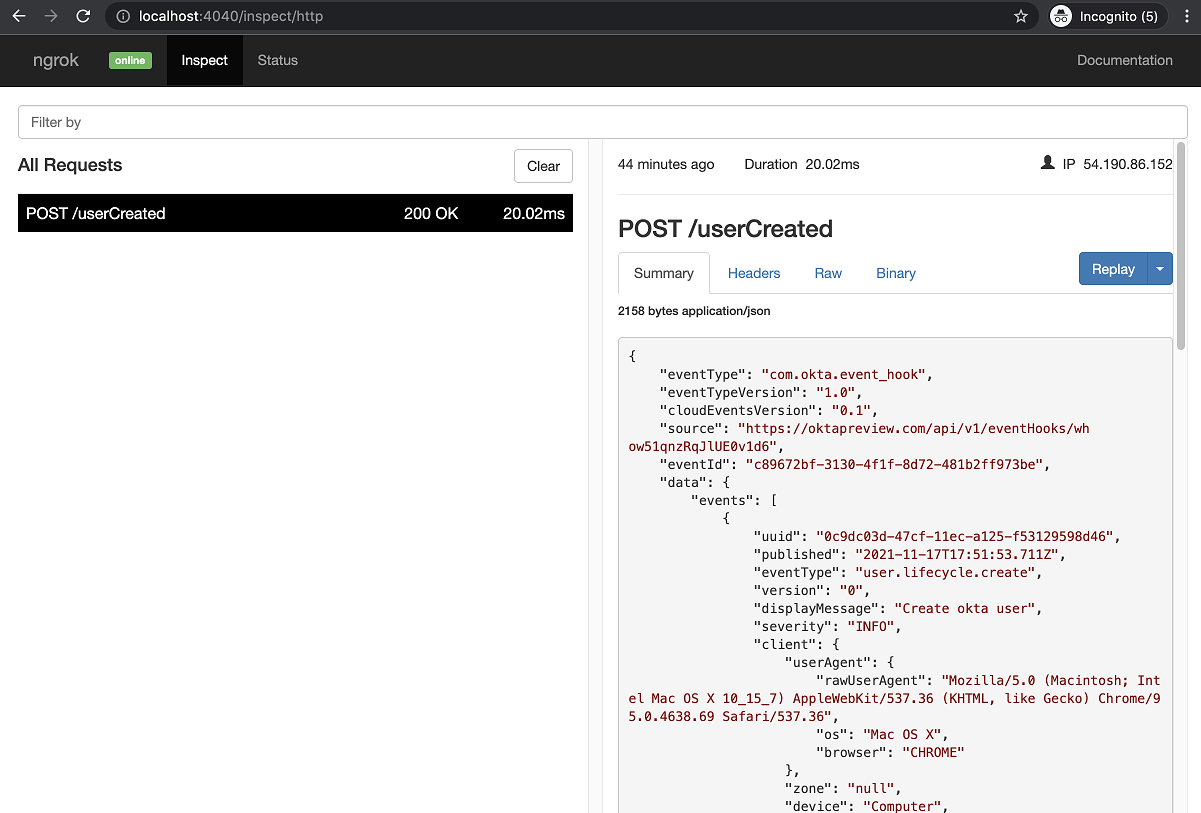
Review ngrok inspection interface
The ngrok inspection interface provides an opportunity to review all calls to your local app. See ngrok documentation (opens new window) for details on using this interface. With the ngrok utility running, open the following URL in a browser: http://localhost:4040.
Each call to your local app appears in the interface and includes the response body, header, replay functionality, and other details. Proceed to the following sections to see an example request.
Create an Okta event hook
Create the Okta event hook to work with your local app, which can now be exposed externally. You must configure and verify the event hook within your Admin Console.
Note: If your org is set up to use the self-service Early Access (EA) feature event hook filtering, the event hook set up flow is slightly different. Follow the procedure in Create an event hook with the same values. To enable this feature, see Manage Early Access and Beta features.
Set up the event hook
Sign in to your Okta org (opens new window).
From the Admin Console, go to Workflow > Event Hooks.
Click Create Event Hook. The Add Event Hook Endpoint dialog box opens.
In the Name field, add a unique name for the hook (in this example, "New user event hook").
In the URL field, add your external service URL. For this example, add the code endpoint,
/userCreatedfromserver.jsto the end of thehttps://URL from the ngrok session. For example: your URL should appear similar to:https://2d20-142-126-163-77.ngrok.io/userCreated.Add the Authentication field and Authentication secret values. This example uses HTTP Basic Authentication.
- Authentication field =
authorization - Authentication secret =
Basic YWRtaW46c3VwZXJzZWNyZXQ=
- Authentication field =
In the REQUESTS section of the dialog box, subscribe to the Event Type you want to monitor. In this example, a user created in the Okta org:
User created.Click Save & Continue.
With your ngrok session and local app running, complete the one-time verification Okta call now. You can also verify the event hook later.
Verify the event hook
You must verify the event hook to prove that your external service controls the endpoint. See One-Time Verification Request.
If you didn't verify the hook during the Create the event hook procedure, ensure that your ngrok session and local app are ready for the external verification call, and go to the Event Hooks table, click the Actions dropdown menu of your UNVERIFIED event hook, and select Verify.
The event hook is now set up with a status of VERIFIED and is ready to send event hook calls to your external service.
Note: A successful event hook verification also indicates that your local app is usable with the ngrok session. Review the ngrok terminal or inspector interface for details on the first
GETcall to your local app.
Test, preview, and review the event hook
With your local app now exposed externally through an ngrok session, you can test and preview Okta event hook calls, and review details of the calls using the ngrok inspection interface. The Okta org is also set up to call your local app when an event is triggered. In this example, the event is triggered when a user is added to your Okta org.
Test the event hook
To run a test of your event hook:
Ensure that both your ngrok session and local sample app are running.
In your Okta org, sign in as an administrator and create a test user in the Admin Console.
- Go to Directory > People, and click Add person. As an example, add the user John Doe with the following fields:
- First name: John
- Last name: Doe
- Username: john.doe@example.com
- Go to Directory > People, and click Add person. As an example, add the user John Doe with the following fields:
Navigate back to your local app's console. If the event hook was successful, the following message appears:
The user john.doe@example.com has been added to the Okta org!Check your ngrok inspection interface (
http://localhost:4040). Each call recorded by ngrok appears in the interface from which you can review the complete call response body, header, and other details. See Review ngrok inspection interface. Click Replay on the ngrok inspection interface to replay the event hook call to assist in development. See Replay the event hook.
Preview the event hook
To run a preview call of your event hook:
In the Admin Console, go to Workflow > Event Hooks.
Locate the event hook that you created during the set-up step. In this example, select
New User Event Hookor the name you gave the event hook.Click the Actions menu for this hook, and select Preview.
In the Configure Event Hook request section, select an event from the Event Type dropdown menu. In this example, the only available option is:
User Created (user.lifecycle.create).The most recent event (in this case, user John Doe created previously) populates the Preview & Deliver Event Hook section with the JSON body of the event hook. You can also select an older event from the System Log Event dropdown menu. If no event is available, the JSON body populates with sample data.
Note:
- The preview event hook JSON body can be modified for testing or development purposes. Click Edit to update the
"target"field, for example. - If you're using the preview sample data, you must edit the preview to add a
targetvalue. Include an email address for thealternateIdproperty. For example:"target": [{ "alternateId": "john.doe@example.com"}]
- The preview event hook JSON body can be modified for testing or development purposes. Click Edit to update the
Ensure that both your ngrok session and local sample app are running.
Note: If you start a new ngrok session at any time, make sure to update the event hook URL.
Click Deliver Request. The Event Hook Preview displays the status request as either successful or a failure. Check your local app console. The following message appears if successful:
The user john.doe@example.com has been added to the Okta org!Check your ngrok inspection interface (
http://localhost:4040). Each call recorded by ngrok appears in the interface from which you can review the response body, header, and other details. See Review ngrok inspection interface.
Replay the event hook
The ngrok inspection interface provides a replay function that you can use to test your code without reproducing test conditions in Okta. To replay your call:
In the ngrok inspection interface (
http://localhost:4040), select an event hook from Okta.Click Replay > Replay with modifications:
Optionally, modify the request body with a different content. For example:
"target": [{ "alternateId": "jane.doe@example.com"}]Click Replay.
Your local app receives the modified request to process and provide a response.
See also ngrok Documentation (opens new window).
See also
- For background conceptual information on event hooks, see Event hooks.
- For information on using event hooks with Okta Workflows, see Understanding Okta Workflows Events (opens new window).