On this page
Add a private SCIM integration
Use this guide to create and test a private SCIM integration from your Okta org to your SCIM API service. To test and submit your SCIM integration to the Okta Integration Network (OIN) for public use, see Submit an integration with the OIN Wizard.
Learning outcomes
- Learn how to add a private SCIM integration to your Okta org.
- Learn how to configure SCIM provisioning and verify user profile and attribute mappings.
What you need
Overview
This guide shows you how to create an instance of a private SCIM integration in Okta so you can test your SCIM service. This integration is considered private because it's only available in the org from where the integration instance was created.
Note: An app integration is considered public if it's available in the OIN catalog (opens new window) for all Okta customers. See Publish an OIN integration for an overview of the submission process. To create a public SCIM integration, see Submit an integration with the OIN Wizard.
Make sure that your SCIM service passes all the SCIM specification tests in Runscope before integrating it with Okta. For more information on SCIM specification tests, see Build your SCIM service > Test your SCIM API.
Begin by signing in to your Integrator Free Plan org. If you don't have one, sign up for an Integrator Free Plan org (opens new window).
Create your private integration in Okta
Sign in to your Okta org (opens new window) with your administrator account.
Click Admin in the upper-right right corner of the page.
Select Applications > Applications.
Click Browse App Catalog.
Search for either "SCIM 2.0" or "SCIM 1.1" depending on the version of SCIM supported by your server. Select the SCIM integration template that's based on the authentication method supported by your SCIM server:
- SCIM 1.1 test apps (opens new window) for SCIM 1.1
- SCIM 2.0 test apps (opens new window) for SCIM 2.0
- SCIM 1.1 Test App(Header Auth) (opens new window) for SCIM 1.1 servers that use custom header expression for header authentication
- SCIM 2.0 Test App(Header Auth) (opens new window) for SCIM 2.0 servers that use custom header expression for header authentication
Click Add Integration for the desired SCIM integration template.
On the General Settings page of your SCIM integration, enter a name. Choose if it's hidden from general and mobile users, and choose if users' are automatically signed in from the landing page. Click Next.
Select the sign-in method for your integration on the Sign-On Options page. Select either SAML or SWA. For guidance on choosing the access method, see App integrations (opens new window). Click Done to create the integration.
Click the Provisioning tab, then in the main panel click Configure API Integration. Select the Enable API Integration checkbox. Enter the base URL for your SCIM server. Configure the credential options based on the previously chosen authentication method:
- Basic Auth: Enter the username and password for the account that handles the create, update, and deprovision actions of your SCIM implementation.
- HTTP Header: Enter a bearer token for accessing your SCIM implementation.
- OAuth: Enter the OAuth token for accessing your SCIM implementation.
Test the credentials by clicking Test API Credentials. The server attempts to connect to Okta. If there's an error, check the entered credentials.
Click Save to complete the API integration.
On the Assignments tab, ensure that the right users and groups in your org are assigned to the app integration. For instructions on how to assign the app integration to individual users and groups, see the Assign app integrations (opens new window) topic in the Okta product documentation.
SCIM integration troubleshooting
If you experience any difficulties when creating your SCIM integration in Okta, check out the System Log information available in the Admin Console.
- In the Admin Console, go to Applications > Applications.
- Select your Okta integration to open the integration settings page.
- Click View Logs to open the System Log.
The System Log captures all events in your Integrator Free Plan org for the previous seven days. This information is invaluable to troubleshoot any connection or authentication issues between Okta and your app. See System Log (opens new window) in the Okta product documentation.
Configure your Okta integration
Now that you’ve created an integration within your Okta org, you need to configure the SCIM options for that integration. These settings tell your Okta integration how to handle provisioning between the users in your downstream SCIM app and their Okta user profiles.
On the Provisioning tab of your Okta integration page, there are now three options listed in the SETTINGS panel:
- To App
- To Okta
- API Integration
To App
This page contains settings for all information that flows from Okta user profiles and through this integration downstream to your app.
Click Edit to change the following sections.
Create Users: Assigns a new account in your downstream app for each user managed by Okta. Okta doesn't create an account if it detects that the username specified in Okta exists in your app. The user's Okta username is assigned by default.
In addition to the user profile, Okta sends a random password in its request to create a user.
Update User Attributes: Syncs any updates made to the profiles of users assigned to the integration and sends those changes to your downstream app. Profile changes made in your app are overwritten with their respective Okta profile values.
Deactivate Users: Automatically deactivates user accounts in the downstream app when either the integration is removed from a user profile in Okta or if the Okta account is deactivated.
Okta can also reactivate the user account in the downstream app if the integration is later reassigned to a user in Okta.
Exclude Username Updates: Prevents your downstream app profile from overwriting the Okta user profile when using the Profile Push (opens new window) feature.
Sync Password: Ensures that a user's app password is always the same as their Okta password, or alternatively, allows Okta to generate a unique password for the user. See Synchronize passwords (opens new window).
Profile Attribute Mappings: Edit attributes and mappings through the Profile Editor. See Check the attributes and corresponding mappings or Work with profiles and attributes (opens new window) in the Okta product documentation.
To Okta
This page contains settings for all information that flows from your app upstream into Okta.
Click Edit to change the following sections.
General: Schedules imports and dictates a username format for imported users. You can also define a percentage of acceptable assignments before the import safeguards (opens new window) feature is automatically triggered.
If the Okta username is overridden due to mapping from a provisioning-enabled app, the custom mapping appears in this section.
User Creation & Matching: Sets up matching rules to use when importing users from your app. Establishing matching criteria allows you to specify how an imported user is defined when creating a user or mapping to an existing Okta user.
Imported user is an exact match to Okta user if: Sets the matching criteria to determine when an imported user matches to an existing Okta user. To consider the new imported user an exact match, each option that you select must be true. If you choose the third option, the first and second choices are disabled.
Allow partial matches: Permits partial matching when the first and last names of an imported user match those of an existing Okta user, but not the username or email address.
Confirm matched users: Automates the confirmation or activation of existing users. If the option isn't selected, matches are confirmed manually.
Confirm new users: Automates the confirmation or activation of a newly imported user. If this option is selected, you can clear it during import confirmation. This feature doesn't apply to users who exist in Okta.
Profile & Lifecycle Sourcing: Allows your downstream app to be a source for Okta user profiles. If enabled, your app appears in the list of profile sources on the Profile Sources (opens new window) page.
Allow
<app>to source Okta users: Enables profile sourcing and determines what happens when a user is deactivated or reactivated in your app. Only the highest priority profile source for that Okta user can deactivate or suspend an Okta user. To verify the highest priority profile source, check the Profile Sources page for your integration.When a user is deactivated in the app: Select Do Nothing to prevent activity in your app from controlling the user life cycle when a user is removed from your app. This option still permits profile source control of attributes and mappings.
The other options are to deactivate or suspend the Okta user profile if the user is removed from your downstream app.
When a user is reactivated in the app: Determines if deactivated or suspended Okta user profiles that are assigned to your Okta integration should also be reactivated when they’ve been reactivated in your downstream app.
Note When a user is reactivated in your app, the user profile must be an exact match to the Okta profile for the reactivation to occur in Okta. If any user profile isn’t an exact match, then after importing the reactivated users, the user profiles appear in Pending Activation state.
Import Safeguards: Defines the maximum percentage of users in your org that can be left unassigned while still allowing the import to proceed. App-level and org-level safeguards are enabled by default and set at 20 percent.
Inline hooks: Configures custom logic to the process of importing new users into Okta from a downstream app. You can program the hooks to resolve conflicts in profile attributes and control whether imported users are treated as matches for existing users. To enable an import inline hook, see Inline hooks.
Okta Attribute Mappings: Edit attributes and mappings through the Profile Editor. See Check the attributes and corresponding mappings or Work with Okta user profiles and attributes (opens new window) in the Okta product documentation.
API Integration
If your API authentication credentials change at any point, this panel allows you to modify any of the authentication settings needed to connect to your SCIM app.
Check the attributes and corresponding mappings
When you add a SCIM template integration to your development org, it comes with base attributes set by default. The user schema in your SCIM app might not support all of these attributes. It’s important that you go through the steps in the next section to ensure that the integration you're submitting to Okta for review reflects the attributes supported by your app.
Note: Confirm your attributes and mappings before you submit your integration for review, or the Okta OIN team returns your submission with a request to update your attributes.
Delete attributes
Before you can delete an attribute, you first need to remove the mapping for that attribute.
From the Admin Console, open your SCIM integration.
Go to the Provisioning tab. Under the Settings section, click To App.

Scroll to the Attribute Mappings section. Look for the attribute that you want to delete and then click the corresponding X.
Click OK to confirm that you want to remove the mapping for the attribute that you selected.
Repeat steps 3 and 4 until you remove all the mappings for the attributes that you want to delete.
After removing all the mappings for the attributes that you want to delete, click Go to Profile Editor in the Attribute Mappings section.
In the Profile Editor, look for the attribute that you want to delete, and click the corresponding X.
Click Delete Attribute to confirm that you want to remove the attribute.
Repeat steps 6 and 7 for all the attributes that you want to delete.
Add attributes
From the Admin Console, open your SCIM integration.
Go to the Provisioning tab. Under the Settings section, click To App.
Scroll to the Attribute Mappings section. Click Go to Profile Editor.
In the Profile Editor, click Add Attribute.
Enter the information for the new attribute that you’re adding and then click Save.
Note: The Scope property determines whether the attribute that you’re adding can be assigned at a group level or just per user. If you want your admins to be able to assign a value for this attribute at a group level, don't select the User personal checkbox.
After adding an attribute, you can add a mapping for that new attribute.
Map attributes
From the Admin Console, open your SCIM integration.
Go to the Provisioning tab. Under the Settings section, click To App.
Scroll to the Attribute Mappings section. Look for the attribute that you want to update and click the corresponding Edit (pen) button.
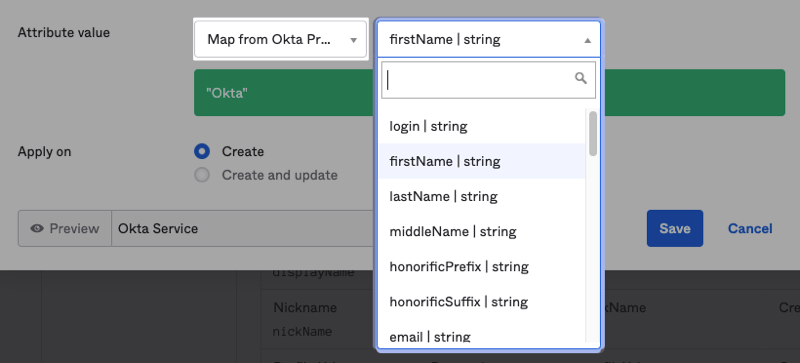
In the dialog that appears, there are two dropdown fields. In the first dropdown menu, select Map from Okta Profile. In the second dropdown menu, choose the Okta profile attribute that you want to map the SCIM attribute from. Click Save.
Repeat steps 3 and 4 for all other SCIM attributes that you want to map (from Okta to your app).
After you update the mappings from Okta to your app, click To Okta in the Settings section.
Scroll to the Attribute Mappings section. Look for the attribute that you want to update and click Edit.
In the dialog that appears, there are two dropdown fields. In the first dropdown menu, select Map from {App Name} App Profile. In the second dropdown menu, choose the Okta profile attribute that you want to map the SCIM attribute to. Click Save.
Repeat steps 7 and 8 for all other SCIM attributes that you want to map (from your app to Okta).
Attribute support
You only want to include the attributes that you support in your current user schema. To ensure that the attributes are being sent properly to and from Okta:
When assigning a user to the SCIM integration that you added in your Integrator Free Plan org, ensure that all expected attributes are populated for that user.
After the user is pushed to your SCIM app, check that all attributes are populated in your SCIM repository.
If your integration supports user imports, try importing one user from your app. Check the imported user and ensure that the values for supported attributes are reflected in that imported user's account in Okta.
From the Admin Console, select Directory > People. The list of Okta users for your org appears.
Find the user that you imported and click the user's name.
After the user account appears, click Profile. The Profile page shows the user's attributes. Verify that the supported attribute values were imported properly.
Your Profile Mapping template can always be updated in the future.
As mentioned in the adding and deleting attributes sections, you can set whether the attribute you’re adding is set per user, or for both per user and group. This is set using the Scope attribute. If you want the attribute you’re adding to be set strictly per user, you need to check the User personal checkbox for the Scope attribute. If you want to give admins the ability to set the attribute both per user or per group, leave this checkbox empty.
Next steps
Now that you've successfully created a SCIM integration with your Okta org, the next step is to Test your private SCIM integration.