On this page
Web Authentication integration guide
Enable phishing-resistant, passwordless authentication in your app using the embedded SDK to integrate WebAuthn for sign-in flows with passkeys, security keys, or biometrics.
Note: When the Passkeys Rebrand self-service Early Access feature is enabled, the FIDO2 (WebAuthn) authenticator is called Passkeys (FIDO2 WebAuthn), and there are new settings and updates to the authenticator page layout.
See Configure the FIDO2 (WebAuthn) authenticator (opens new window) and
settings(opens new window). To enable the Passkeys Rebrand feature, see Enable self-service features (opens new window).
Learning outcomes
- Understand the WebAuthn flow
- Learn how to integrate WebAuthn into your authentication use case
What you need
- An authenticator such as a fingerprint scanner or hardware security key
Sample code
The case for WebAuthn
Passwords and other authenticators that rely on one-time passcodes (OTPs) are vulnerable to security attacks because they use relayed information that bad actors can obtain. Bad actors use phishing and other fraudulent tactics to gain access to passwords, OTPs, and other data. Phishing is one of the major causes of security attacks today.
To be resistant to phishing attacks, a local communication channel should exist between the device and the authentication factor. WebAuthn supplies this local communication channel by providing a framework to authenticate through USB security keys, fingerprints, Touch ID, and other types of localized authenticators. For example, an app running in a browser can authenticate a user by initiating a biometric request using a fingerprint scanner on their laptop.
Besides being resistant to phishing attacks, WebAuthn can drastically reduce sign-in friction by allowing passwordless sign-ins during reauthentication use cases. For example, mobile banking apps use this type of sign-in flow. Some mobile banking apps allow iPhone users to sign in using only Face ID after the user first signs in with a password.
Note: For detailed information on the WebAuthn standard, including an up-to-date list of supported browsers, see webauthn.me (opens new window).
Passkeys and WebAuthn
Passkeys are discoverable WebAuthn credentials that use the FIDO2 Web Authentication (WebAuthn) standard (opens new window). They store the user identifier, which is the unique ID that associates the credential with a specific user, on the authenticator.
Storing the user identifier on the authenticator enables "usernameless" sign-in flows, allowing users to initiate an authentication challenge without having to enter their username. You can sync passkeys across devices by using cloud services (multi-device passkeys). You can also hardware-bind passkeys to a specific authenticator (single-device passkeys), such as a security key or platform authenticator.
Non-discoverable WebAuthn credentials are sometimes referred to as second-factor credentials, and they're explicitly used after another factor during MFA flows. They don't store a user identifier. They require the user to provide a username first so the app can identify which credential to challenge. They're typically hardware-bound, but some non-discoverable credentials can also be synced across devices.
See Passkeys and Okta overview to learn more about passkeys, relying party IDs (RP IDs), and how to use them.
Example authentication flow
WebAuthn uses public-key cryptography to securely communicate and validate the user's device, credentials, and other information. An example WebAuthn authentication challenge flow is as follows:
- A user attempts to sign in to a Service Provider's website.
- The website's back-end servers generate a challenge that's cryptographically signed using a public key.
- The encrypted challenge and other identifying information is sent to the client app running in the browser.
- The client app then calls WebAuthn APIs in the browser and passes the challenge to the authenticator for validation.
- The challenge and other data are validated, and the computer's biometrics authenticator prompts the user for a fingerprint.
- After the fingerprint is validated, the challenge is decrypted using a private key, repackaged with additional information, and re-encrypted using a private key.
- The repackaged challenge is sent to the server where it's decrypted using the public key. The server validates that it's the same challenge that started the flow.
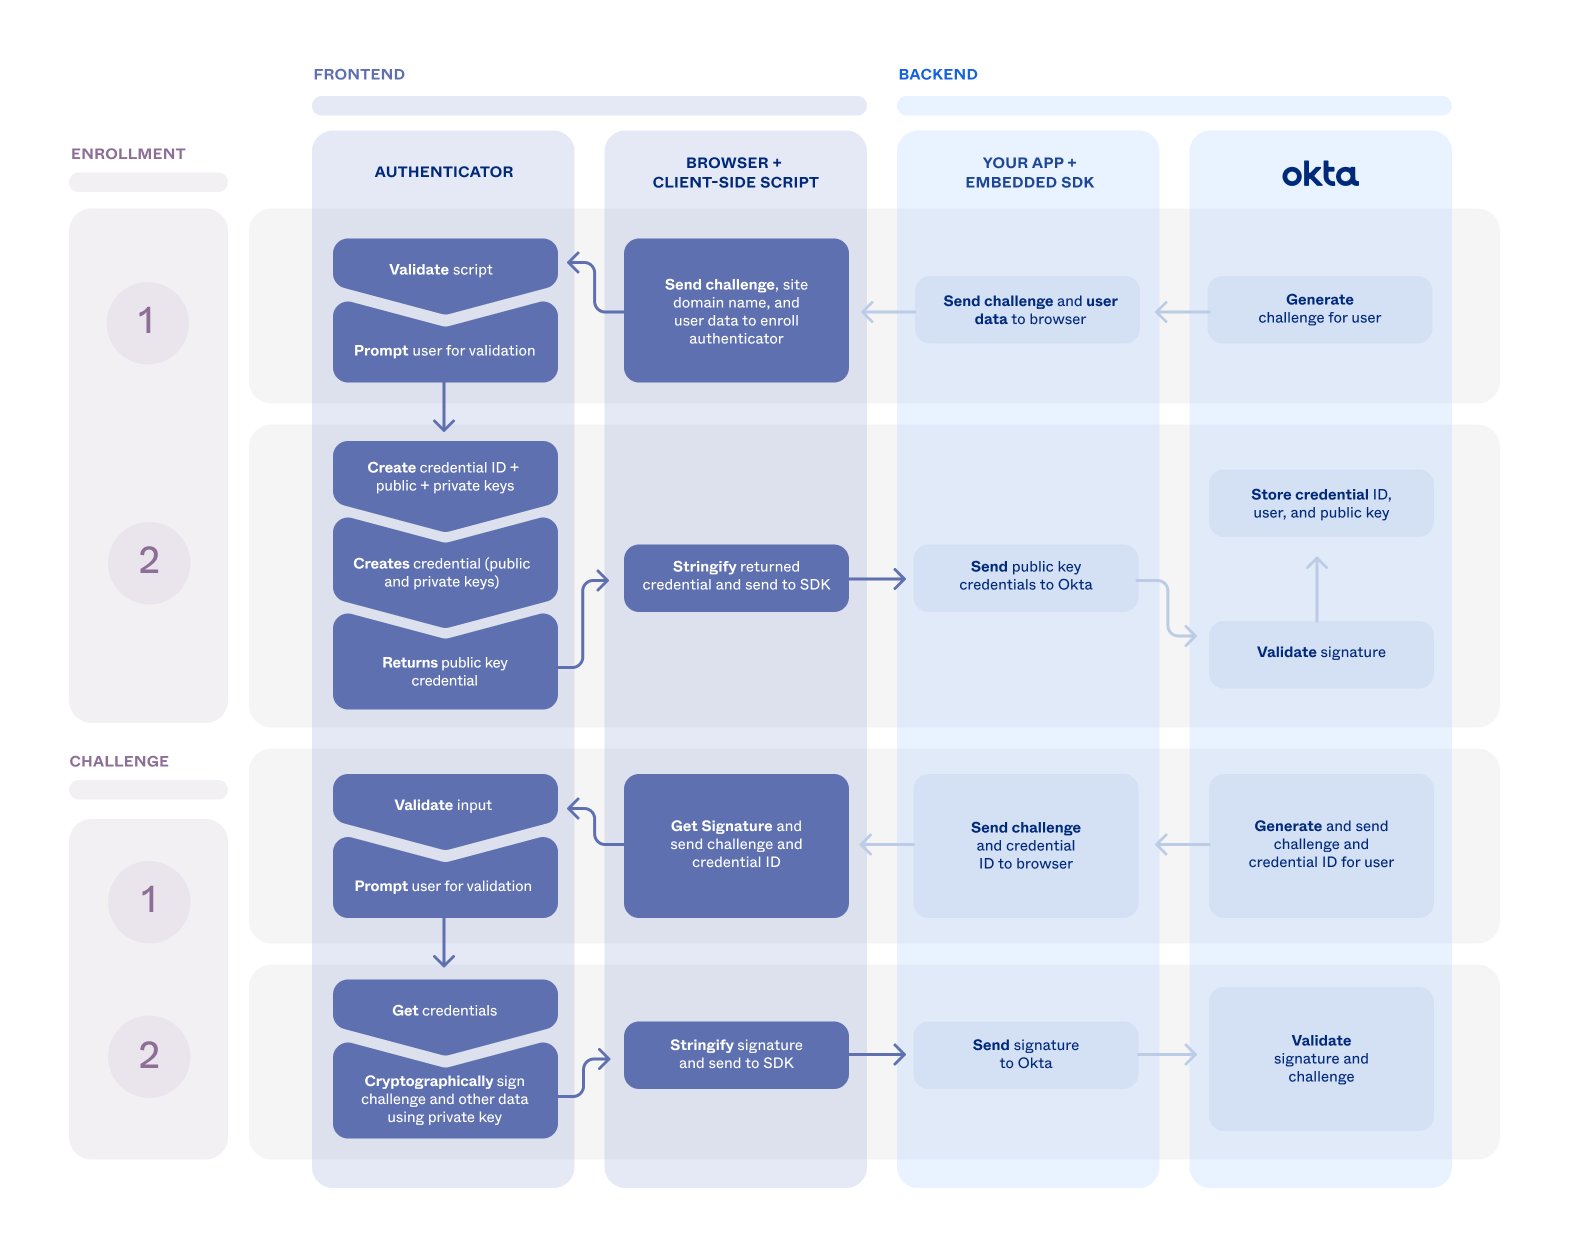
In the previous example, the public and private keys are generated on the user's device during enrollment. The following diagram illustrates the enrollment and challenge flows and how they're integrated within Okta.
As the Service Provider, you can provide WebAuthn support to your users. Enable WebAuthn in your Okta org and build out support for it in your app using the embedded SDK.
Update configurations
Before you can start using WebAuthn, enable it in your Okta org and create an app sign-in policy that requires it to be used.
Add WebAuthn to your org
First, add the WebAuthn authenticator to your org and enable it.
In the Admin Console, go to Security > Authenticators to show the available authenticators.
Follow these steps if FIDO2 (WebAuthn) isn't in the list:
- Click Add Authenticator.
- Click Add on the FIDO2 (WebAuthn) tile.
- Verify that User verification is set to Discouraged.
- Click Add.
If FIDO2 (WebAuthn) is in the list:
- Select Actions > Edit for FIDO2 (WebAuthn).
- If User verification isn't set to Discouraged, click Edit to set it.
- Click Save.
Select the Enrollment tab.
Check that FIDO2 (WebAuthn) is set to either Optional or Required in the Eligible Authenticators section of the default policy.
- If FIDO2 (WebAuthn) is set to Disabled, click Edit for the default policy.
- Select Optional from the dropdown list for FIDO2 (WebAuthn), and then click Update Policy.
Note: See Configure the FIDO2 (WebAuthn) authenticator (opens new window) for information about configuring WebAuthn in the Admin Console.
Set your app integration to use the WebAuthn authenticator
Apps are automatically assigned the shared default app sign-in policy (opens new window). This policy has a catch-all rule that allows a user access to the app using either one or two factors, depending on your org setup. In production, it becomes evident when you can share your authentication needs between apps.
Create a policy specifically for your app for testing purposes.
In the Admin Console, go to Security > Authentication Policies.
Click Add a Policy, name it, and then click Save.
Locate the catch-all rule of the new policy and select Actions > Edit.
Select Allowed after successful authentication.
Set User must authenticate with to Password / IdP + Another factor.
Follow these steps for the Possession factor constraints are setting:
- Select Phishing resistant.
- Verify that FIDO2 (WebAuthn) is listed in the box under Additional factor types. If it isn't listed, check that the authenticator has been enabled using steps 4 and 5 of Add WebAuthn to your org.
- Click Save.
Select the Applications tab for your policy, and then click Add App.
Find your app in the list and click Add next to it.
Click Close.
Verify that the app appears in the Applications tab of the new policy.
Integrate SDK for authenticator enrollment
Integrate the embedded SDK to enroll a user with a WebAuthn authenticator, such as a security key or biometric. This flow typically starts after a primary authentication method, like a password, when the SDK signals that enrollment is required. Your app then uses a challenge from Okta to call the browser's navigator.credentials.create() method. After the user creates the passkey, it's sent back to Okta to complete the enrollment process.
Summary of steps
The following example illustrates the WebAuthn enrollment flow that occurs when a user signs in.
Integrate SDK for authenticator challenge
Use the authenticator challenge flow to verify a user with their previously enrolled passkey or security key. This process confirms possession of an existing credential for a secure sign-in flow. It confirms possession by using the SDK to orchestrate a navigator.credentials.get() request and validate the cryptographic response from the authenticator.
Summary of steps
The following example illustrates the WebAuthn enrollment flow that occurs when a user signs in.