How to Develop a Quarkus App with Java and OIDC Authentication
Quarkus is a container-first Kubernetes Java framework designed to have a super-fast start-up time and low memory usage. The container-first strategy emphasizes packaging the runtime environment along with the application code, allowing both to be tightly optimized and avoiding the endless updates and configuration problems that can come along with monolithic server systems. Quarkus was built from the beginning to support compilation to native code for use with Graal/SubstrateVM but also supports the good old JVM with OpenJDK HotSpot.
Quarkus is intended to be used in serverless and microservice environments and works with oth imperative and reactive programming paradigms. Its REST endpoints use JAX-RS, data models can be persisted using JPA, and CDI is used for dependency injection. Further, a large number of industry-standard libraries are supported like Vert.x, Hibernate, RESTEasy, Netty, Kubernetes, and Eclipse MicroProfile, just to name a few.
In this tutorial, you’ll learn how to create a simple REST endpoint using Java and Quarkus and how to secure it with OAuth 2.0 and Okta, a leading software-as-service identity management company.
This tutorial is a modified and updated version of the “Quarkus - Using JWT RBAC” tutorial on the Quarkus website., the main difference being that this tutorial will use Okta as the OAuth provider and the OIDC Debugger to generate tokens for ad hoc testing (instead of rolling the whole thing yourself).
Let’s get started!
Table of Contents
- Install Quarkus Tutorial Prerequisites
- Create a Java Quarkus Project
- Configure Quarkus Application Properties
- Test the Default Quarkus Endpoint
- Create an OIDC Application in Okta to Test Your Quarkus Service
- Add Groups Claims To Default Authorization Server
- Update TokenSecuredResource
- Generate an OAuth 2.0 Access Token to Test Authentication in Quarkus
- Test the JWT with the Protected Quarkus Endpoint
- Add Functionality to Quarkus REST Endpoint
- Test Your Quarkus Endpoint and Add a New Kayak
- Learn More about Java, Quarkus, and Token Authentication
Note: In May 2025, the Okta Integrator Free Plan replaced Okta Developer Edition Accounts, and the Okta CLI was deprecated.
We preserved this post for reference, but the instructions no longer work exactly as written. Replace the Okta CLI commands by manually configuring Okta following the instructions in our Developer Documentation.
Install Quarkus Tutorial Prerequisites
You’ll need to install a few things before you get started.
Java 11: This project uses Java 11. OpenJDK 11 will work just as well. Instructions are found on the OpenJDK website. OpenJDK can also be installed using Homebrew. Alternatively, SDKMAN is another great option for installing and managing Java versions.
Just a hint, if you run mvn -v, you’ll see your Maven version AND the Java version Maven is running on.
On my computer (a Mac), I was able to use the following command to set the shell in which Maven was running to Java 11: export JAVA_HOME=$(/usr/libexec/java_home -v 11).
HTTPie: This is a simple command-line utility for making HTTP requests. You’ll use this to test the REST application. Check out the installation instructions on their website.
Okta Developer Account: You’ll be using Okta as an OAuth/OIDC provider to add JWT authentication and authorization to the application. Go to our developer site and sign up for a free developer account.
Create a Java Quarkus Project
Open a terminal and cd to an appropriate parent directory for your project. The command below uses the quarkus-maven-plugin to create a starter application and places it in the oauthdemo subdirectory.
mvn io.quarkus:quarkus-maven-plugin:1.11.1.Final:create \
    -DprojectGroupId=com.okta.quarkus \
    -DprojectArtifactId=oauthdemo \
    -DclassName="com.okta.quarkus.jwt.TokenSecuredResource" \
    -Dpath="/secured" \
    -Dextensions="resteasy-jsonb, smallrye-jwt"
If you run the project at this point, you’ll get an error because you need to define some application properties first.
Configure Quarkus Application Properties
Open the src/main/resources/application.properties file and copy and paste the following into it.
mp.jwt.verify.publickey.location=https://{yourOktaDomain}/oauth2/default/v1/keys
mp.jwt.verify.issuer=https://{yourOktaDomain}/oauth2/default
You’ll need to fill in your Okta developer URI in two places.
To find your Okta domain, open the Okta Admin Console and navigate to Security > API > Authorization Servers. Look at the row for the default auth server where you’ll see the Issuer URI.
That domain is your Okta URI that you’ll need to populate in place of {yourOktaDomain}.
Test the Default Quarkus Endpoint
Navigate into the project directory: cd oauthdemo.
Run the project:
./mvnw compile quarkus:dev
You should see output like this:
[INFO] Scanning for projects...
[INFO]
[INFO] ---------------------< com.okta.quarkus:oauthdemo >---------------------
[INFO] Building oauthdemo 1.0-SNAPSHOT
[INFO] --------------------------------[ jar ]---------------------------------
[INFO]
...
Listening for transport dt_socket at address: 5005
2019-09-30 10:39:02,186 INFO  [io.qua.dep.QuarkusAugmentor] (main) Beginning quarkus augmentation
2019-09-30 10:39:02,889 INFO  [io.qua.dep.QuarkusAugmentor] (main) Quarkus augmentation completed in 703ms
2019-09-30 10:39:03,266 INFO  [io.quarkus] (main) Quarkus 0.23.1 started in 1.195s. Listening on: http://0.0.0.0:8080
2019-09-30 10:39:03,268 INFO  [io.quarkus] (main) Profile dev activated. Live Coding activated.
2019-09-30 10:39:03,268 INFO  [io.quarkus] (main) Installed features: [cdi, resteasy, resteasy-jsonb, security, smallrye-jwt]
If you get an error, first check which version of java Maven is using.
./mvnw -v
Now, in another terminal window, use HTTPie to test the generated endpoint:
$ http :8080/secured

HTTP/1.1 200 OK
Connection: keep-alive
Content-Length: 5
Content-Type: text/plain;charset=UTF-8

hello
Pretty sweet! But we can do a little better.
Replace the src/main/java/com/okta/quarkus/jwt/TokenSecuredResource.java file with the following:
package com.okta.quarkus.jwt;

import java.security.Principal;

import javax.annotation.security.PermitAll;
import javax.enterprise.context.RequestScoped;
import javax.inject.Inject;
import javax.ws.rs.GET;
import javax.ws.rs.Path;
import javax.ws.rs.Produces;
import javax.ws.rs.core.Context;
import javax.ws.rs.core.MediaType;
import javax.ws.rs.core.SecurityContext;

import org.eclipse.microprofile.jwt.JsonWebToken;

/**
 * Version 1 of the TokenSecuredResource
 */
@Path("/secured")
@RequestScoped
public class TokenSecuredResource {

    @Inject
    JsonWebToken jwt;

    @GET()
    @Path("/permit-all")
    @PermitAll
    @Produces(MediaType.TEXT_PLAIN)
    public String hello(@Context SecurityContext ctx) {
        Principal caller =  ctx.getUserPrincipal();
        String name = caller == null ? "anonymous" : caller.getName();
        boolean hasJWT = jwt != null;
        String helloReply = String.format("hello + %s, isSecure: %s, authScheme: %s, hasJWT: %s", name, ctx.isSecure(), ctx.getAuthenticationScheme(), hasJWT);
        return helloReply;
    }

}
Now save the file and test the new, updated endpoint:
$ http :8080/secured/permit-all

HTTP/1.1 200 OK
...

hello + anonymous, isSecure: false, authScheme: null, hasJWT: true
Did you notice how you didn’t need to re-start or re-compile your application for the new endpoint to work? That’s one of the slickest features of Quarkus!
Next, we’ll add OAuth 2.0 support to the application.
Create an OIDC Application in Okta to Test Your Quarkus Service
Install the Okta CLI and run okta login.
Then, run okta apps create. Select the default app name, or change it as you see fit.
Choose Web and press Enter.
Select Other.
Then, change the Redirect URI to https://oidcdebugger.com/debug and use https://oidcdebugger.com for the Logout Redirect URI.
What does the Okta CLI do?
The Okta CLI will create an OIDC Web App in your Okta Org. It will add the redirect URIs you specified and grant access to the Everyone group. You will see output like the following when it’s finished:
Okta application configuration has been written to: /path/to/app/.okta.env
Run cat .okta.env (or type .okta.env on Windows) to see the issuer and credentials for your app.
export OKTA_OAUTH2_ISSUER="https://dev-133337.okta.com/oauth2/default"
export OKTA_OAUTH2_CLIENT_ID="0oab8eb55Kb9jdMIr5d6"
export OKTA_OAUTH2_CLIENT_SECRET="NEVER-SHOW-SECRETS"
Your Okta domain is the first part of your issuer, before /oauth2/default.
NOTE: You can also use the Okta Admin Console to create your app. See Create a Web App for more information.
Add Groups Claims To Default Authorization Server
You’re going to add a groups claim mappings in the JWT access token, this is what maps Okta’s groups to the role-based authorization in Quarkus.
Run okta login and open the returned URL in a browser. Sign in to the Okta Admin Console and go to Security > API and select Authorization Servers.
Click on the default server.
Select the Claims tab.
Click Add Claim.
- Name:
groups - Include in token type:
Access TokenAlways - Value type:
Groups - Filter:
Matches regex.*
Click Create.
Update TokenSecuredResource
Now update the TokenSecuredResource class to do two things:
1) Use CDI dependency injection to inject the groups claim from the JWT, if it’s available2) Add a default endpoint for the /secured path that is protected by OAuth 2.0 and requires the Everyone group to access.
Change TokenSecuredResource.java to the following:
package com.okta.quarkus.jwt;

import java.security.Principal;
import java.util.Set;

import javax.annotation.security.PermitAll;
import javax.annotation.security.RolesAllowed;
import javax.enterprise.context.RequestScoped;
import javax.inject.Inject;
import javax.ws.rs.GET;
import javax.ws.rs.Path;
import javax.ws.rs.Produces;
import javax.ws.rs.core.Context;
import javax.ws.rs.core.MediaType;
import javax.ws.rs.core.SecurityContext;

import org.eclipse.microprofile.jwt.Claim;
import org.eclipse.microprofile.jwt.JsonWebToken;

/**
 * Version 1 of the TokenSecuredResource */
@Path("/secured")
@RequestScoped
public class TokenSecuredResource {

    @Inject
    JsonWebToken jwt;

    @Inject
    @Claim("groups")
    Set<String> groups;

    @GET()
    @Path("permit-all")
    @PermitAll
    @Produces(MediaType.TEXT_PLAIN)
    public String hello(@Context SecurityContext ctx) {
        Principal caller =  ctx.getUserPrincipal();
        String name = caller == null ? "anonymous" : caller.getName();
        boolean hasJWT = jwt != null;
        String groupsString = groups != null ? groups.toString() : "";
        String helloReply = String.format("hello + %s, isSecure: %s, authScheme: %s, hasJWT: %s, groups: %s", name, ctx.isSecure(), ctx.getAuthenticationScheme(), hasJWT, groupsString);
        return helloReply;
    }

    @GET()
    @Path("/")
    @RolesAllowed({"Everyone"})
    @Produces(MediaType.TEXT_PLAIN)
    public String helloRolesAllowed(@Context SecurityContext ctx) {
        Principal caller =  ctx.getUserPrincipal();
        String name = caller == null ? "anonymous" : caller.getName();
        boolean hasJWT = jwt != null;
        String groupsString = groups != null ? groups.toString() : "";
        String helloReply = String.format("hello + %s, isSecure: %s, authScheme: %s, hasJWT: %s, groups: %s\"", name, ctx.isSecure(), ctx.getAuthenticationScheme(), hasJWT, groupsString);
        return helloReply;
    }
}
Try out the new default endpoint:
$ http :8080/secured

HTTP/1.1 401 Unauthorized
...

Not authorized
Generate an OAuth 2.0 Access Token to Test Authentication in Quarkus
An easy way to get an access token is to generate one using OpenID Connect Debugger. Open the site in a new window or tab. Fill in your client ID, and use https://{yourOktaDomain}/oauth2/default/v1/authorize for the Authorize URI. Select code for the response type and Use PKCE.
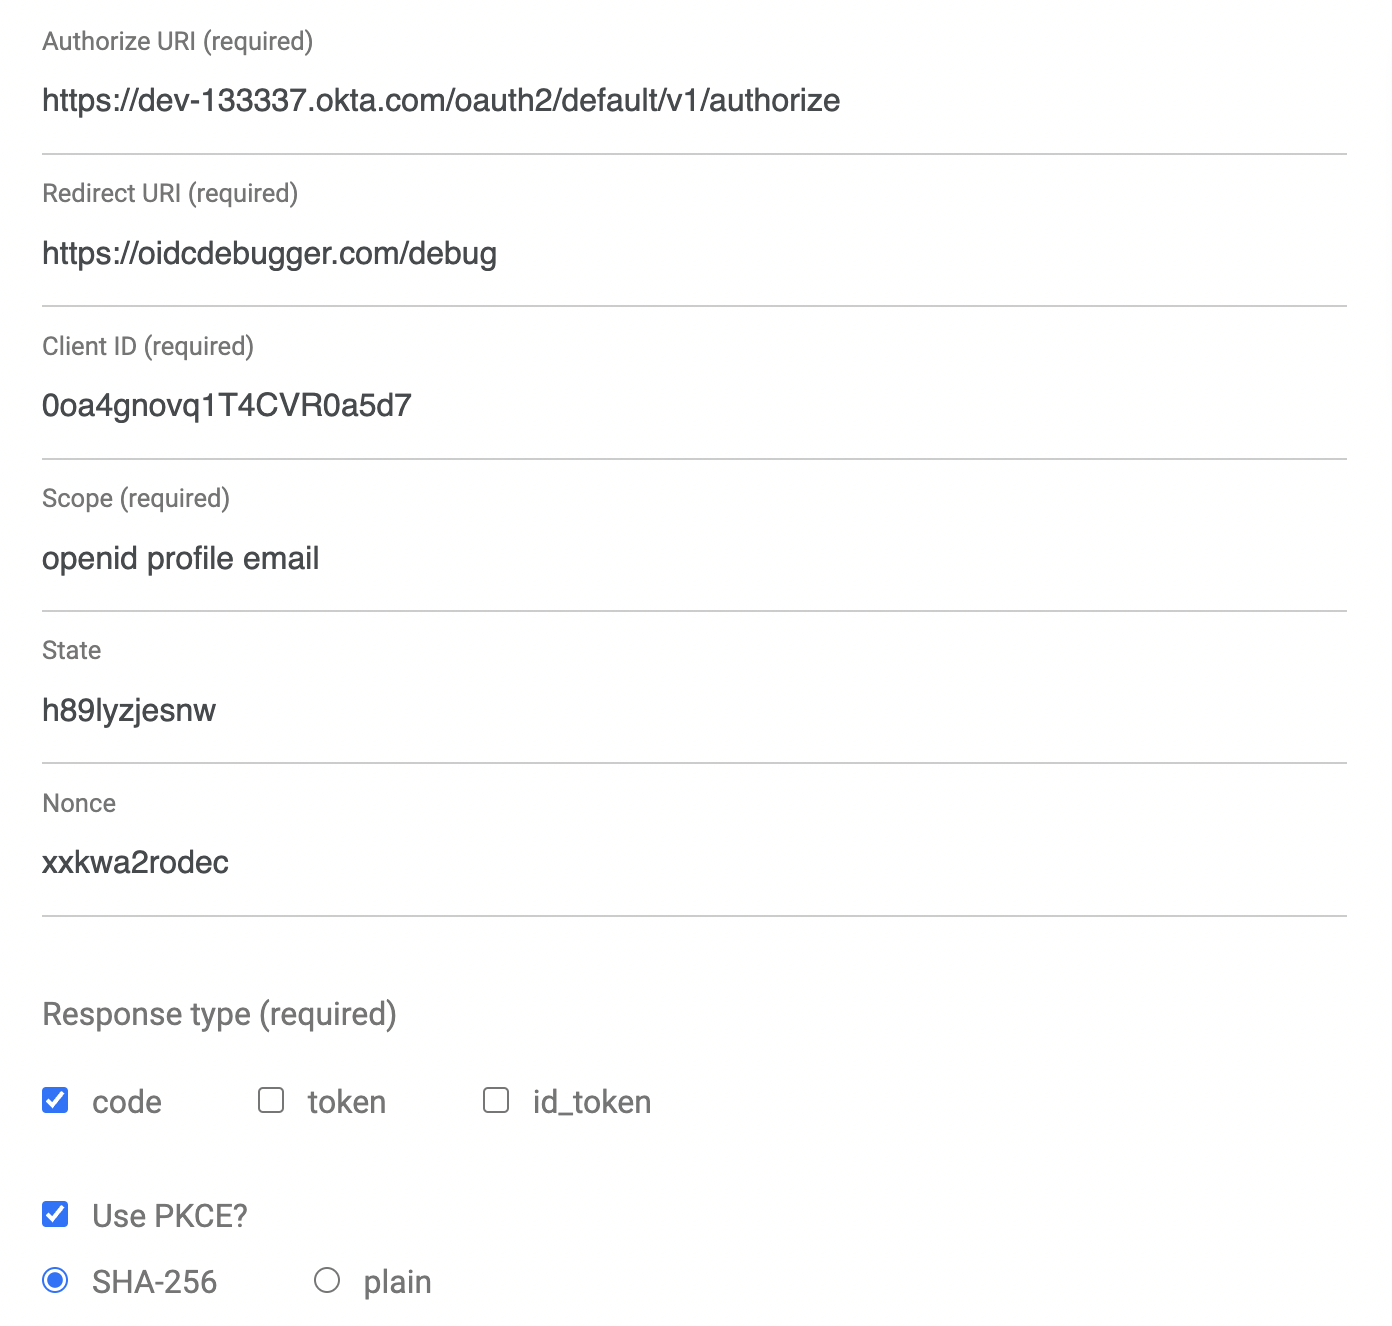
Scroll down and click Send Request.
Copy the resulting JWT Access Token to the clipboard, and in the terminal where you are running your HTTPie commands, save the token value to a shell variable, like so:
TOKEN=eyJraWQiOiJxMm5rZmtwUDRhMlJLV2REU2JfQ...
Test the JWT with the Protected Quarkus Endpoint
Now that you have a valid JWT from your OAuth provider (Okta), you should be able to use this JWT to authenticate against the protected endpoint.
Try it out:
http :8080/secured "Authorization: Bearer $TOKEN"
You should see something like:
HTTP/1.1 200 OK
Connection: keep-alive
Content-Length: 123
Content-Type: text/plain;charset=UTF-8

hello + andrew@gmail.com, isSecure: false, authScheme: MP-JWT, hasJWT: true, groups: [Everyone, Admin]"
Add Functionality to Quarkus REST Endpoint
The first step to building a more realistic REST resource is to create a data model class. To do this, you can use a helper project called Lombok (more on their website).
To work with Lombok, add the following dependency to your pom.xml.
 <dependency>
    <groupId>org.projectlombok</groupId>
    <artifactId>lombok</artifactId>
    <version>1.18.16</version>
    <scope>provided</scope>
</dependency>
NOTE: If you’re using an IDE to build your project, and not the command line, install the Lombok plugin for it. For example, see the Lombok IntelliJ plugin.
You’re only going to use a small part of Lombok, the @Data annotation, to save time writing boilerplate code in the data model class (check out the annotation docs, if you like). It generates getters, setters, equals(), and hashCode() methods.
Go ahead and create a java class: src/main/java/com/okta/quarkus/jwt/Kayak.java.
package com.okta.quarkus.jwt;

import lombok.Data;

import java.util.Objects;

@Data
public class Kayak {

    private String make;
    private String model;
    private Integer length;

    public Kayak() {
    }

    public Kayak(String make, String model, Integer length) {
        this.make = make;
        this.model = model;
        this.length = length;
    }
}
You may have guessed by now that your new REST endpoint is going to manage a list of kayaks.
This code is pure JAX-RS and is not specific to working with Quarkus or Kubernetes. JAX-RS is the Java API for Restful Web Services, an annotation-based specification for configuring REST services. Because it’s just a spec, the actual implementation is provided by the Quarkus stack.
Now you need to create the REST endpoint resource:
src/main/java/com/okta/quarkus/jwt/KayakResource.java.
package com.okta.quarkus.jwt;

import java.util.Collections;
import java.util.LinkedHashMap;
import java.util.Set;

import javax.annotation.security.RolesAllowed;
import javax.ws.rs.Consumes;
import javax.ws.rs.DELETE;
import javax.ws.rs.GET;
import javax.ws.rs.POST;
import javax.ws.rs.Path;
import javax.ws.rs.Produces;
import javax.ws.rs.core.MediaType;

@Path("/kayaks")
@Produces(MediaType.APPLICATION_JSON)
@Consumes(MediaType.APPLICATION_JSON)
public class KayakResource {

    private Set<Kayak> kayaks = Collections.newSetFromMap(Collections.synchronizedMap(new LinkedHashMap<>()));

    public KayakResource() {
        kayaks.add(new Kayak("NDK", "Romany", 17));
        kayaks.add(new Kayak("NDK", "Surf", 16));
        kayaks.add(new Kayak("P&H", "Scorpio HV", 15));
    }

    @GET
    public Set<Kayak> list() {
        return kayaks;
    }

    @RolesAllowed({"Everyone"})
    @POST
    public Set<Kayak> add(Kayak kayak) {
        kayaks.add(kayak);
        return kayaks;
    }

    @RolesAllowed({"Everyone"})
    @DELETE
    public Set<Kayak> delete(Kayak kayak) {
        kayaks.remove(kayak);
        return kayaks;
    }
}
I won’t go into a ton of detail here, but I do want to point out a few things. First, notice the @Produces and @Consumes annotations. The Quarkus docs state that it is very important to include these as they’re used to optimize the final build. This endpoint uses JSON, specified by the constant MediaType.APPLICATION_JSON.
Also, notice that the GET endpoint is public, but the POST and DELETE endpoints require membership in the Everyone group. Don’t confuse Everyone with anonymous. Everyone is a catch-all, default group assigned to anyone that authenticates on the Okta OIDC application. In this instance, it means that a user has authenticated but isn’t necessarily part of any other group, such as Admin.
Test Your Quarkus Endpoint and Add a New Kayak
Since you added a new dependency to your pom.xml, you’ll need to restart the Maven process running your server.
Then, test the POST endpoint without a token to verify that it’s protected.
$ http POST :8080/kayaks make="P&H" model="Cetus HV" length=18

HTTP/1.1 401 Unauthorized
...

Not authorized
Now, try again with the token. You’ll see that a new kayak has been added to the list!
$ http POST :8080/kayaks make="P&H" model="Cetus HV" length=18 "Authorization: Bearer $TOKEN"

HTTP/1.1 200 OK
Connection: keep-alive
...

[
    {
        "length": 17,
        "make": "NDK",
        "model": "Romany"
    },
    {
        "length": 16,
        "make": "NDK",
        "model": "Surf"
    },
    {
        "length": 15,
        "make": "P&H",
        "model": "Scorpio HV"
    },
    {
        "length": 18,
        "make": "P&H",
        "model": "Cetus HV"
    }
]
You can delete the newly added kayak with the following command:
http DELETE :8080/kayaks make="P&H" model="Cetus HV" length=18 "Authorization: Bearer $TOKEN"
You might notice there’s no PUT (update) in this service. In a more complete service, each record would have a unique ID of some type associated with it. This would allow a client app to specify a specific record for update and deletion (instead of using the record properties themselves and the equals() method).
Also, clearly this resource is pretty naive, storing the data in a class property. In a real application, JPA annotations could be used to map the data model to a database for easy serialization and deserialization.
Learn More about Java, Quarkus, and Token Authentication
All done! In this tutorial, you used Quarkus and Java to create a simple REST service, secured with JWT OAuth using Okta as an OAuth/OIDC provider. You also saw how to use CDI dependency injection to inspect JWT claims and retrieve information about the authenticated (or not) client. Finally, you tried some of the basics of RBAC (role-based authentication).
As a reminder, this tutorial was inspired by the Quarkus post: Using JWT RBAC.
Quarkus has a ton of other great guides on their website.
You can find the source code for this tutorial at oktadeveloper/okta-quarkus-example.
Here are some related blog posts to learn more about Java and authentication:
- Simple Token Authentication for Java Apps
- Build a Web App with Spring Boot and Spring Security in 15 Minutes
- Create a Secure Spring REST API
- Build a Simple CRUD App with Spring Boot and Vue.js
If you have any questions about this post, please add a comment below. For more awesome content, follow @oktadev on Twitter, like us on Facebook, or subscribe to our YouTube channel.
Changelog:
- Jan 28, 2021: Updated post to upgrade Quarkus to version 1.11.1.Final. See the code changes in the example on GitHub. Changes to this post can be viewed in oktadeveloper/okta-blog#537.
Okta Developer Blog Comment Policy
We welcome relevant and respectful comments. Off-topic comments may be removed.