How to use KentorIT AuthServices with Okta
If you’re wondering how to configure an ASP.NET application with KentorIT’s AuthServices and Okta, you’ve come to the right place. But before delving into the specifics of how to make Okta work with an SAML-enabled ASP.NET application powered by KentorIT AuthServices, it is worth spending some time going over a critical, but easily fixable issue:
Important note : As of March 22nd, 2016, you have 2 choices:
-
Either get the source code of the AuthServices assemblies and compile them on your own machine. In this case, no specific adjustment is necessary.
-
Or use the v0.17 KentorIT NuGet assemblies. In this case, if you plan to use the SampleApplication project (not the SampleMvcApplication) for testing purposes, make sure you remove the following line from the web.config file:
<requestedAuthnContextclassRef="Password" comparison="Minimum" />If you don’t, the SP-initiated login flow will fail because Okta won’t manage to deserialize the SAMLRequest parameter (due to a case issue).
Here’s how you should configure an app powered by Kentor AuthServices to make it work with Okta:
- Download the latest version of KentorIT’s AuthServices from https://github.com/KentorIT/authservices and open the Kentor.AuthServices.sln solution in Visual Studio.
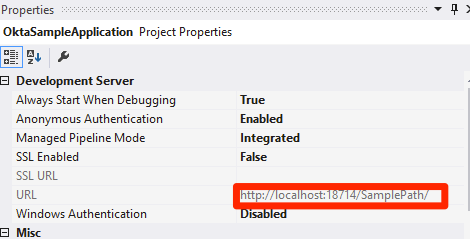
- Identify the SampleApplication project and make a note of its URL property:
- Go to you Okta organization, click the Admin button and select Applications.
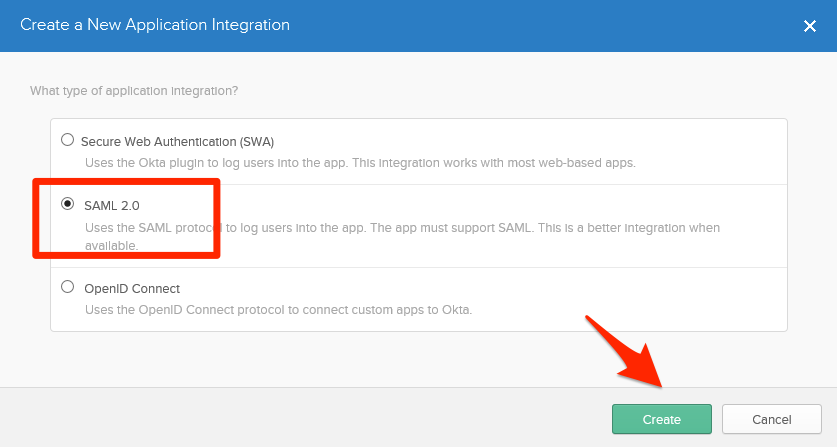
- Press the Add Application button and the green Create New App button

- Select the SAML 2.0 option and press the Create button.
- Give your application a name and optionally upload a custom logo. We’ll call it “Kentor AuthServices App 1”
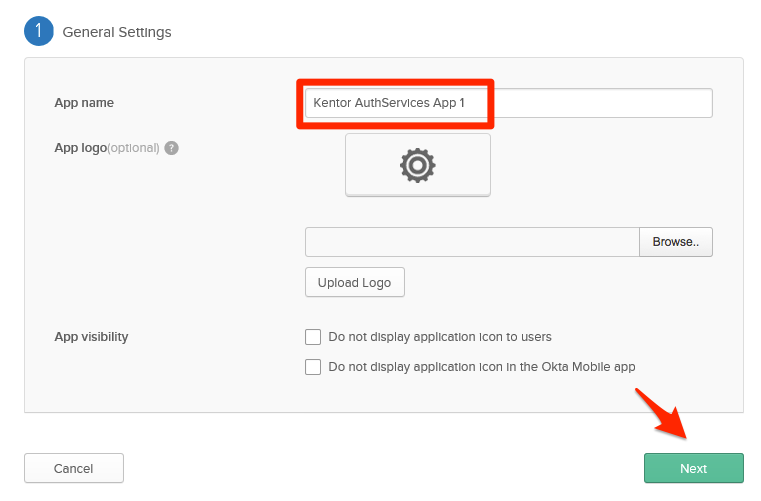
- Press Next.
- In the Single sign on URL field, enter the url you retrieved above in step #2 and append “ /AuthServices/Acs”, for instance http://localhost:18714/SamplePath/AuthServices/Acs
- For the Audience URI field, enter the Url you retrieved above in step #2 and append “ /AuthServices”, for instance http://localhost:18714/SamplePath/AuthServices
- In the Name ID format field, select the default Unspecified (or select any other value of your choice).
-
Select the Show Advanced Settings link. For the Signature Algorithm field, we suggest that you leave the default value, SHA-256. However, if you do, you will need to add the following line of code to the Application_Start() method of your Global.asax.cs file:
Kentor.AuthServices.Configuration.Options.GlobalEnableSha256XmlSignatures();Otherwise, you may switch to RSA-SHA1 though we do not recommend it (as it less secure than SHA-256).
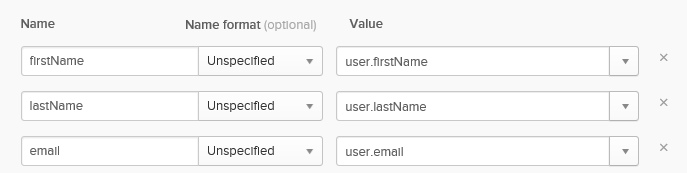
- In the Attribute Statements section, optionally enter additional attributes, such as in the following screenshot:
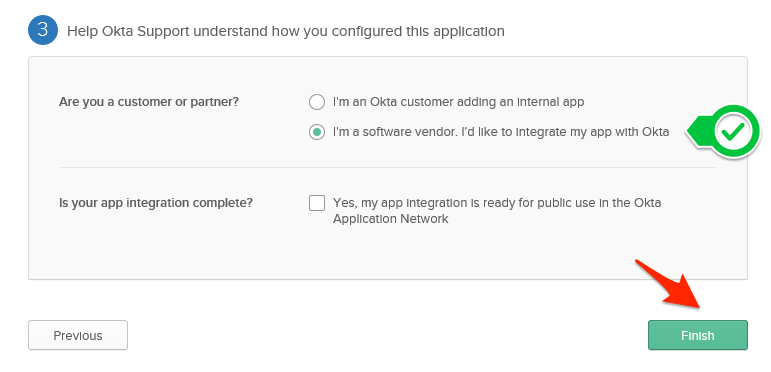
- Press the Next button. Select the I’m a software vendor option (if you’re indeed a vendor - if you are developing an internal app, select the first option) and press the Finish button.
- Now edit the web.config file of the SampleApplication project.
- In the
<kentor.authServices>section, enter the following values:- entityId = same value as the Audience URI for the Okta app, e.g.
http://localhost:18714/SamplePath/AuthServices - returnUrl = value of the web application’s url, i.e.
http://localhost:18714/SamplePath
- entityId = same value as the Audience URI for the Okta app, e.g.
- In the
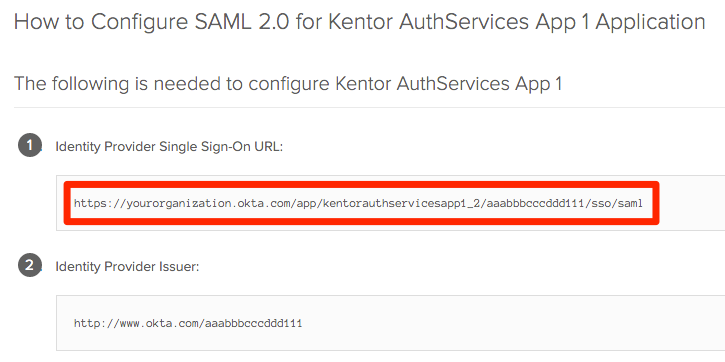
section, enter the following values: - entityId = Identity Provider Issuer from Sign On => View Setup Instructions
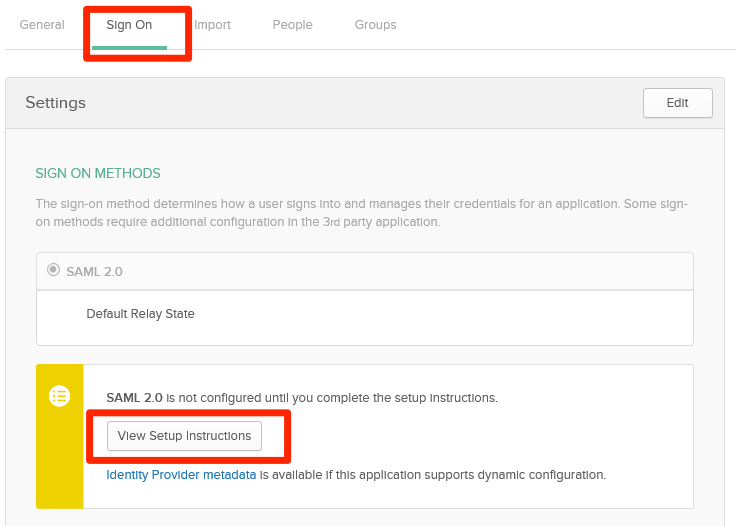
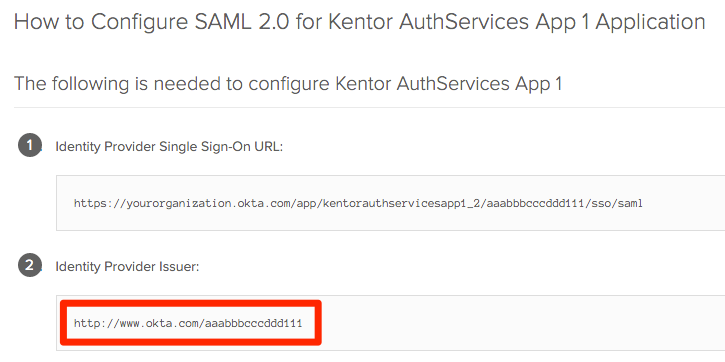
- signOnUrl = value of the Identity Provider Single Sign-On URL below
- In the
<signingCertificate>section, download the okta.cert X.509 certificate from the instructions page in the Okta app and put it in the App_Data folder of your web application. Then reference it accordingly (such as with fileName=”~/App_Data/okta.cert”) in the web.config file.
- entityId = Identity Provider Issuer from Sign On => View Setup Instructions
You should be good to go now! Don’t forget to assign users to your Okta application and test that you can sign in into your SAML application both from the Okta portal (IdP-initiated sign-in flow) and from your SAML application itself (SP-initiated sign-in flow).
If you run into any issue while using the SP-initiated login flow (when a user clicks on the “Sign In” link of the /SamplePath page), then try to recompile the KentorIT.AuthServices project and make sure it is used by your project. If your project uses v0.17 of the NuGet corresponding library, make sure to comment out any <requestedAuthnContext > section in your web.config file.
Happy Okta’ing!
Okta Developer Blog Comment Policy
We welcome relevant and respectful comments. Off-topic comments may be removed.