Build a .NET App Quickly with Docker

In this post, you’ll build a .Net Framework application with Visual Studio on Windows 10. You’ll then containerize your application so it can be reliably deployed and run on any instance of Docker for Windows.
Since containers share the host operating system, you can only run containers compatible with your host operating system kernel. For Linux based applications, practically all versions of Linux share the same kernel, so as long as you’ve installed Docker, you’re good to go. However, for .Net Framework applications, you need a Windows-based container that can only run on Windows-based hosts with the Windows Containers feature enabled.
Note: It’s possible to run Linux-based containers on Windows with a combination of virtualization and containerization to run Docker against a Linux kernel. Docker on MacOS works in a similar manner.
For this post, we’ll build a CRUD application that uses ASP.NET MVC and Entity Framework, so we have something interesting to containerize. You’ll need:
- Windows 10 - Version 10.0.18362 or later
- Visual Studio Community 2017 or later
- Docker for Windows
- An Okta Developer account
- Git for Windows
Build a .Net Framework Application
To help you get started quickly, I’ve added some sample code to a Git repo. Clone by entering this in your command line:
git clone https://github.com/oktadeveloper/okta-docker-dotnet-framework-example.git
Once you’ve downloaded the source code, open CrudMVCCodeFirst.sln in Visual Studio, and we can get this show on the road.
Configure Identity Management for Your ASP.NET Application
If you try running the project in Visual Studio, by pressing F5 or selecting Debug > Start Debugging, you’ll find that it fails with an error like:
System.ArgumentException
HResult=0x80070057
Message=Your Okta URL must start with https. Current value: {yourOktaDomain}. You can copy your domain from the Okta Developer Console. Follow these instructions to find it: https://bit.ly/finding-okta-domain
Thankfully, this is very easy to fix. Okta simplifies identity management, while making to more secure and scalable than is worth building yourself. Okta’s APIs create, edit, and securely store user accounts and data, and connect them with one or more applications, without the need for custom code. To add Okta to your app to offload authentication, simply configure Okta Identity Management and add the appropriate configuration values to your web.config file:
<add key="okta:ClientId" value="{clientId}" />
<add key="okta:ClientSecret" value="{clientSecret}" />
<add key="okta:OktaDomain" value="{yourOktaDomain}" />
If you don’t already have an Okta account, you can sign up for a free-forever developer account. Once logged into your Okta account, you’ll see your Okta domain at the top right of your developer dashboard.

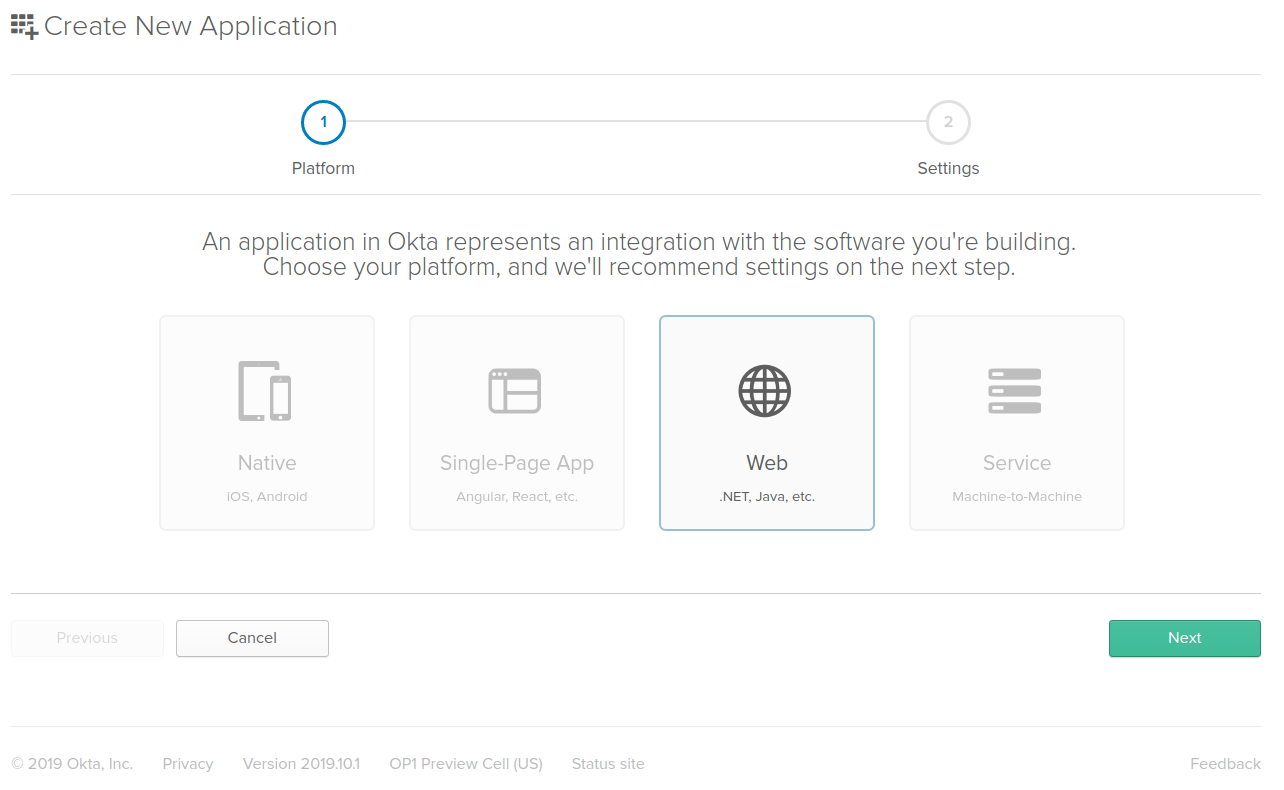
To create a new application, select Applications from the main menu and click the Add Application button at the top of the applications list. Then choose Web Application and click Next.
To configure the application, set the values to look like below, and then click Done.
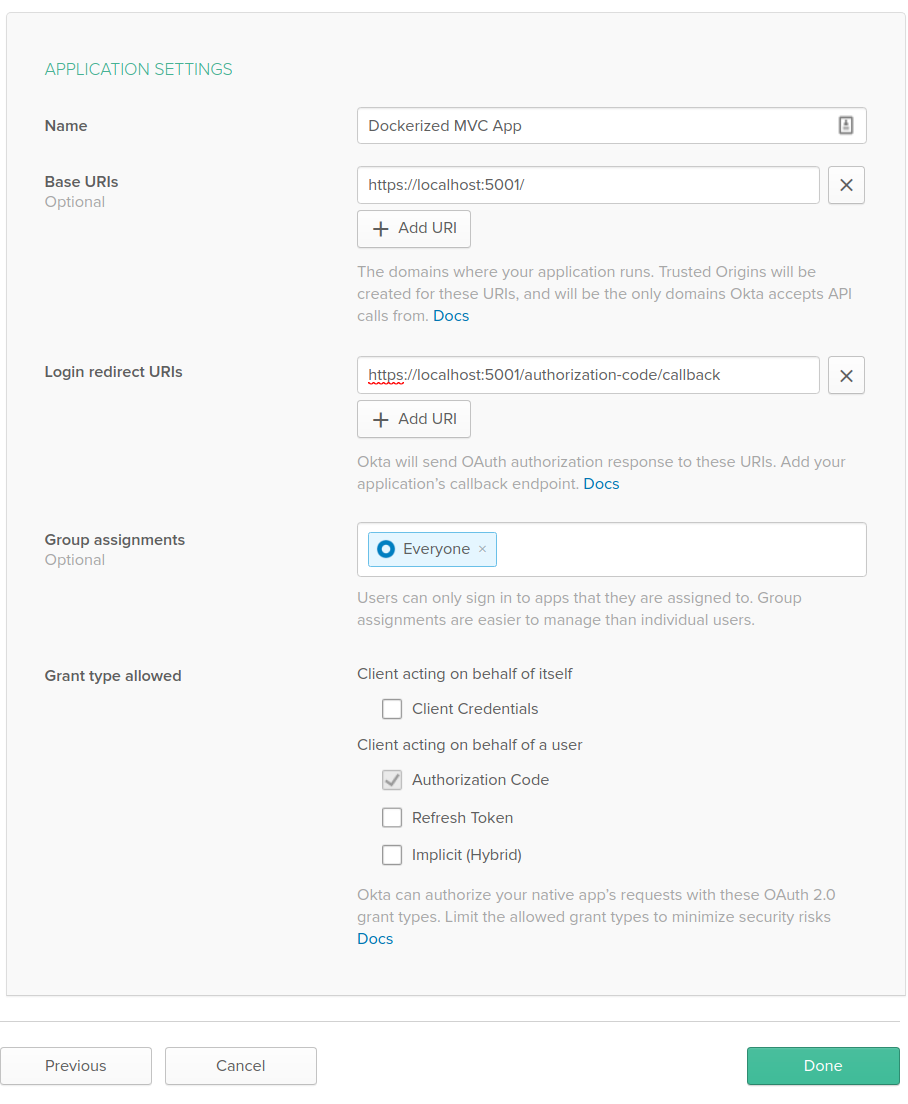
At the bottom of the General Settings tab, you’ll see a section with Client ID and Client Secret. Copy those into the corresponding configuration values from above.
Once you’ve added the correct configuration values, you’ll be able to launch the application using Ctrl-F5 or Debug > Start Without Debugging. Point your browser at https://localhost:44300 and add some Launches (after authenticating, of course!) to make sure everything is working correctly.
Docker and the .Net Framework
Now you’ve got a working sample application, you can containerize it with Docker for Windows. The process is pretty much the same for Windows containers as for Linux containers.
Add a Dockerfile to Your .NET Application
Visual Studio provides some useful tooling to containerize applications. To easily set up your application to use Docker and Docker Compose,right-click on the project node (CrudMVCCodeFirst) and then select Add > Container Orchestrator Support. In the dialog that appears, select Docker Compose. Then, as if by magic, Visual Studio adds a Dockerfile and docker-compose file to your application and things start building in the background.
Once the build process completes, start the application and keep an eye on the URL. You’ll see that it’s pointing to http://172.x.x.x What’s going on?
Note: It can take a long time to build a Docker image the first time around. The build process must first download the appropriate base image, which are generally large for Windows Containers. If you’re not blessed with a Gigabit internet connection, have some coffee, and don’t worry.We’ll wait!
Docker Networking for .NET Applications
Usually, applications running in Docker containers don’t know they’re running in a container. They talk to other containerized applications over the network as though they were running on physical hardware. However, Docker’s networking capabilities are extensible and can be set up in many different ways to support particular scenarios. Visual Studio automatically deploys your Docker container on a virtual network with an address in the 172.x.x.x range. You can then connect to that virtual network address from your browser and see your containerized application as though it was running on a physical machine.
Create a Self-Signed Certificate for .NET in Docker
To securely authenticate, you need to add an SSL certificate to your application. When you run the application locally without Docker, then Visual Studio and Kestrel (the development web server) take care of the certificate for you automatically. However, since you’re running the app in a container, you’ll need to take a few additional steps to make this work properly.
Modify your Docker file to create a self-signed certificate. Change your Dockerfile to:
FROM mcr.microsoft.com/dotnet/framework/aspnet:4.7.2-windowsservercore-ltsc2019
ARG source
WORKDIR /inetpub/wwwroot
COPY ${source:-obj/Docker/publish} .

SHELL ["powershell", "-Command", "$ErrorActionPreference = 'Stop'; $ProgressPreference = 'SilentlyContinue';"]

RUN $newCert=New-SelfSignedCertificate -DnsName 'localhost' -CertStoreLocation cert:\LocalMachine\My; \
  New-WebBinding -Name 'Default Web Site' -Protocol 'https'; \
  $binding=Get-WebBinding -Name 'Default Web Site' -Protocol 'https'; \
  $binding.AddSslCertificate($newCert.GetCertHashString(),'my')
These changes use PowerShell as part of the Docker build process. The build now:
- creates a new self-signed certificate
- changes the default binding to use https rather than http
- adds the new certificate to the https binding.
Important Note: The base image differs from the default one provided by Visual Studio. A known issue with
windowsservercorebase images earlier thanltsc2019results in an incorrect system clock. This issue causes significant problems with authentication and certificate generation since both rely on the current date and time to determine the validity of access tokens and certificates.
When you save these changes, Visual Studio automatically builds a new Docker image. Again, this might take some time on the first build since Docker needs to download a new base image. While you wait, there’s another change you need to make to hook up SSL.
Modify Docker Compose to Use Localhost
Your build process creates a self-signed certificate that uses localhost as the domain name, although your app is currently configured to use http://172.x.x.x. To access your application on localhost, modify your docker-compose file to map port 443 in the container to port 5001 on your host machine. That way, you’ll be able to access the application as https://localhost:5001, and it’ll work properly with your self-signed certificate.
Modify your docker-compose file to:
version: '3.4'

services:
  crudmvccodefirst:
    image: ${DOCKER_REGISTRY-}crudmvccodefirst
    build:
      context: .\CrudMVCCodeFirst
      dockerfile: Dockerfile
  ports:
    - "5001:443"
Update Identity Management Configuration
You’ll also need to update your Okta Identity application with the new URL. Log into your Okta dashboard and select Applications and choose the Okta MVC Crud App. In the General tab, click Edit to change the various URLs.
Add:
- https://localhost:5001/authorization-code/callback to Login redirect URIs
- https://localhost:5001/Account/PostLogout to Logout redirect URIs
- https://localhost:5001/authorization-code/callback to initiate login URI
Once you’ve done this, update your web.config file to use the new URLs:
<appSettings>
...
  <add key="okta:RedirectUri" value="https://localhost:5001/authorization-code/callback" />
  <add key="okta:PostLogoutRedirectUri" value="https://localhost:5001/Account/PostLogout" />
</appSettings>
Take Docker and .NET For a Spin
With any luck, by the time you get here your Docker base image has downloaded and you’re ready to go. To ensure Visual Studio has rebuilt everything after your changes, use Ctrl+F5 or Debug > Start Without Debugging to build and deploy to Docker.
Point your browser at https://localhost:5001, and see your CRUD sample application. You can also login securely via Okta, with all traffic encrypted via SSL/TLS. So far, so good.
Try creating a new Launch.
Houston, We Have a Problem
After a bit of time you’ll see:
Error.
An error occurred while processing your request.
This error is thrown by a missing SQL server. Applications run on your local machine use a SQL server installed in the Visual Studio setup process. However, when you run your application in a Docker container, no SQL server has been set up yet.
You may think the solution is to tweak the Dockerfile to install SQL Server. While that would work, it’s not the best solution. When it comes to containerization, best practice is to have each container perform a single function only. To that end, you can combine multiple containers using Docker Compose. All you need to do is pull down a container with SQL Server pre-installed and hook it up to your application.
Add a SQL Server Container
Modify your docker-compose file to include:
version: '3.4'

services:
  crudmvccodefirst:
  image: ${DOCKER_REGISTRY-}crudmvccodefirst
  build:
    context: .\CrudMVCCodeFirst
    dockerfile: Dockerfile
  ports:
    - "5001:443"
  depends_on:
    - sqlserver
  sqlserver:
    image: microsoft/mssql-server-windows-express
    environment:
        SA_PASSWORD: "JackSwigertRocks123"
        ACCEPT_EULA: "Y"
Now, instead of just one service that runs your application, you’ll have two. One for the application and one for the database server.
Since you’re using a different database, you also need to update the connection string in your web.config. Change it to:
<connectionStrings>
  <!--<add name="LaunchContext" connectionString="Data Source=(LocalDb)\MSSQLLocalDB;Initial Catalog=RocketLaunch1;Integrated Security=SSPI;" providerName="System.Data.SqlClient" />-->
  <add name="LaunchContext" connectionString="Server=sqlserver;Database=RocketLaunch;User=sa;Password=JackSwigertRocks123;" providerName="System.Data.SqlClient" />
  </connectionStrings>
With these changes in place, once your Docker containers are rebuilt, you can browse to https://localhost:5001 and experience the joys of complete CRUD functionality for your Launches. It’s not quite up there with landing on the moon, but hopefully it was a voyage of discovery nonetheless!
Now you know how to use containerization for Windows-based applications. You also saw how containerization makes it easy to compose applications from several different components. Composition goes a long way toward improving reliability since each component does only one thing. There have been many different approaches to composition over the years, but you’ve seen how composition and containerization is a powerful combination.
Learn More About Docker and ASP.NET Framework
If you want to learn more about how to use Docker or the ASP.NET Framework, check out some of our other great content!
- A Developer’s Guide to Docker - A Gentle Introduction
- Build a Simple .NET Core Application on Docker
- Build a CRUD App with ASP.NET Framework 4.x Web API and Angular
As always, you can leave questions about this post in the comments below. Don’t forget to follow us on Twitter and subscribe to our YouTube Channel for more awesome content!
Okta Developer Blog Comment Policy
We welcome relevant and respectful comments. Off-topic comments may be removed.