Implement the OAuth 2.0 Authorization Code with PKCE Flow

Imagine two levers that are inversely connected. That is, as one goes up, the other goes down. One lever is User Experience and the other is Security. It’s not a perfect analogy, but most developers can attest that as user experience goes up, security goes down.
Take browser history syncing for example. I can start a session with my bank on Firefox mobile and pick up right where I left off on Firefox desktop. From a security standpoint, however, I’m now counting on Firefox to handle cookies and other session information responsibly and securely. Security professionals will tell you that, at the very least, you’ve increased your surface area for attack by using browser syncing.
Single Page Apps (SPAs) offer a great user experience in the browser as they enable interactivity without full page transitions. But securing SPAs is challenging since there may not be a backend (like a .NET or Spring Boot) app and the browser is an inherently insecure environment. If you are building an app that will have 1,000,000 users, it’s likely - almost guaranteed - that some percentage of those users will have compromised machines to malware or viruses.
So, how do you protect your SPA in such a hostile environment? When SPAs were new and browsers as well as providers were more limited in their capabilities, OAuth 2.0 and its sister standard, OpenID Connect (OIDC) offered an approach called the Implicit flow. This flow has always had problems inherent to it and these problems are exacerbated by the advanced capabilities focused on user experience in browsers. Today, Proof Key for Code Exchange (PKCE) provides a modern solution for protecting SPAs.
OIDC is a thin identity layer for authentication and Single Sign-On that rides on top of OAuth 2.0, an authorization framework. In this post, you’ll learn some foundational concepts of OIDC and OAuth2. You’ll be guided through a simple SPA example written in Vue.js that starts with the older (now deprecated) Implicit flow and then shows the more secure Authorization Code with PKCE flow.
OpenID Connect and OAuth 2.0 Overview
In the beginning, there were siloed web sites that didn’t talk to each other, and it was sad.
Sites like Yelp started wanting access to the contact information you had in your Google Contacts. So, Yelp naturally collected your Google username and password so that it could access your contacts. You gave Yelp your permission, so this was all good, Yes? No! With your username and password, Yelp could access your email, your docs - everything you had in Google - not just your contacts. And, worse, Yelp had to store your password in a way that it could use it in plaintext and there was no standard way to revoke your consent to Yelp to access your Google account.
The world needed an authorization framework that would allow you to grant access to specific information without you sharing your password. Cue OAuth.
Three revisions later, we’re at OAuth 2.0 (there was 1.0 and 1.0a before it) and all’s right with the world. Now, an application like Yelp (a Client Application) can request an Access Token from a service like Google (an Authorization Server). You (the Resource Owner) log into Google with your credentials and give your Consent to Yelp to access your contacts (and only your contacts). Access Token in hand, Yelp makes a request of the Google Contacts API (the Resource Server) and gets your contacts. Yelp never sees your password and never has access to anything more than you’ve consented to. And, you can withdraw your consent at any time.
In this new world of consent and authorization, only one thing was missing: identity. Cue OpenID Connect. OIDC is a thin layer on top of OAuth 2.0 that introduces a new type of token: the Identity Token. Encoded within these cryptographically signed tokens in JWT format, is information about the authenticated user. This opened the door to a new level of interoperability and single sign-on.
OAuth (and by extension OIDC) uses a number of defined Flows to manage the interactions between the Client App, the Authorization Server and the Resource Server. The most secure of these is the Authorization Code Flow. This flow is meant to be kicked off from your browser and goes like this:
- Yelp wants access to your contacts. It presents a button to link your Google Contacts.
- When you click the button, you’re redirected to Google where you login with your username and password (if you’re not already logged in).
- Google shows you a screen telling you that Yelp would like read-only access to your contacts.
- Once you give your consent, Google redirects back to Yelp, via your browser, with a temporary code (called an authorization code)
- Using this code along with a secret, Yelp contacts Google to trade it for an Access Token
- Google validates the code and if all checks out, issues an Access Token with limited capabilities (read-only access to your contacts) to Yelp
- Yelp then presents the Access Token to the Google Contacts API
- Google Contacts API validates the token and, if the request matches the capabilities identified by the token, returns your contact list to Yelp

Notice step 8 in the diagram. In addition to the code, Yelp must present a secret that has been assigned by Google, which is how Google validates Yelp as a client.
This flow is great for web apps, but it’s not safe to store a secret in a SPA app, since anyone can view source code in the browser and gain access to that secret. In the early days of OAuth 2.0, without better options, the Implicit flow provided a mechanism to get ID and Access tokens from the Authorization server. PKCE represents a better option now, but let’s first visit the Implicit flow to see why it’s less secure.
Why You Should Never Use the Implicit Flow Again
The OAuth 2.0 specification included the Implicit Flow at a time when browser support for SPAs was much more limited. In particular, JavaScript did not have access to browser history or local storage. Also, most providers did not allow cross-site POST requests to a /token endpoint, which is a requirement of the Authorization Code flow.
Here’s what the Implicit flow looks like:

Notice that after you authenticate, the Authorization Server (like Google) responds directly with tokens. This means that the tokens are in your browser’s address bar as a result of the redirect. That’s problematic since Google can’t definitively know that your browser (the intended recipient) actually received the response. It’s also problematic because modern browsers can do browser history syncing and they support browser extensions that could be actively scanning for tokens in the browser address bar. Leaking tokens is a big security risk.
In the screenshot below, you can see that the execution is paused to capture the id_token in the browser address bar:
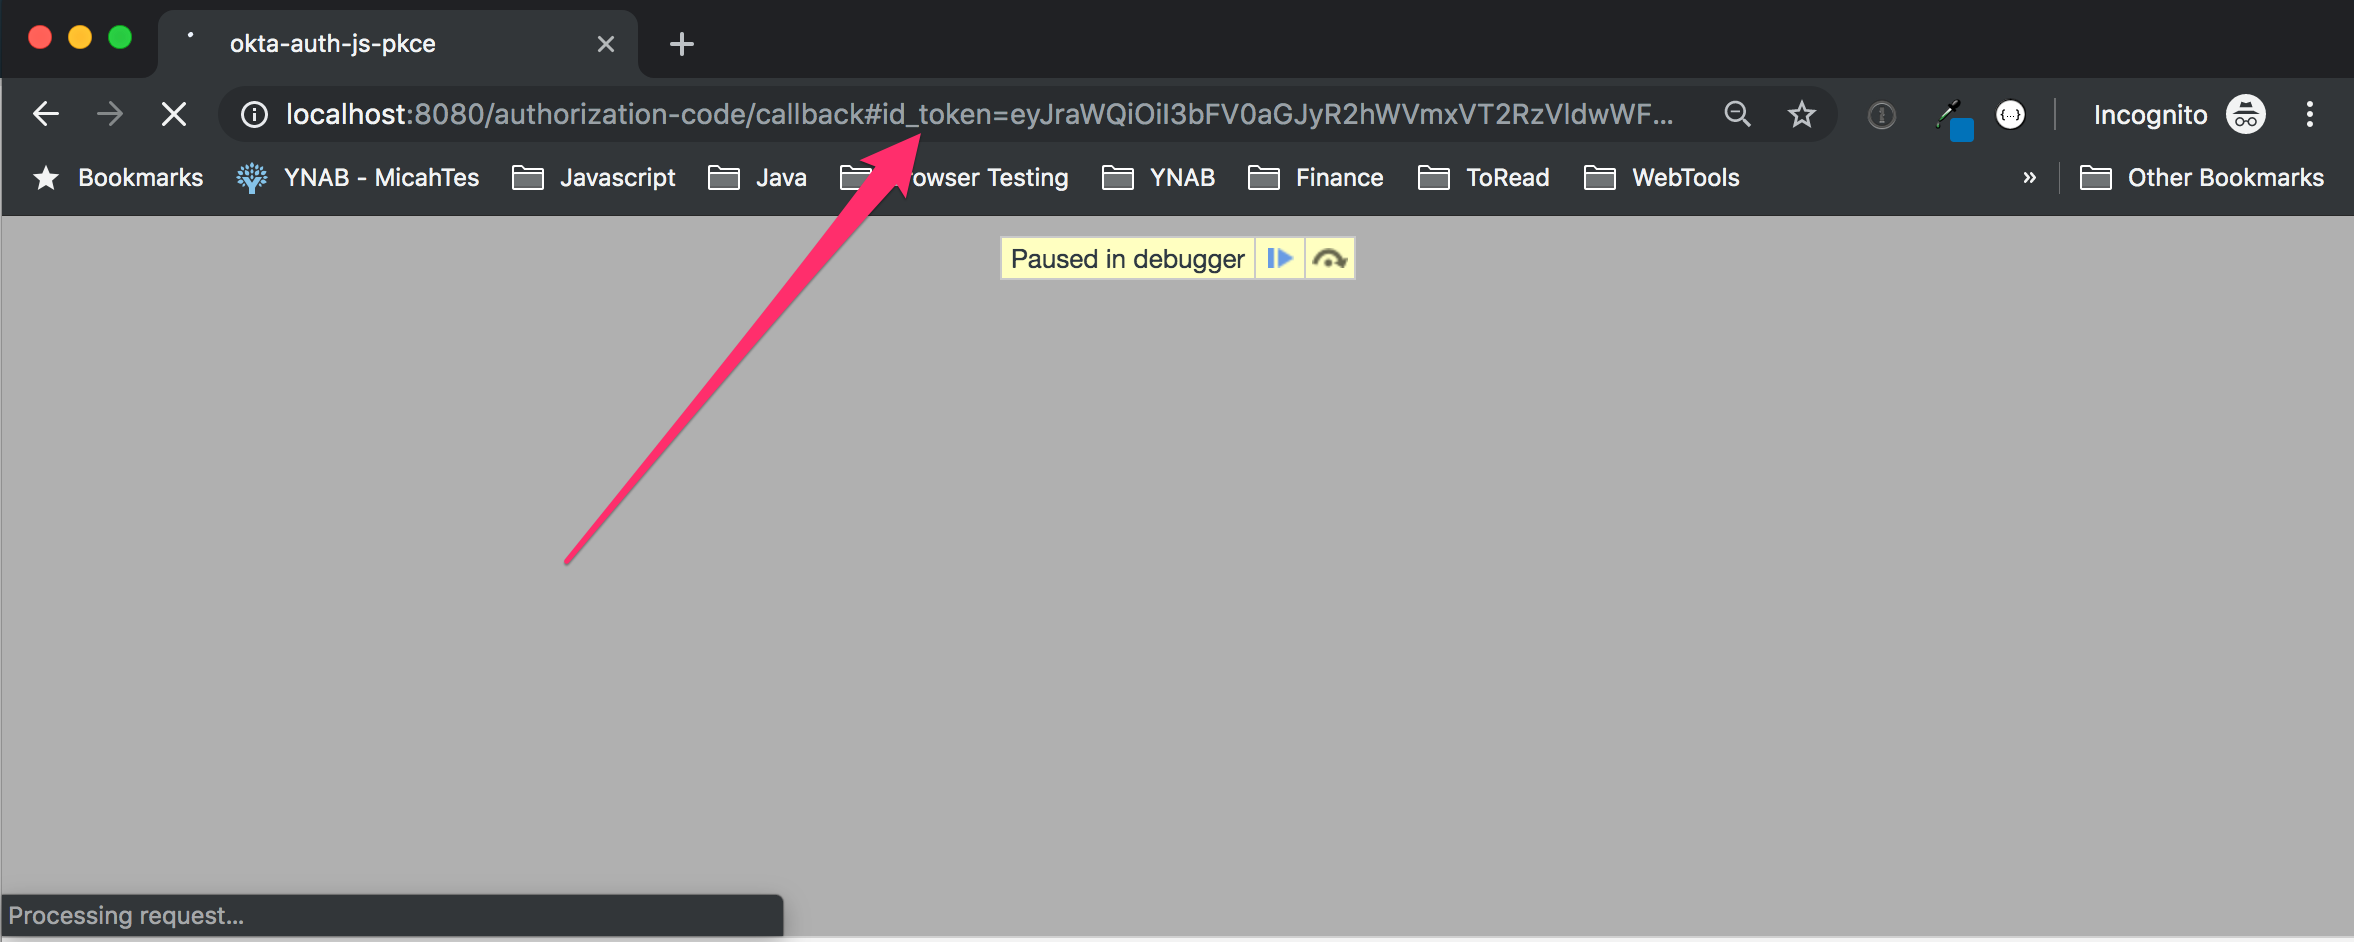
These security issues led to a reassessment of the value of the Implicit flow, and in November of 2018, new guidance was released that effectively deprecated this flow. Additional specs that speak to updated guidelines for security with OAuth 2.0 in general and security for web apps in particular were put forward this year as well.
If you can’t (or shouldn’t) use the Implicit flow, then what? It turns out there’s an extension to the Authorization Code flow that’s been in use for some time with Mobile and Native apps. That’s Proof Key for Code Exchange or PKCE (pronounced “pixie”).
Use PKCE to Make Your Apps More Secure
PKCE has its own separate specification. It enables apps to use the most secure of the OAuth 2.0 flows - the Authorization Code flow - in public or untrusted clients. It accomplishes this by doing some setup work before the flow and some verification at the end of the flow to effectively utilize a dynamically-generated secret. This is crucial since it’s not safe to have a fixed secret in a public client (like a SPA app in your browser).
PKCE was originally created for mobile and native applications because, at the time, both browsers and most providers were not capable of supporting PKCE. That is no longer the case.
PKCE works by having the app generate a random value at the beginning of the flow called a Code Verifier. The app hashes the Code Verifier and the result is called the Code Challenge. The app then kicks off the flow in the normal way, except that it includes the Code Challenge in the query string for the request to the Authorization Server.
The Authorization Server stores the hashed value (the Code Challenge) for later verification and, after the user authenticates, redirects back to the app with an authorization code.
The app makes the request to exchange the code for tokens, only it sends the Code Verifier instead of a fixed secret. Now the Authorization Server can hash the Code Verifier and compare it to the hashed value it stored earlier. This is an effective, dynamic stand-in for a fixed secret. Assuming the hashed value matches, the Authorization Server will return the tokens.
Here’s what this flow looks like:

To see the difference between the Implicit flow and the Authorization Code with PKCE flow, there’s a sample on GitHub that you can follow along with.
First, let’s get an OpenID Connect application setup in Okta.
Create an OIDC Application on Okta
Before you begin, you’ll need a free Okta developer account. Install the Okta CLI and run okta register to sign up for a new account. If you already have an account, run okta login.
Then, run okta apps create. Select the default app name, or change it as you see fit.
Choose Single-Page App and press Enter.
Use http://localhost:8080/callback for the Redirect URI and accept the default Logout Redirect URI of http://localhost:8080.
What does the Okta CLI do?
The Okta CLI will create an OIDC Single-Page App in your Okta Org. It will add the redirect URIs you specified and grant access to the Everyone group. It will also add a trusted origin for http://localhost:8080. You will see output like the following when it’s finished:
Okta application configuration:
Issuer:    https://dev-133337.okta.com/oauth2/default
Client ID: 0oab8eb55Kb9jdMIr5d6
NOTE: You can also use the Okta Admin Console to create your app. See Create a Vue App for more information.
Run okta login and open the resulting URL in your browser. Go to the Applications section and select the application you just created. Edit its General Settings and add Implicit (Hybrid) as an allowed grant type, with access token enabled. Click Save and copy the client ID for the next step.
NOTE: The demo app uses both the Implicit flow and the Authorization Code with PKCE flow for demonstration purposes. For your production app, you would uncheck the Implicit checkbox and check the Authorization Code checkbox.
That’s it on the Okta side. You just configured an OAuth 2.0 + OIDC identity provider. Congrats!
Run the Vue.js App
You can grab the code from the GitHub repository.
Open up the project in your favorite editor and update the top of auth/index.js with the values you captured earlier for ISSUER and CLIENT_ID.
To build and the application, execute:
npm install
npm run serve
Browse to: http://localhost:8080 and you’ll see this simple app. The home page is not protected in any way. The navigation at the top includes both a link to Profile (implicit) and Profile (pkce). The idea here is that in order to look at your profile,
you’ll need to authenticate first.
I recommend you use an incognito window to exercise the app. First, click Profile (implicit) and confirm that you’re redirected to Okta, can authenticate and that you see the resultant profile screen:
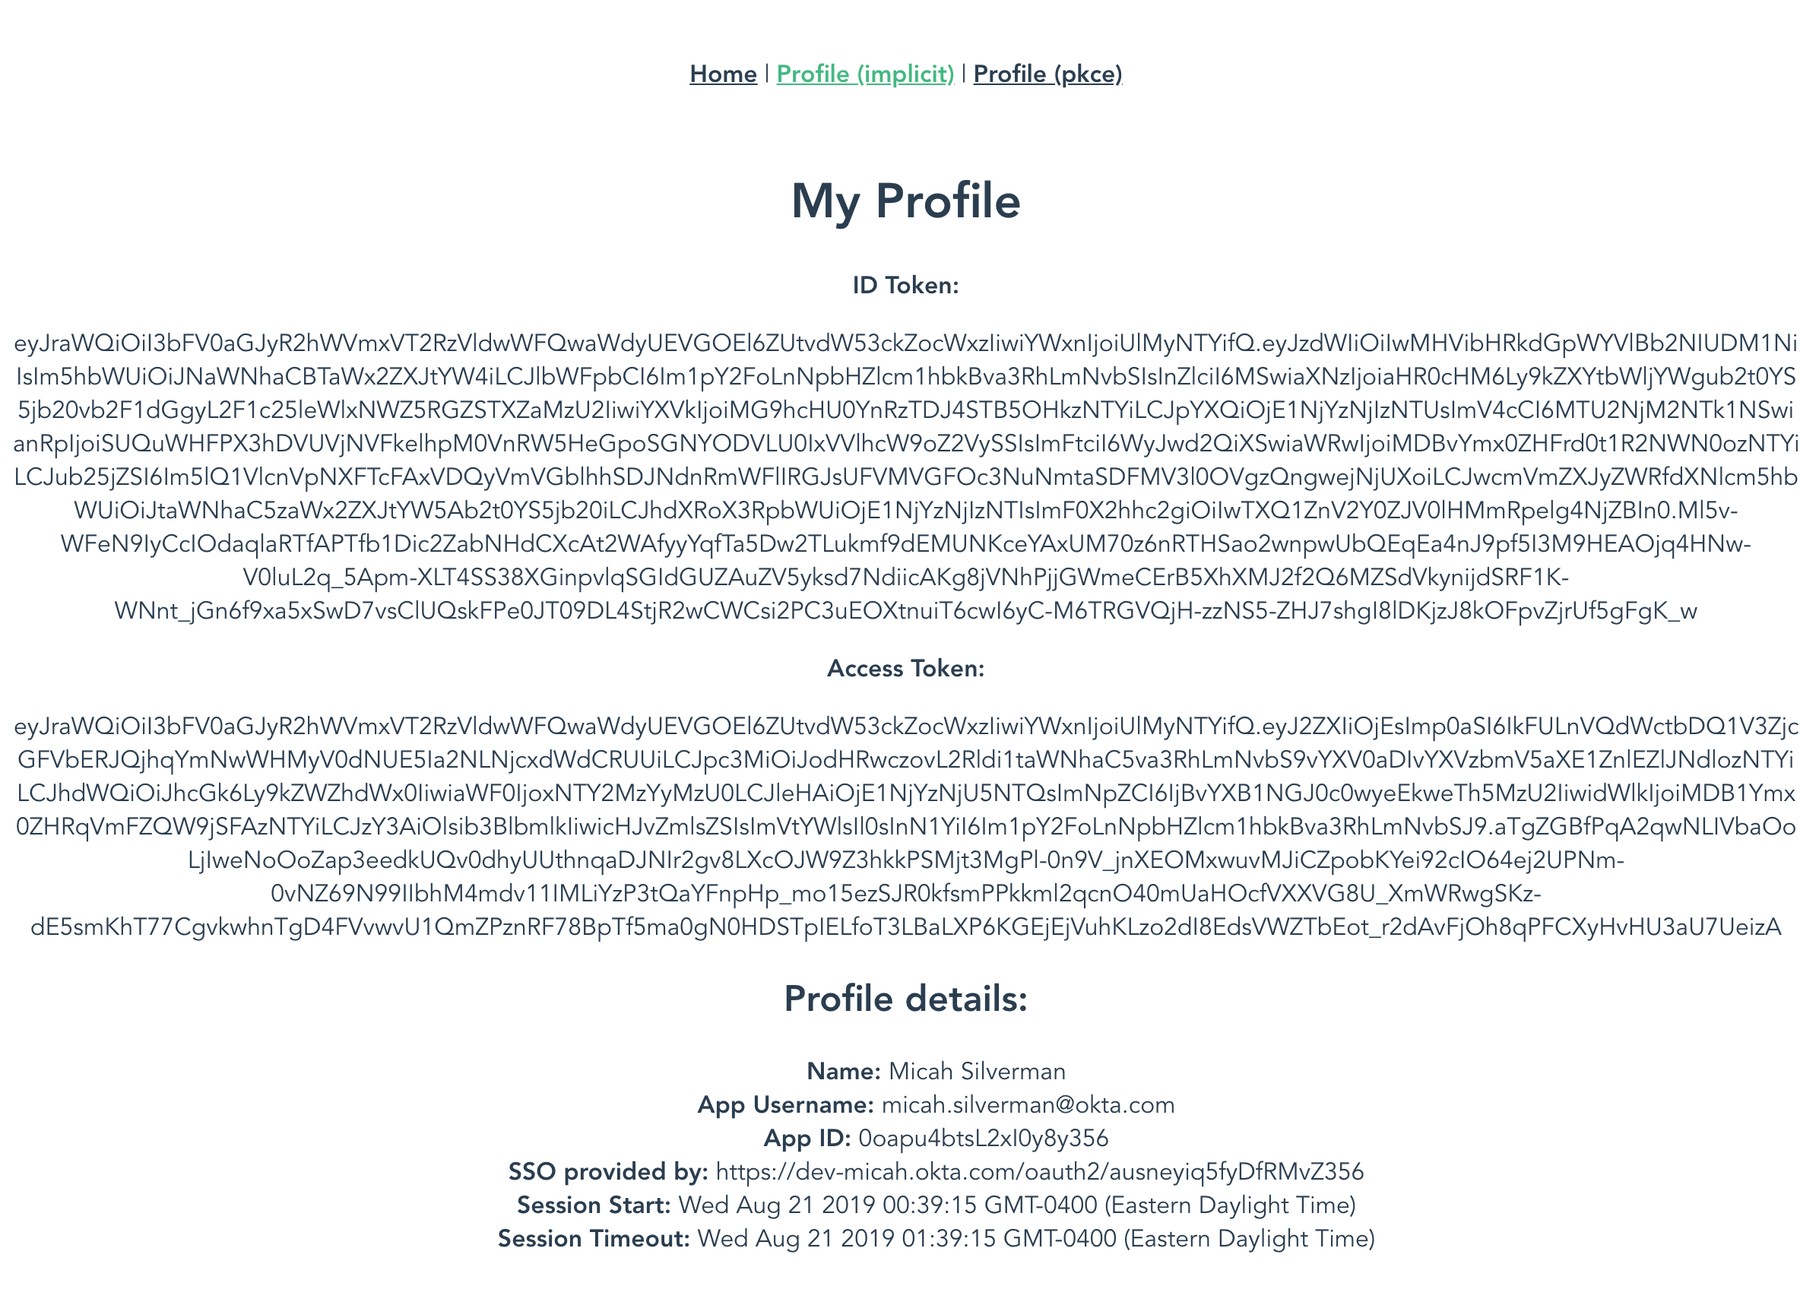
Next, click Logout and click Profile (pkce). Login once again and you should see the profile information screen as above.
Let’s see what’s going on under the hood to better understand why the PKCE approach is better.
Dive Into How the Implicit Flow Works
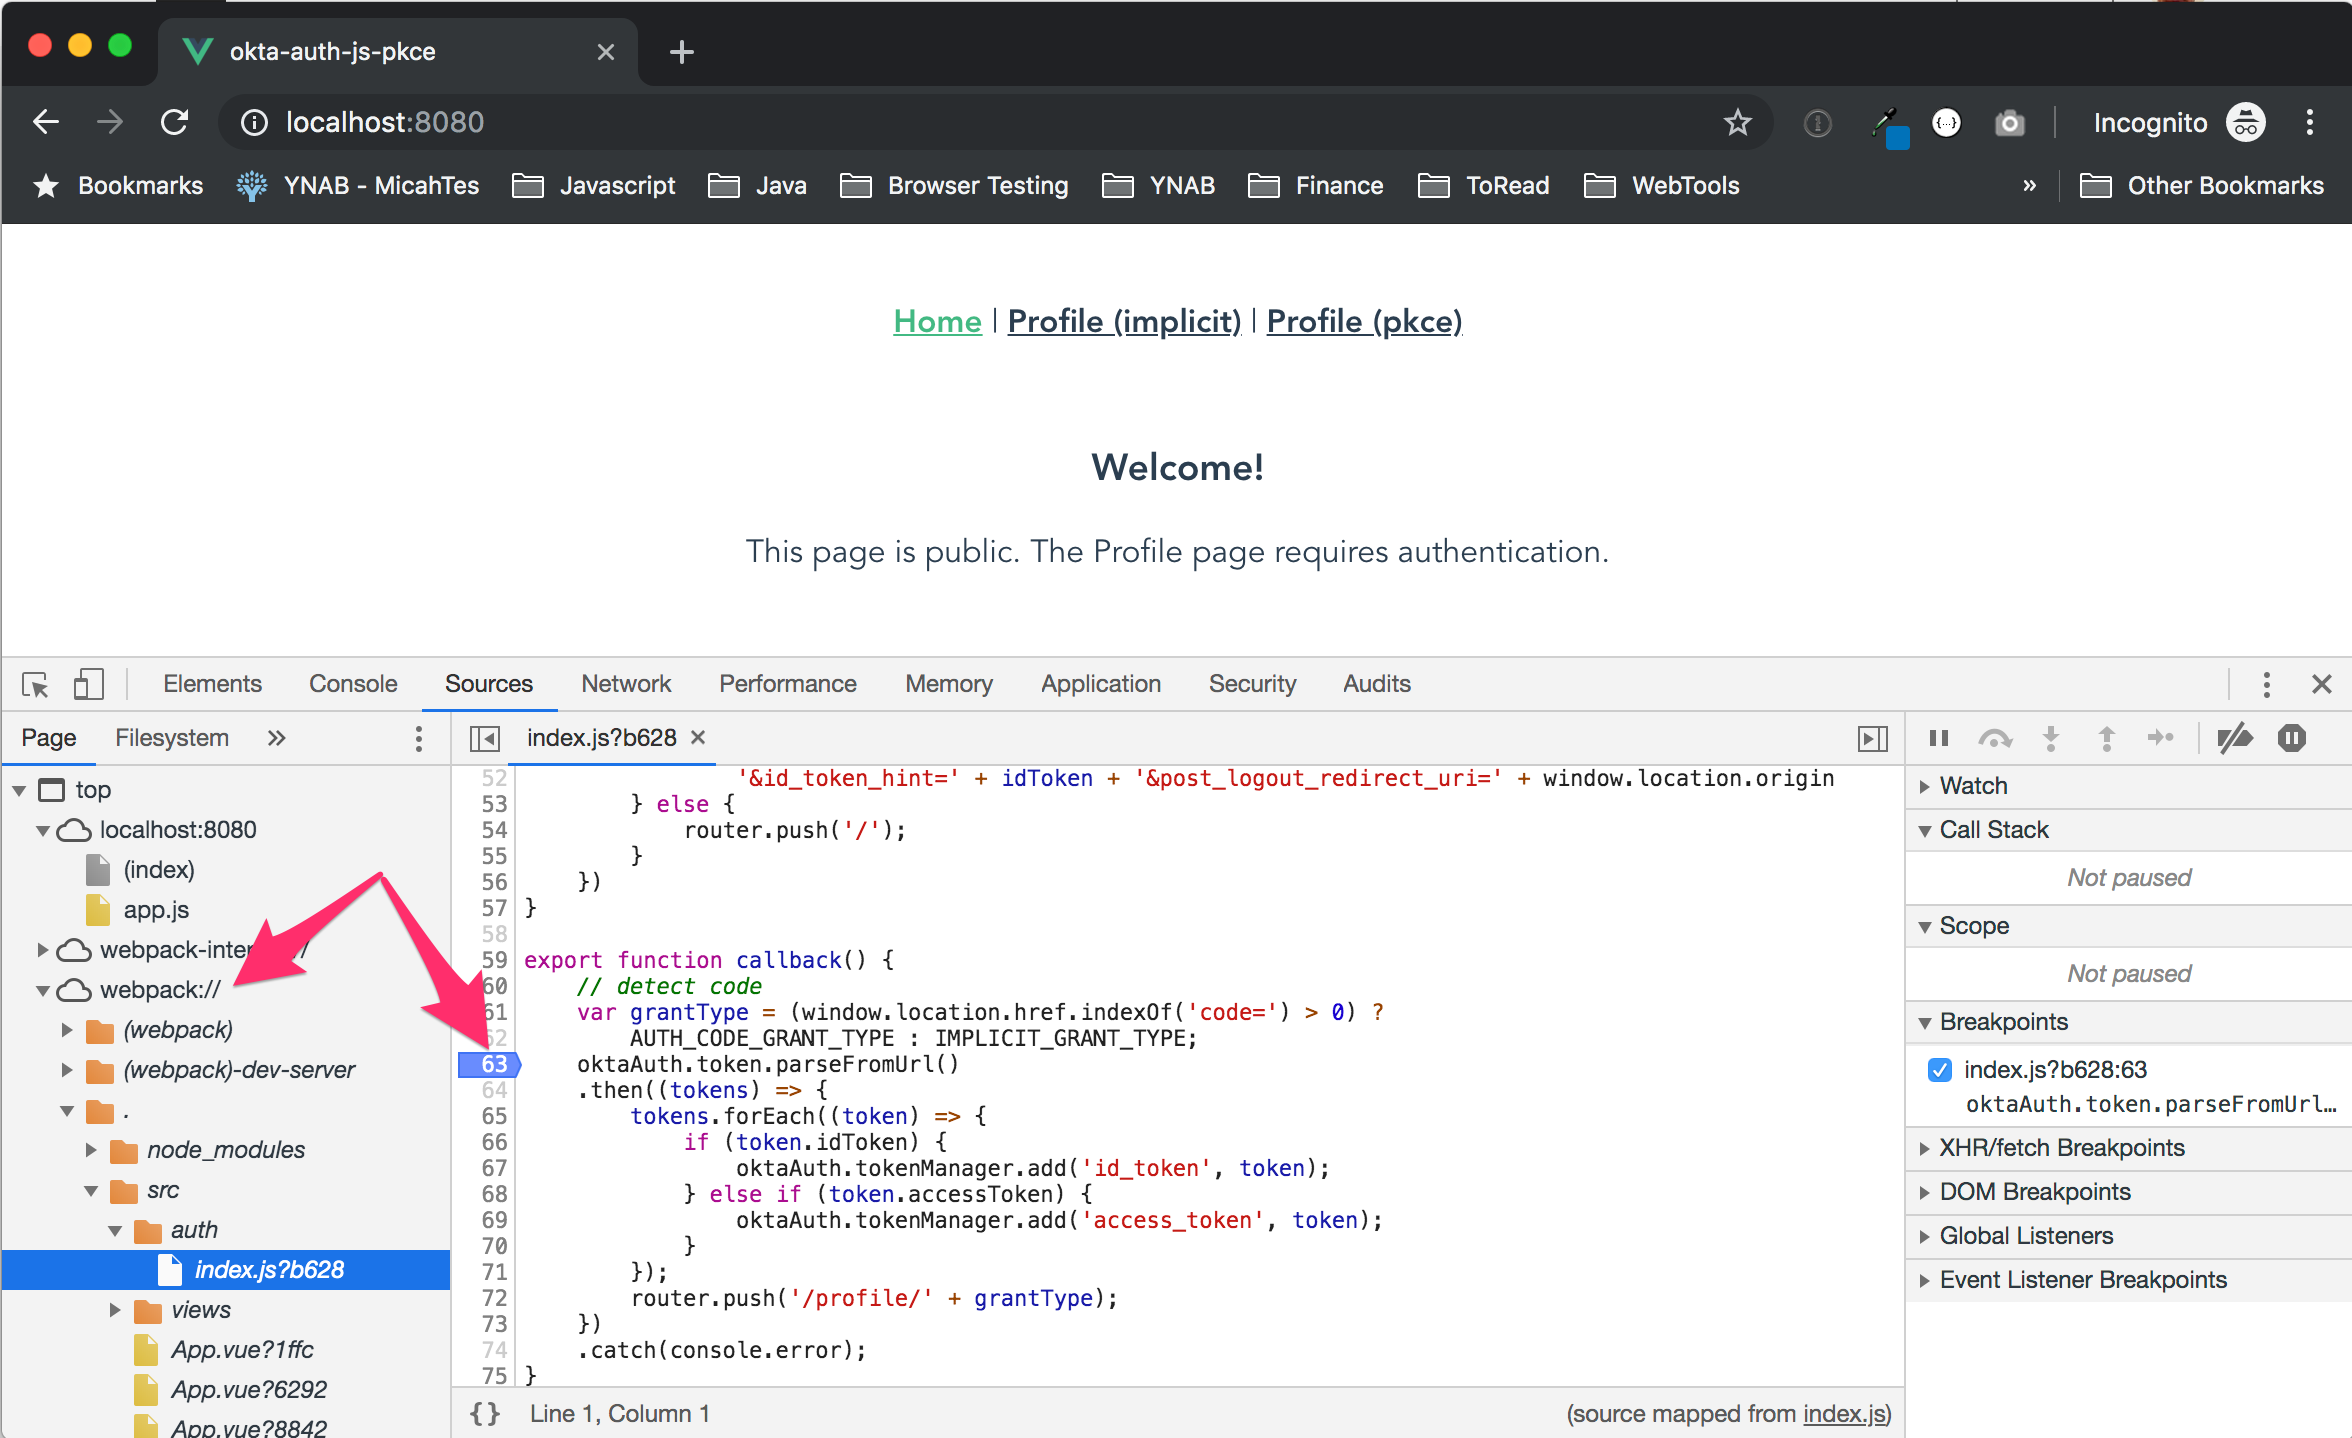
Log out once again. Open the developer tools pane (CMD + option + i on mac) and click the Sources tab. Expand webpack:// > . > src > auth > index.js. Set a breakpoint by clicking in the margin inside the callback function.
Click Profile (implicit) and login. The app should pause at the breakpoint you’ve set. Click the Network tab and locate the /authorize call. It will look something like this (formatted for easier reading):
https://dev-micah.okta.com/oauth2/default/v1/authorize?
client_id=0oapu4btsL2xI0y8y356
&redirect_uri=http://localhost:8080/callback
&response_type=id_token token
&response_mode=fragment
&state=SU8nskju26XowSCg3bx2LeZq7MwKcwnQ7h6vQY8twd9QJECHRKs14OwXPdpNBI58
&nonce=Ypo4cVlv0spQN2KTFo3W4cgMIDn6sLcZpInyC40U5ff3iqwUGLpee7D4XcVGCVco
&scope=openid profile email
Notice the value for response_type is id_token token. This is what indicates the request is using the Implicit flow and that the expectation is that an id_token and an access_token will be returned directly.
Take a look in your browser’s URL address bar. Because you’ve paused at the breakpoint, you have an opportunity to capture what’s there before it changes. It will look something like this (formatted for easier reading):
http://localhost:8080/callback#
id_token=eyJraWQiOiI3bFV0aGJyR2hWVmx...
&access_token=eyJraWQiOiI3bFV0aGJyR2...
&token_type=Bearer
&expires_in=3600
&scope=profile+openid+email
&state=SU8nskju26XowSCg3bx2LeZq7MwKcwnQ7h6vQY8twd9QJECHRKs14OwXPdpNBI58
Both the id_token and the access_token values are right there. This means they’re in your browser history and any mischievous browser extensions could access these values.
Click the button that looks like an old school tape recorder play icon to allow the browser to continue.
Let’s see how the Authorization Code with PKCE flow gives you a better security footing.
Replace Implicit Flow with PKCE
Logout again and repeat the process, only this time, click on Profile (pkce). Locate the /authorize call again on the network tab. It will look something like this:
https://dev-micah.okta.com/oauth2/default/v1/authorize?
client_id=0oapu4btsL2xI0y8y356&
redirect_uri=http://localhost:8080/callback&
response_type=code&
response_mode=fragment&
state=MdXrGikS5LACsWs2HZFqS7IC9zMC6F9thOiWDa5gxKRqoMf7bCkTetrrwKw5JIAA&
nonce=iAXdcF77sQ2ejthPM5xZtytYUjqZkJTXcHkgdyY2NinFx6y83nKssxEzlBtvnSY2&
code_challenge=elU6u5zyqQT2f92GRQUq6PautAeNDf4DQPayyR0ek_c&
code_challenge_method=S256&
scope=openid profile email
Notice that the response_type is code, meaning that we expect the result of the request to be an authorization code. This is how you would construct an authorize call for the ordinary Authorization Code flow. However, there’s also the inclusion of the code_challenge and the code_challenge_method which the okta-auth-js library has automatically prepared in advance. This is the PKCE extension in action.
Take a look in your browser’s URL address bar as before:
http://localhost:8080/callback#
code=ZIhxKbQyh-vC32deCWpM&
state=MdXrGikS5LACsWs2HZFqS7IC9zMC6F9thOiWDa5gxKRqoMf7bCkTetrrwKw5JIAA
This time, you should see the code parameter. While this does end up in your browser history, it has three advantages from a security perspective over having the tokens in your browser history:
- It’s very short lived (60 seconds with Okta)
- It can only be used once to be exchanged for tokens
- It can only be exchanged for tokens using a secret (the code verifier created by the
okta-auth-jslibrary earlier), which malicious browser extensions would not have access to.
You may be wondering just how our current code handles exchanging the code for tokens. This is handled internally by the okta-auth-js library without additional coding on your part.
Let the code execution continue as before. Look on the Network tab and locate the /token call. It will look something like this:
POST https://dev-micah.okta.com/oauth2/ausneyiq5fyDfRMvZ356/v1/token

client_id=0oapu4btsL2xI0y8y356&
code_verifier=7073d688b6dcb02b9a2332e0792be265b9168fda7a6&
redirect_uri=http%3A%2F%2Flocalhost%3A8080%2Fcallback&
grant_type=authorization_code&
code=AyfnwMyCi2S9-op2xToh
The client_id, code_verifier (stand-in for a fixed secret) and code are validated by Okta and if everything checks, tokens are returned.
Notice that the request is a POST. The response is returned on the same channel (as opposed to a redirect response with the Implicit flow) and, as such, that response will not be in your browser history.
NOTE: The authorization code returned in the
/authorizestep is only valid for 60 seconds. If you waited too long at the breakpoint in the debugger, you’ll need to start over.
Here’s what the valid response looks like:
{
    "token_type":   "Bearer",
    "expires_in":   3600,
    "access_token": "eyJraWQiOiI3bFV0aGJyR2hWVmx...",
    "id_token":     "eyJraWQiOiI3bFV0aGJyR2hWVmx...",
    "scope":        "profile openid email"
}
The fact that the tokens never end up in your browser history makes the PKCE approach much more secure than the Implicit flow.
PKCE vs. Implicit: A Closer Look
The code example does some fancy footwork to support both the Implicit and Authorization Code with PKCE flows. This is not something you’d likely do in a production application. But, it’s worth looking at the mechanism of how this code works and to highlight how easy it is to switch from the Implicit flow to the Authorization Code with PKCE flow when you use the okta-auth-js library.
When you click either of the Profile links in the nav bar, the validateAccess function is called by virtue of the middleware processing capabilities of the Vue.js router. Here’s the router definition:
export default new Router({
  mode: 'history',
  base: process.env.BASE_URL,
  routes: [
    { path: '/', name: 'home', component: Home },
    { path: '/callback', component: callback },
    { path: '/profile', redirect: '/profile/authorization_code' },
    { path: '/profile/:mode', beforeEnter: validateAccess, component: Profile },
    { path: '/logout', component: logout }
  ]
})
Notice the beforeEnter parameter for the /profile/:mode path. The :mode will either be authorization_code or implicit and matches the technical name of the flow in use. Flows are called grants in the specification.
Take a look at the validateAccess function in the auth/index.js folder:
export function validateAccess(to, from, next) {
    getIdToken()
    .then(function(token) {
        if (token) {
            next();
        } else {
            oktaAuth.tokenManager.clear();
            // implicit or pkce?
            var grantParam = to.path.substring(to.path.lastIndexOf('/') + 1);
            var grantType = (responseTypes[grantParam]) ? grantParam : AUTH_CODE_GRANT_TYPE
            loginOkta(grantType);
        }
    })
    .catch(console.error);
}
This code attempts to retrieve the idToken from the okta-auth-js token manager. If found, the next() function call allows the router to proceed to the profile page.
If the idToken is not found, then the grant type (flow) is extracted from the path. The loginOkta function is then called with the retrieved grantType.
export function loginOkta(grantType) {
    oktaAuth.options.grantType = grantType;
    oktaAuth.token.getWithRedirect({
        responseType: responseTypes[grantType],
        scopes: ['openid', 'profile', 'email']
    });
}
The loginOkta function sets the grantType and the responseType in the okta-auth-js library which is how this code supports both flows dynamically.
The last little bit of trickery is in the callback function with these lines of code:
export function callback() {
    // detect code
    var grantType = (window.location.href.indexOf('code=') > 0) ?
        AUTH_CODE_GRANT_TYPE : IMPLICIT_GRANT_TYPE;
    oktaAuth.token.parseFromUrl()
    .then((tokens) => {
        ...
        router.push('/profile/' + grantType);
    })
    .catch(console.error);
}
The grantType is detected from the response url by looking for the presence of a code= parameter. grantType is used further down in the router.push call. By virtue of how the Vue.js and the router work, navigating to the specific profile url will cause the proper item in the nav to be highlighted.
The call to oktaAuth.token.parseFromUrl() extracts the tokens from the url in the case of the Implicit flow OR automatically calls the /token endpoint to exchange the code for tokens in the case of the Authorization Code with PKCE flow.
Hopefully it’s now crystal clear why you want to use the Authorization Code with PKCE flow over the (now deprecated) Implicit flow. The good news is that if you’ve already used the okta-auth-js library, a few tweaks to your existing code should be all that’s required to switch flows!
If you want to keep learning, here are some more links from the Okta blog to keep you going:
- Is the OAuth 2.0 Implicit Flow Dead?
- 7 Ways an OAuth Access Token is like a Hotel Key Card
- What the Heck is Sign In with Apple?
- What’s Going On with the Implicit Flow? (video)
- Our new Okta Security Site
If you have any questions about this post, please add a comment below. For more awesome content, follow @oktadev on Twitter, like us on Facebook, or subscribe to our YouTube channel.
Micah Silverman is a Senior Security H@X0R. With 25 years of Java Experience (yup, that's from the beginning), he's authored numerous articles, co-authored a Java EE book and spoken at many conferences. He's a maker, who's built full size MAME arcade cabinets and repaired old electronic games. He brings his love of all things Java and Developer Advocacy to you!
Okta Developer Blog Comment Policy
We welcome relevant and respectful comments. Off-topic comments may be removed.