Build a Simple CRUD App with ASP.NET Core, MySQL, and Twilio

In this article, we’ll be building an MVC task management form with .NET Core 2.2. We’ll also be showing how to integrate with a MySQL database from MVC, and how to use Twilio to send SMS messages to your app that will add new tasks to your list.
.NET Core and MySQL are both free and open source technologies. The new ASP.NET Core can run on Linux and in Linux Containers, and MySQL is one of the easiest databases to get started with. This makes the combination of ASP.NET Core and MySQL a pretty compelling combination. Let’s take a look at what you’ll need to get started.
Prerequisites
- A Free Okta Developer Account
- MySQL installed and will need to know your host and access credentials momentarily.
- A Twilio Account
Scaffold Your ASP.NET Core MVC App
Let’s get started with some basic scaffolding and dependencies. To start, open Visual Studio and create a new ASP.NET Core Web Application named TextTasks and select the Web Application (Model-View-Controller) template, configured for ASP.NET Core 2.2. Click the Start Debugging icon or hit F5 to start the application and keep track of the URL for use in a moment.
Install MySQL.Data Nuget Package
Install the MySql.Data Nuget Package published by Oracle. This article uses version 8.0.17 - the latest version at the time of publication.
Install Okta for User Management in Your ASP.NET Application
Install the Okta.Sdk NuGet Package published by Okta, Inc. This article uses version 1.2.2 - the latest version at the time of publication.
Also install the Okta.AspNetCore NuGet Package published by Okta, Inc. This article uses version 1.2.0 - the latest version at the time of publication.
We’ll use Okta’s Single Sign On (SSO) management for your MVC app. This will allow you to restrict access to your app to only those users you grant access to.
If you don’t already have one, create a free Okta developer account. Okta is a developer service that securely stores user accounts and makes it simple to add common user management functionality. Once you have your Okta account, log in to your dashboard.
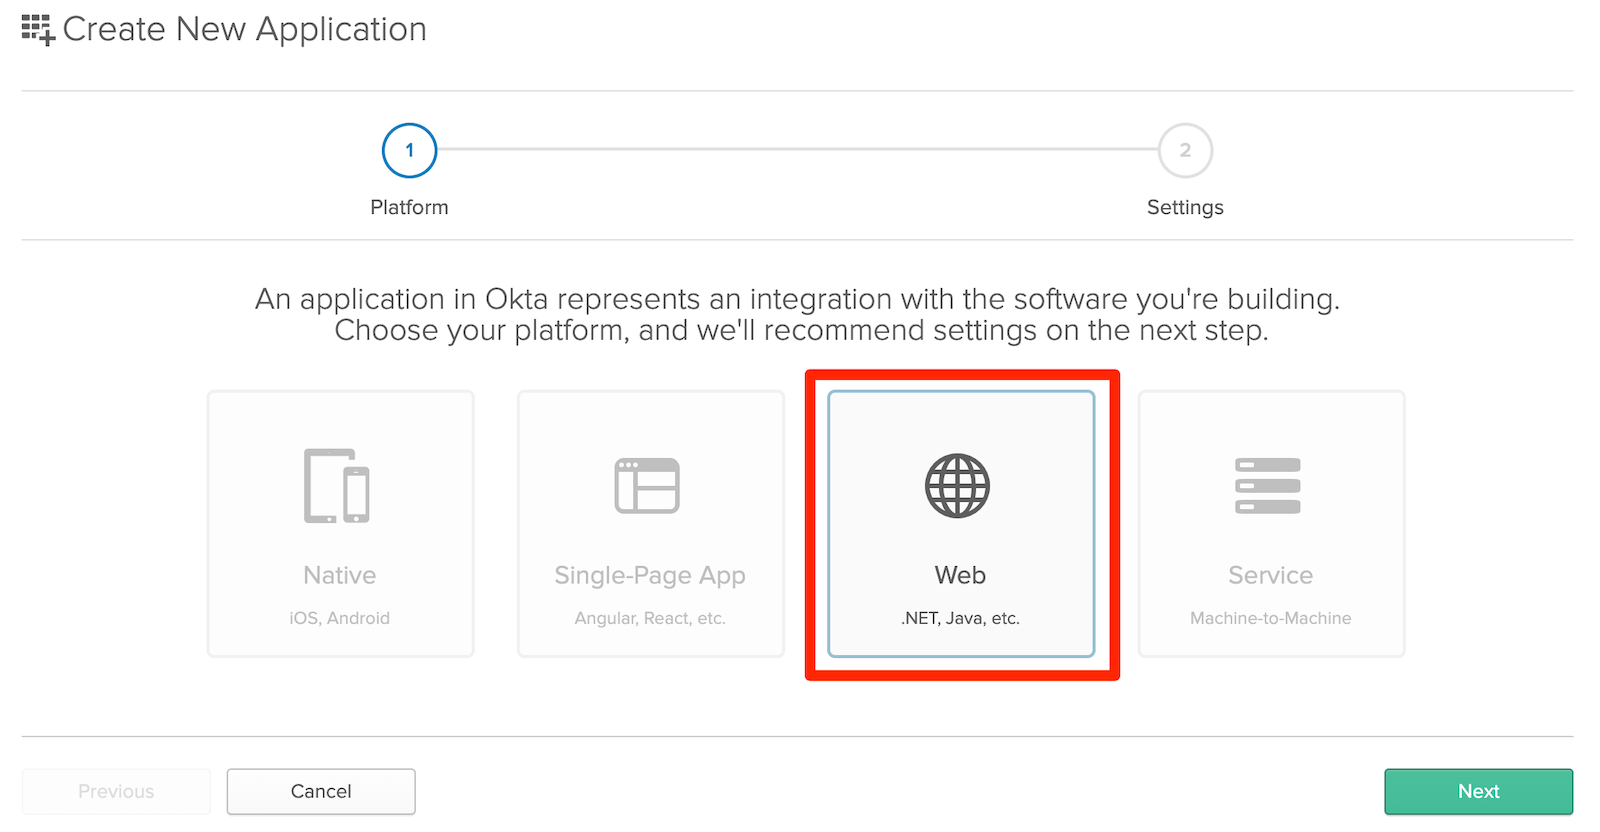
Log in and select Applications from the main menu, then select Add Application.
Select Web as your application type.
Next, you’ll need the URL you saved earlier to your locally running MVC app. Configure the following settings for your new app replacing “{yourLocalUrl}” with your actual local URL (e.g. localhost:59601):
- Base URIs:
http://{yourLocalUrl} - Login redirect URIs:
http://{yourLocalUrl}/authorization-code/callback - Initiate login URI:
http://{yourLocalUrl}/authorization-code/callback - Allow grant types:
- Authorization Code
- Implicit (Hybrid)
After you save your settings, click Edit by General Settings, then check the following two checkboxes as shown in the screenshot below:
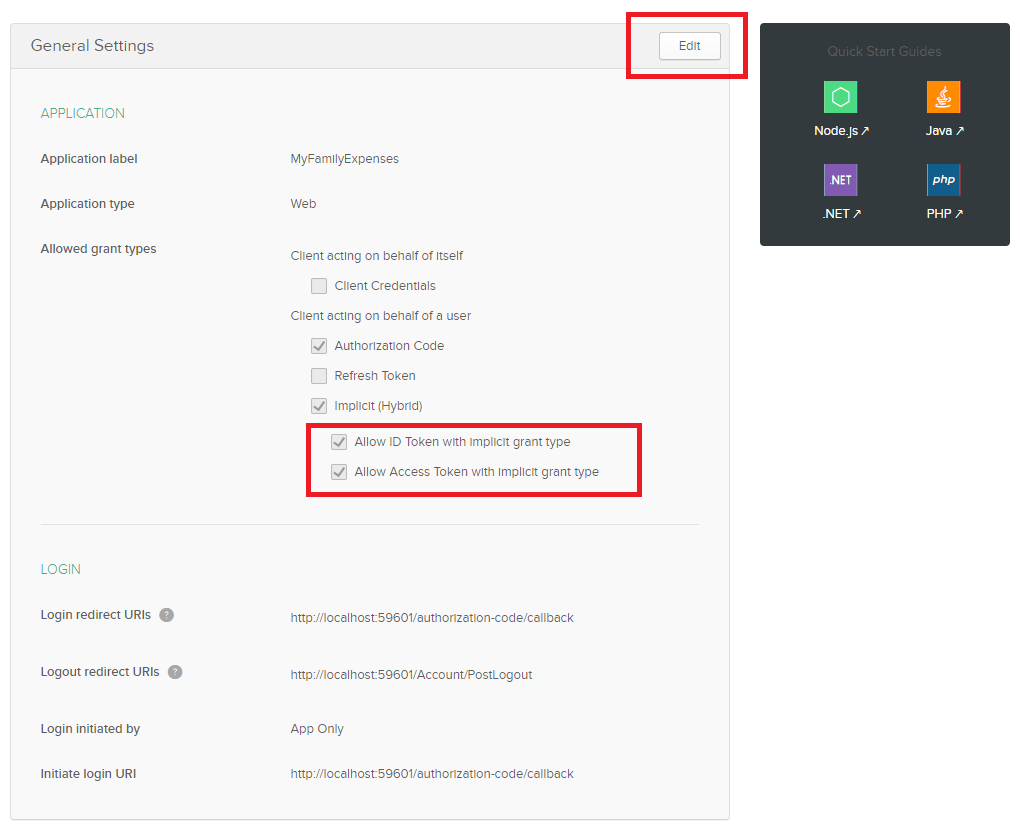
Once your new application is created, scroll to the bottom and copy your Client ID and Client secret. You will need those later on when coding Okta into your MVC app.
Setup Your MySQL Database
Before we write our application to access our database, we need to get our database stood up and running. To do so we’ll connect to our MySQL server and run some scripts. This article uses MySQL Workbench to connect to our database server, but any MySQL IDE will do!
Open up MySQL Workbench and go to Database > Connect to Database. Enter the hostname for your database server and your database credentials. Once connected, execute the following script to create your new TextTasks database:
CREATE DATABASE IF NOT EXISTS TextTasks;
Next, you’ll need to set up tables to store your tasks. In the query window, execute the following script to create the Tasks table that will hold all the tasks in our task list and create three tasks to test with:
USE TextTasks;

CREATE TABLE IF NOT EXISTS Tasks (
  TaskId INT AUTO_INCREMENT,
  Text TEXT NOT NULL,
    Created DATE NOT NULL,
    Completed DATE,
    Archived DATE,
  PRIMARY KEY(TaskId)
);

INSERT INTO Tasks(Text,Created) VALUES ('Initial test task 1', STR_TO_DATE('2019/07/04', '%Y/%m/%d'));
INSERT INTO Tasks(Text,Created) VALUES ('Initial test task 2', STR_TO_DATE('2019/07/04', '%Y/%m/%d'));
INSERT INTO Tasks(Text,Created) VALUES ('Initial test task 3', STR_TO_DATE('2019/07/04', '%Y/%m/%d'));
Add Code to Connect with MySQL from ASP.NET
Now let’s jump to the code! Right-click on the project and add a new class named MySqlDatabase. This class is a wrapper for the MySqlConnection dependency we’ll be working with to query the MySQL database.
using System;
using MySql.Data.MySqlClient;

namespace TextTasks
{
  public class MySqlDatabase : IDisposable
  {
    public MySqlConnection Connection;

    public MySqlDatabase(string connectionString)
    {
      Connection = new MySqlConnection(connectionString);
      this.Connection.Open();
    }

    public void Dispose()
    {
      Connection.Close();
    }
  }
}
Next, add the following lines of code to the bottom of the ConfigureServices() method of the Startup.cs file. Replace the server, username, and password with that of your own MySQL instance.
//MySql
services.AddTransient<MySqlDatabase>(_ => new MySqlDatabase("server=YOUR-MYSQL-ENDPOINT; database=texttasks; uid=YOUR-USER-NAME; pwd=YOUR-PASSWORD;"));
Your database dependency has now been implemented so that an instance of the MySqlDatabase class will be generated, using the code above, whenever a controller’s constructor accepts a MySqlDatabase type as a parameter.
Build the ASP.NET Core Models
We’ll use the following two types to pass data about our entities between the layers of your new app. Add a new class to the Models folder named Task. Paste the following code into your new class:
using System;

namespace TextTasks.Models
{
  public class Task
  {
    public int TaskId { get; set; }
    public string Text { get; set; }
    public DateTime? Completed { get; set; }
  }
}
Create another new class in the Models folder named TaskIdentifier and paste the following code into your new class:
using System;

namespace TextTasks.Models
{
  public class TaskIdentifier
  {
    public int TaskId { get; set; }
  }
}
Add Controllers to your ASP.NET Core Application
The TasksController will handle the creation of new records, as well as updating existing records to mark them as complete, incomplete, or archived.
Add a new class named TasksController to the Controllers folder. Paste the code below into your new class. As you can see, the first parameter of the constructor is a MySqlDatabase type. This is the code that will receive the instance of the MySqlDatabase type we generated in the ConfigureServices() method of Startup.cs.
using System;
using System.Collections.Generic;
using System.Diagnostics;
using System.Linq;
using System.Threading.Tasks;

using Microsoft.AspNetCore.Mvc;

using MySql.Data.MySqlClient;

using dto = TextTasks.Models;

namespace TextTasks.Controllers
{
  public class TasksController : Controller
  {
    private MySqlDatabase MySqlDatabase { get; set; }
    public TasksController(MySqlDatabase mySqlDatabase)
    {
      this.MySqlDatabase = mySqlDatabase;
    }

    [HttpPost]
    public void Complete(dto.TaskIdentifier input)
    {
      var cmd = this.MySqlDatabase.Connection.CreateCommand() as MySqlCommand;
      cmd.CommandText = @"UPDATE Tasks SET Completed = STR_TO_DATE(@Date, '%Y/%m/%d') WHERE TaskId = @TaskId;";
      cmd.Parameters.AddWithValue("@TaskId", input.TaskId);
      cmd.Parameters.AddWithValue("@Date", DateTime.Now.ToString("yyyy/MM/dd"));

      var recs = cmd.ExecuteNonQuery();
    }
    [HttpPost]
    public void Incomplete(dto.TaskIdentifier input)
    {
      var cmd = this.MySqlDatabase.Connection.CreateCommand() as MySqlCommand;
      cmd.CommandText = @"UPDATE Tasks SET Completed = NULL WHERE TaskId = @TaskId;";
      cmd.Parameters.AddWithValue("@TaskId", input.TaskId);

      var recs = cmd.ExecuteNonQuery();
    }
    [HttpPost]
    public void Archive(dto.TaskIdentifier input)
    {
      var cmd = this.MySqlDatabase.Connection.CreateCommand() as MySqlCommand;
      cmd.CommandText = @"UPDATE Tasks SET Archived = STR_TO_DATE(@Date, '%Y/%m/%d') WHERE TaskId = @TaskId;";
      cmd.Parameters.AddWithValue("@TaskId", input.TaskId);
      cmd.Parameters.AddWithValue("@Date", DateTime.Now.ToString("yyyy/MM/dd"));

      var recs = cmd.ExecuteNonQuery();
    }

    [HttpPost]
    public string Sms()
    {
      var input = Request.Form["Body"];
      string response = null;

      var cmd = this.MySqlDatabase.Connection.CreateCommand() as MySqlCommand;
      cmd.CommandText = @"INSERT INTO Tasks(Text,Created) VALUES (@Text,STR_TO_DATE(@Date, '%Y/%m/%d'));";
      cmd.Parameters.AddWithValue("@Text", input);
      cmd.Parameters.AddWithValue("@Date", DateTime.Now.ToString("yyyy/MM/dd"));

      var recs = cmd.ExecuteNonQuery();

      if (recs == 1)
        response = "OK";
      else
        response = "Sorry! I didn't get that.";

      return response;
    }
  }
}
Build the Home Controller and Page
Next, modify the HomeController to pass a List<Task> to the view. To start, add the following using statements:
using MySql.Data.MySqlClient;
using dto = TextTasks.Models;
Then, add the following constructor declaring MySqlDatabase as a dependency and storing it for future use:
private MySqlDatabase MySqlDatabase { get; set; }
public HomeController(MySqlDatabase mySqlDatabase)
{
  this.MySqlDatabase = mySqlDatabase;
}
Add the following private method to assist with loading the list of tasks from the database:
private async Task<List<dto.Task>> GetTasks()
{
  var ret = new List<dto.Task>();

  var cmd = this.MySqlDatabase.Connection.CreateCommand() as MySqlCommand;
  cmd.CommandText = @"SELECT TaskId, Text, Completed FROM Tasks WHERE Archived IS NULL";

  using (var reader = await cmd.ExecuteReaderAsync())
    while (await reader.ReadAsync())
    {
      var t = new dto.Task()
      {
        TaskId = reader.GetFieldValue<int>(0),
        Text = reader.GetFieldValue<string>(1)
      };
      if (!reader.IsDBNull(2))
        t.Completed = reader.GetFieldValue<DateTime>(2);

      ret.Add(t);
    }
  return ret;
}
Modify the Index() method to pass the data to the view:
public async Task<IActionResult> Index()
{
  return View(await this.GetTasks());
}
Finally, modify the view to display the data in our form. Open up Index.cshtml and paste the following code into the file:
@{
  ViewData["Title"] = "Home Page";
}

<script>
    function Click(id, action) {
      if(action !== "Archive" || confirm('Are you sure you want to archive this task?')) {
        $.ajax({
          url: ('@Url.Action("REPLACE", "Tasks")'.replace('REPLACE', action)),
          type: 'POST',
          data: { TaskId: id }
        }).done(function () {
          if (action === 'Archive'){
            document.getElementById('tr_' + id).style.display = "none";
          } else if (action === 'Complete') {
            document.getElementById('td_complete_' + id).style.display = "";
            document.getElementById('td_incomplete_' + id).style.display = "none";
          } else if (action === 'Incomplete') {
            document.getElementById('td_complete_' + id).style.display = "none";
            document.getElementById('td_incomplete_' + id).style.display = "";
          }
        });
      }
    }
</script>

<div class="row">
  <!-- List of Tasks -->
  <h2>Tasks</h2>
  <table>
    <tr class="header">
      <td class="empty"></td>
      <td class="empty"></td>
      <td>Description</td>
    </tr>
    @if (Model != null)
    {
      var added = false;
      foreach (var t in Model)
      {
        <tr id="tr_@t.TaskId">
          <td><i class="fas fa-archive" onclick="Click(@t.TaskId,'Archive')"></i></td>
          <td id="td_incomplete_@t.TaskId" style="display:@(t.Completed == null ? "" : "none");">
            <i class="far fa-square" onclick="Click(@t.TaskId,'Complete')"></i>
          </td>
          <td id="td_complete_@t.TaskId" style="display:@(t.Completed == null ? "none" : "");">
            <i class="far fa-check-square" onclick="Click(@t.TaskId,'Incomplete')"></i>
          </td>
          <td>@t.Text</td>
        </tr>

        added = true;
      }

      if (!added)
      {
        <tr>
          <td></td>
          <td></td>
          <td style="display:none;"></td>
          <td>No tasks found.</td>
        </tr>
      }
    }
  </table>
</div>
Add SMS Functionality to your ASP.NET Application with Twilio
When you created your Twilio account, it walked you through the process of setting up your first phone number. If when prompted you selected that you wanted to send and receive SMS messages with your phone number, it can be used in this article. If not, you’ll need to add a new phone number.
Once your new phone number is setup go to the All Services menu and select Phone Numbers. Click on the phone number you just created in the list.
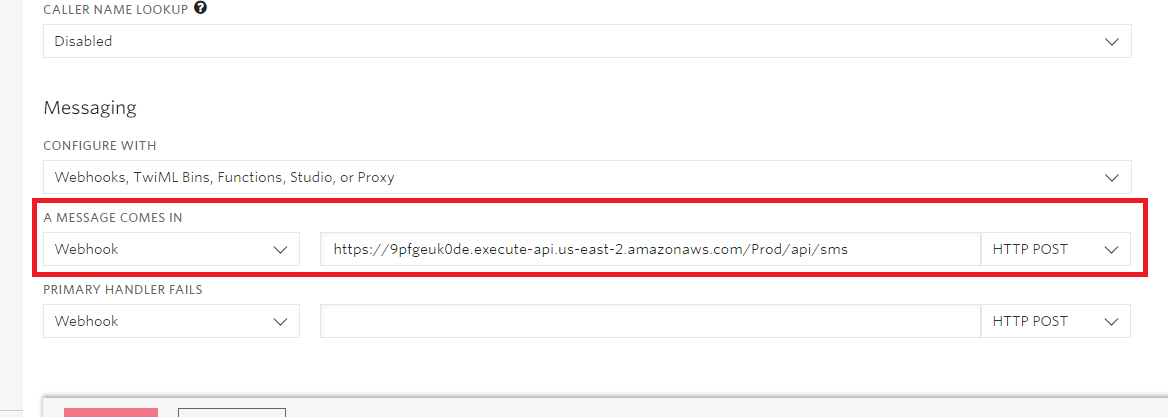
Now that we’re looking at the details for this new phone number, we want to modify the webhook settings for when a message comes in. Change the action to HTTP POST and then we’re going to set the webhook URL to the Sms action of the Tasks controller. You’re going to want to use the public URL for your MVC app so that Twilio can access it (replace “{yourPublicUrl}” with your actual public URL):
Webhook when a message comes in:
https://{yourPublicUrl}/Tasks/sms
Test the ASP.NET Locally with Postman
If you’d like to quickly test your solution locally (without invoking your webhook via Twilio), you can do so via Postman.
Prepare the following Postman request (replacing “{yourLocalUrl}” with your actual URL):
[POST]
https://{yourLocalUrl}/Tasks/Sms
Add the following params:
Body = Hello world!
Click Send to test your service. “Hello world!” represents the copy that is texted into the system. The service will respond with either “OK” or “Sorry! I didn’t get that.” That response is the message that the sender of the original “Hello world” text will receive back.
Add Authentication to Your ASP.NET Core MVC App
Your app at this point is fully functional minus the Okta authentication code. To get started, add the following using statements to the top of your Startup class:
using Microsoft.AspNetCore.Authentication.Cookies;
using Okta.AspNetCore;
Next add the following to the top of the ConfigureServices() method of your Startup class:
// Okta
services.AddAuthentication(options =>
{
  options.DefaultAuthenticateScheme = CookieAuthenticationDefaults.AuthenticationScheme;
  options.DefaultSignInScheme = CookieAuthenticationDefaults.AuthenticationScheme;
  options.DefaultChallengeScheme = OktaDefaults.MvcAuthenticationScheme;
})
.AddCookie()
.AddOktaMvc(new OktaMvcOptions
{
  OktaDomain = "https://{yourOktaDomain}",
  ClientId = "{yourClientId}",
  ClientSecret = "{yourClientSecret}"
});
Then add the following to the top of the Configure() method of your Startup class:
app.UseAuthentication();
Add the following using statements to HomeController and TasksController. This makes it so we can use the [Authorize] attribute short-hand - rather than using [Microsoft.AspNetCore.Authorization.Authorize]:
using Microsoft.AspNetCore.Authorization;
Then you just have to add the [Authorize] attribute to your HomeController and TasksController. This will be located on the line just above the class declaration as shown for HomeController in the following snippet:
[Authorize]
public class HomeController : Controller
Now all your pages are secure and you will be forced to log in to view your app. You can allow access for new users by adding them as a user to your Okta account. Your new app is in a very basic starting point that you can continue adding to if you want. For example you may want to add the ability to add and edit tasks from the web page.
Learn More About Working with .NET Core and MySQL
You can find the complete source code on GitHub here. Fail early. Keep it simple. Write clean code. Refactor, refactor, refactor. Test, test, test. Have fun coding!
For other examples using .NET Core, MySQL, and Okta SSO check out the following links:
- Use Spring Boot and MySQL to go Beyond Authentication
- Build a CRUD App with ASP.NET Core 2.2 and SQL Server
- Build a Simple CRUD App with ASP.NET Core and Vue
As always, leave comments below and don’t forget to follow us on Twitter and subscribe to our YouTube channel.
Okta Developer Blog Comment Policy
We welcome relevant and respectful comments. Off-topic comments may be removed.