Build a Desktop Application with Angular and Electron
So, you have been learning all about web technologies including JavaScript, HTML, and CSS. The advantage of web technologies is, of course, that the same software can be used on many different platforms. But this advantage comes with a number of problems. Web applications have to be run inside a browser and the interoperability with the operating system is limited. Direct access to features of the operating system is usually the domain for desktop applications. They run inside their own process and can easily be added to the dock or start menu. Wouldn’t it be nice if you could develop a desktop application using the tools that you are comfortable with as a web developer? This is where Electron comes into play.
What is Electron?
Electron is a JavaScript wrapper around a Chromium web browser. An Electron program consists of two independent JavaScript threads. An outer thread that runs within Node and has access to Node’s operating system libraries, such as File System and Process libraries. Then there is a JavaScript thread that runs within the browser window. This thread has the usual restrictions of web applications. The outer thread and the browser thread can communicate via inter-process communication (IPC) functions provided by Electron. Chromium is an open source web browser that is developed by Google and provides the basis for the Chrome browser. It comes with a powerful JavaScript engine which makes it possible to run all types of modern web applications. You can think of an electron application just like a normal web application.
In this tutorial, I’ll be showing you how to develop a desktop application using Electron and Angular. The application will be a simple image browser. Angular will be providing the user interface and processing the user interactions. The main process will be accessing the file system and reading directory contents. In addition, I will be showing you how to process authentication with Okta.
Scaffold the Angular Electron App
I will start with the user interface. I will sometimes refer to this part of the application as the client because of its similarity to web client applications. You will hopefully be somewhat familiar with JavaScript and Node. I am assuming that you have already installed Node and the npm command line tool. The client will be based on Angular. To this end, you will also need the Angular command line tool. Open a terminal and enter the command:
npm install -g @angular/cli@7.3.6
This will install the global ng command. If you are on a Unix-like system, Node installs global commands in a directory that is only writeable by super-users. In this case, you have to run the command above using sudo. To create a new Angular application, navigate to a directory of your choice and issue the following command.
ng new ImageBrowser --routing --style=css
This will create a directory ImageBrowser and initialize it with a base Angular application. To use the Electron library you will need to install it first. In the terminal navigate into the ImageBrowser directory and run this command.
npm install --save electron@4.1.0
Build the Angular Application
The application will use a service that encapsulates the interprocess communication with the Node process. This service is created using the command line as follows.
ng generate service images
This should create a new file src/app/images.service.ts. Open this file and paste the following code into it.
import { Injectable } from '@angular/core';
import { BehaviorSubject } from 'rxjs';
const electron = (<any>window).require('electron');

@Injectable({
  providedIn: 'root'
})
export class ImagesService {
  images = new BehaviorSubject<string[]>([]);
  directory = new BehaviorSubject<string[]>([]);

  constructor() {
    electron.ipcRenderer.on('getImagesResponse', (event, images) => {
      this.images.next(images);
    });
    electron.ipcRenderer.on('getDirectoryResponse', (event, directory) => {
      this.directory.next(directory);
    });
  }

  navigateDirectory(path) {
    electron.ipcRenderer.send('navigateDirectory', path);
  }
}
The Electron browser library is imported using the somewhat strange looking require statement const electron = (<any>window).require('electron'); Electron makes itself available to the browser side JavaScript through the window global variable. Since the TypeScript compiler is not aware of this, window has to be cast to any before accessing the require function. Electron provides the ipcRenderer object which implements interprocess communication for the renderer. ipcRenderer.on is used to register listeners for IPC messages. In this application, you are listening to getImagesResponse which will receive an array of image URLs and getDirectoryResponse which will receive an array of directory names. To send a request to the Node application to navigate to a different directory, ipcRenderer.send is used.
The images and directory arrays are sent to a BehaviorSubject. In this way, any updates can be picked up by an observer. These observers will be defined in the image browser component. Create this component by calling the ng command in the terminal.
ng generate component browser
Now, open src/app/browser/browser.component.ts and paste the code below into the file.
import { Component, OnInit, ChangeDetectorRef } from '@angular/core';
import { ImagesService } from '../images.service';

@Component({
  selector: 'app-browser',
  templateUrl: './browser.component.html',
  styleUrls: ['./browser.component.css']
})
export class BrowserComponent implements OnInit {
  images: string[];
  directory: string[];

  constructor(private imageService: ImagesService, private cdr: ChangeDetectorRef) { }

  ngOnInit() {
    this.imageService.images.subscribe((value) => {
      this.images = value;
      this.cdr.detectChanges();
    });

    this.imageService.directory.subscribe((value) => {
      this.directory = value;
      this.cdr.detectChanges();
    });
  }

  navigateDirectory(path) {
    this.imageService.navigateDirectory(path);
  }
}
The BrowserComponent subscribes to images and directory of the ImagesService. Note that the changes triggered by an Electron IPC call are not seen by Angular’s change detection strategy. For this reason, a call to ChangeDetectorRef.detectChanges() is needed to tell Angular to update the view with any data changes that might have occurred. Next, open src/app/browser/browser.component.html and create the template for the browser component.
<div class="layout">
  <div class="navigator">
    <ul>
      <li *ngFor="let dir of directory">
        <a (click)="navigateDirectory(dir)">{{dir}}</a>
      </li>
    </ul>
  </div>
  <div class="thumbnails">
    <div *ngFor="let img of images" class="image">
      <img [src]="img">
    </div>
  </div>
</div>
This template simply displays a list of directories next to a grid of images. When a directory link is clicked, the application requests to navigate to that directory. The browser should also get some styling in src/app/browser/browser.component.css.
.layout { display: flex; }

.navigator {
    width: 300px;
    overflow: auto;
    flex-grow: 0;
    flex-shrink: 0;
    border-right: 1px solid #EEEEEE;
}

.navigator ul { list-style: none; }

.navigator a {
  cursor: pointer;
  font-family: "Courier New", monospace;
  font-size: 14px;
}

.thumbnails {
    flex-grow: 1;
    display: flex;
    flex-wrap: wrap;
}

.thumbnails .image {
    width: 25%;
    flex-shrink: 0;
    height: 200px;
    padding: 8px;
    box-sizing: border-box;
}

.thumbnails img {
    width: 100%;
    height: 100%;
    object-fit: cover;
}
To show the browser component as the main component of the application modify src/app/app-routing.module.ts to import the component and include it as the main route in the routes array.
import { BrowserComponent } from './browser/browser.component';

const routes: Routes = [
  { path: '', component: BrowserComponent }
];
Next, open src/app/app.component.html and delete everything except the router outlet.
<router-outlet></router-outlet>
Finally, open src/app/app.component.ts and modify the contents to match the code below.
import { Component, OnInit } from '@angular/core';
import { ImagesService } from './images.service';

@Component({
  selector: 'app-root',
  templateUrl: './app.component.html',
  styleUrls: ['./app.component.css'],
})
export class AppComponent implements OnInit {
  title = 'Image Browser';

  constructor(private imageService: ImagesService) {}

  ngOnInit(): void {
    this.imageService.navigateDirectory('.');
  }
}
The application component initializes the image service by loading the contents of the current directory. This completes the client part of the application. As you can see, it is a typical Angular application apart from the fact that the image service communicates via IPC calls. You could extend this application just like any other web application with multiple routes or HTTP calls to other web services.
Create Your Electron Application
The Electron application will be placed into its own directory. For larger applications, you will probably keep the two parts of the application completely separate in different folders. For the sake of simplicity, in this tutorial, the Electron application will be implemented in a subdirectory of our application directory. Within the ImageBrowser directory, create a new directory electron. Copy the tsconfig.json from the Angular application into this directory. Open the new tsconfig.json and modify the output directory to "outDir": "./dist" and the module resolution to "module": "commonjs". Also add the setting "skipLibCheck": true. Now create a new file electron/main.ts and paste the following code into it.
import { app, BrowserWindow, ipcMain } from "electron";
import * as path from "path";
import * as url from "url";
import * as fs from "fs";

let win: BrowserWindow;

function createWindow() {
  win = new BrowserWindow({ width: 800, height: 600 });

  win.loadURL(
    url.format({
      pathname: path.join(__dirname, `/../../dist/ImageBrowser/index.html`),
      protocol: "file:",
      slashes: true
    })
  );

  win.webContents.openDevTools();

  win.on("closed", () => {
    win = null;
  });
}

app.on("ready", createWindow);

app.on("activate", () => {
  if (win === null) {
    createWindow();
  }
});

// Quit when all windows are closed.
app.on('window-all-closed', () => {
  // On macOS it is common for applications and their menu bar
  // to stay active until the user quits explicitly with Cmd + Q
  if (process.platform !== 'darwin') {
    app.quit()
  }
});

function getImages() {
  const cwd = process.cwd();
  fs.readdir('.', {withFileTypes: true}, (err, files) => {
      if (!err) {
          const re = /(?:\.([^.]+))?$/;
          const images = files
            .filter(file => file.isFile() && ['jpg', 'png'].includes(re.exec(file.name)[1]))
            .map(file => `file://${cwd}/${file.name}`);
          win.webContents.send("getImagesResponse", images);
      }
  });
}

function isRoot() {
    return path.parse(process.cwd()).root == process.cwd();
}

function getDirectory() {
  fs.readdir('.', {withFileTypes: true}, (err, files) => {
      if (!err) {
          const directories = files
            .filter(file => file.isDirectory())
            .map(file => file.name);
          if (!isRoot()) {
              directories.unshift('..');
          }
          win.webContents.send("getDirectoryResponse", directories);
      }
  });
}

ipcMain.on("navigateDirectory", (event, path) => {
  process.chdir(path);
  getImages();
  getDirectory();
});
Don’t be intimidated by the amount of content you see here. I will talk you through this file step by step.
At the top of the file, a global variable win is declared. In the following function createWindow(), this variable is assigned a new BrowserWindow. BrowserWindow is Electron’s application window. It is called Browser Window because it really is a simple Chromium browser that will host your Angular application. After win is created, content is loaded into it with win.loadURL(). The path should point to the index.html of compiled Angular app.
The line win.webContents.openDevTools() opens the developer tools inside Chromium. This should be used for development only. But it allows you to use the full set of developer tools that you are probably familiar with from the Chrome browser.
Next, an event handler is added to the window that is activated when the window is closed, setting the win variable to null. Later on, when the application is activated again, win can be checked and a new window can be created. This is done in the app.on("activate", ...) handler.
The createWindow function is registered with the ready event by calling app.on("ready", createWindow). The window-all-closed event signals that all windows are closed. On most platforms, this should terminate the application. However, on macOS closing the window does not normally terminate the application.
Two functions getImages and getDirectory perform similar operations. They both read the current directory and filter its contents. getImages selects all files ending in .png or .jpg and construct a full URL for each file. It then sends the result to the getImagesResponse IPC channel. This will be received by the ImagesService of the Angular part of the application. getDirectory is very similar but it selects only directories and sends the result to getDirectoryResponse. Note that the file system’s fs.readdir does not return an entry for the parent directory. So when the current directory is not the root directory, the .. entry is manually added to the list.
Finally, an IPC listener is added that listens to the navigateDirectory event. This listener changes the current directory and then retrieves all images and directories from the new directory.
To run the full application, you can add the following script to your package.json.
"electron": "ng build --base-href ./ && tsc --p electron && electron electron/dist/main.js"
This script first builds the Angular application, then the Electron application and finally starts electron. You can run it by calling this command.
npm run electron
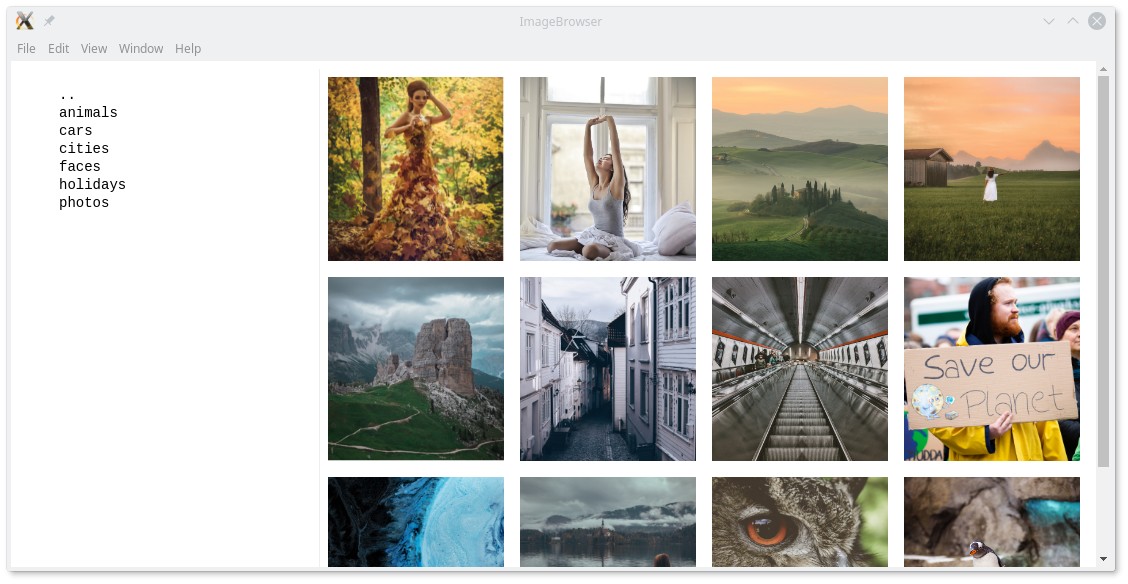
If you did everything right, the application should compile and then you should see a window popping up that lets you browse directories and view the images in them.
Add Authentication to Your Angular Electron Desktop App
You may want to restrict access to your desktop application to users that are registered. Okta allows you to quickly set up secure authentication with full user control. This means that you can freely decide who can use your application and who can’t.
Before you begin, you’ll need a free Okta developer account. Install the Okta CLI and run okta register to sign up for a new account. If you already have an account, run okta login.
Then, run okta apps create. Select the default app name, or change it as you see fit.
Choose Native and press Enter.
Use http://localhost:8000 for the Redirect URI and the Logout Redirect URI
.
What does the Okta CLI do?
The Okta CLI will create an OIDC Native App in your Okta Org. It will add the redirect URIs you specified and grant access to the Everyone group. You will see output like the following when it’s finished:
Okta application configuration:
Issuer:    https://dev-133337.okta.com/oauth2/default
Client ID: 0oab8eb55Kb9jdMIr5d6
NOTE: You can also use the Okta Admin Console to create your app. See Create a Native App for more information.
I will be using the AppAuth library from Google which allows authentication through OIDC and OAuth 2.0. You can install the library with the following command.
npm install --save @openid/appauth@1.2.2
Google provides an example on how to integrate AppAuth with Electron. To make your life simple, you can use the authentication flow for the purpose of your own application. Copy the contents of the example flow.ts into a flow.ts file in your electron folder. Near the top of the file, find the following lines.
/* an example open id connect provider */
const openIdConnectUrl = "https://accounts.google.com";

/* example client configuration */
const clientId =
  "511828570984-7nmej36h9j2tebiqmpqh835naet4vci4.apps.googleusercontent.com";
const redirectUri = "http://127.0.0.1:8000";
const scope = "openid";
Replace them with this content.
const openIdConnectUrl = 'https://{yourOktaDomain}/oauth2/default';
const clientId = '{yourClientId}';
const redirectUri = 'http://localhost:8000';
const scope = 'openid profile offline_access';
To keep the example minimal, replace the import of the logger, import { log } from "./logger"; with const log = console.log;. Now, open electron/main.ts again. At the top of the file, import some classes from flow.ts.
import { AuthFlow, AuthStateEmitter } from './flow';
Then, at the bottom of the same file add the following snippet.
const authFlow = new AuthFlow();

authFlow.authStateEmitter.on(
    AuthStateEmitter.ON_TOKEN_RESPONSE, createWindow
);

async function signIn() {
  if (!authFlow.loggedIn()) {
    await authFlow.fetchServiceConfiguration();
    await authFlow.makeAuthorizationRequest();
  }
}
The function signIn() will check if the user is logged in and, if not, make an authorization request. The authStateEmitter will receive an ON_TOKEN_RESPONSE when the user is successfully logged in. It will then call createWindow to start the application. In order to call the signIn method, change the handler for the application’s ready event to the following.
app.on('ready', signIn);
Give it a try and run the following command.
npm run electron
Your default web browser should open up and request you to log into your Okta account. Once successfully logged in the Image Browser application will open up.
Learn More About Angular and Electron
In this tutorial, I have shown you how to create a desktop application with Angular and Electron. Authentication control with Okta has been added using Google’s AppAuth library. Electron makes it straightforward to use current web technologies and create native desktop applications. Electron uses the Chromium browser to run a web client. The browser is controlled by a Node process. To learn more about Electron, Angular and authentication, why not check out one of the following links.
- A more in-depth look at the authentication flow with electron
- Build Your First PWA with Angular
- Check out how to add authentication to any web page
- Learn more about what’s new in Angular 7
The code for this tutorial is available on GitHub and as always, leave your questions or feedback in the comments, or reach out to us on Twitter @oktadev.
Okta Developer Blog Comment Policy
We welcome relevant and respectful comments. Off-topic comments may be removed.