Build a Basic Website with ASP.NET MVC and Angular

ASP.NET has been around for a long time. When Microsoft introduced ASP.NET MVC, it changed the way many developers approach their codebase. There is an excellent separation of concerns, a TDD friendly framework, and easy integration with JavaScript while maintaining full control over rendered HTML. On the client side, a lot of .NET developers prefer Angular because it comes with TypeScript and it’s a much closer language to C# than plain JavaScript. Angular is an excellent framework for building enterprise-level, feature rich, applications.
You will be using .NET Framework 4.7.1, and you should have the latest version of Visual Studio 2017 installed. Also, you should have Node and npm installed since you will use Angular tools that require Node and npm.
Get Started with ASP.NET MVC
Create an API using a built-in template within Visual Studio. You’ll start from a scratch.
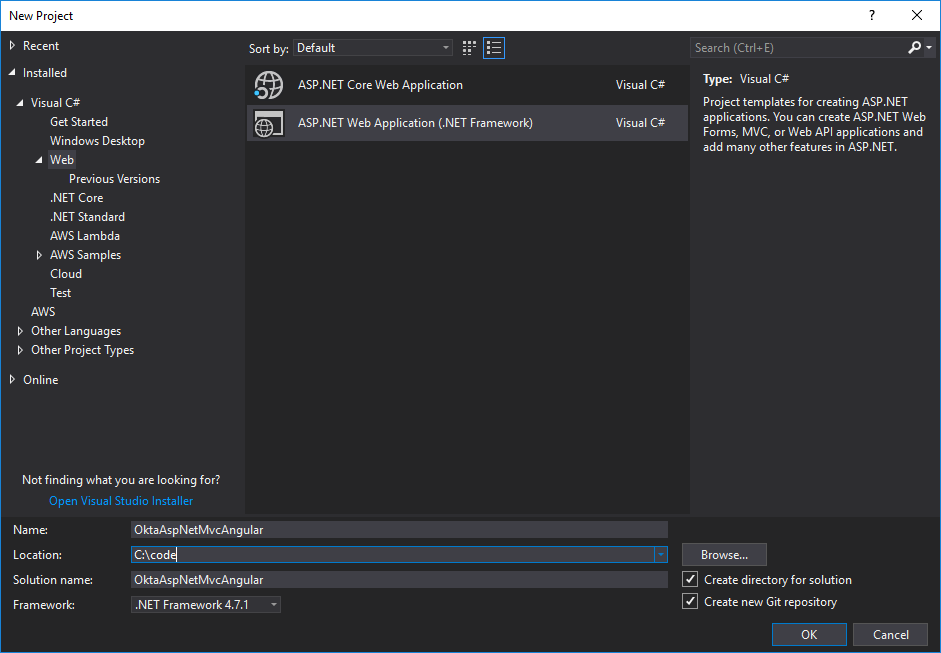
In Visual Studio, select File -> New Project
Select Web, ASP.NET Web Application (.NET Framework)
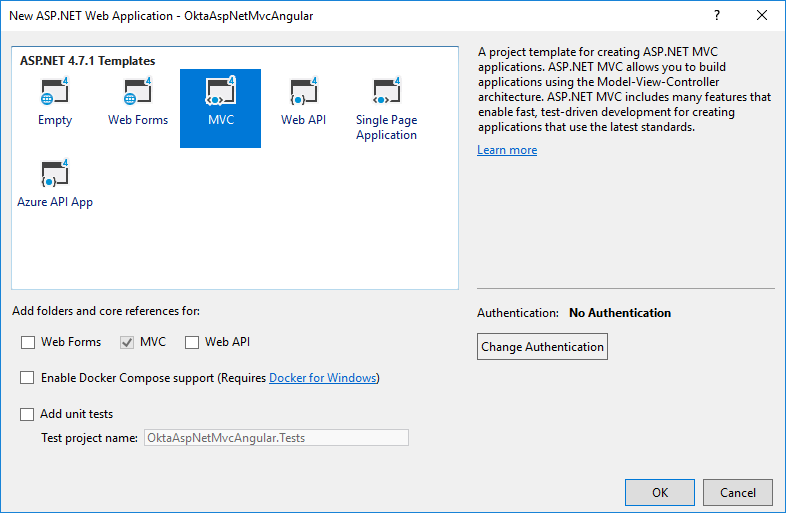
On the following screen select MVC:
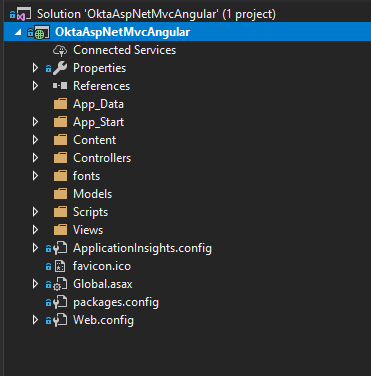
You should have a new ASP.NET MVC application ready now, with all the folders and files as shown in the following picture:
At this moment, in your project, you have some NuGet packages you won’t be using. You can get rid of them quite quickly. Run the following commands inside of your Package Manager Console
Uninstall-Package Microsoft.ApplicationInsights.Web
Uninstall-Package Microsoft.ApplicationInsights.WindowsServer
Uninstall-Package Microsoft.ApplicationInsights.WindowsServer.TelemetryChannel
Uninstall-Package Microsoft.ApplicationInsights.PerfCounterCollector
Uninstall-Package Microsoft.ApplicationInsights.DependencyCollector
Uninstall-Package Microsoft.ApplicationInsights.Agent.Intercept
Uninstall-Package Microsoft.ApplicationInsights
Additionally, make sure you delete ApplicationInsights.config file.
After finishing, you should have a clean project and perfect starting ground.
Create an Angular Project
Using Angular CLI is the best way to get started with Angular applications. With Angular CLI tools, you can easily create new projects, update existing projects, add different components to your codebase, and do all of that by entering a few commands in your terminal. You can also run the application in the development environment and publish it to production environments. It saves you the trouble of setting up configuration and Webpack. It can also do all the optimizing, compressing and minifying for you. It’s highly recommended to use Angular CLI to prepare your applications for production environments.
You can install the Angular CLI by entering the following in your favorite terminal:
npm install -g @angular/cli@7.1.0
After that, navigate to the folder of your MVC project and open your terminal there and enter the following:
ng new Angular --skip-tests --style=scss
This will create a new Angular project under Angular folder within your MVC project. The --skip-tests argument will make sure that CLI skips creating spec files.
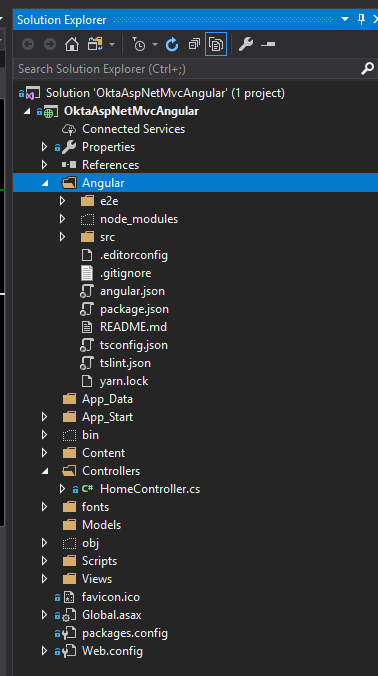
You should include the Angular folder in your MVC project. To do that, click on the Show All Files button in your Solution Explorer. You can now navigate to Angular folder and include all folders and files except for node_modules. After you do that you should have a folder structure like on the following picture:
Set up a Database for ASP.NET
You will use Entity Framework (EF) 6 as your Object-Relational Mapper (ORM), a proven solution from Microsoft. EF 6 is pretty easy to set up and get going, and you don’t need to know any SQL to have it working for your applications. Think of it as an adapter or bridge to your database. All of your database queries will go through Entity Framework.
The central point is your DbContext class, and that’s where you define your connection string and the tables for your database. EF 6 uses the DbSet collection type to represent a table in a database. All you need to do is create a connection string, create a new class that inherits from DbContext, make the data models and create appropriate properties within DbContext for those models. Those properties will represent tables in the database. From that point, it’s pretty easy to get and update existing data by using Language Integrated Queries (LINQ).
You should first install the EF 6, by running the following code in the Package Manager Console:
Install-Package EntityFramework -Version 6.2.0
Add the Connection String
You can get started by adding a connection string to your Web.config file. Make sure to add it inside of the <configuration> section, and after <configSections></configSections>:
<connectionStrings>
  <add name="OktaConnectionString"
    connectionString="Data Source=(LocalDb)\MSSQLLocalDB;Initial Catalog=JoggingTracker;Integrated Security=SSPI;AttachDBFilename=|DataDirectory|\WeightTracker.mdf"
    providerName="System.Data.SqlClient"
  />
</connectionStrings>
Create Your DbContext and Data Models in Angular
First, create a model for a recording a jog. Create a file in the Models directory called JoggingRecord.cs:
using System;

namespace OktaAspNetMvcAngular.Models
{
  public class JoggingRecord
  {
    public int Id { get; set; }

    public float Distance { get; set; }

    public string Description { get; set; }

    public DateTime CreatedAt { get; set; }
  }
}
Nothing special here, a standard Id property that represents a unique identifier for every row within a table and Entity Framework will use a naming convention and automatically set it as a primary key for this table. You definitely need the Distance property to track your jogs, a Description to describe the jog and CreatedAt property for an audit trail.
Next, create an ApplicationDbContext class inside of a new folder called Data. For now, it will be pretty straightforward:
using System.Data.Entity;
using OktaAspNetMvcAngular.Models;

namespace OktaAspNetMvcAngular.Data
{
  public class ApplicationDbContext : DbContext
  {
    public ApplicationDbContext() : base("OktaConnectionString")
    {
    }

    public static ApplicationDbContext Create() => new ApplicationDbContext();

    public DbSet<JoggingRecord> JoggingRecords { get; set; }
  }
}
The piece of code that calls the base DbContext class is used to set up the connection string. There is the DbSet property that I previously mentioned, and it will be used to fetch records from the table, update and delete those records.
Enable and Run Migrations in Your ASP.NET Project
Open the Package Manager Console, and run the following to enable migrations:
Enable-Migrations
Now you can add your initial migration, which will contain the creation of the JoggingRecords table:
Add-Migration Initial
Now, you can update the database:
Update-Database -Verbose
The verbose flag will allow you to see the generated SQL statements, and this can help you in resolving errors if any occur.
Seed the Database
After you have updated the database, add Migrations by adding code inside of the Seed method in the Configuration class.
First, add the using for the Models namespace:
using OktaAspNetMvcAngular.Models;
After that, add the following code for the Seed method:
protected override void Seed(OktaAspNetMvcAngular.Data.ApplicationDbContext context)
{
  context.JoggingRecords.AddOrUpdate(x => x.Id,
    new JoggingRecord { Id = 1, Description = "Friday Evening", Distance = 5.5f, CreatedAt = new DateTime(2018, 5, 1) },
    new JoggingRecord { Id = 2, Description = "Saturday morning", Distance = 6.15f, CreatedAt = new DateTime(2018, 4, 4) },
    new JoggingRecord { Id = 3, Description = "Marathon", Distance = 20, CreatedAt = new DateTime(2018, 5, 13) },
    new JoggingRecord { Id = 4, Description = "Short one", Distance = 3.5f, CreatedAt = new DateTime(2018, 6, 6) }
  );

  //  This method will be called after migrating to the latest version.

  //  You can use the DbSet<T>.AddOrUpdate() helper extension method
  //  to avoid creating duplicate seed data.
}
Add Authentication to Your Angular Application
Handling the authentication is never an easy or comfortable task. If you want to quickly and easily take care of authentication for your application you’re likely in the market for a solution like Okta. That’s why so many developers love and use Okta, they never want to build auth again and are happy to leave it to us.
Before you begin, you’ll need a free Okta developer account. Install the Okta CLI and run okta register to sign up for a new account. If you already have an account, run okta login.
Then, run okta apps create. Select the default app name, or change it as you see fit.
Choose Web and press Enter.
Select Other.
Then, change the Redirect URI to http://localhost:8080/authorization-code/callback and use http://localhost:8080/Account/PostLogout for the Logout Redirect URI.
What does the Okta CLI do?
The Okta CLI will create an OIDC Web App in your Okta Org. It will add the redirect URIs you specified and grant access to the Everyone group. You will see output like the following when it’s finished:
Okta application configuration has been written to: /path/to/app/.okta.env
Run cat .okta.env (or type .okta.env on Windows) to see the issuer and credentials for your app.
export OKTA_OAUTH2_ISSUER="https://dev-133337.okta.com/oauth2/default"
export OKTA_OAUTH2_CLIENT_ID="0oab8eb55Kb9jdMIr5d6"
export OKTA_OAUTH2_CLIENT_SECRET="NEVER-SHOW-SECRETS"
Your Okta domain is the first part of your issuer, before /oauth2/default.
NOTE: You can also use the Okta Admin Console to create your app. See Create a Web App for more information.
It is quite easy to add authentication to ASP.NET MVC with help of Okta.
Add the following to your Web.config file, inside of <appSettings></appSettings>:
<!-- 1. Replace these values with your Okta configuration -->
<add key="okta:ClientId" value="{yourClientId}" />
<add key="okta:ClientSecret" value="{yourClientSecret}" />
<add key="okta:OrgUri" value="https://{yourOktaDomain}/oauth2/default" />

<!-- 2. Your Okta application should already have these values -->
<add key="okta:RedirectUri" value="http://localhost:8080/authorization-code/callback" />
<add key="okta:PostLogoutRedirectUri" value="http://localhost:8080/Account/PostLogout" />
Install the required NuGet packages:
Install-Package Okta.AspNet -Version 1.1.1
Install-Package Microsoft.Owin.Host.SystemWeb -Version 4.0.0
Install-Package Microsoft.Owin.Security.Cookies -Version 4.0.0
Add the Startup class. Right click on the project -> Add new item -> OWIN Startup Class:
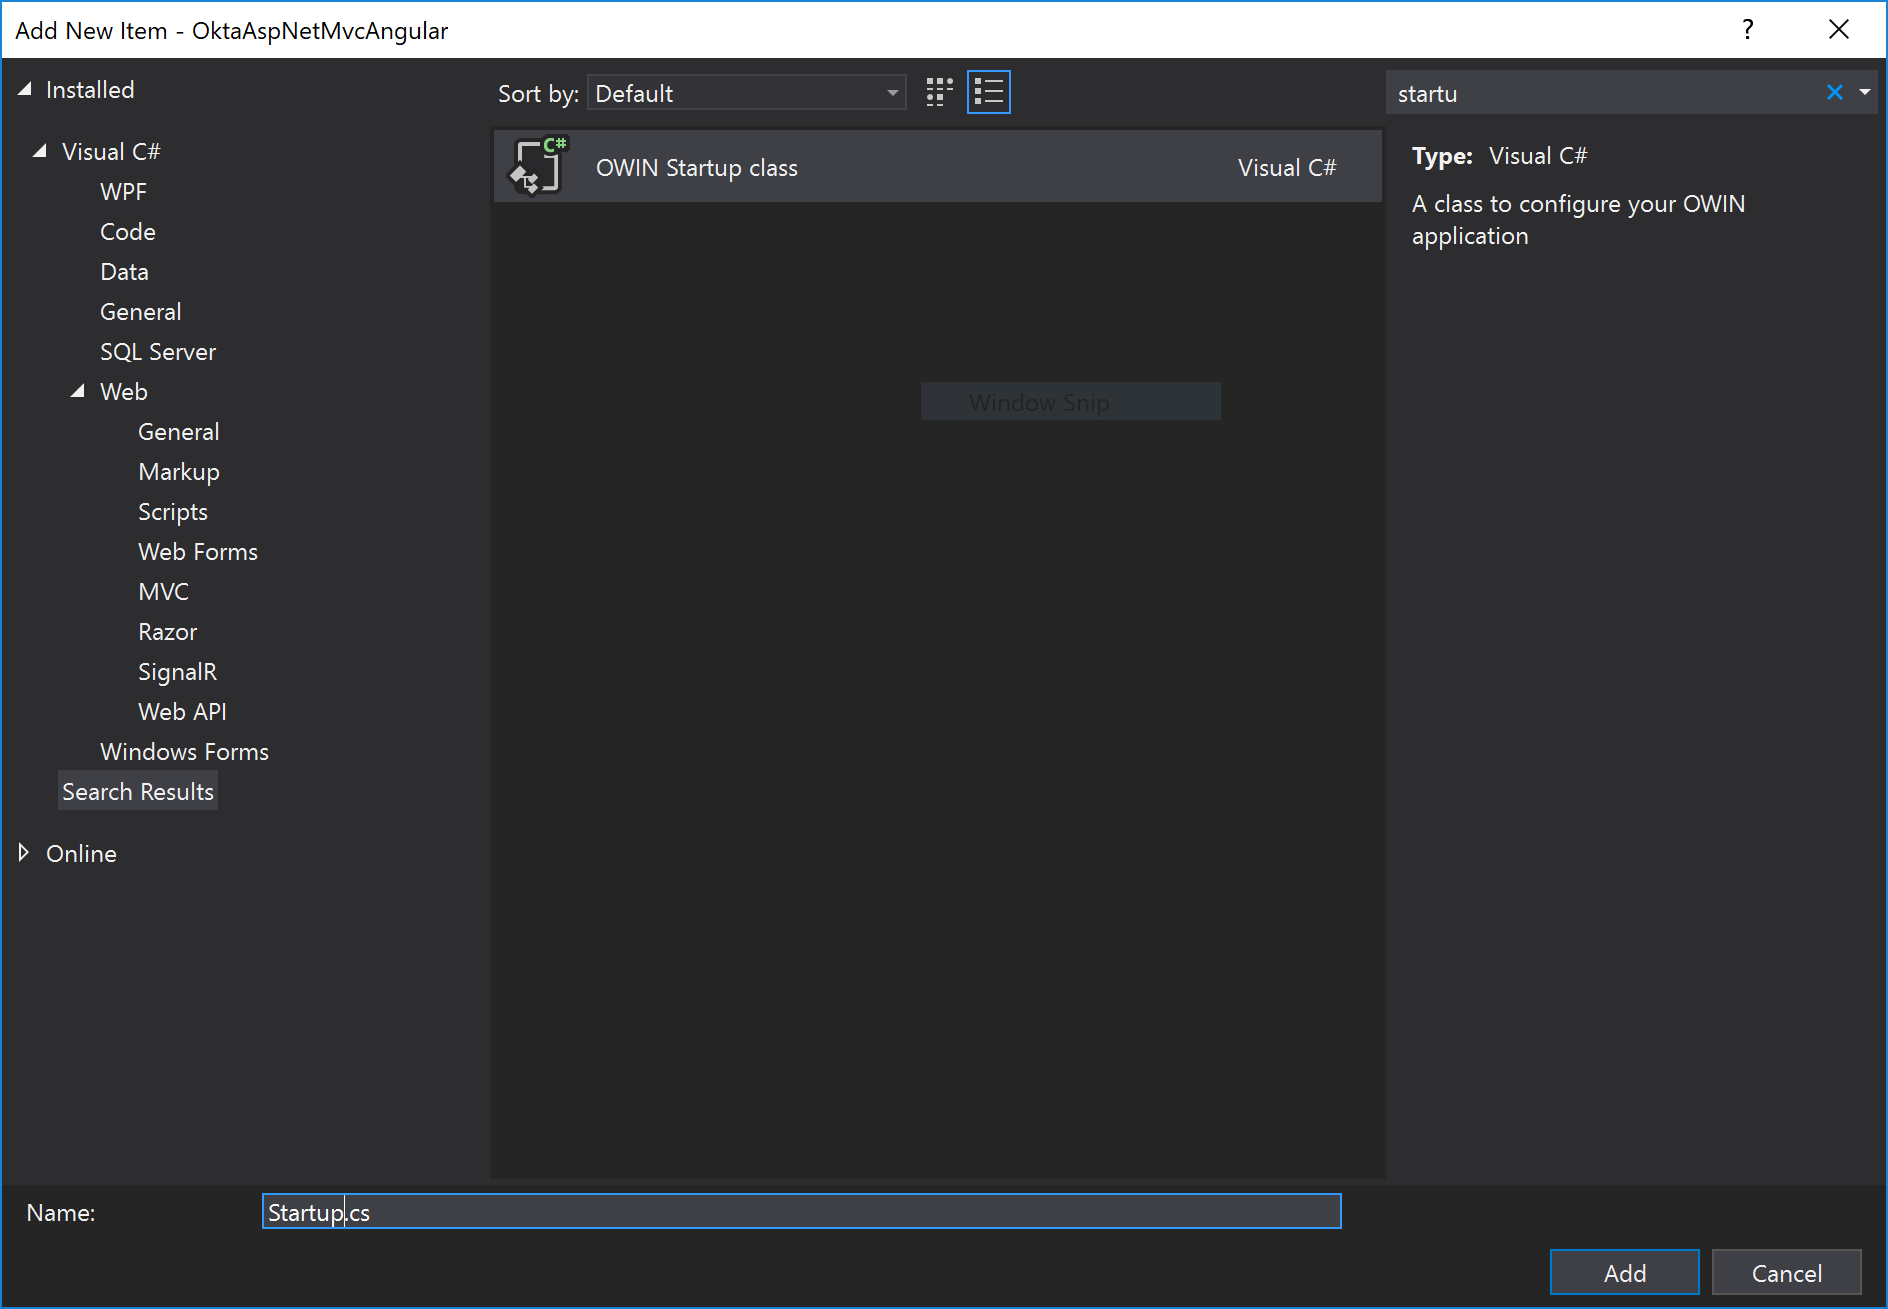
Replace the content of that file with the following code:
using IdentityModel.Client;
using Microsoft.IdentityModel.Protocols.OpenIdConnect;
using Microsoft.IdentityModel.Tokens;
using Microsoft.Owin;
using Microsoft.Owin.Security;
using Microsoft.Owin.Security.Cookies;
using Microsoft.Owin.Security.OpenIdConnect;
using Owin;
using System;
using System.Collections.Generic;
using System.Configuration;
using System.Security.Claims;
using System.Threading.Tasks;

[assembly: OwinStartup(typeof(OktaAspNetMvcAngular.Startup))]

namespace OktaAspNetMvcAngular
{
  public class Startup
  {
    // These values are stored in Web.config. Make sure you update them!
    private readonly string clientId = ConfigurationManager.AppSettings["okta:ClientId"];
    private readonly string redirectUri = ConfigurationManager.AppSettings["okta:RedirectUri"];
    private readonly string authority = ConfigurationManager.AppSettings["okta:OrgUri"];
    private readonly string clientSecret = ConfigurationManager.AppSettings["okta:ClientSecret"];
    private readonly string postLogoutRedirectUri = ConfigurationManager.AppSettings["okta:PostLogoutRedirectUri"];

    public void Configuration(IAppBuilder app)
    {
      // For more information on how to configure your application, visit https://go.microsoft.com/fwlink/?LinkID=316888
      app.SetDefaultSignInAsAuthenticationType(CookieAuthenticationDefaults.AuthenticationType);
      app.UseCookieAuthentication(new CookieAuthenticationOptions());
      app.UseOpenIdConnectAuthentication(new OpenIdConnectAuthenticationOptions
      {
        ClientId = clientId,
        ClientSecret = clientSecret,
        Authority = authority,
        RedirectUri = redirectUri,
        ResponseType = OpenIdConnectResponseType.CodeIdToken,
        Scope = OpenIdConnectScope.OpenIdProfile,
        PostLogoutRedirectUri = postLogoutRedirectUri,
        TokenValidationParameters = new TokenValidationParameters
        {
          NameClaimType = "name"
        },

        Notifications = new OpenIdConnectAuthenticationNotifications
        {
          AuthorizationCodeReceived = async n =>
          {
            // Exchange code for access and ID tokens
            var tokenClient = new TokenClient(authority + "/v1/token", clientId, clientSecret);
            var tokenResponse = await tokenClient.RequestAuthorizationCodeAsync(n.Code, redirectUri);

            if (tokenResponse.IsError)
            {
              throw new Exception(tokenResponse.Error);
            }

            var userInfoClient = new UserInfoClient(authority + "/v1/userinfo");
            var userInfoResponse = await userInfoClient.GetAsync(tokenResponse.AccessToken);
            var claims = new List<Claim>();
            claims.AddRange(userInfoResponse.Claims);
            claims.Add(new Claim("id_token", tokenResponse.IdentityToken));
            claims.Add(new Claim("access_token", tokenResponse.AccessToken));

            if (!string.IsNullOrEmpty(tokenResponse.RefreshToken))
            {
              claims.Add(new Claim("refresh_token", tokenResponse.RefreshToken));
            }

            n.AuthenticationTicket.Identity.AddClaims(claims);

            return;
          },
          RedirectToIdentityProvider = n =>
          {
            // If signing out, add the id_token_hint
            if (n.ProtocolMessage.RequestType == OpenIdConnectRequestType.Logout)
            {
              var idTokenClaim = n.OwinContext.Authentication.User.FindFirst("id_token");
              if (idTokenClaim != null)
              {
                n.ProtocolMessage.IdTokenHint = idTokenClaim.Value;
              }
            }

            return Task.CompletedTask;
          }
        },
      });
    }
  }
}
Add an a new MVC 5 empty controller inside of Controllers folder. You can name it AccountController and paste the following code inside of it:
using Microsoft.Owin.Security.Cookies;
using Microsoft.Owin.Security.OpenIdConnect;
using System.Web;
using System.Web.Mvc;

namespace OktaAspNetMvcAngular.Controllers
{
  public class AccountController : Controller
  {
    public ActionResult Login()
    {
      if (!HttpContext.User.Identity.IsAuthenticated)
      {
        HttpContext.GetOwinContext().Authentication.Challenge(OpenIdConnectAuthenticationDefaults.AuthenticationType);
        return new HttpUnauthorizedResult();
      }

      return RedirectToAction("Index", "Home");
    }

    [HttpPost]
    public ActionResult Logout()
    {
      if (HttpContext.User.Identity.IsAuthenticated)
      {
        HttpContext.GetOwinContext().Authentication.SignOut(CookieAuthenticationDefaults.AuthenticationType, OpenIdConnectAuthenticationDefaults.AuthenticationType);
      }

      return RedirectToAction("Index", "Home");
    }

    public ActionResult PostLogout()
    {
      return RedirectToAction("Index", "Home");
    }
  }
}
Add Login Section to Layout
Inside of Views/Shared folder create a new partial view named _LoginPartial and paste the following code inside:
@if (Context.User.Identity.IsAuthenticated)
{
  <ul class="nav navbar-nav navbar-right">
    <li>
      <p class="navbar-text">Hello, <b>@Context.User.Identity.Name</b></p>
    </li>
    <li>
      <a onclick="document.getElementById('logout_form').submit();" style="cursor: pointer;">Log out</a>
    </li>
  </ul>
  <form action="/Account/Logout" method="post" id="logout_form"></form>
}
else
{
  <ul class="nav navbar-nav navbar-right">
    <li>@Html.ActionLink("Log in", "Login", "Account")</li>
  </ul>
}
Set Up Your ASP.NET API Endpoints
You will use the controller as your endpoint source for the API. Add a new Web API controller namedJoggingRecordsController.cs class inside of your Controllers folder and paste the following code:
using OktaAspNetMvcAngular.Data;
using OktaAspNetMvcAngular.Models;

using System.Data.Entity;
using System.Data.Entity.Infrastructure;
using System.Linq;
using System.Net;
using System.Threading.Tasks;
using System.Web.Http;
using System.Web.Http.Description;

namespace OktaAspNetMvcAngular.Controllers
{
  public class JoggingRecordsController : ApiController
  {
    private ApplicationDbContext db = new ApplicationDbContext();

    // GET: api/JoggingRecords
    public IQueryable<JoggingRecord> GetJoggingRecords() => db.JoggingRecords;

    // GET: api/JoggingRecords/5
    [ResponseType(typeof(JoggingRecord))]
    public async Task<IHttpActionResult> GetJoggingRecord(int id)
    {
      JoggingRecord joggingRecord = await db.JoggingRecords.FindAsync(id);
      if (joggingRecord == null)
      {
        return NotFound();
      }

      return Ok(joggingRecord);
    }
  }
}
The code above adds two endpoints. The first one will fetch all JoggingRecords from the database. In your applications, you will probably want some kind of paging and filtering. The second endpoint will fetch individual JoggingRecords instances based on the id parameter that the client will pass to the API. That parameter will match the Id in JoggingRecords table in the database.
Set a Default Formatter for ASP.NET Web API 2
Unfortunately, ASP.NET Web API 2 is set to use XML as default formatter. Remove it and make sure JSON formatter is the default one. Add the following code at the end of the Register() method inside of WebApiConfig.cs file:
// Set JSON formatter as default one and remove XmlFormatter

var jsonFormatter = config.Formatters.JsonFormatter;
jsonFormatter.SerializerSettings.ContractResolver = new CamelCasePropertyNamesContractResolver();
config.Formatters.Remove(config.Formatters.XmlFormatter);
jsonFormatter.SerializerSettings.DateTimeZoneHandling = Newtonsoft.Json.DateTimeZoneHandling.Utc;
You’ll also need to add the following using statement for the JSON serializer to the file:
using Newtonsoft.Json.Serialization;
You will also want to specify the port for your ASP.NET application. You need to know the exact address so you can communicate with the API from your Angular application. To do so, right click on the project in the solution explorer and click properties. In the main properties window, choose Web from the left-hand menu and set the Project Url property to http://localhost:8080.
Set Up the Angular Application for ASP.NET MVC
Since you will let your ASP.NET MVC application handle routing you can remove the app-routing.module.ts file and its references in the AppModule. Your app.module.ts file should look like this:
import { BrowserModule } from '@angular/platform-browser';
import { NgModule } from '@angular/core';

import { AppComponent } from './app.component';

@NgModule({
  declarations: [
    AppComponent
  ],
  imports: [
    BrowserModule,
  ],
  providers: [],
  bootstrap: [AppComponent]
})
export class AppModule { }
After that is done, delete the <router-outlet></router-outlet> code from app.component.html.
You also need to make sure that the Angular CLI outputs files to the appropriate folder. Inside of your Angular folder open angular.json file and change the outputPath setting:
"outputPath": "../Bundles/AngularOutput",
In the ASP.NET MVC application, you will add a new JS and CSS bundle for Angular. Locate the BundleConfig.cs file inside of App_Start folder and at the end of the RegisterBundles function add the following code:
// Angular bundles
bundles.Add(new ScriptBundle("~/bundles/Angular")
  .Include(
    "~/bundles/AngularOutput/inline.*",
    "~/bundles/AngularOutput/polyfills.*",
    "~/bundles/AngularOutput/scripts.*",
    "~/bundles/AngularOutput/vendor.*",
    "~/bundles/AngularOutput/runtime.*",
    "~/bundles/AngularOutput/main.*"));

bundles.Add(new StyleBundle("~/Content/Angular")
  .Include("~/bundles/AngularOutput/styles.*"));
For this to work, you need to make use of these bundles inside of your views. You should first create a new MVC view for your Angular application. Create a new folder inside of Views folder called AngularData and inside of it create new Index.cshtml file:
@{
  ViewBag.Title = "Index";
}

@Styles.Render("~/Content/Angular")

<app-root>test</app-root>

@Scripts.Render("~/bundles/Angular")
The code above will actually render the JS bundle that our angular application produces. Angular will find the <app-root> tag and render the App component and everything inside of it.
To access this view, you need to create a matching controller. Inside of Controllers folder create a new MVC 5 controller named AngularDataController:
using System.Web.Mvc;

namespace OktaAspNetMvcAngular.Controllers
{
  public class AngularDataController : Controller
  {
    public ActionResult Index()
    {
      return View();
    }
  }
}
You should also update the layout file so that you can access the Angular application from the menu bar. Locate the _Layout.cshtml file inside of Views/Shared folder. Make sure your navbar looks like this:
<ul class="nav navbar-nav">
  <li>@Html.ActionLink("Home", "Index", "Home")</li>
  <li>@Html.ActionLink("Angular", "Index", "AngularData")</li>
  <li>@Html.ActionLink("About", "About", "Home")</li>
  <li>@`Html.ActionLink("Contact", "Contact", "Home")</li>
</ul>
To have the Angular application outputting the content, navigate inside of the Angular folder and open your favorite terminal. Enter the following command:
ng build --extractCss --watch
The command above will make sure that new bundle is produced whenever you change any code that is part of the Angular codebase, and it will also extract CSS from global styles into CSS files instead of JS ones.
Create a Model and API Service for Your Angular Application
Your app contains only one root module, AppModule, and one component AppComponent. Since the application that you will be making here is a small one you will not create additional modules. Once the application grows and gets more complicated, you should introduce new modules, shared modules to organize your code better. The application itself will only show some records from the API. However, since your Angular application is interacting with the server, you should create a separate Angular service for this purpose.
You can also create a TypeScript model for the JoggingRecord. First create a shared folder inside the app folder, which is part of the Angular application that gets created by the Angular CLI.
Inside of the shared folder create a new file — JoggingRecord.ts:
export default class JoggingRecord {
  id: number;
  distance: number;
  description: string;
  createdAt: string;
}
The class above will allow you to have a strongly typed model for the JoggingRecord inside of your Angular application.
You can now create the API service inside of the shared folder. Name the file api.service.ts:
import { Injectable } from '@angular/core';
import { HttpClient } from '@angular/common/http';
import { Observable } from 'rxjs';

import JoggingRecord from './JoggingRecord';

@Injectable()
export default class ApiService {
  public API = 'http://localhost:8080/api';
  public JOGGING_RECORDS_ENDPOINT = `${this.API}/joggingrecords`;

  constructor(private http: HttpClient) { }

  getAll(): Observable<Array<JoggingRecord>> {
    return this.http.get<Array<JoggingRecord>>(this.JOGGING_RECORDS_ENDPOINT);
  }
}
The ApiService class is the bridge between our Angular application and our Web API endpoints. You need it to fetch the data from our server.
Add the service to the App module by updating the providers array inside of app.module.ts file. You also need to import the HttpClientModule. Your app.module.ts file should end up looking like this:
import { BrowserModule } from '@angular/platform-browser';
import { NgModule } from '@angular/core';
import { HttpClientModule } from '@angular/common/http';

import { AppComponent } from './app.component';
import ApiService from '../shared/api.service';

@NgModule({
  declarations: [
    AppComponent
  ],
  imports: [
    HttpClientModule,
    BrowserModule,
  ],
  providers: [ApiService],
  bootstrap: [AppComponent]
})
export class AppModule { }
Fetch Data from the ASP.NET API Endpoint
Update the app.component.ts file with the following content:
import { Component, OnInit } from '@angular/core';

import JoggingRecord from '../shared/JoggingRecord';
import ApiService from '../shared/api.service';

@Component({
  selector: 'app-root',
  templateUrl: './app.component.html',
  styleUrls: ['./app.component.scss']
})
export class AppComponent implements OnInit  {
  joggingRecords: Array<JoggingRecord>;

  constructor(private apiService: ApiService) {
  }

  ngOnInit() {
    this.apiService.getAll().subscribe(data => {
      this.joggingRecords = data;
    });
  }
}
The code above will subscribe will assign the data that ApiService fetches from server to the joggingRecords property.
You also need to update this component’s template (app.component.html):
<div style="text-align:center">
  <h1>
    Jogging Records
  </h1>

  <span *ngFor="let record of joggingRecords">
    {{record.description}} - {{record.distance}}
    <br />
  </span>
</div>
Test Out Your ASP.NET and Angular Application
Since you already have the Angular CLI outputting the code changes for your Angular application in the Bundles/AngularOutput folder, and your MVC application is making use of that folder you can simply start the MVC application and preview Angular app inside of it.
From your Visual Studio use CTRL+F5 to start the application your browser should open and you should see the following screen:
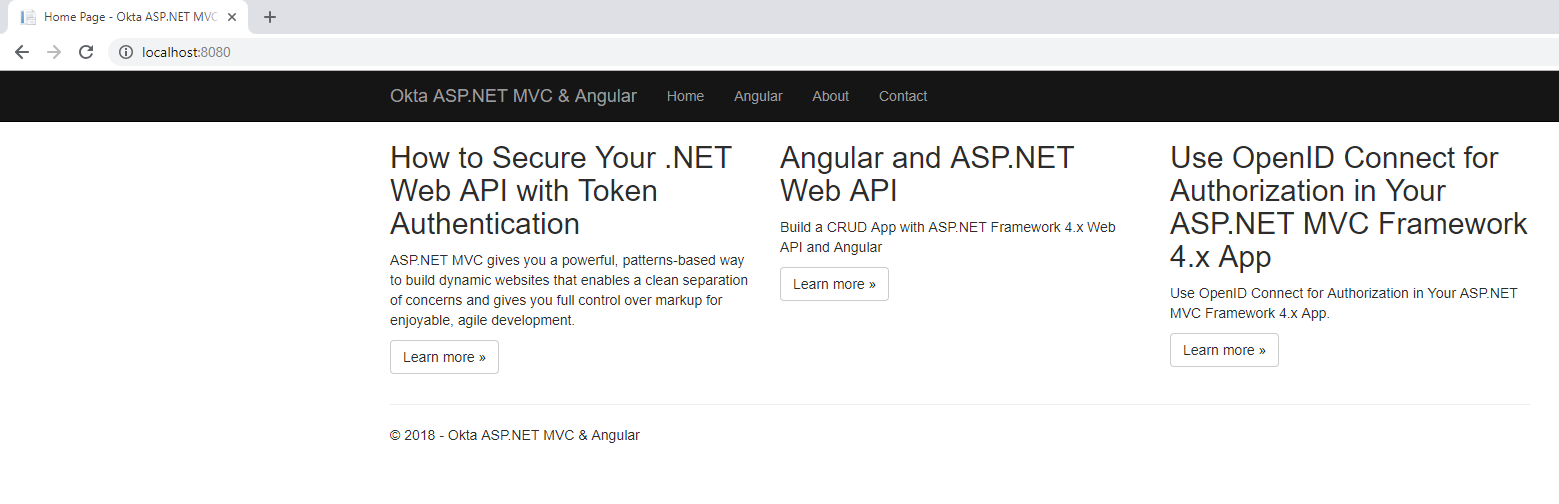
Clicking on the Angular link in the menu will actually render the MVC view for the Angular application and from that point it’s Angular who is in charge of rendering. The Angular page should look like this:
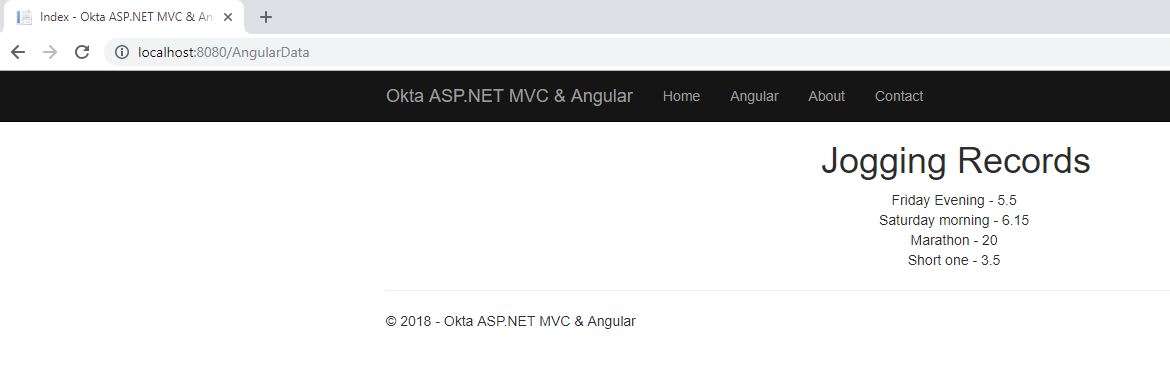
If you open the Dev Tools on your editor you should see that the Angular application actually hits the ASP.NET API:

Learn More About ASP.NET Core and Angular
You can find the source code for the complete application on GitHub: https://github.com/oktadeveloper/aspnet-mvc-angular-example.
If you enjoyed building this ASP.NET MVC with Angular, check out more full-stack application posts from Okta.
- Build a CRUD App with ASP.NET Framework 4.x Web API and Angular
- Angular 7: What’s New and Noteworthy + OIDC Goodness
- Token Authentication in ASP.NET Core – A Complete Guide
- Build a Secure CRUD App with ASP.NET Core and React
As always if you have any questions, comments, or concerns about this post feel free to leave a comment below. For other great content from the Okta Dev Team, follow us on Twitter @OktaDev, Facebook, LinkedIn and YouTube!
Okta Developer Blog Comment Policy
We welcome relevant and respectful comments. Off-topic comments may be removed.